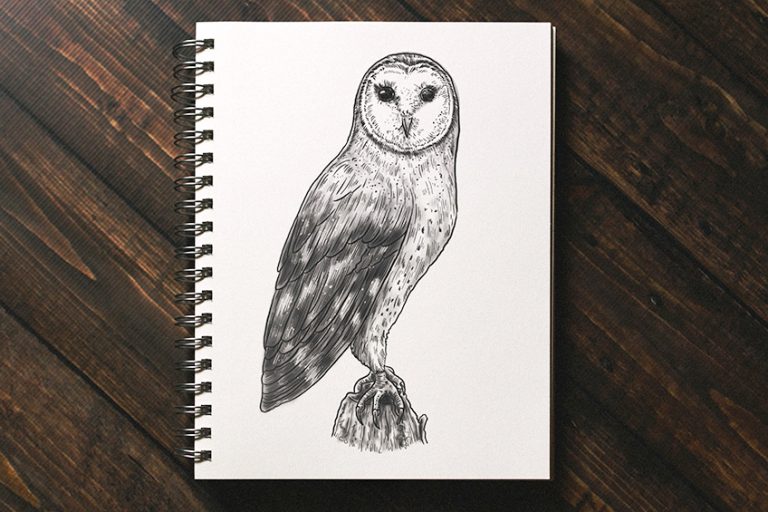
How to Draw Animals – Learn to Draw Animals the Easy Way
If you have ever drawn an animal, you will understand just how tricky and challenging it can be. No matter how good an artist you are, animal drawings can be a massive source of much frustration. That said, once you have found the knack to approaching these complicated drawings, along with lots of practice and of course, patience, you will be well on your way to becoming a seasoned animal artist! Have a look at our simple how-to guide for some tips and tricks on technique. So, gather your materials and have fun as you learn how to draw animals!
Necessary Materials
If you are hoping not only to improve the quality of your animal drawings, but also to learn the techniques for achieving better end results, you are going to require the correct equipment and proper materials. So often, people do not realize just how important these materials really are when drawing subject matter like animals. Your choice of art materials can have a huge influence on not only the end result but the entire feel of your piece.
Rather choose better quality right from the start, as this way you can avoid any mishaps due to products of poor quality. Remember, a good set of paper and pencils will ensure that half of your job is already complete! You will be able to progress and evolve your skills much faster without losing any interest in your art.
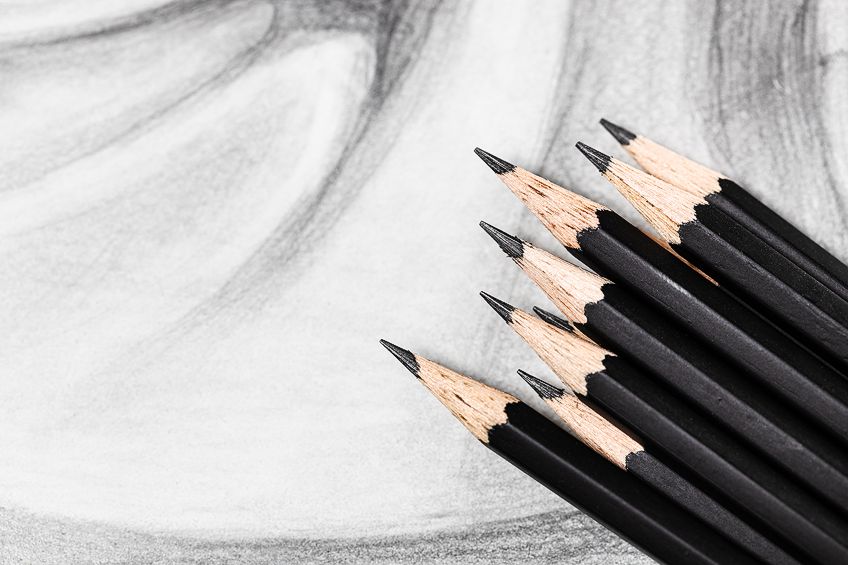
A Good Mechanical Pencil
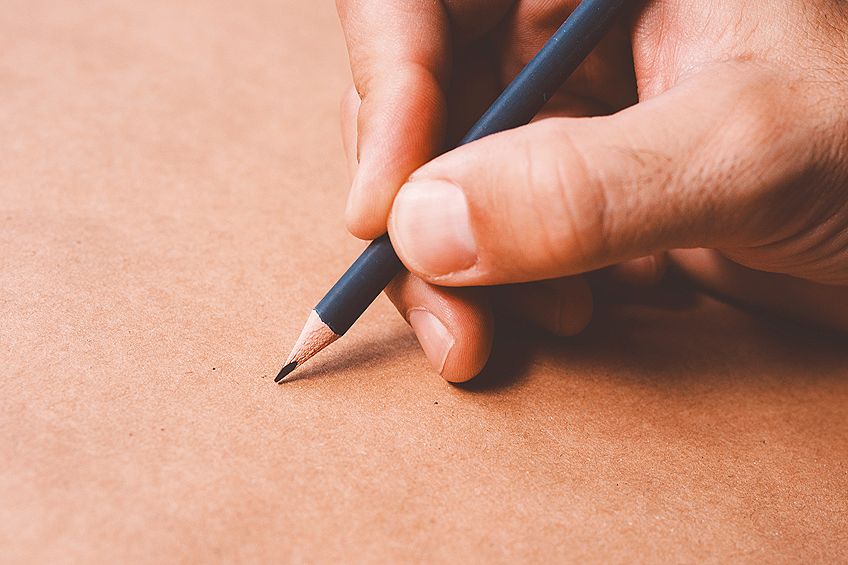
The first process of any drawing is the sketch. You want to avoid any paper damage caused by the erasing of lines, so making sure that you have the correct pencil is of utmost importance. Mechanical pencils are our favorite for this purpose, which is due to their slightly rounded nibs that prevent any digging into and damage to the paper.
When using a regular pencil, the tips can sometimes leave scratches and indentations in the paper, which you may only notice at a later stage when coloring your animal drawings in. It is almost impossible to conceal this once the damage has been done! So, do not skimp on your pencils – mechanical pencils are extremely practical in that if you accidentally press down with too much force, the nibs will simply break.
This little advantage will help you with your journey of drawing animals by teaching you to go gently and to feel as you draw.
The decision of which mechanical pencil you use is entirely up to you – just bear thickness in mind. A pencil with a thickness of 0.5mm and a 2B hardness is ideal. If you are wanting to achieve thicker and softer line work, 0.7mm is the recommended thickness. Should you require darker linework, try a 0.3mm pencil.
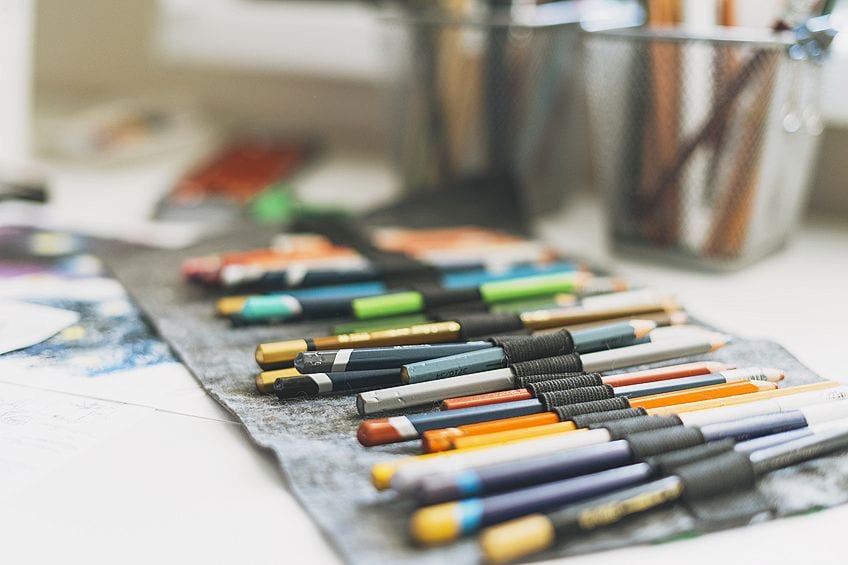
The Right Colored Pencils
Of course, one of the biggest factors to think about is the colored pencils you choose to use for your drawings of animals. Of all the equipment you will use, your choice of colored pencils is by far the most important! The higher the quality pencil, the higher the pigment concentration. High-quality pencils also have a stable and strong barrel as well as more solid lead.
Your animal drawings will not be of as good a quality if you skimp on this important drawing tool, especially if you plan to draw on a frequent basis. Luckily, there are only a few colored pencils available that really meet the best and highest professional drawing requirements, making it a much easier decision on which pencils to choose!
There are wax- and oil-based colored pencils for you to choose from. Wax-based pencils are softer, which ensures effortless and beautiful blending. Thus, these pencils are perfect for coloring in backgrounds, eyes, and even flowers. Oil-based pencils are the opposite, being harder but easier to sharpen. They work best for finer details and this makes them ideal for doing the hairs and coats of animals.
Selecting the Correct Colored Pencils
Some of the best coloring pencils can be found by the Castle Art Supplies brand, who offer an excellent set of premium soft pencils. This beautiful range of colored pencils has 120 different vibrant colors on offer, making this range a solid and ideal choice. You can draw nearly anything your heart desires with this awesome set. On top of that, this range is also good value for money.
Another fantastic choice is the range offered by Caran d’Ache Pablo. While this set also consists of 120 beautiful colors, they are lacking in natural skin tones, so it is best to avoid if coloring in various skin shades is part of your project. That said, when you are still learning to draw animals properly, these colored pencils are ideal thanks to their strong, vivid colors and high-quality lead. They also allow for easy blending of color, helping you blend and mix your own tones too.
One of the bigger palette sets, offering 150 colors, comes from Prismacolor Premier. These beautiful wax-based colored pencils make for a perfect complement to the Castle Art Supplies range. Our favorite thing to draw and color with the Prismacolor range are eyes – the effect these pencils have is beyond beautiful; something you will not be able to achieve with any oil-based pencils. To add to the value, their set of 150 is affordable too!
The white shade offered by the the Prismacolor Premier range is by far the most superior, and should be used regardless of whether or not you use any other products.
If you are looking for luxury wax-based colored pencils, the Caran d’Ache Luminance is by far our favorite. They are obviously more costly, but their quality is hard to beat, offering rich, strong pigments and stability. These beautiful pencils come in a set of 76 different colors. Bear in mind, however, that these are marketed towards artists and illustrators with more experience.
Derwent’s Lightfast Pencils make an excellent addition to all sets. These oil-based pencils are similar to those of Castle Art Supplies, but have drawing characteristics closer to a wax-based colored pencil, much like the Luminance range. These versatile pencils are the ideal blend of both wax and oil, coming in a big range of lovely, interesting colors and shades. When using these shades with white, they show very intriguing and exciting nuances!
A Good Sharpener
An often overlooked little tool, a sharpener is your best friend. The perfect sharpener will not create brittle lead nor will it sharpen too angularly. You have an option between hand or crank sharpeners, the choice of which is entirely your preference. Something to consider is that the classic hand sharpener allows for ease of control and faster sharpening.
If you do like crank-style sharpeners, Dahle is an excellent brand. It can even be used for pastel pencils, which is an added bonus, as hand sharpeners often struggle with these. Unfortunately, there is no real be-all and end-all when it comes to sharpeners.
Some pencil brands even sharpen better with different sharpener brands! Many brands of coloring pencils sharpen best when used in a Cretacolor sharpener, but they can become blunt rather quickly, leading to the need for frequent changes. When using thicker pencils, it is best to use a loose, metal double-sharpener.
The Perfect Paper
Paper is so underestimated, and it really should not be. No matter how expensive and fancy your pencils might be, if you do not have the right paper, your pencils will not ever work as well as they potentially could! As you may already know, with so many options of paper to choose from, it makes paper selection seem like a rather daunting task!
A rule of thumb is to avoid beginner-style sketch paper. These are made for sketching and not for actual drawing, and will thus limit you enormously. You will not be able to develop or grow your skills drawing animals if you use the wrong paper.
Every paper has unique properties suited for different kinds of drawing. Grained, smooth, or rough paper may be intended for either closed lines or soft/hard strokes – each paper is unique. When you start learning how to draw animals step by step, you will want to begin with a good paper right from the get-go.
Choose a smooth but resistant paper that will allow you to use many color layers. Your choice of paper should be able to absorb the color properly in order to achieve realistic effects. If you choose to skip on paper, you will end up regretting so in the long run!
So, which papers are our favorite for making animal drawings easy? We love the Hahnemühle Cézanne and the Strathmore Bristol Smooth Series 300 paper brands! The Hahnemühle Cézanne is a smoother paper, which helps to produce a harder line than the Smooth Series papers do. This is not the ideal option for animal fur.
The Cézanne paper option is by far the most superior paper, followed quite closely by the Bristol Smooth – costing half the price! Choose the Smooth if you want to save some money, as you will not find anything else quite as good. Both papers allow you to make fast progress while you learn to draw animals. They are quite literally limitless and will allow for optimal drawing.
If you have some experience with drawing already, you could also give the Strathmore Toned Tan/Toned Gray paper a try. These are very robust and have a tint, thus offering awesome properties. This paper allows for excellent and easy drawing of animals, especially when drawing fur. Wax-based colored pencils do very well with this paper.
Bear in mind that while this paper is actually intended for sketching, it is also the only one that offers the qualities that drawing paper does.
If you want an excellent all-around paper, Hahnemühle Britannia is the paper you want. This paper provides a wonderful, even base for both watercolors and colored pencils. That said, this is a sensitive paper and breaks quite easily. If you are drawing with crayons, this is a good and suitable alternative that will make for an excellent choice compared to most other papers.
If you will not be drawing images that need many layers, for example, comic or manga style drawings, you should be using very smooth paper. A smooth paper in this instance will help you to create rich, lovely, and soft drawings. When drawing animals with hair and fur, smooth papers like these will not work very well.

The Correct Eraser
You may be surprised, but erasers are important, and each has different qualities and erasing abilities. You do not want an eraser that is too soft, as this could smear your color pigments and cause quite a mess. You want to choose an eraser that will absorb the color without causing any paper damage. Thankfully, there is a large range of erasers that are created especially for when one uses colored pencils.
Consider buying a kneaded eraser for dust removal and the lightening of layers and pencil lines, as well as purchasing a little round or cubed eraser to be used on areas that are more detailed. Remember, all erasers take their toll on your paper and will change the paper’s properties, even if hardly used! You need to be gentle and be careful not to go over the same space too much or too harshly, or your paper will end up quite badly damaged. You want to erase as little as possible.
A Fan brush
As you draw, you will generate dust. This is inevitable, unfortunately. You must ensure that you remove this dust constantly, or you will likely suffer more smudges and stains than necessary. Do not use your hand to remove the dust, and do not use a brush intended for makeup, as they are created to absorb pigment and spread it rather than dust it off. A basic and simple fan brush is a cheap must-have. Make sure it is not too stiff or hard, as you could scratch your paper while using it.
A Highlighter
This is something that is extremely important when you learn to draw animals. Highlights are the points where the light hits, for example, the points in the animal’s eyes. You cannot achieve perfect highlights with only your colored pencils. Most people use an acrylic marker pen or even a gel pen.
The best option for the image below would be the Copic opaque white pigment. You can purchase this in two variants, the larger version which has no brush, and the small version that comes with a brush. It creates a fantastic shining white that is not achievable with gel pens or acrylic markers. What makes this product even more unique is that it can be removed from the picture by scratching it off!
A Light Table
When you draw, are you using a grid or are you drawing your baselines freehand? Using a light table is far less frustrating! Do not be ashamed, there is absolutely nothing wrong with tracing your baselines. Your art is still yours, so do not be discouraged. The real part of the art is your coloring, which is not something you can trace.
Using a light table can be a very valuable time-saver and an excellent tool. Should you choose to purchase one, make sure that you get one of at least A3 size. You could even build your own at a relatively low price. In fact, you can simply use a glass table with a brightly lit lamp underneath it! To prevent your drawing from slipping mid-trace, secure it with some removable tape.
Tracing Paper
If a light table is not an option, you can also use transfer paper. This method will not be as accurate and, unfortunately, you will struggle to fully remove the graphite lines it creates. When using thicker paper, however, specific tracing paper would work better than a light table, as these papers do not allow light to shine through sufficiently.
A Daylight Lamp
As you learn to draw animals step by step, you will find that the more you practice and draw, the more aware you are of how many daylight hours you have! Artificial light will falsify your colors, making working at night an absolute nightmare. If you want to be able to create your art at any time of day, no matter the cloud cover, you should invest in a daylight lamp.
You want your light to be as close as possible to actual daylight and have a color temperature of 5500 Kelvin, which is the closest you will get. You need to be careful, however, as some of these lamps actually emit UV radiation. Therefore, make sure that you select a lamp that will not do any damage to your eyes and skin while you create your drawings. If using a ceiling lamp, make sure that it is at least 12 watts. Your colors will then be clear and very natural.

Steps to Note Before You Start
Now that you have accumulated all the materials and equipment you will need for learning easy drawings of animals, and it is time to learn the actual skills! But, before diving in with our guide, have a look at some basic first steps that are quite important.
Use the Correct Underlay
Sometimes, even though you are extremely careful, things can go wrong. The tiniest little crumb or a little bit of uneven surface can cause more damage than you realize. Therefore, choosing a clean, smooth, and very firm base is of utmost importance! Glass is the best option. You need to avoid pressing the hand you draw with onto your paper as you can cause smudging.
You can purchase specially made gloves for drawing, but a simple piece of paper underneath your drawing hand is sufficient for protecting your artwork. Where possible, using a 90° angled, slanted base will help you to avoid skew and crooked drawings.
Make the Right Design Choice
If your original is not of good enough quality, or simply too complicated, you will struggle to recreate it. When learning to draw animals, you want to select images that have good exposure and sharp lines. Do not make the mistake of over-complicating things, and aim to choose a simple subject as well.
When learning, you do not want to land up frustrated and wanting to give up, all because your subject matter was too advanced for you at this stage. It is very important to be realistic and understand what your strengths and weaknesses are.
If you are looking for ideas, a tiger is actually a good animal, to begin with. You will be able to practice things like coat structures and patterns, and the tiger itself is also fairly simple to draw. Remember to be patient as you learn! Rome was not built in a day!
Choose the Size of Your Design
Another common error the budding artist tends to make is the size of their motif. Oftentimes, an artist will choose something too small without realizing how much more detailed and complicated it would be. Or perhaps too large a size was chosen, and now the artist is unable to cope with the workload. If you are doing a full-body portrait, A4 may be too small, but this size is perfect for a head portrait. To begin with, A3 is a good size to work with, as a size of A5 or smaller would be too small for a beginner. If you feel you are not able to get fine enough lines, draw your subject matter larger! This will save you much frustration.
Patience Is Important
Without patience, you will not be able to perfect your animal drawing skills! Even when you are just starting out, you have to give yourself time – especially if you want to get to the point of being able to draw very realistic animal pictures. A very simple and basic portrait of an animal without any background work can take over 25 hours to complete.
The average drawing time is around 40 to 60 hours!
Of course, that depends on how realistic your drawing is. It takes much skill and fine work if you want your drawings of animals to have beautiful-looking fur or feathers. Drawing a nice, rich, and realistic-looking coat on your giraffe is not going to take a handful of hours. So, if you are just starting out, be mindful of this. Animal drawings take time and patience for the very best end results.
How to Draw Animals Step by Step
Finally! Here we are – how to draw animals step by step! After all that preparation, you are finally ready to get drawing! Our guide is a great way to learn to draw animals the right way. Remember to take it slow and easy and not to rush any of the steps. Learning should be a fun experience, and all art forms take time. And, as we mentioned before – practice!
The first real step is to choose your motif and transfer it to your paper using your mechanical pencil. Remember not to press too hard, or you will have trouble erasing the pencil lines afterward. Use a plasticine rubber to get rid of the lines, as this will not leave any residue behind. Of course, you still need to be able to see some of your linework, and this rubber will give you more control over the number of lines erased. Make sure that you have your sharpener ready because there is nothing worse than blunt pencils – although, every now and then a blunt tip is actually necessary.
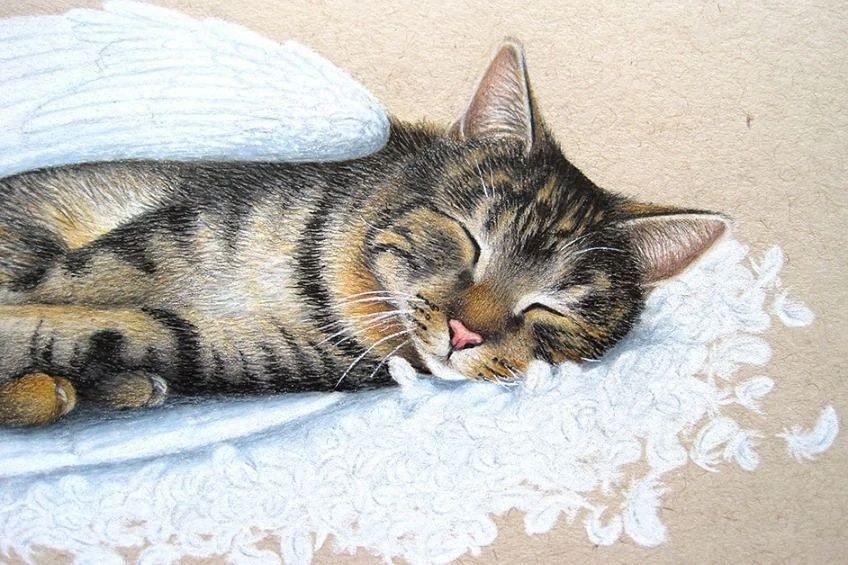
With our guide on how to draw animals, we will be using a cat as an example. Cats make awesome first-time drawing subjects.
Drawing the Eyes
The first step: the eyes. The eyes are your drawing’s focal point and are actually quite easy to draw. It is better to use wax-based pencils for the cat’s eyes as the effect is far nicer. In our example image, we used Prismacolor Premier pencils, but if you want to use oil-based pencils, try the Castle Art Supplies range.
Step 1
Normally, for both coat and eyes, a basic tone is used. Every other color used in your animal drawing is based and applied on this basic tone. When you look at a cat’s eyes, what is the basic tone you see? For our cat drawing, that color is yellow or cream.

Then, for the edges of the eyes, the color becomes more of a soft, green tone. For our drawing, the secondary color we are using is a light grey-green, which will allow you to create a scale of color in different bright tones. And, depending on the image, it will help create a more vivid appearance. We will use pale sage for this, which is a darker green tone, as well as an even darker tone, light sap green.
We will also use white, and an oil-based black (or blue) for more precise details.
Step 2
Using your basic tone, fill the eye, excluding the pupil. Then, with a slightly blunt black pencil, color in the pupil of the cat’s eye. Then sharpen your pencil and slowly build the border of the cat’s eye. This enables you to see the edges for the next steps you need to take, making for a useful aid.
To ensure that no smearing occurs, it is a good idea to avoid making this area too dark and strong. You could even remove a little of the pigment with a kneading tool before tackling the eyes’ outer and inner edging with your secondary tone of lighter green. Be mindful not to overlap into the black.
Step 3
Using pale sage, you will perform the same steps, but this time only in certain places – you must be irregular. You do not want to completely draw this part. You will color over these darker green areas once more with a lighter-toned pencil. Do not put too much pressure or press too hard, causing them to disappear. You want them to be visible and blend in beautifully with the other colors. The center should be kept in the original yellow shade. It may end up rather narrow.

You will then follow the stripe as you once again widen it. This time, do so in a more jagged way to help create more natural-looking shapes within the eye. Hint slightly towards the eyelids of your cat’s eyes to help bring life to the eye. Lastly, add a narrow white line along with the light center of the iris.
You will be able to create a glow and have some contrast this way.
Step 4
To liven your eye up a bit more, create shadow towards the upper part of the iris. Do this even if the original image does not have such a shadow, as it helps a lot to add even a slight shadow in this area. Being very careful, create an ever so slight arc leading from one side of the iris to the other. Do not ever demarc a line. Press lightly at all times and take your time, or you could easily darken it too much and too unevenly. If you feel you have in fact done this, use a little bit of your basic tone to push the black back.
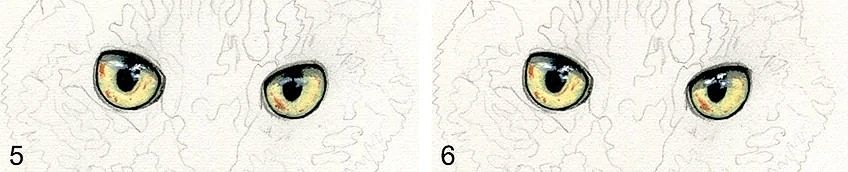
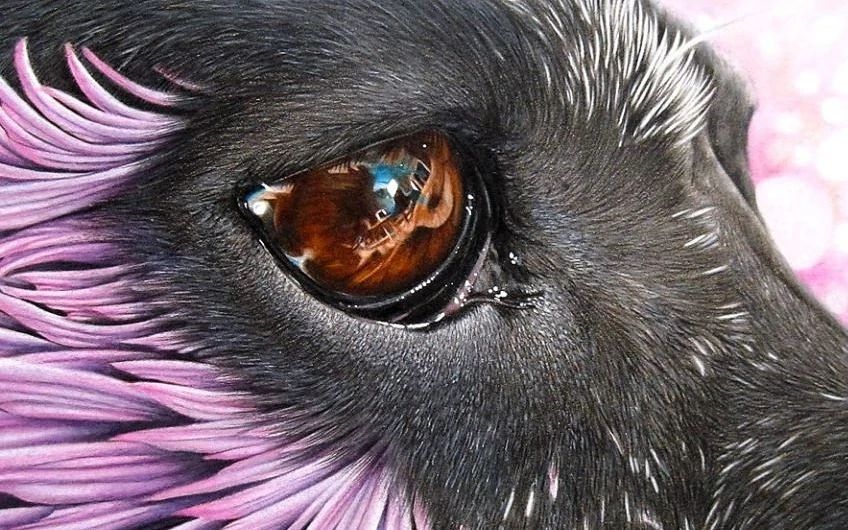
Reflexes are what will create even more life in the eye, as now, they will still appear quite lifeless. The best way to achieve this is by using blue pencils. We suggest using Luminance for this, although many of the other brands mentioned earlier will do.
Using a dark blue, color ovals on just one or two areas within the pupil and the upper half of the irises. You can make the eye appear more natural if you go over both. You do not have to worry about where the blue areas are in shadow – simply place them where you feel they look and fit best. We will now use lighter blue in a strong fashion over the dark blue.
That said, the darker tone should still be visible towards the edges. You can now add some speckles or other features.
Step 5
This is the most magical part – the light spots. We advise you to wait until the end to add these, although you can definitely add them at the beginning as well. Waiting until the end is better as you can then size and place them correctly. You will not be able to get those light spots quite white enough with only colored pencils.
This is where the Copic Opaque White helps, as it will set your light points.
Remember not to make them round, as it is not often that eyes will have round light points! Eyes are usually reflecting the sky or even a window, so the light spots are more square or triangular in shape. Sometimes, light points are more like clouds in that they form an irregular shape.
You will have both brighter and fainter reflections as well as small and larger ones. Put the white color into the blue, and do the same at another point like the upper edge of the eye. Do not overdo them or you will overload the eye. At the same time, you do not want too few light points either. You will, with time, learn to judge accurately.
Step 6
Both the pupil and iris are now complete, however, you may still need to work on some small areas. Accentuate the green’s darker tones by creating more gradation with a light sap green or even a little black. You will only color in over certain areas, and again, in a jagged fashion, this will help to make your iris structure stronger. For the most part, the contrast will help to liven up your eye. Experiment by using very dark or very light tones (black and white) in places you would not normally.

Step 7
You now need eyelids, or else your cat will have a deadpan stare. In the case of the cat in our example, you cannot see the upper lid as it is hidden under the black shadow. The principle stays the same, however, for both upper and lower eyelids, depending on your own drawing.
Using a pointed black pencil, border the iris. Be strong with these lines, but be careful not to make it look like a line. You will need to blend this out softly, and to achieve this, you will minimally draw into the iris right along the whole lower edge of the eyelid. This helps create a faint shadow effect. It is barely visible, but it works wonders! Your second line will mark where the eyelid becomes fur. It should remain soft by using tiny little lines in a fur-like manner.
Remember, eyelids usually widen up towards the edges. In our cat image, you can see that the edges lighten out into a brighter tone.
Step 8
You now will make the strip of the eyelid darker with black. Then, using a white oil-based pencil, follow the line. Create interruptions on the black line towards the cat’s nose, so that as the white and black colors mix, you will see it create an almost blue-grey tone. This helps keep the area looking natural. You now need to widen your line with black to show clear separation of the lower and upper eyelids.

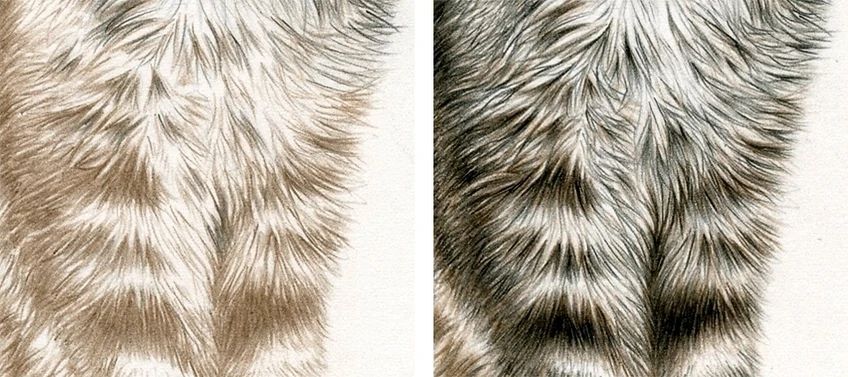
Drawing the Fur
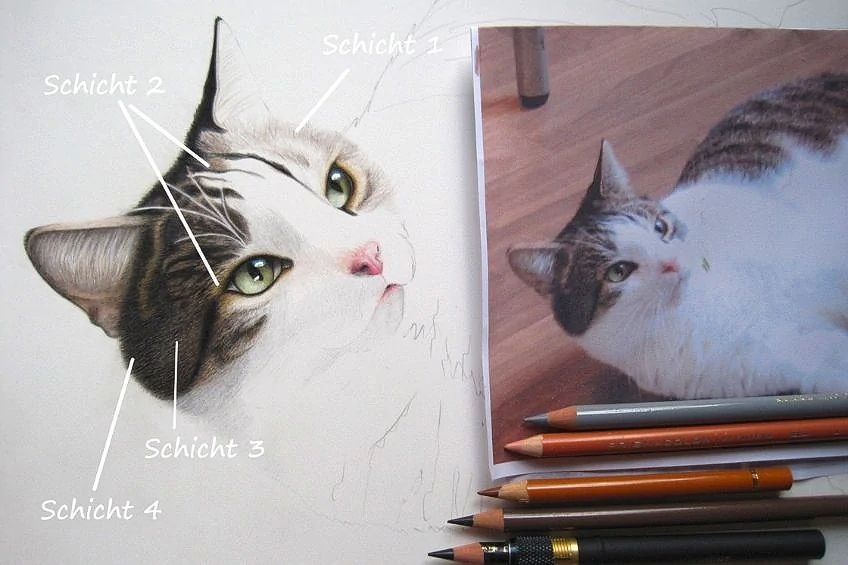
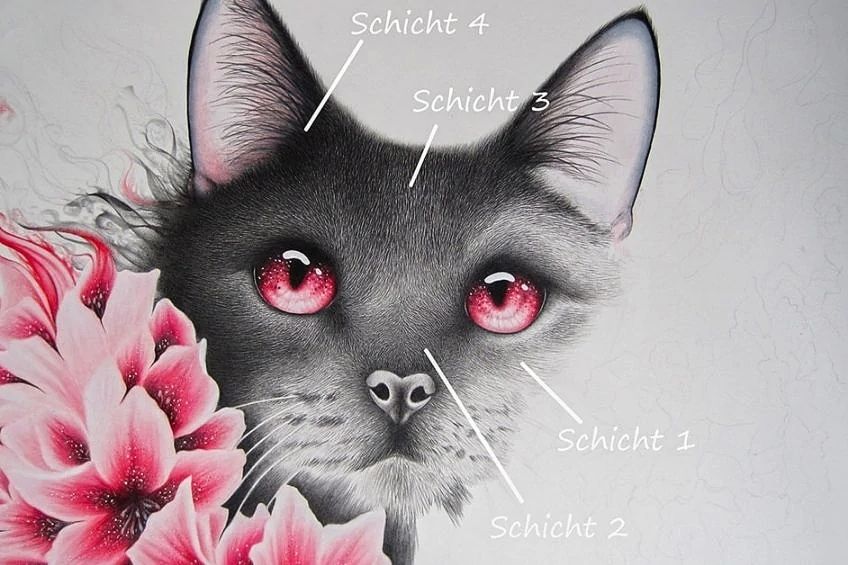
The coat needs your utmost patience. Almost every single hair will be done individually. Every artist has their own technique for this and it is something you will also learn to do in your own specific way. That said, if you are creating a realistic-looking cat, you will definitely need to layer.
Layers are created by starting with light and working towards dark.
Many beginners try to do the fur in just one layer and it never works because animal fur has dimensions, texture, various lengths, and tons of color gradation as well as pattern. As you draw your coat, you will be creating fine lines. Using an oil-based pencil is best suited for this.
Just like with the cat’s eyes, your cat’s body has a basic tone. For our cat, we chose a brown tone. Our secondary color is warm grey and the first darker tone or gradation will be another warm grey of a darker shade. Black will help to intensify this. Just like with eyes, fur needs four to six color layers – even more at times!
You will be using your black pencil for the enhancement of contrast and the fur’s shading. Yes, even lighter-colored animals will need this. Do not be afraid to use it as any color can be darkened, and it will allow for an increase in the depth and richness of the color, keeping your drawing vivid.
Step 9
Begin with the cat’s nose because it is a focal point, just as the eyes are. This fixed area or focal point will help you draw the coat in a much easier manner. There are no real rules here – there are just lighter and darker parts that indicate where the shadow falls or where light enters, which will also show the growth direction of the hairs.
Using white, you can enhance the light areas just as you will enhance the darker parts with black. Using a dash-like motion, you can taper the fur’s edges. Do not use a pink tone but rather more flesh-type colors, or else it will look unnatural at best. Your first layer needs a sharp pencil that stays sharp. If you do not sharpen it often enough, you will not be able to create fine, closed lines correctly.
As mentioned before, layer one must be a light tone. This layer is what shows variation in hair length and different hair growth directions.
Avoid etching as this will damage your paper. Do not draw the first layer flush either – you want to leave spaces between each individual hair. This space and distance will help your first layer to show through in flashes, making for a more natural-looking coat.
Remember that every single layer will help to create the bigger picture. All of them are important if you want realistic-looking hair density, growth direction, and of course, length. Along the bridge of your cat’s nose, the hair will be much more dense and fine. However, above each eye’s rim, the hair is sparse, allowing a bit of skin to show, although it does have more length.
In our cat drawing example, you can see that these eye hairs point away from each eye and towards the middle of the eye, where they then point towards the cat’s nose and start to fan out. Closer to the cat’s forehead, the hairs lean more towards one another and meet up, then further up they run in a parallel manner.
It is important to note things like hair directly from your very first layer of color. Even in your final layer, the first layer of hair will still be somewhat visible if done incorrectly and in the wrong direction! Hair is never to be drawn symmetrically or too carefully. Hair is also never all the same length, nor is it all the same thickness.
Try to move your wrist freely and quickly, as this will help to keep the irregular hair structure that makes it look more natural.
Step 10
Now that the first layer is complete, you will select your secondary color pencil. When an animal is one color, you will be using the same tone once again, but stronger the second time around. Alternatively, you could use a slightly darker or similar shade of pencil. For our cat, we will now use a shade of grey, but apply the same principles as in the first layer. You are still able to see the brown and, the stronger it was drawn to start with, the more clear it will appear later on.
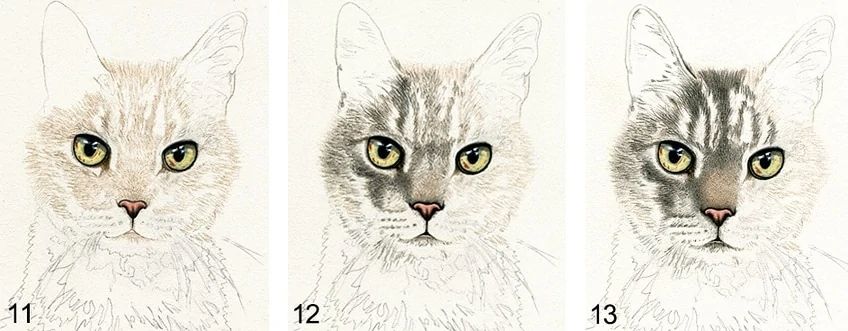
Step 11
Considering that the first layer is an aid, you will now be reworking the next layers across the nose and similar areas. The brown will be made to be more intense in the correct places. Do not forget to consider the hair condition.
The hair along the bridge of a cat’s nose is very small and quite dense, so you will not have to put many lines at all, allowing you to color the area more solidly. This, however, must be done in a slow manner, and you must use a pencil the is properly sharpened to avoid it looking unnatural. When it comes to the paws and such, you would be using more strokes. You should be able to assess which technique to use where.
When drawing, the approach is very important. You will constantly be working from light to dark. You will again do another layer of grey, this time more strongly, repeating until you have reached the appropriate and perfect strength.
Remember not to move from step to step. Finish each part first before moving on to the next. This will help your image remain uniform and correct.
Step 12
The entire face will now be covered in your secondary color, where parts with a weak base layer can be made stronger in layer two. It is important and normal to rework as you go. Using your kneading rubber, you will also be able to lighten specific areas in a soft form. In our example image, we have done this along the bridge of the cat’s nose, reducing the brown.
Our cat also has patches of hair that are white. Bear in mind that drawing a white coat is not easy, but once you understand the principles of layers and how nothing is ever a solid color, it becomes more simple. Even a white coat has varying shades and darker areas. A cold gray is good for white coats. Using this color, you should draw lines a good distance from one another. The white flashes throughout will prevent the final image from appearing just grey.
For shaded areas of a white coat, you will want to press more firmly and color in more flatly, minding any edges that hit the light. You could also use a colder and darker shade of grey for this. You cannot go wrong with cold gray for a white coat, but, if you are more experienced, you could even use a high-pointed black instead, as it will actually allow your shadow and line work to stand out more when the image is complete. You can also add another color to the grey to liven up the coat even more. In this instance we used brown – have a look at the cat’s muzzle in the following step.
Step 13
It is finally time for some darker gradation! And again, we follow the same principle – dashes with enough distance between them. Remember that if you are not using high-quality paper for your animal drawing, your gradation can fast become far too strong and/or dark.
Start off light and continue with caution always. If you are using a good paper, one big advantage will be how the paper’s texture actually helps to prevent lines that are too dark. How does it do this? Because high-quality paper will not absorb the full strength of the ink right away!
In this step, any areas that may need to have more reworking done are going to be very visible – you may notice a more intense brown peeking through in some parts.
An area to cover more sparsely would be the cat’s temples. There is not much hair here. Some skin will also show through in this area, and the ears as well. From this step onwards, you can start drawing these hairs.
Just like the nose, when you draw the ears you always start with a lighter tone and then a darker one – but never pink! And of course, you will create intensified darkness with a black pencil. The hair on the ears is quite difficult, as they are not as white as whiskers would be and also need to be irregular and in varying lengths.
Maximize contrast and keep enhancing with your black pencil as you cover the face with more dark gradation.
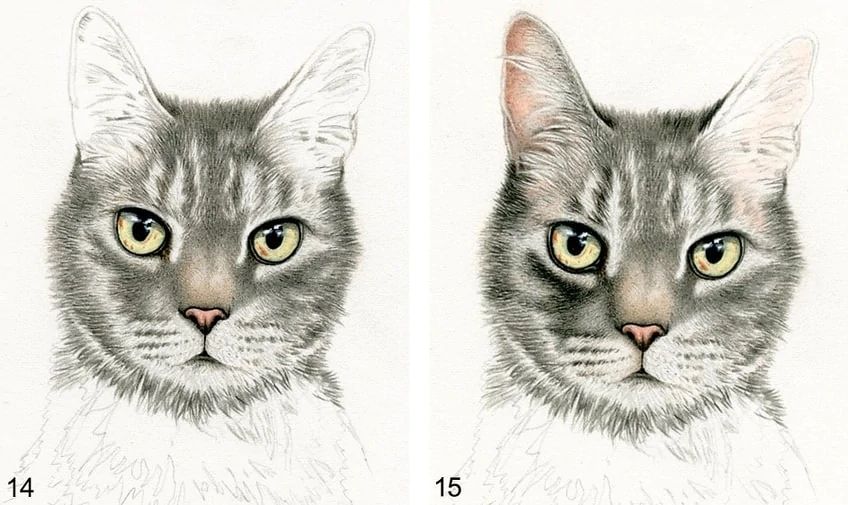
Step 14
Now that all of your layers are in place, you will be able to see the finer points. The ears, nose, and eyes have been darkened or lightened and your colors will be nice and intense or more minimized. Your proportions should also have been adjusted properly, such as your cat’s facial width and mouth texture. Keep adjusting until it looks as close to the original drawing as possible.
When you are working with so much detail, it is easy for it to come together only in the end as you start to see where things are missing or need fixing up. Try not to commit entirely to the pattern, as it is intended to guide and help you only. You are not a photocopier, and drawing brings its own beauty to life.
Step 15
Often, you can be a lot quicker and less careful when it comes to drawing an animal’s body hair compared to the face. A rabbit, for example, has very similar hair on its face and body, so this stance would not be recommended. However, with most cats, the body hair is longer and wilder, allowing for a different approach.
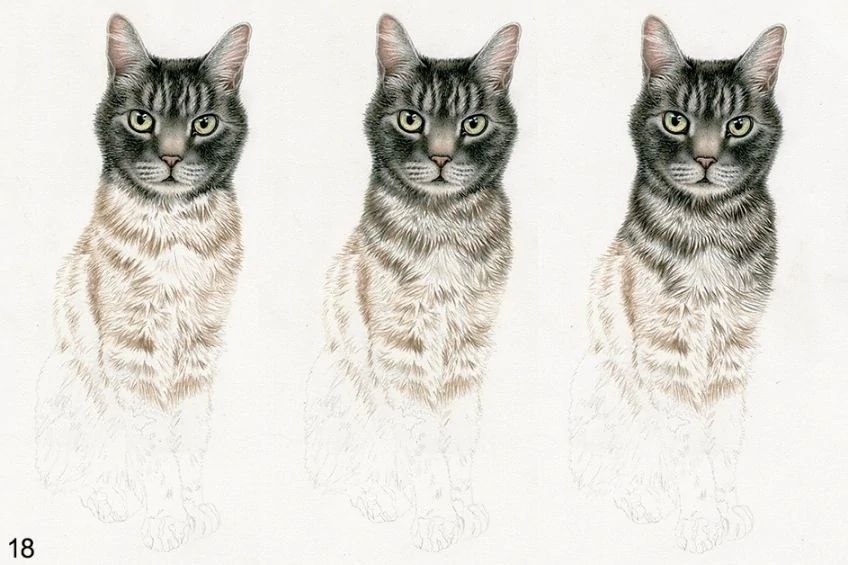
The body hair of a cat allows for faster work with just your basic tone, secondary color, and just one dark gradation, which is usually black, as with our example drawing. This means that there are just three layers! The principle, however, is still applicable to other animal hair and skin.
When drawing the coat, you will do the entire thing with your base or main shade. When it comes to wilder coats, it is often better if certain areas are more closed up. See the image detail for this. To ensure more even-looking hairs, you should draw each stroke briskly, starting at the hair tip and ending at the hairline. You should also be paying attention to growth direction and hair length.
Step 16
With your base tone now complete and set, you can continue with your choice of secondary color. Cover the entire underlying layer with this. Remember to continue using an irregular stroke when doing this. The basic tone underneath will still come through. When you are drawing more of a solid-colored animal, your lighter shade beneath will peep through, helping the coat appear more alive.
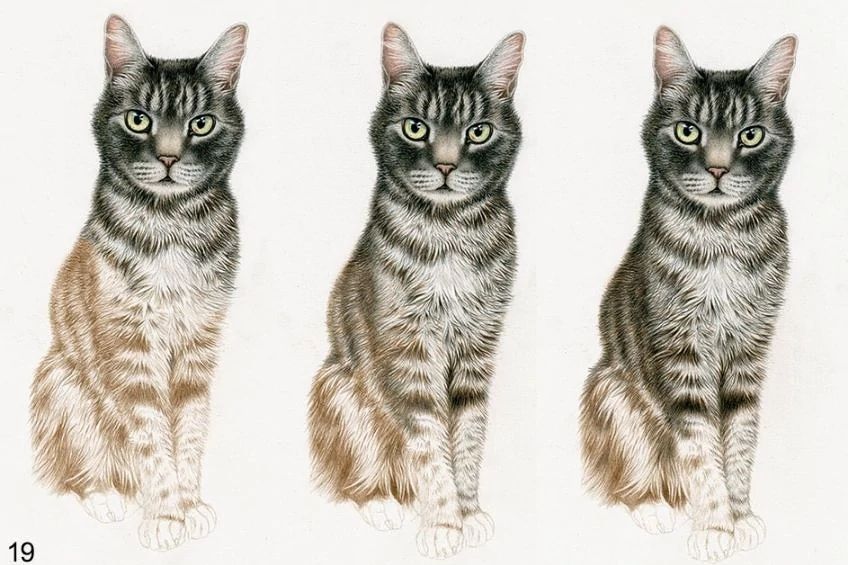
Now, just as you did with the cat’s face, you will add your dark gradation to the cat’s body. It does not matter if you use black or another color, so long as the shades are the same. You will now use this final color to work on any and all layers until your cat is complete. When it comes to parts of the coat that are white, you will notice clearly that you are able to create isolated black strokes without causing harm to the white. The fur will appear natural to anyone who looks at the picture you drew.
Remember that pictures, be they drawn or painted, should be viewed from a distance and never up close the way you see it while you are drawing it. Sometimes an outside perspective is better than your own.
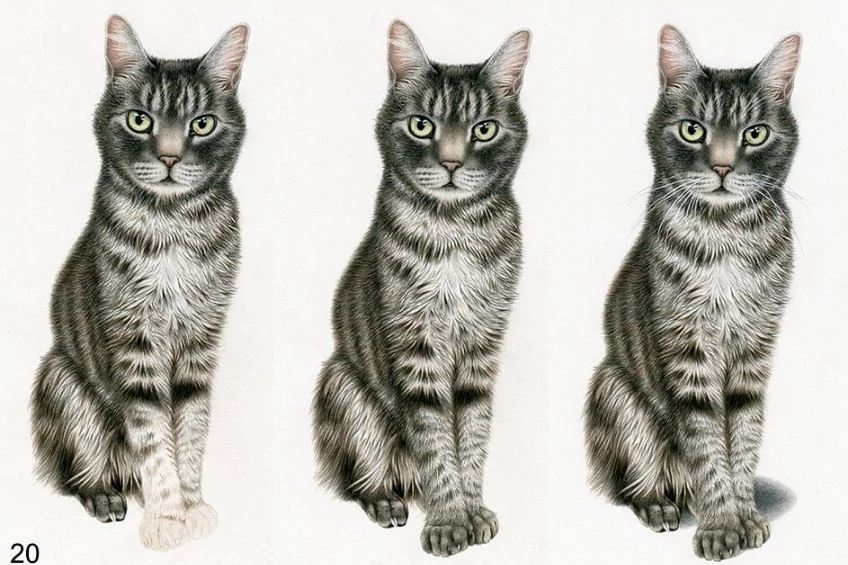
Step 17
The final step, at last! All that is missing is your cat’s shadow to help bring it to life! Set your shadow in a careful manner using cold grey gradations. Do not forget the dark inner part of the shadow. Often, it helps to see exactly where the placement should be by using a computer program. Take a photo of your drawing and put it on your PC. This will help you with placement without ruining your image, as you get to test things out first!
Lastly, your cat still needs her whiskers. Add these with your Copic Opaque White. Using the small brush, use quick pulls. You could also use a tractor brush as it has a nice long tip that works very well when doing fine lines. Whiskers are seen on the muzzle but are also visible above each eye.
Your Drawing of an Animal Is Complete!
You have done it! Well done! It was not too difficult, was it? All you really need when drawing an animal is the right tools, materials, and proper equipment, combined with knowledge of proper technique and some patience, and of course, practice! You cannot become a master overnight! We all began by drawing little stick figures with a sun in the corner of the page. Remember to relax, stop feeling pressured, and enjoy! Go at a pace that you are comfortable with; it is not a race. Your goals need to be realistic too.
Art should be fun, so do not allow anything or anyone to make you feel otherwise. Enjoy!
Our Animal Drawing Tutorials


Madeleine Edsberger
Living in a little Lower Saxony village, Madeleine Edsberger is a self-taught artist who has loved being creative from a young age. She has always enjoyed both writing and drawing and spent her childhood doing just that! Because of issues beyond her control, she chose to become an artist after leaving school. She did not complete any tertiary education, but has, however, proven her artistic talent in many ways. She self-studied and now professionally works as a proofreader and occasional novel editor. Her professional drawing career kicked off in 2016 and she has since built up a freelance artist’s portfolio. Madeline loves to learn and grow each day and still has many things she wishes to learn and accomplish.

Matthew Matthysen is an educated multidisciplinary artist and illustrator. He successfully completed his art degree at the University of Witwatersrand in South Africa, majoring in art history and contemporary drawing. The focus of his thesis was to explore the philosophical implications of the macro and micro-universe on the human experience. Matthew uses diverse media, such as written and hands-on components, to explore various approaches that are on the border between philosophy and science.
Matthew organized various exhibitions before and during his years as a student and is still passionate about doing so today. He currently works as a freelance artist and writer in various fields. He also has a permanent position at a renowned online gallery (ArtGazette) where he produces various works on commission. As a freelance artist, he creates several series and successfully sells them to galleries and collectors. He loves to use his work and skills in various fields of interest.
Matthew has been creating drawing and painting tutorials since the relaunch in 2020. Through his involvement with artincontext.org, he has been able to deepen his knowledge of various painting mediums. For example, watercolor techniques, calligraphy and lately digital drawing, which is becoming more and more popular.
Learn more about Matthew Matthysen and the Art in Context Team.
Cite this Article
Matthew, Matthysen, “How to Draw Animals – Learn to Draw Animals the Easy Way.” Art in Context. May 10, 2021. URL: https://artincontext.org/how-to-draw-animals/
Matthysen, M. (2021, 10 May). How to Draw Animals – Learn to Draw Animals the Easy Way. Art in Context. https://artincontext.org/how-to-draw-animals/
Matthysen, Matthew. “How to Draw Animals – Learn to Draw Animals the Easy Way.” Art in Context, May 10, 2021. https://artincontext.org/how-to-draw-animals/.