How to Draw a Monarch Butterfly – Realistic Drawing Tutorial
A monarch butterfly drawing is a classic and a really useful drawing skill to have, as the monarch butterfly is the epitome of the perfect butterfly shape. The monarch butterfly is a great creature to know how to draw because of how easily it can fit into various artwork ideas. Whether it is an addition to a larger drawing or a subject matter on its own, a monarch butterfly can be used in all sorts of ways. The possibilities for using the monarch butterfly in a drawing are endless, and in this tutorial, we will learn how to draw a monarch butterfly in its classic form.
An Easy Guide to Drawing a Monarch Butterfly With Colored Pencils
There are many ways to draw a monarch butterfly, and the flying monarch butterfly outline is perhaps the most popular way to represent this creature in motion. However, to capture the full effect of the monarch butterfly, we will be drawing the butterfly in a classic front view. This will also provide us the opportunity to work on creating symmetry in both pattern and coloration within the butterfly drawing. In this tutorial, we will break down the drawing process in a way that refines a simple monarch butterfly sketch into a more realistic monarch butterfly drawing. This tutorial is an easy and digestible process for learning how to create a beautiful realistic monarch butterfly drawing.
How to Draw a Monarch Butterfly Step by Step
In this tutorial, we will start with a simple monarch butterfly sketch, using our pencils to work out the form and pattern within the butterfly. From there we will work with colored pencils to capture the coloration within the butterfly. We will then proceed to work with a ballpoint pen and a marker to add in the darker qualities within the monarch butterfly drawing. Now that we know what to expect, we can get into this tutorial on how to draw a monarch butterfly.

Step 1: Sketching the Butterfly Outline
We want to start by creating a basic monarch butterfly sketch with our pencils. A good suggestion is to draw a horizontal line that will help to establish the separation between the upper and lower wings.

The upper wings of the monarch butterfly are more triangular whereas the lower wings are more circular. The body of the monarch butterfly is quite narrow and bullet-shaped. The abdomen of the butterfly is slightly narrower than the body.

The upper wings or forewings are slightly larger than the lower pair of wings or hind wings, and both sets of wings connect to the body of the butterfly.

Using your eraser and pencil, take time on correcting the form until it resembles the flying monarch butterfly outline. We also want to make sure that we put subtle spikes along the bottom edges of the lower wings.

Step 2: Sketching Patterns on the Butterfly Wings
We now want to continue with our pencils by adding the cells or patterns into the butterfly wings. Starting with the top wings, we want to draw a set of elongated shapes, which are called cells, that flow from the body to the middle of the wings.

For the lower wing, we simply want to draw a set of rectangular shapes or cells that flow along the circular formation of the wing. We can add more in the lower wing as the lower wings generally have more cells.

These patterns will set up the perimeters for coloration in the later steps. We want to make sure that the outer margin along the top wings is relatively thicker than that of the lower wings. This is the area that will be colored in black with a marker.

We can also add smaller circular shapes along the outer margins of both the upper and lower wings. Once we have drawn one side, we can simply replicate it identically on the other side of the butterfly.

Take your time sketching in the cells of the butterfly, making sure that they are as symmetrical as possible. You can also look at an image of a monarch butterfly on the internet to assist you in your monarch butterfly sketch.

We want to also make sure we add in the antennae to the butterfly, as well as give the lower wings their jagged edges. Take your time with the sketch, making sure the form and patterns are drawn as best as they can be.

Step 3: Adding the First Layer of Color
Using your colored pencils, try to get a few different oranges, yellows, and reds for the first layer of coloring. Within the cells of the butterfly, we want to start adding in yellow, followed by orange and a little red, blending them.

Again, we are only coloring in the cells of the butterfly, which are the patterns we have drawn. That being said, we will not color in all the patterns or cells as some will be left white along the outer margins of the butterfly.

Take your time with layering colors in the cells of the butterfly. By layering darker colors over lighter colors, such as yellows to reds, we will give the butterfly a more enriched quality.
We want to take our time going through all the wings of the butterfly as we layer our colors into the cells. We want to make sure that we are only coloring within the patterns and leaving out the outer margin patterns, such as the little circular shapes.

You can also explore making the lower wings’ coloration slightly lighter than the upper wings of the monarch butterfly drawing. Take your time blending the colors into the cells of the butterfly. We want to set a base lighter color of predominantly orange, which will then be darkened with darker colors later on.

Again, we want to make sure that the coloration is only within the cells situated in the center areas of each wing. The outer shapes within the upper wings and lower wings will be left blank.

Step 4: Adding Black to the Upper Wings
We will now proceed to use both a marker and our pens to add the black detailing to the butterfly. Using your micron pen, begin to outline the butterfly including the colored micron cells. this will give us clear border lines to work within.

Once we have outlined the details, starting with one wing at a time, we can then proceed by coloring in the wing around the patterns with a black marker.

We want to do this process for all the wings, where we color the surrounding features of the wings in black. We can also use our micron pens to add in some stippling marks to create texture and gradients within the black areas of the wings.

We want to continue this process throughout the entire butterfly, although, we want to make sure we focus on one wing at a time.
Again, we want to still make sure that the patterns remain untouched along the outer marginal areas of the wings. These details should remain blank, as it is an iconic feature of the monarch butterfly.

As you continue with coloring in the butterfly, we can also add stippling along the edges of the cells. By doing this, we give a more seamless integration between the black and colored areas of the butterfly.
At this point, we can also start to color the body of the butterfly black. We can leave little shapes of negative space to suggest highlights, but we can mostly color the body black.

Step 5: Adding Black to the Lower Wings
We will now continue with the same process for the lower wings. Try using your micron pen to create stippling along the edges of the cells or patterns to create textural qualities within the butterfly.

Adding in some stippling along the edges of the patterns creates a seamless integration between the black and colored features of the butterfly.
As we move to the other lower wing, we can continue with the process of adding black marks to the surrounding features. We can also add some slight coloration to the lower abdomen feature of the butterfly.

We want to make sure that as we add in these black-colored marks, we don’t fill in the smaller patterns along the edges of the lower wings.
As we come to fill in the monarch butterfly drawing with our black marks, we should start to see how the butterfly starts to seem more realistic.

Again, once you have filled in the black areas of the butterfly, take your time working on some stippling with your micron pen. We want to add stippling marks along the edges of the cells within the monarch butterfly drawing.

Once we have worked on these stippling marks along the edges of the cells within the monarch butterfly, we will see that it creates a more natural connection between the colored cells and black marginal features.
Step 6: Adding the Last Layer of Color
Now that our butterfly is done, we want to work with oranges and red coloring pencils to deepen the coloration in the wings. We simply want to color over the current coloration within the cells.

Work with a darker orange and some red to make the colors a little deeper in the monarch butterfly drawing. However, try to keep the upper wings slightly darker to create a realistic quality of the butterfly.
Continue with this process until you have reached a deep orange hue within the wings of the monarch butterfly drawing. And that is it – a few simple steps on how to draw a monarch butterfly!
Tips to Remember
- Work out the pencil sketch first. You want to have a well-drawn monarch butterfly sketch before adding in colors.
- Play around with blending color. Utilize at least three different colors in a blend to create a deeper color quality in the monarch butterfly drawing.
- Make sure there is symmetry in the cells. You want to make sure that the patterns are as symmetrical as possible.
- Leave the outer margin cells blank. The white patterns along the edges of the monarch butterfly’s wings are iconic of its species, leaving them blank is essential.
- Deepen the coloration. Make sure you spend some time going over the colors in the end with some reds and oranges to deepen the orange hue.

A flying monarch butterfly outline is perhaps the trickiest part, and in the case of this tutorial, we want to make sure that the monarch butterfly sketch is as accurate as possible. Once we have the sketch, adding on color and black detailing is easy, as long as we make sure that the sketch is as good as it can be.
Frequently Asked Questions
How Do You Draw the Patterns on a Monarch Butterfly?
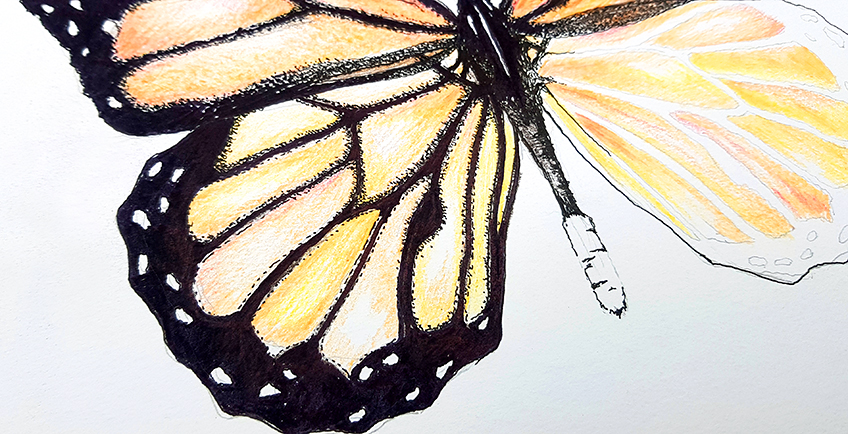
The patterns on a monarch butterfly are quite simple, as they are mostly bold and black streaks that extend between the edges of the wings into the body. The Monarch butterfly also has hole structures that form along the edges of the wings and are generally larger in the top corners of the wings of the upper wings. These bold, weblike streaks are also thinner and larger in variety within the lower two wings, whereas the upper wings have fewer steaks and are slightly thicker. The upper wing patterns also flow in a horizontal direction, whereas the webbing in the lower wings flows in a more diagonal direction.
How Do You Color in a Monarch Butterfly?
The classic coloration of the monarch butterfly is bright, deep orange. However, a lot of the butterfly is black, whereas the orange coloration is situated in the center of each wing. When using colored pencils, the good idea is to utilize at least three different oranges and explore blending colors. This way, you can create both darker and lighter moments of orange to create a translucent quality within the wings. However, the black streaks and edges along the butterfly’s wings can be dark. The black features in the monarch butterfly are generally stark and less translucent than the orange coloration within the wings.

Matthew Matthysen is an educated multidisciplinary artist and illustrator. He successfully completed his art degree at the University of Witwatersrand in South Africa, majoring in art history and contemporary drawing. The focus of his thesis was to explore the philosophical implications of the macro and micro-universe on the human experience. Matthew uses diverse media, such as written and hands-on components, to explore various approaches that are on the border between philosophy and science.
Matthew organized various exhibitions before and during his years as a student and is still passionate about doing so today. He currently works as a freelance artist and writer in various fields. He also has a permanent position at a renowned online gallery (ArtGazette) where he produces various works on commission. As a freelance artist, he creates several series and successfully sells them to galleries and collectors. He loves to use his work and skills in various fields of interest.
Matthew has been creating drawing and painting tutorials since the relaunch in 2020. Through his involvement with artincontext.org, he has been able to deepen his knowledge of various painting mediums. For example, watercolor techniques, calligraphy and lately digital drawing, which is becoming more and more popular.
Learn more about Matthew Matthysen and the Art in Context Team.
Cite this Article
Matthew, Matthysen, “How to Draw a Monarch Butterfly – Realistic Drawing Tutorial.” Art in Context. March 5, 2023. URL: https://artincontext.org/how-to-draw-a-monarch-butterfly/
Matthysen, M. (2023, 5 March). How to Draw a Monarch Butterfly – Realistic Drawing Tutorial. Art in Context. https://artincontext.org/how-to-draw-a-monarch-butterfly/
Matthysen, Matthew. “How to Draw a Monarch Butterfly – Realistic Drawing Tutorial.” Art in Context, March 5, 2023. https://artincontext.org/how-to-draw-a-monarch-butterfly/.