


How to Draw a Gorilla – A Simple Gorilla Drawing!
Gorillas are one of the biggest, most powerful living primates on earth and can weigh up to 396 lbs! Despite their intimating stature, they are very humble and peaceful animals. The late Dian Fossey once said: “the more you learn about the dignity of the gorilla, the more you want to avoid people”. This quote just amplifies how magnificent gorillas are, and that is why our how-to-draw a gorilla drawing tutorial will be honoring these beautiful creatures.
A Step-by-Step Guide to Creating a Fun and Simple Gorilla Drawing
Our how-to-draw a gorilla drawing tutorial will take you step-by-step to creating a realistic gorilla! Today we have a fully detailed 16-step guide showing you how to draw and paint a gorilla in the most detail possible. Follow along and learn how to draw a gorilla today!
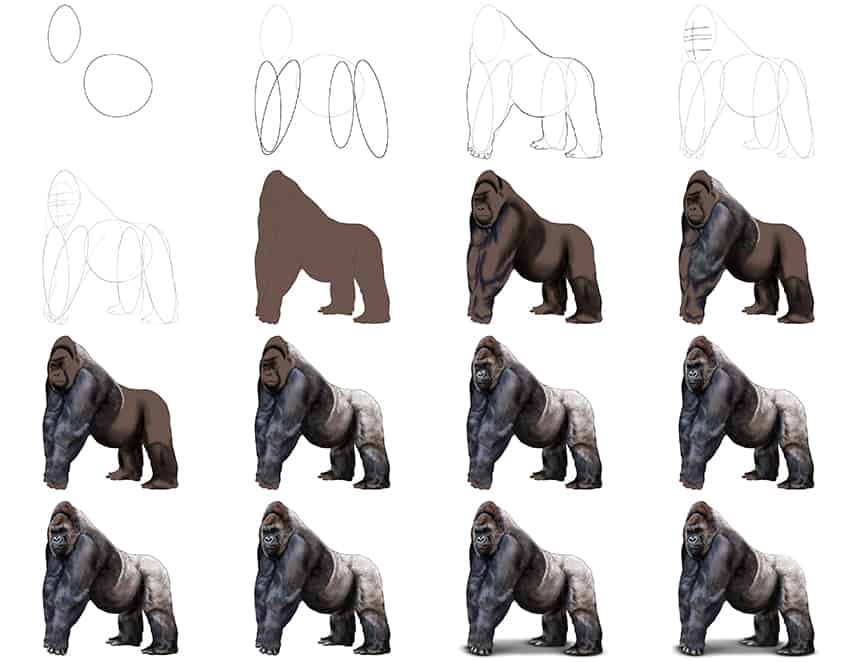
The above gorilla sketch collage shows you each step we will take to achieve your magnificant gorilla drawing!
Step 1: Draw the Body and Head of Your Gorilla Sketch
Begin your gorilla drawing by drawing a broad oval that will represent the main body. On the left-hand side of the gorilla’s body, draw a vertical oval to represent the head of your gorilla sketch.

Step 2: Draw the Arms and Legs
Draw two slightly tilted and stretched-out ovals. These may overlap each other as they will represent the two front arms of your gorilla. Draw another two stretched-out ovals at the back of the body. These will represent your gorilla’s legs, and they should overlap the body.

Step 3: Outline the Body
Make use of your construction lines to aid you in outlining a more realistic shape of your gorilla. Begin by drawing a tilted line from the top of the head, and let it arch above the body. Let this line curve around the back legs. Draw the visible hands and feet on your gorilla drawing.

Step 4: Add the Facial Construction Lines
Draw a line in the center of your gorilla’s face. Overlap the center line with four horizontal lines. This will help us to draw symmetrical facial features in proper proportions.

Step 5: Draw the Facial Features
Draw each eyebrow curing towards the center line, using the facial construction lines. Draw each eye as a small oval in the middle of the second horizontal line. Draw several small lines around the eyes, as these will represent wrinkles.
Draw one-half of the gorilla’s nostril on either side of the center line. Complete the face by drawing a single line for the mouth and a visible ear.
Add a jawline within the head of the gorilla. Finally, add fine structure lines along the body and front arms of the gorilla. Once completed, you may erase any visible construction lines.

Step 6: Add the First Color Coat
Make use of a regular brush and brown paint, and evenly color the entire body of your gorilla drawing.

Step 7: Shade Your Gorilla Sketch
Select a small brush and black paint, and add shading along the bottom half of the back legs, feet, and the underside of the belly. Finish shading the sides of each arm, below the jawline, mouth, and facial features. Switch to dark navy paint and add a touch of structural contour along the front arms.

Step 8: Texture the Fur on Your Gorilla Drawing
Use a fine, sharp brush and navy blue paint, and apply fine hairline brush strokes in a wave-like pattern. These should flow from the top of the head to the right arm. Repeat this step using light blue and cyan paint to cover the entire hairline brush strokes.
Tip! The fur can overlap each other. Certain areas need less fur than others to keep the first color coat still visible.
Complete this step with white paint, and paint a surrounding coat to your gorilla drawing.

Step 9: Continue Adding Texture to the Fur
Using the same paintbrush as previously and navy blue paint, apply fine hairline brush strokes in a wave-like pattern. This pattern can continue from the first coat of texture to the second arm. Repeat this process with light blue, cyan, and black paint, and apply a final fur coat along the left hand, the lower part of the face, and the upper belly area.

Step 10: Texture the Rear Fur on Your Gorilla Sketch
Begin this step with a fine brush and black paint, and fill in the edges and surrounding belly’s curve, as well as between the thighs with fine brush strokes. Repeat with a soft brush and gray paint. Continue to the side of the belly and back legs with white paint, and add a decent amount of patches along these areas. On the underside of the belly and bottom part of the back legs, make use of a fine brush and light blue, cyan, and black paint, and add fine hairline brush strokes.

Step 11: Texture the Face and Head
In this step, we will start by adding dark shades to the face and head. Select a fine brush and black paint, and paint fine hairline brush strokes along the top of the head. Continue onto the facial structures which include the nostrils, eyes, and mouth area. Repeat this process with navy blue and light blue paint.
Using the same paintbrush and tan paint, you are going to start adding light shades to the facial features!
Repeat this step using light brown and white paint to create several layers of fur. Complete this step with a soft brush and white paint, to soften the nostrils and add highlights to the mouth area.

Step 12: Enhance the Facial Structure of Your Simple Gorilla Drawing
Select a soft brush and navy paint, and fill in the ears, nostrils, and eye area. Focus mainly on the wrinkled and creased part of the skin. Continue with white paint, and apply realistic highlights to the facial features. Color the inner eye using brown paint, and repeat with white paint to add a shimmer to the eye.

Step 13: Color the Fingers
Use a soft brush and navy paint, and apply the first coat of color to your gorilla’s fingers. Repeat using a blending brush and white paint, and fade the colors into one another.

Step 14: Add a Fur Outline
In this step, we will enhance the fur outline to create a more realistic gorilla drawing! To do this, simply select a fine brush and the various colors used, and paint fine hairline brush strokes around the entire outline of your gorilla drawing.

Step 15: Draw a Ground Shadow
With a small, soft brush and black paint, paint a soft shadow directly underneath your gorilla drawing. Complete the shadow with a blending brush and smooth out the edges.

Step 16: Finalize Your Simple Gorilla Drawing
You have almost completed your easy and simple gorilla drawing! To finish off, erase any visible outlines and construction lines. For any visible inner texture lines, make use of a fine brush and the corresponding colors, and trace the entire outline of your gorilla sketch.

Congratulations on a terrific job! You have just created a flawless and realistic gorilla drawing. We hope you have enjoyed our how-to-draw a gorilla drawing tutorial, and that you will be leaving with some valuable detailing skills! Keep up the good work and you will soon become a pro at drawing anything!
Frequently Asked Questions
How to Draw a Realistic Gorilla Step-by-Step?
To draw a realistic gorilla, you must have proper shading and highlighting techniques. If this sounds too intimidating, do not worry, as our how-to-draw a gorilla drawing tutorial is designed in a way that anyone can follow! Our drawing tutorial follows a step-by-step process, and at the end of 16 easy steps, you would have created a magnificent and realistic gorilla sketch.
What Materials Do I Need to Draw a Gorilla?
All you need is a couple of paintbrushes and different paint colors! In our how to draw a gorilla tutorial, we make use of small, soft brushes, and fine, sharp brushes. We also use brown, black, white, navy blue, light blue, and cyan paint. You will also need a pencil to trace your gorilla drawing and a drawing area of your choice. And just like that, you have everything to complete your simple gorilla drawing!

Matthew Matthysen is an educated multidisciplinary artist and illustrator. He successfully completed his art degree at the University of Witwatersrand in South Africa, majoring in art history and contemporary drawing. The focus of his thesis was to explore the philosophical implications of the macro and micro-universe on the human experience. Matthew uses diverse media, such as written and hands-on components, to explore various approaches that are on the border between philosophy and science.
Matthew organized various exhibitions before and during his years as a student and is still passionate about doing so today. He currently works as a freelance artist and writer in various fields. He also has a permanent position at a renowned online gallery (ArtGazette) where he produces various works on commission. As a freelance artist, he creates several series and successfully sells them to galleries and collectors. He loves to use his work and skills in various fields of interest.
Matthew has been creating drawing and painting tutorials since the relaunch in 2020. Through his involvement with artincontext.org, he has been able to deepen his knowledge of various painting mediums. For example, watercolor techniques, calligraphy and lately digital drawing, which is becoming more and more popular.
Learn more about Matthew Matthysen and the Art in Context Team.
Cite this Article
Matthew, Matthysen, “How to Draw a Gorilla – A Simple Gorilla Drawing!.” Art in Context. February 27, 2023. URL: https://artincontext.org/how-to-draw-a-gorilla/
Matthysen, M. (2023, 27 February). How to Draw a Gorilla – A Simple Gorilla Drawing!. Art in Context. https://artincontext.org/how-to-draw-a-gorilla/
Matthysen, Matthew. “How to Draw a Gorilla – A Simple Gorilla Drawing!.” Art in Context, February 27, 2023. https://artincontext.org/how-to-draw-a-gorilla/.


