


How to Draw a Polar Bear – Draw a Cute and Cuddly Polar Bear
Polar bears, the majestic giants of the Arctic, are perhaps the most iconic symbol of the tundra. With their thick white fur, powerful build, and sharp claws, these magnificent creatures are the undisputed kings of their icy domain. But while they may be the ultimate predators on land, they are also among the most vulnerable species on the planet, threatened by the rapidly changing climate that is melting their sea ice habitat. Despite their fearsome reputation, polar bears are a poignant reminder of the fragility of our planet and the urgent need to protect its most vulnerable inhabitants. So, grab your pens, pencils, and brush, and let’s begin our step-by-step tutorial on how to draw a polar bear!
Learn How to Draw a Polar Bear With Our Step-by-Step Guide
Learning how to draw a polar bear can be a fun and rewarding experience, especially if you are a fan of these magnificent creatures. Before you start, it’s important to observe some key features of polar bears, such as their large size, round head, small ears, and a distinctive black nose. You’ll also want to pay attention to the way their fur appears, which is dense and fluffy, providing warmth in the harsh Arctic climate. When sketching out your polar bear, it’s helpful to start with basic shapes like circles and ovals, gradually adding in more details as you go along. Don’t worry about getting everything perfect at first – practice makes perfect! With time and patience, you’ll be able to capture the beauty and majesty of the polar bear on paper.
Take a look at the below collage, depicting each step you will take to achieve a cute and cuddly polar bear drawing!
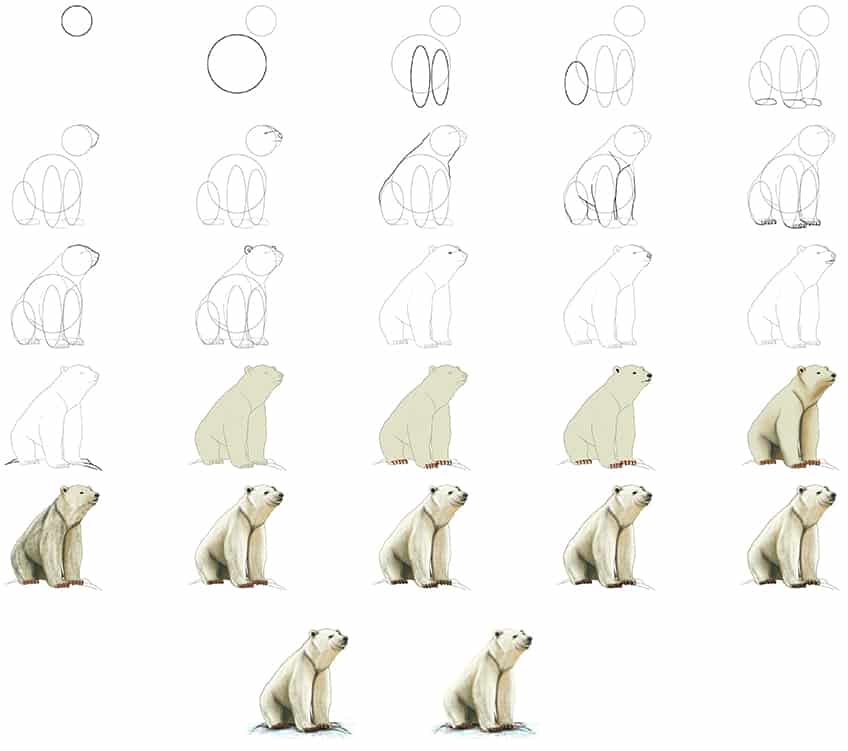
Step 1: Draw the Head of Your Polar Bear Drawing
Begin this drawing tutorial, by drawing a circle on the top right side of your drawing area. This will represent the head of the polar bear.

Step 2: Draw the Main Body
Below the previously drawn head, draw a large circle to represent the main body.

Step 3: Attach the Legs to Your Polar Bear Sketch
Overlapping the main body, draw two narrow shapes to represent the front legs of the polar bear. Make sure that the left leg is slightly larger than the right one.

Step 4: Draw the Rear Leg
In this step, draw a wide oval shape overlapping the left side of the body. This will represent the rear leg of your polar bear drawing.

Step 5: Attach the Feet on Your Polar Bear Sketch
Attached to the lower ends of each leg, draw the general shape of your polar bear’s feet.

Step 6: Shape the Face
Attached to the head drawn in step one, draw a cone-like shape to represent the edged face of a polar bear.

Step 7: Draw the Facial Features
Draw a fine, curving vertical line within the face. Across this draw a second horizontal line, and between the two points draw two small circles to represent the eyes. Within the edge of the cone, draw a half circle to represent the nose.
Finish this step by drawing a single horizontal line at the bottom of the face, to represent the mouth.

Step 8: Outline the Necklines
Use the previously drawn construction lines to aid you in outlining a more realistic top and lower neckline connecting to the main body of your polar bear sketch.

Step 9: Continue to Outline Your Polar Bear Drawing
Continue to outline a more realistic-looking polar bear, using the previously drawn oval shapes to aid you.

Step 10: Outline the Feet
In this step, outline the large flat feet of the polar bear, including the sharp toes.

Step 11: Continue to Outline Your Drawing
Use the previously drawn guidelines to aid you in outlining a realistic face for your polar bear sketch. Leave a short gap between the added line and the existing top neckline, this is where the visible ear will be added.

Step 12: Draw the Ears
Between the gap, draw the fully visible ear. Continue behind the face, and draw a half circle to represent the partially visible ear. Once this step is completed, erase any visible construction lines or guidelines.

Step 13: Outline the Eyes
Using the previously drawn circles in step seven, outline more realistic-looking eyes. Draw a curving arch within the circle to represent the iris.

Step 14: Draw a Realistic Nose
In this step, outline a more realistic nose to your polar bear drawing, and draw the nostril holes within this outline.

Step 15: Outline the Mouth on Your Polar Bear Sketch
Begin this step by outlining the top edge of the mouth that links to the bottom edge lines of the nostrils.

Step 16: Add a Surrounding Ground
On each end of the polar bear, draw the slightly sloping edges to represent the natural terrain where the polar bear lives.

Step 17: Apply the First Coat of Color
With a fine, sharp brush paint and a light shade of olive paint, evenly color the polar bear.

Step 18: Continue to Color Your Polar Bear Drawing
Use the same brush as previously and switch to brown paint, and evenly color each claw. Continue using black paint to fill the ear, eyes, nostrils, and mouth lines. Switch to gray paint to fill the nose, and continue by using brown paint for the inner mouth area.
Finish this step using a thin brush and white paint, and paint each eye.

Step 19: Shade Your Drawing
In this step, being to softy shade the edges of your polar bear using a soft brush and brown paint. Continue using a blending brush to spread and enhance the contouring and structure. Repeat once more using dark gray paint, and add subtle shading between the edges and the brown paint.

Step 20: Add the Fur Coat Texture
Begin using a fine, sharp brush and black paint, and add fine brushstrokes within the main body and along the outline edges of your polar bear drawing. Repeat using a combination of white and brown paint. Make sure that the first color coat is still visible.
Step 21: Highlight the Texture
Continue to add a furry coat to your polar bear using a thin brush and a combination of yellow and dark olive paint. Continue adding black fur lines along the muzzle area and surrounding the eyes and ears. Next, use a small, soft brush and black paint to add soft shading between the claws.
Complete the step using white paint to lighten and fade the fur coat. Switch to a blending brush to soften and spread the highlights throughout the body and face of the polar bear.

Step 22: Add a Furry Outline
Before you add a furry outline to your polar bear drawing, apply soft shading on the edges of each claw using a soft brush and black paint. Repeat using white paint to add a fine subtle highlight to each claw. Continue by extending the fur coat beyond the outline so you have a more natural look to the polar bear. To do this, use a fine, sharp brush and the corresponding colors to paint fine furry texture lines.
Complete this step by detailing the facial features. Select a thin brush and brown paint, and add subtle coloring within the ear, eyes, and nose area. Continue using white paint to add a shimmer to the eyes and subtle highlights to the nose area.

Step 23: Add a Ground Shadow
Begin by using a small, soft brush and turquoise paint to lightly add color to the icy terrain. Continue using black paint to lightly trace the terrain’s outline, and apply soft shading beneath the feet and main body of your polar bear. Finish off with a blending brush to spread and soften the shading.

Step 24: Finalize Your Polar Bear Sketch
For your last step before completing your drawing, select a fine, sharp brush and the corresponding colors, and trace any harsh visible outline to achieve a final seamless look!

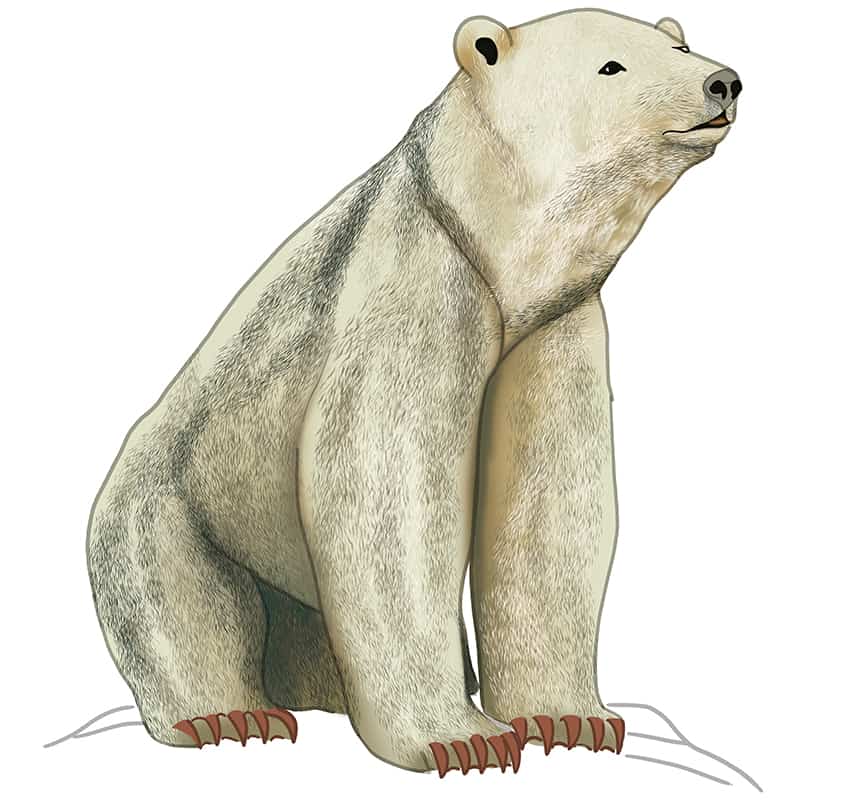
Congratulations on your cute and cuddly polar bear drawing! While polar bears are known for their fierce reputation, it’s also important to remember that they can be incredibly adorable as well. Your drawing likely captured the soft and fluffy nature of these creatures, with their round ears and small eyes giving them a playful and endearing appearance. However, it’s important to note that polar bears are still wild animals and should be treated with caution and respect. Your drawing is a wonderful representation of the more charming side of these powerful creatures, and a great reminder that there’s more to them than just their strength and ferocity. Keep practicing and exploring different styles – the possibilities are endless!
Frequently Asked Questions
How to Add a Background to My Polar Bear Drawing?
Adding a background or setting to your polar bear drawing can bring it to life and create a sense of place for the animal. One option is to draw the polar bear in its natural Arctic habitat, with ice, snow, and perhaps other animals such as seals or whales in the background. Another option is to create a more artistic or abstract background, perhaps with bright colors or patterns that contrast with the polar bear’s white fur. Consider using different drawing tools and techniques, such as watercolors or colored pencils, to create a more dynamic and visually appealing setting. Ultimately, the choice of background or setting will depend on your personal preferences and the style you are going for with your polar bear drawing.
How to Capture the Texture of the Polar Bear’s Fur in My Drawing?
Capturing the texture of the polar bear’s fur is key to creating a realistic and impressive drawing. One way to achieve this is to start with a basic outline of the polar bear and then add layers of shading and details to create depth and dimension. Pay close attention to the direction of the fur, as polar bears have thick fur that covers their entire body, so it’s important to capture the way it lays and the varying lengths of the hairs. You can use different shading techniques, such as cross-hatching or stippling, to create a sense of the different textures and layers in the fur. Don’t be afraid to experiment with different tools and techniques to create a realistic and striking polar bear drawing.

Matthew Matthysen is an educated multidisciplinary artist and illustrator. He successfully completed his art degree at the University of Witwatersrand in South Africa, majoring in art history and contemporary drawing. The focus of his thesis was to explore the philosophical implications of the macro and micro-universe on the human experience. Matthew uses diverse media, such as written and hands-on components, to explore various approaches that are on the border between philosophy and science.
Matthew organized various exhibitions before and during his years as a student and is still passionate about doing so today. He currently works as a freelance artist and writer in various fields. He also has a permanent position at a renowned online gallery (ArtGazette) where he produces various works on commission. As a freelance artist, he creates several series and successfully sells them to galleries and collectors. He loves to use his work and skills in various fields of interest.
Matthew has been creating drawing and painting tutorials since the relaunch in 2020. Through his involvement with artincontext.org, he has been able to deepen his knowledge of various painting mediums. For example, watercolor techniques, calligraphy and lately digital drawing, which is becoming more and more popular.
Learn more about Matthew Matthysen and the Art in Context Team.
Cite this Article
Matthew, Matthysen, “How to Draw a Polar Bear – Draw a Cute and Cuddly Polar Bear.” Art in Context. April 20, 2023. URL: https://artincontext.org/how-to-draw-a-polar-bear/
Matthysen, M. (2023, 20 April). How to Draw a Polar Bear – Draw a Cute and Cuddly Polar Bear. Art in Context. https://artincontext.org/how-to-draw-a-polar-bear/
Matthysen, Matthew. “How to Draw a Polar Bear – Draw a Cute and Cuddly Polar Bear.” Art in Context, April 20, 2023. https://artincontext.org/how-to-draw-a-polar-bear/.


