How to Draw a Coyote – Create a Cunning Coyote Drawing
Coyotes, also known as the song dogs of the wilderness, are fascinating creatures that have adapted remarkably well to urban environments. These highly intelligent and resourceful animals are skilled hunters, using their keen senses and exceptional agility to catch prey ranging from rodents to deer. But coyotes are more than just predators; they also play a vital role in maintaining ecosystem balance. With their distinctive howls and yips, these adaptable canids have captured the imaginations of humans for centuries, inspiring both admiration and fear. So the next time you hear a coyote’s haunting call, remember that you’re sharing your space with one of nature’s most resilient and captivating creatures. Get ready for today’s epic tutorial where we guide you through a step-by-step process to create a stunning coyote sketch!
How to Draw a Coyote in 16 Easy-to-Follow Steps
If you’re about to learn how to draw a coyote, get ready to capture the essence of this fascinating animal on paper. Start by studying reference images or videos of coyotes to get a sense of their unique physical characteristics, such as their lean frames, bushy tails, and distinctive facial features. Pay attention to the way coyotes move and behave, as this will help you bring your drawing to life. When sketching, use light, loose lines to establish the basic shapes and proportions of your coyote, then gradually refine your drawing by adding details and shading. Remember that coyotes are highly adaptable creatures, so you have some creative license to experiment with different poses and expressions. With patience and practice, you’ll be able to capture the wild spirit of the coyote and create a stunning piece of artwork!
Take a look at the below collage which demonstrates all the steps you will take to create an easy coyote drawing!
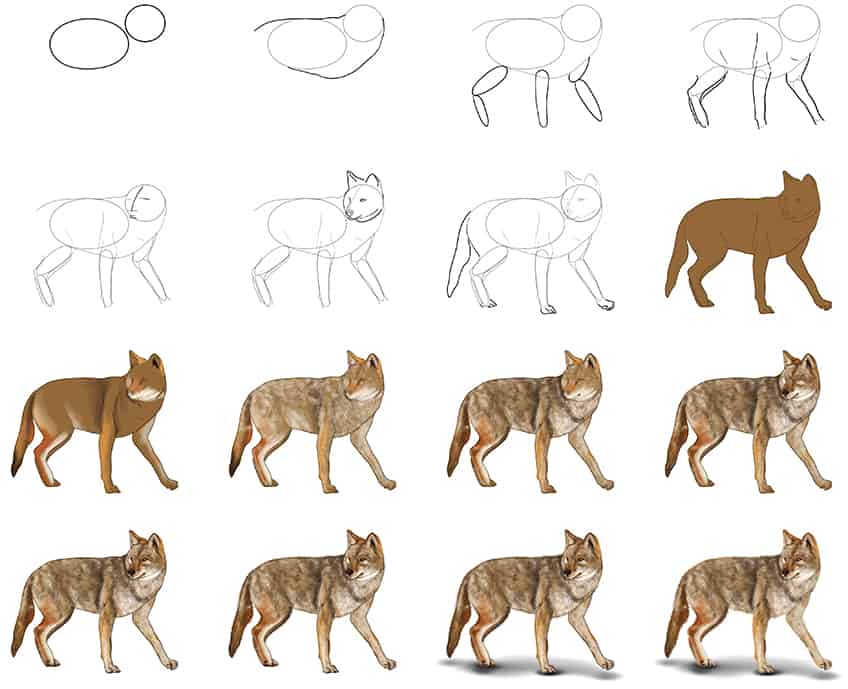
Step 1: Draw the Main Body of Your Coyote Drawing
To start your easy coyote drawing, draw the main body represented by a wide oval shape. On the right-hand side of the main body, draw a small oval shape to represent the head of the coyote.

Step 2: Outline the Body
Use the previously drawn construction lines to aid you in outlining a more realistic top and lower shape for your coyote sketch.

Step 3: Draw the Legs on Your Coyote Sketch
In this step, draw the rear leg as two connected oval shapes. Continue to draw the front leg represented by an elongated oval shape. Finally, draw the second front leg as two connected oval shapes.
Note! These oval shapes may overlap the main body outline if needed.

Step 4: Outline the Legs
Use the previously drawn construction lines to aid you in outlining each of the legs more realistically. Complete the step by adding fine structure lines within the main body.

Step 5: Add Facial Construction Lines
You are going to prepare the face for detail by adding construction lines. To do this, draw a gentle curving vertical line and four horizontal separation lines overlapping the vertical line. This will help you to draw the facial features symmetrically.

Step 6: Outline the Face of Your Coyote Sketch
In this step, you will outline a more realistic head and facial structure of the coyote, by using the previously drawn construction lines. Within the face, use the construction lines to draw the muzzle, eyes, mouth, and nostrils. Include an outline of the coyote’s ears.

Step 7: Draw the Tail
Complete the coyote’s body by drawing a fine curving line on the rear end to represent the lengthy tail. Finalize this step by drawing the paws on each foot. Once this is complete, you can now erase any construction or overlapping lines that are still visible.

Step 8: Apply the First Coat of Color
Select a regular brush and brown paint, and evenly coat the entirety of your coyote drawing.

Step 9: Color Blend Your Easy Coyote Drawing
Begin by using a small, soft brush and black paint, and add subtle shading spots along the body, tail, and ears. Continue using a brighter shade of brown to lightly add highlighted spots on the skin. Repeat this step with a combination of white, gray, and tan paint, and add a final color pallet to the coat.
Finish this step using a blending brush to soften, blend and spread the color coats.

Step 10: Add a Fur Coat
Add fine, individual brushstrokes along the body, tail, legs, and face using a fine, sharp brush and white paint. Use the curvature of the coyote outline to aid you in which direction the fur coat should be heading. Make sure that the previous color coats are still somewhat visible.
Step 11: Continue to Add to the Fur Coat
Use the same brush as previously and switch to a dark shade of brown paint, and add a second coat of fine, individual brushstrokes. Repeat on the white areas using white paint to add enhanced the highlighted areas.
Step 12: Complete the Fur Coat
In this step, fill the facial structure with fine fur lines using a thin brush and a combination of dark brown, gray, and tan paint. Complete the step using dark brown paint to fill the nostrils.
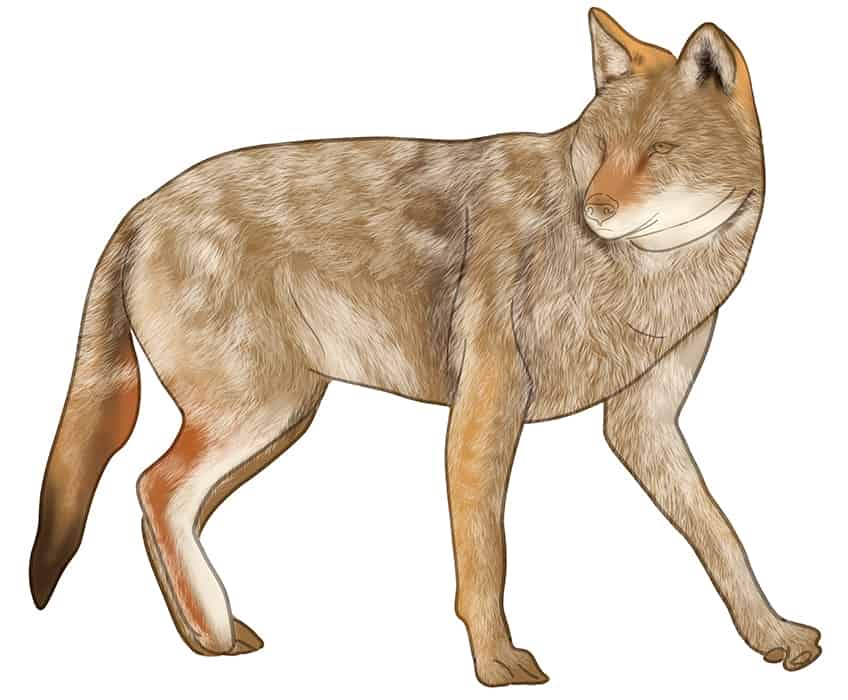
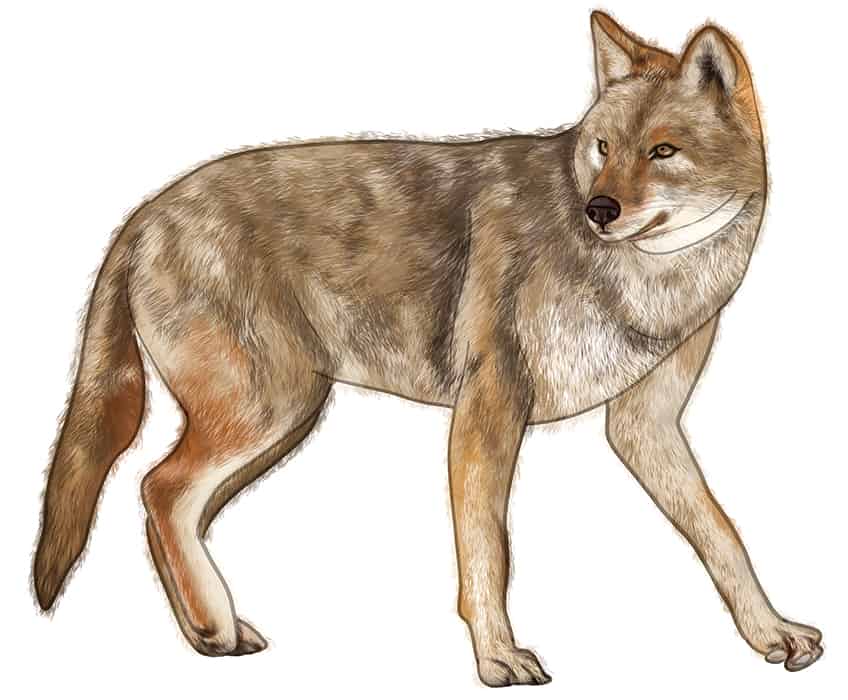
Step 13: Darken the Eyes on Your Coyote Sketch
With a thin brush and black paint, begin to outline the eyes and pupils. Switch to a blending brush and smooth out the color within each eye. Repeat on the nostrils using a thin brush and black paint to trace the outline. Continue using gray paint and add the whiskers to your coyote drawing.
With a small, soft brush and dark brown or black paint, add soft shading between the paws. Complete the step by enhancing the fur coat along the edges of the head and legs.
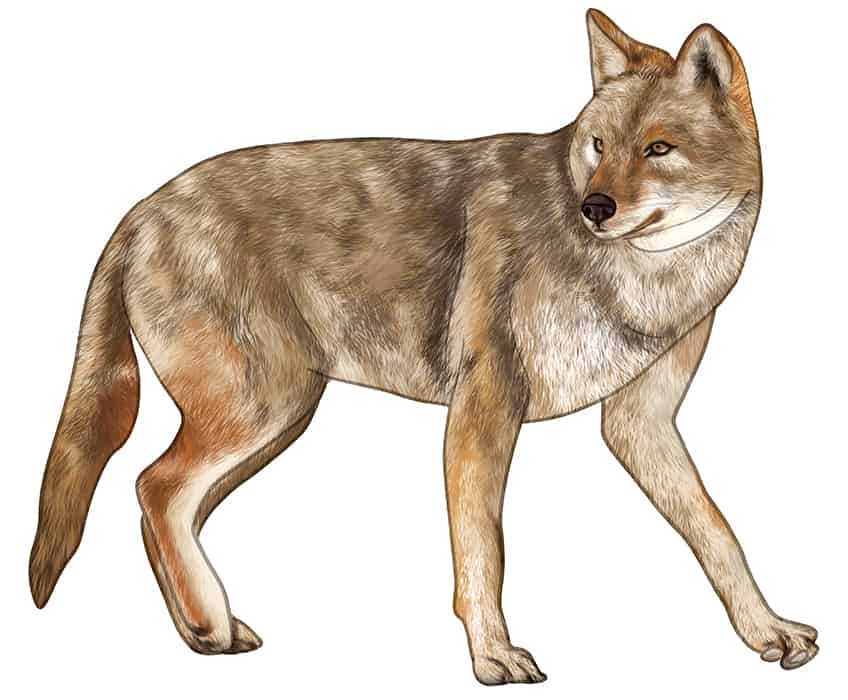
Step 14: Add the Outer Fur
In this step, select a fine, sharp brush and the corresponding colors to add a fur coat extending beyond the outline of the coyote. This will create a more realistic and less ‘cut out’ look to your coyote drawing.
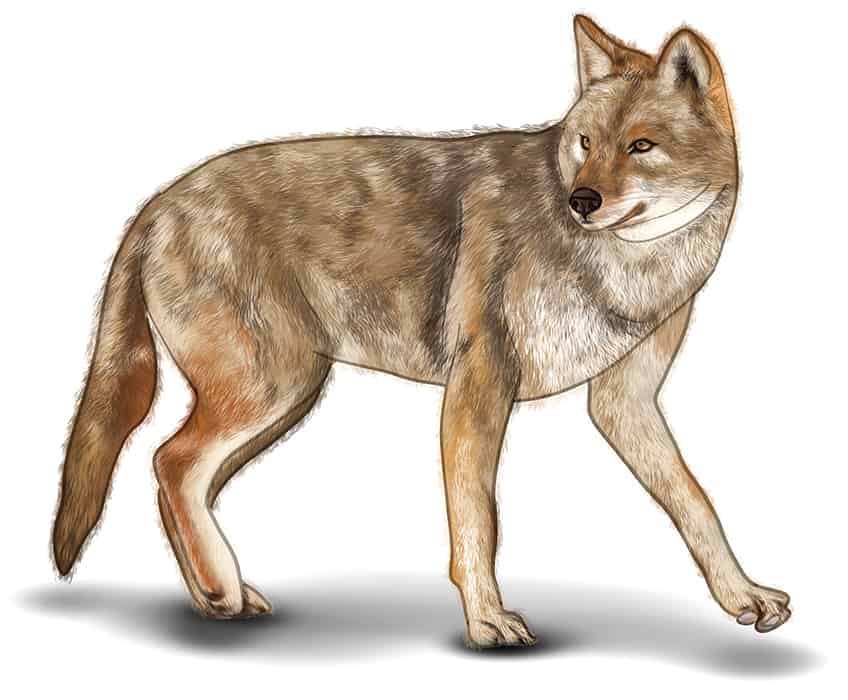
Step 15: Add a Ground Shadow
Begin to add several dark spots directly beneath each foot and tail, using a soft brush and black paint. Continue by using a blending brush to soften and spread the shading to create a realistic-looking casted shadow.
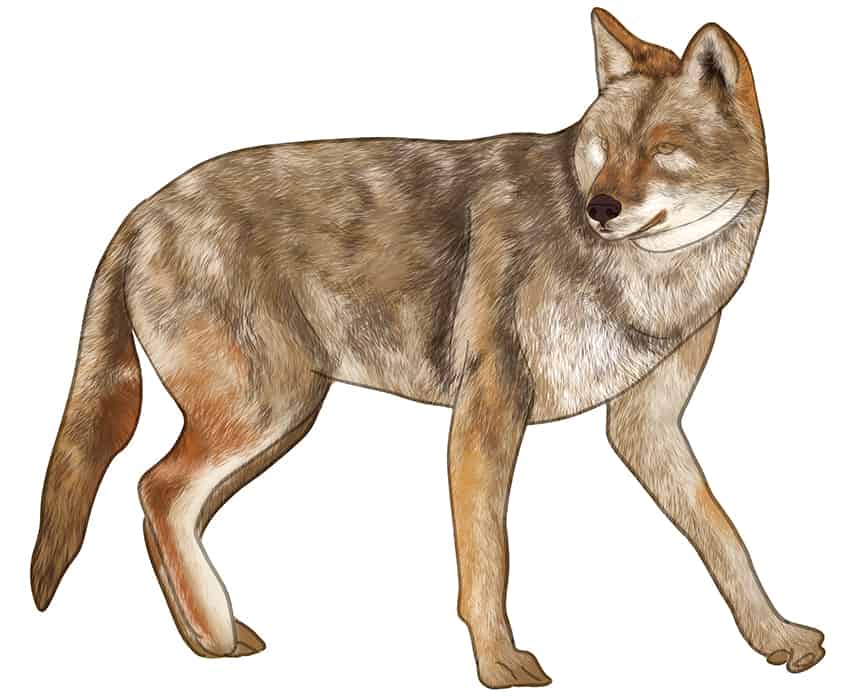
Step 16: Finalize Your Easy Coyote Drawing
You have reached the last step of today’s tutorial on how to draw a coyote! To finalize your drawing, begin to erase any harsh outlines that are still visible. For the inner texture lines, select a fine, sharp brush and the corresponding colors to trace these outlines. This will create a seamless look to your magnificent coyote sketch!
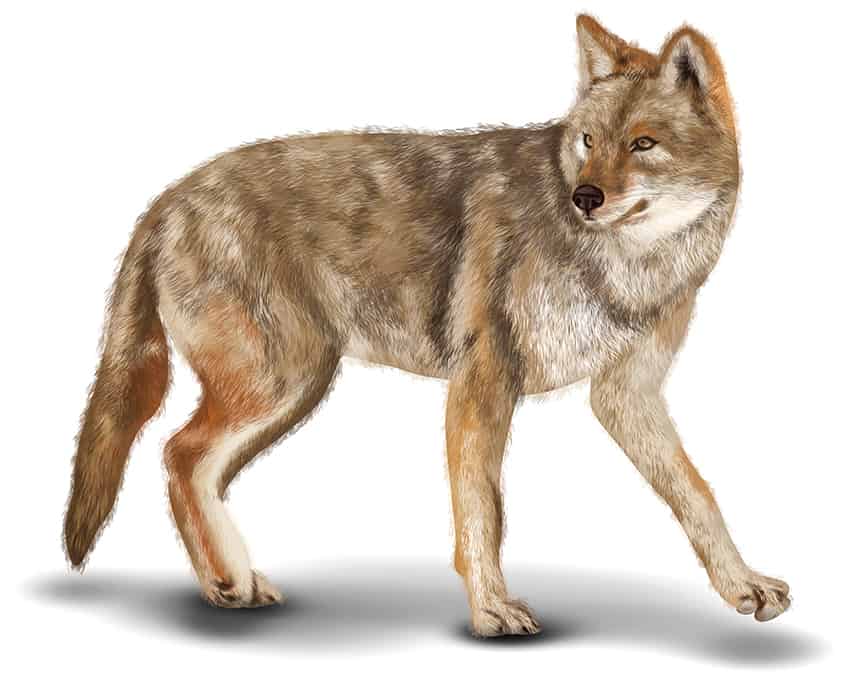
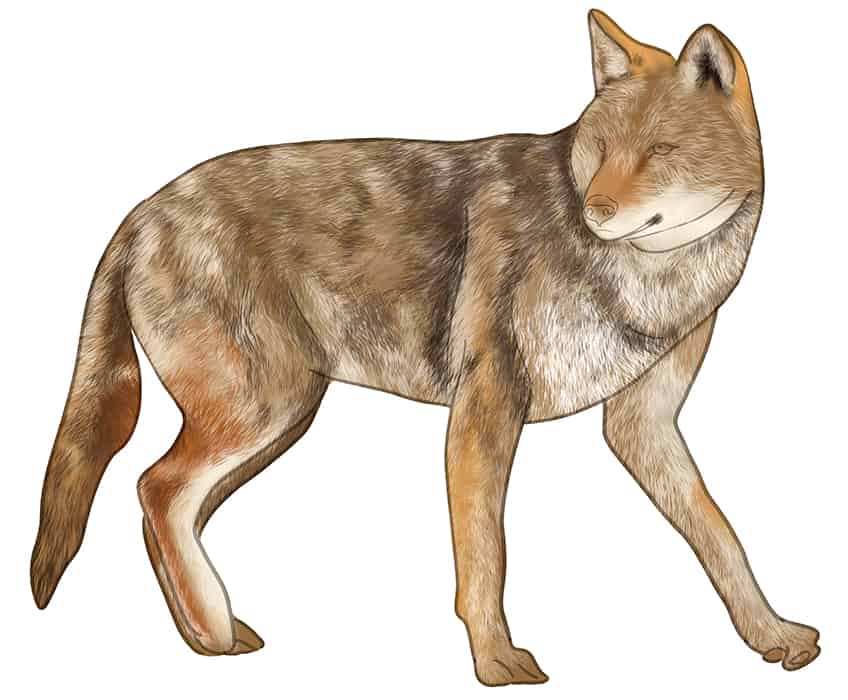
Congratulations on completing our step-by-step tutorial on drawing a coyote! You’ve managed to capture the essence of this wild and fascinating animal with your artwork. Take a moment to appreciate the details you’ve included, such as the coyote’s sharp ears, piercing eyes, and bushy tail. Consider the proportions and shapes you’ve used, and think about how they help to convey the coyote’s agility and grace. Now that you’ve completed your drawing, take some time to reflect on the process. What did you find challenging? What techniques did you use to overcome those challenges? Celebrate your successes, and use any obstacles as opportunities to learn and improve your skills. With practice and dedication, you’ll be able to create even more stunning artworks in the future!
Frequently Asked Questions
How to Draw a Coyote That Looks Realistic?
To draw a realistic coyote, begin by using simple shapes to create an outline of the coyote’s body. Look at reference images to study the unique features of coyotes such as their pointed ears, bushy tails, and lean frames. Focus on the eyes and expression to capture the personality of the animal. Use shading and texture to create depth in the fur, and pay attention to body posture and movement to depict the agility and grace of coyotes. Regular practice of these techniques will help you create a lifelike portrayal of this fascinating animal in your artwork!
How to Draw the Fur Texture on a Coyote Drawing?
Drawing the fur texture on a coyote drawing is essential to create a realistic depiction of this animal. Start by using a pencil or brush to sketch the fur in the direction it grows. Use short, light strokes to create a base layer of fur, and then gradually build up layers of darker and thicker strokes to create the texture and depth of the fur. Take note of the color and pattern of the fur, and use varying shades of brown, gray, and black to depict the different areas of the coat. Pay attention to the shadows and highlights created by the fur to add depth to your drawing. Keep experimenting with different techniques until you achieve your desired result.

Matthew Matthysen is an educated multidisciplinary artist and illustrator. He successfully completed his art degree at the University of Witwatersrand in South Africa, majoring in art history and contemporary drawing. The focus of his thesis was to explore the philosophical implications of the macro and micro-universe on the human experience. Matthew uses diverse media, such as written and hands-on components, to explore various approaches that are on the border between philosophy and science.
Matthew organized various exhibitions before and during his years as a student and is still passionate about doing so today. He currently works as a freelance artist and writer in various fields. He also has a permanent position at a renowned online gallery (ArtGazette) where he produces various works on commission. As a freelance artist, he creates several series and successfully sells them to galleries and collectors. He loves to use his work and skills in various fields of interest.
Matthew has been creating drawing and painting tutorials since the relaunch in 2020. Through his involvement with artincontext.org, he has been able to deepen his knowledge of various painting mediums. For example, watercolor techniques, calligraphy and lately digital drawing, which is becoming more and more popular.
Learn more about Matthew Matthysen and the Art in Context Team.
Cite this Article
Matthew, Matthysen, “How to Draw a Coyote – Create a Cunning Coyote Drawing.” Art in Context. April 13, 2023. URL: https://artincontext.org/how-to-draw-a-coyote/
Matthysen, M. (2023, 13 April). How to Draw a Coyote – Create a Cunning Coyote Drawing. Art in Context. https://artincontext.org/how-to-draw-a-coyote/
Matthysen, Matthew. “How to Draw a Coyote – Create a Cunning Coyote Drawing.” Art in Context, April 13, 2023. https://artincontext.org/how-to-draw-a-coyote/.