


How to Draw a Lynx – Create a Majestic and Stealthy Lynx Sketch
The lynx is a stealthy and elusive feline that roams the dense forests of North America, Europe, and Asia. With its characteristic tufted ears and piercing gaze, this solitary hunter is a true master of camouflage and a formidable predator. Despite its large size and impressive agility, the lynx is a mysterious and elusive creature that is seldom seen in the wild, adding to its allure and mystique. Whether you’re a wildlife enthusiast or simply appreciate the beauty of the natural world, encountering a lynx in its natural habitat is an unforgettable experience that is sure to leave a lasting impression.
How to Draw a Lynx Sketch Step-by-Step
Embark on a thrilling artistic journey with our captivating lynx drawing guide! Our comprehensive tutorial will guide you through each step of the process, from the initial sketch to the final masterpiece, with intricate details and vivid colors. Regardless of your skill level, our tutorial is tailored to cater to artists of all abilities, providing valuable tips and techniques that will elevate your drawing skills to the next level. So, grab your drawing kit and join us on this enchanting journey into the world of lynx art!
View the below lynx collage which demonstrates each step you will take to achieve your majestic and powerful lynx drawing!

Step 1: Draw the Main Body of Your Lynx Drawing
To begin our tutorial on how to draw a lynx, start by drawing the main body of your lynx represented by a large, titled oval shape.

Step 2: Add the Head
To the right of the main body, draw a slightly overlapping small circle to represent the head of your lynx drawing.

Step 3: Draw the Ears
Attached to the head, draw two sharp triangular ears.

Step 4: Include the Facial Features
Within the head of your lynx drawing, draw two small circles to represent the eyes of the lynx. Continue to draw a larger oval to represent the mouth and nostrils area.

Step 5: Detail the Mouth and Nostrils
Use the previously drawn oval shape to aid you in creating a more realistic outline for the mouth and nose area. Begin by drawing the detailed mouth top and bottom, including the tongue. Above this, draw a small oval shape to represent the nostrils.

Step 6: Draw the Neckline of Your Lynx Sketch
Draw the top neckline curving from the bottom of the ear to the rear body of the lynx.

Step 7: Add the Front Legs
Overlapping the main body, draw the main visible leg with a cup-like paw shape. Draw a second, slightly visible front leg.

Step 8: Draw the Rear Legs and Tail
Similar to the previous step, overlap the main body and draw the first rear leg including an upper thigh. Under the body, draw the second rear leg. Both legs should have a cup-like paw. Finish this step by drawing a tail at the rear end of the body. It should be short and flow downwards.

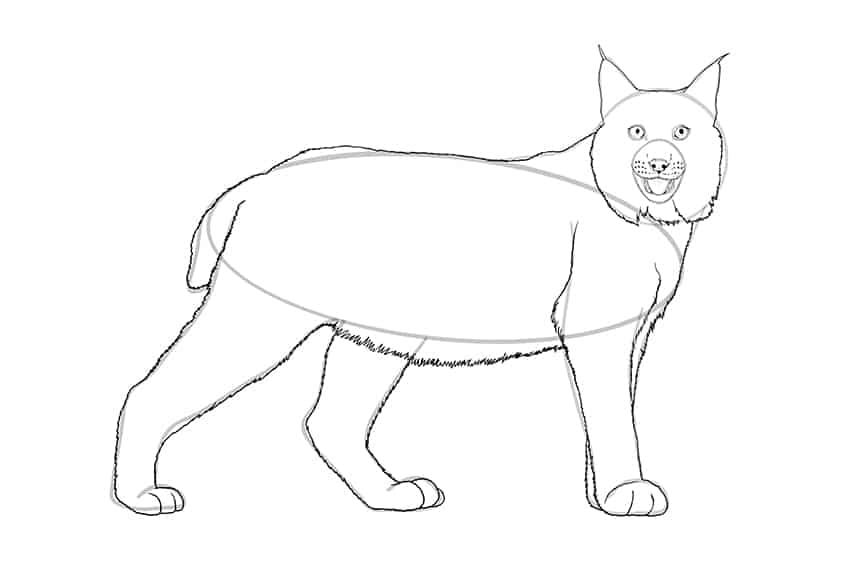
Step 9: Outline Your Lynx Sketch
Use the previously drawn construction lines to aid you in outlining a more realistic shape for your lynx drawing. Begin by outlining sharp edges on each tip of the ears. Follow this by outlining a furry coat surrounding the face, head, and body of your lynx.
Draw the final paw lines and fill in the facial details which include the eyes and nostrils.
Once you have completed this step you are ready to erase any still visible construction lines.
Step 10: Add Texture to Your Lynx Drawing
In this step, we are going to cover the entire lynx with fur. It may be a time-consuming process, however, the result will be worth it! Start on the ears, and draw long, flowing fur lines surrounded by shorter lines that form a wave-like shape. Move onto the forehead, and draw fine texture lines that flow onto the eyes and the face.
Note! The top half of the face should be fine texture lines flowing into longer and more visible texture lines.
Each fur line should be drawn individually. Continue adding texture to the rest of the body, legs, and paws. Use the curvature of the outline to aid you in the direction in which the fur lines should be directed towards.

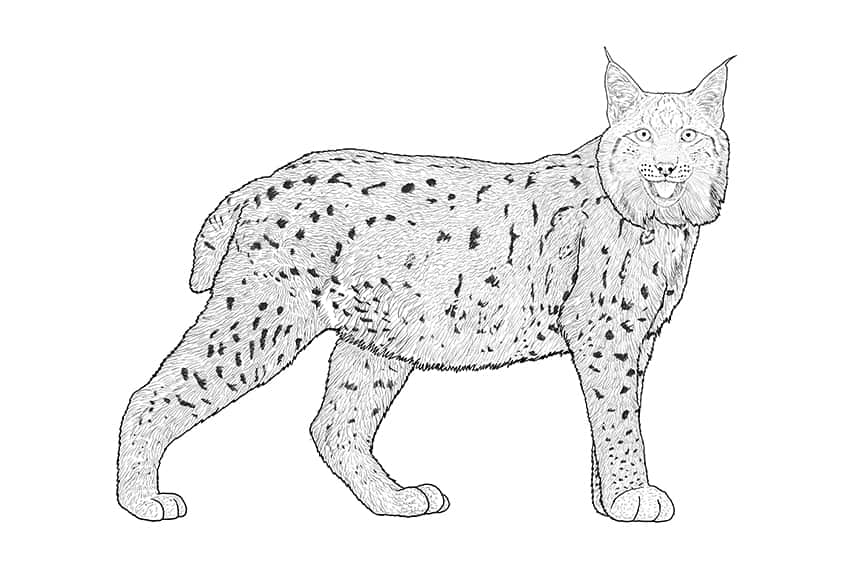
Step 11: Add the Pattern
Overlapping the furry texture, draw small lines and uneven shapes throughout the body of the lynx, creating a spotted pattern. To complete the step erase a small part of the top area of each eye.
Step 12: Add the First Coat of Color
Select a regular brush and a shade of bright pink, and color the tongue of the Lynx. Switch to a soft brush and brown paint, and paint the nostrils and eyes. Complete the eyes by using white paint, and apply a soft shimmer onto each eye.
Finish this step, with a normal brush and chestnut brown paint, and paint the entirety of the lynx.

Step 13: Contour Your Lynx Sketch
With a small, soft brush and a shade of brown paint, contour the main body, legs, and facial structure of your lynx drawing. Complete the step using black paint, and lightly apply shading to the eyes, nose, and inner mouth area.

Step 14: Add a Second Coat of Color
Use the same brush as previously and switch to white paint, and lightly paint along the edges of the body and legs. Continue onto the face, surrounding the eyes, and within each ear. Complete the step by using a clean brush to blend and fade the secondary coat into the first color coat.

Step 15: Shade Your Lynx Drawing
In this step, begin by using a small, fine brush and black paint, and lightly enhance the structure of the mouth and the general facial patterns. Repeat this step along the ears and structure of the face. Switch to a soft brush and black paint, and apply light shading along the contoured areas including the structure of the body, the edge of the tail, and paw split lines.

Step 16: Finalize Your Lynx Drawing
To accomplish this step, you will trace the entire outline, including the inner texture lines, of your lynx with the use of a fine, sharp brush and the corresponding color.

Step 17: Bonus Step
As a bonus, we’ve included a step to elevate your lynx drawing! To create a ground shadow effect, choose a soft brush and apply black paint directly underneath your lynx. Once you have the desired shape and intensity, switch to a blending brush to soften and refine the edges of the shadow.
This simple technique can add depth and dimension to your hedgehog drawing, making it truly stand out.

Congratulations on completing your stunning lynx drawing! Your attention to detail and skillful use of shading and highlights have truly brought this magnificent creature to life on the page. From the piercing gaze of its eyes to the intricate patterns of its fur, every aspect of your drawing showcases your talent and dedication as an artist. The lynx is a symbol of strength, stealth, and beauty, and you have done it justice with your exceptional artwork.
Frequently Asked Questions
How to Draw a Lynx Realistically?
To make your lynx drawing look more realistic, start by studying photographs or real-life examples of lynxes to get a better understanding of their anatomy, proportions, and fur patterns. Pay attention to details like the shape of the ears, the position of the eyes, and the patterns on the fur. Use shading and highlights to create depth and dimension in your drawing. Additionally, consider adding a background or environment to your drawing to give it context and further enhance its realism.
What Are Some Tips for Adding Texture to the Fur of My Lynx Sketch?
To add texture to the fur of your lynx drawing, you can use a variety of techniques. For example, you can use small, quick strokes with your drawing tool to create the appearance of individual hairs. Varying the pressure and direction of your strokes can also help to create depth and dimension in the fur. Additionally, using a blending tool or your fingers to smudge and blend the lines can help to create a more realistic texture.

Matthew Matthysen is an educated multidisciplinary artist and illustrator. He successfully completed his art degree at the University of Witwatersrand in South Africa, majoring in art history and contemporary drawing. The focus of his thesis was to explore the philosophical implications of the macro and micro-universe on the human experience. Matthew uses diverse media, such as written and hands-on components, to explore various approaches that are on the border between philosophy and science.
Matthew organized various exhibitions before and during his years as a student and is still passionate about doing so today. He currently works as a freelance artist and writer in various fields. He also has a permanent position at a renowned online gallery (ArtGazette) where he produces various works on commission. As a freelance artist, he creates several series and successfully sells them to galleries and collectors. He loves to use his work and skills in various fields of interest.
Matthew has been creating drawing and painting tutorials since the relaunch in 2020. Through his involvement with artincontext.org, he has been able to deepen his knowledge of various painting mediums. For example, watercolor techniques, calligraphy and lately digital drawing, which is becoming more and more popular.
Learn more about Matthew Matthysen and the Art in Context Team.
Cite this Article
Matthew, Matthysen, “How to Draw a Lynx – Create a Majestic and Stealthy Lynx Sketch.” Art in Context. March 20, 2023. URL: https://artincontext.org/how-to-draw-a-lynx/
Matthysen, M. (2023, 20 March). How to Draw a Lynx – Create a Majestic and Stealthy Lynx Sketch. Art in Context. https://artincontext.org/how-to-draw-a-lynx/
Matthysen, Matthew. “How to Draw a Lynx – Create a Majestic and Stealthy Lynx Sketch.” Art in Context, March 20, 2023. https://artincontext.org/how-to-draw-a-lynx/.


