How to Draw Scales – A Realistic Snakeskin Drawing Guide
A snakeskin drawing is such an excellent shading exercise because it teaches you to be considerate of finer details. A snake scales drawing also provides a unique opportunity to grasp the process of wrapping a pattern around a three-dimensional structure such as a cylindrical shape similar to that of a snake. This tutorial explores the fundamentals and how they can easily be applied to a cylindrical three-dimensional structure. Learning how to draw snake scales will enhance your attention to detail and will test your patience as an artist.
An Easy Guide on How to Draw Snake Skin
Learning how to draw snake skin can seem complicated, but once you understand the fundamental building blocks, you will find that it is quite an easy drawing process. The real challenge has less to do with drawing and more to do with patience, as it can be quite a repetitive process. We will find that the snake scales pattern is in fact quite simple to create in a drawing, however, we will want to remain patient throughout the process. This is a small price to pay when seeking to make beautiful art and, in the case of a snakeskin drawing, the more patient you are, the more beautiful the outcome.
A Step-by-Step Guide to Drawing Snake Skin
In this tutorial on how to draw scales, we will first look at some basics of the pattern style, shading, and how to utilize this pattern along a three-dimensional surface. From there, we will apply the fundamental concepts we have learned and incorporate them into a simple sketch of a cylindrical shape that resembles the body of a snake. This will allow us to practice both the pattern style, shading, and wrapping quality of the pattern with the intention of creating a realistic snakeskin drawing.
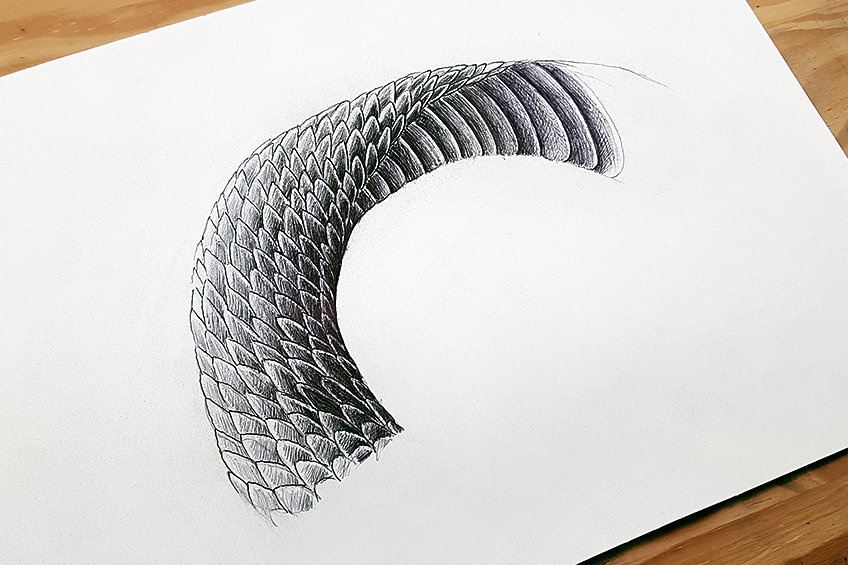
Now that we know what to expect, let us go through this tutorial on how to draw scales.
The Fundamental Concepts of a Snake Scales Pattern
To make the process of drawing a snake scales pattern, let us break down the fundamental building blocks to help us better understand the structure of scales. There are a few simple concepts that we can build on to help assist us in the drawing process later on.
Pattern
The first important aspect of learning how to draw a snake scales pattern is to understand how the grid is used to assist the drawing process. The pattern grid is basically an equally spaced diagonal set of lines. However, instead of simple straight lines, we want to add subtle curvature to the lines to emphasize organic flow that is symbiotic with mobile creatures.
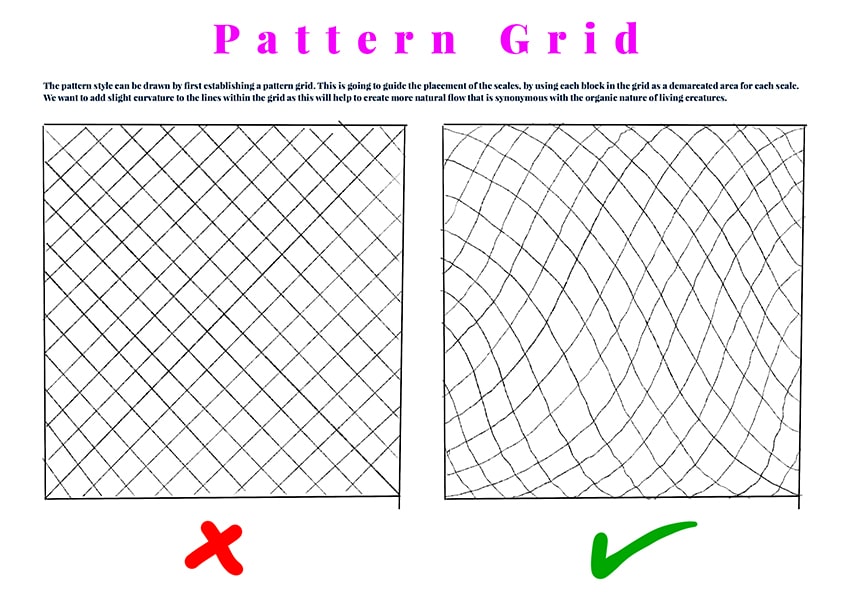
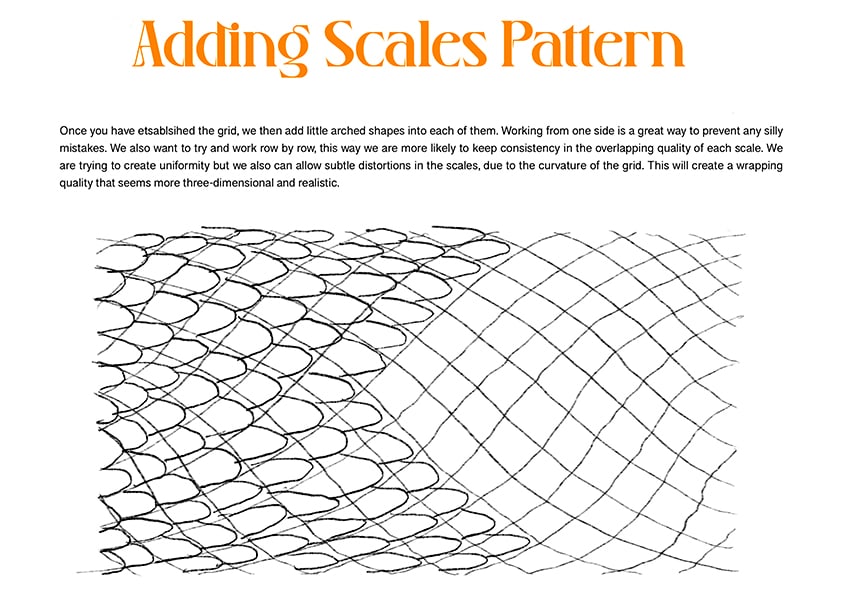
Once the grid is established, the scale pattern then becomes much easier to draw. We basically use the grid as a set of demarcated little spaces to draw little spearhead scale shapes within. When you draw these little spearhead scales, you will find that you want to draw them from corner to corner of each little demarcated block within the grid.
Wrapping
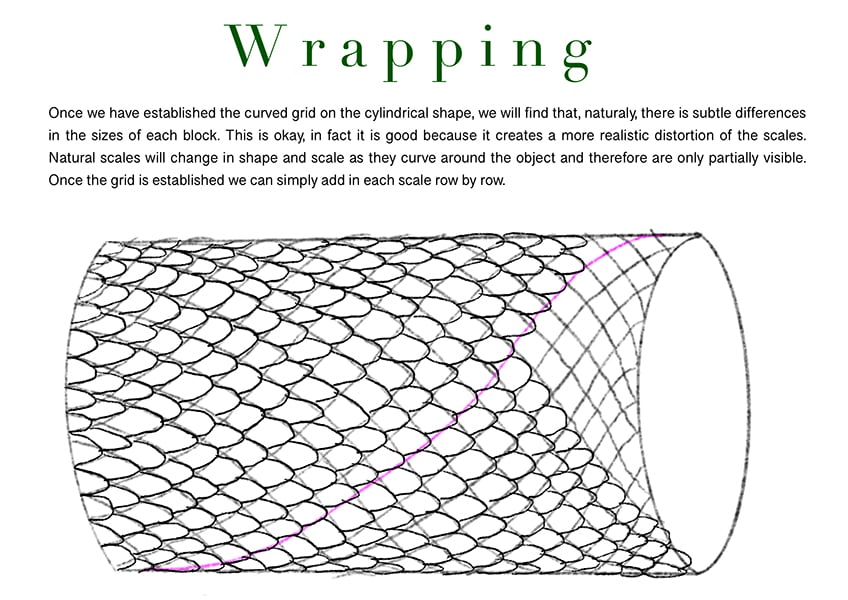
Once we have a grid and understand how to incorporate scales into the grid, we want to apply this to a three-dimensional structure. We want to think of it as wrapping the grid around the three-dimensional structure as if we were clothing it. The subtle curved-line grid will also work well with three-dimensional structures, as it suggests curvature already.
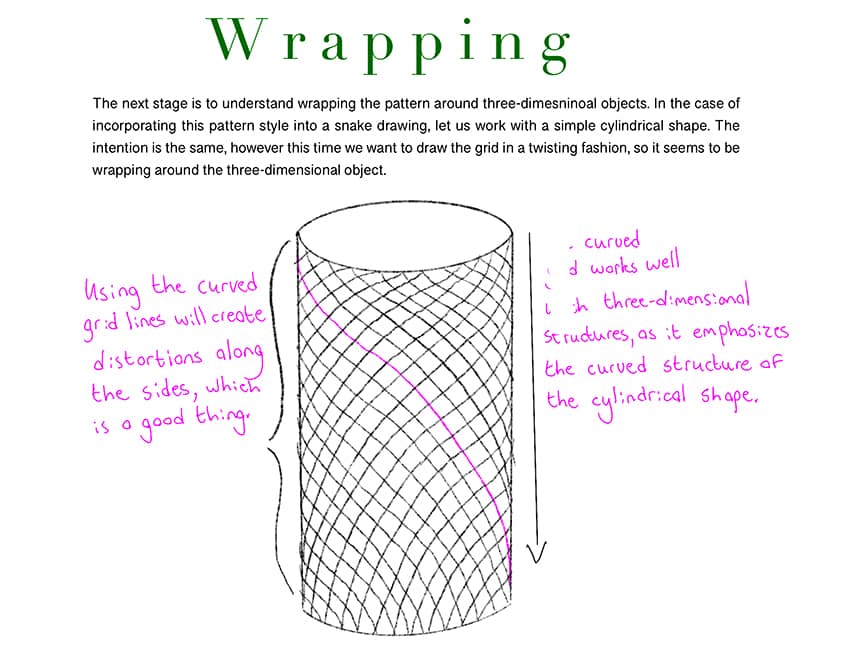
As you add curved lines that wrap around the three-dimensional structure, you will find that the blocks distort and will have subtle differences in size. This is especially true as the blocks get narrower near the edges of the three-dimensional structure. This is a good thing, as it suggests more movement and organic shifting within the scales, which is synonymous with natural movement in animals.
Shading
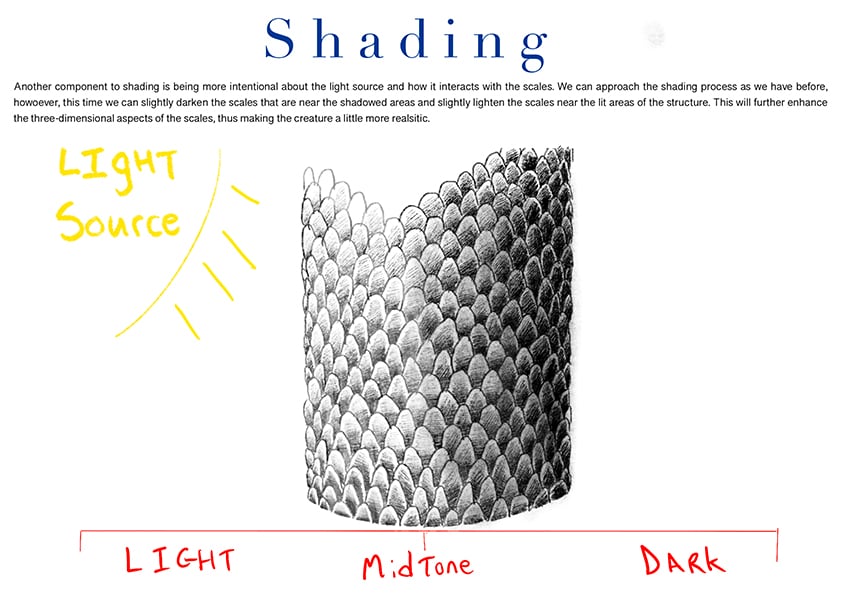
The last and most important concept applied to a snake scales drawing is shading. We shade in the scales by creating little gradients within each little scale. We want to work from bottom to top of each scale, one at a time, making sure that we create a dark-to-light gradient. We also want to leave a little negative space around the edge of each scale to distinguish them and emphasize their three-dimensional texture.

To further emphasize the three-dimensional nature of the scales, we can also create a larger gradient through the entire structure. We can do this in two ways: for one, we can shade individual scales slightly darker in shadowed areas, and secondly, we can shade over the entire structure, making the shaded side slightly darker.
Applying These Concepts to a Drawing
Now that we have a working knowledge of the different concepts and how to progress through the drawing process, let us see how we can utilize these concepts within a simple cylindrical snake structure. We will create a simple cylindrical structure synonymous with a snake.
We will attempt to create a twisting body so that we can see how scales form around a moving structure.
Step 1: Sketching the Shape and Pattern Grid
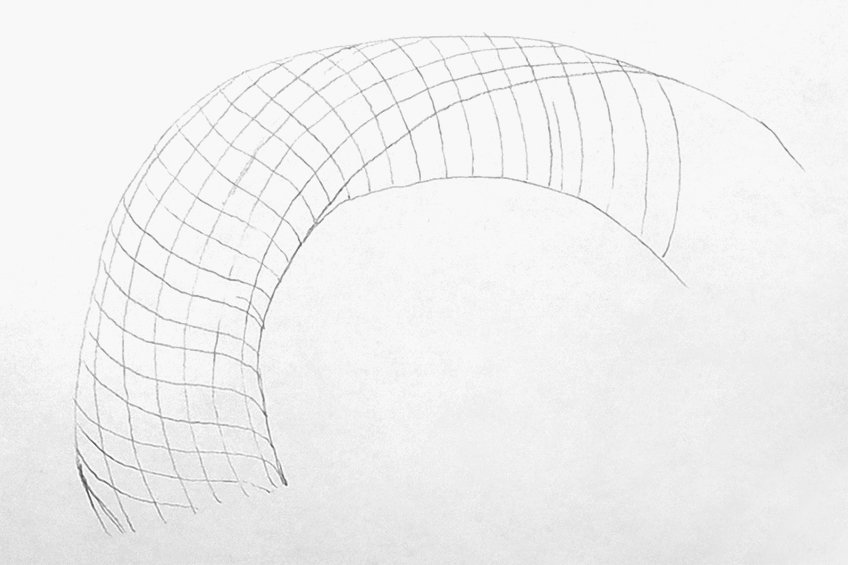
Let us start by drawing a curved cylindrical shape, almost like an arched structure. This will provide us with a unique form of the cylindrical shape as if the snake is twisting. From there, we want to start drawing curved lines that twist around the body.
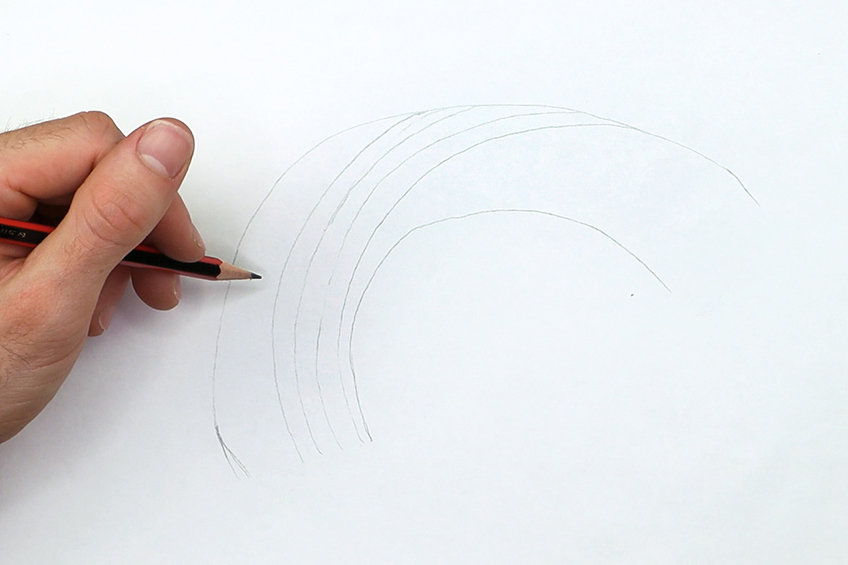
Remember, when we add lines that crisscross, we can add slight curvature to them. We also want to think about how the snake’s body is capable of twisting. Adding a grid to a twisting structure is a good way to learn about the distortions within the different scales.

When you start on one side and move your way through, you will find that the lines will naturally curve just by drawing parallel lines alongside each other. We can continue this process of drawing a twisting grid that flows along the cylindrical structure until the grid twists around the structure and is out of sight. We can also draw simple lines to establish an underbelly feature as well, just to emphasize the twisting of the body.
Step 2: Drawing the Scales in the Grid
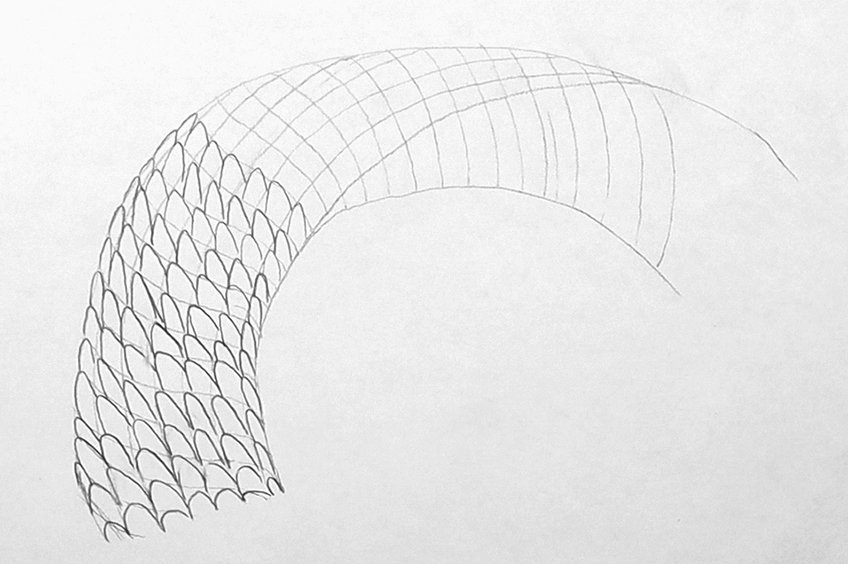
As the fundamental concepts describe the application process of scales, we can now add our scales to our twisting structure. The grid makes the adding of scales much easier. Remember, we want to work from corner to corner within each block. Naturally, because the structure is twisting, the scales will have slight differences in size.
This distortion is okay and, in many ways, adds to the moving and mobile nature of a twisting snake body.
We want to do this process row by row as if we were stacking bricks. By doing it row by row, we insert the next set of scales into the structure more accurately. This creates a more seamless stacking quality within the snake pattern drawing. As you start to draw the scales along the twisting grid, you will find that the scales start to get narrower due to the narrowing of the grid. This is a great way to learn how to represent organic objects like snakes, which have shifting textures as they move.
Step 3: Shading the Scales
Let’s start by establishing a lighter layer of shading with our pencils, where we work little gradients within each scale one at a time.
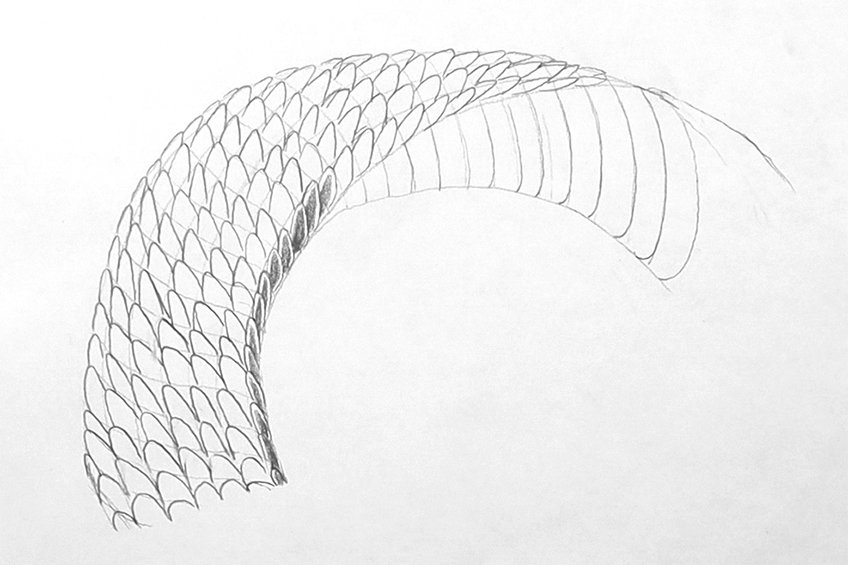
As we shade in each scale, we want to make sure that we are leaving that little negative edging around each scale. This will help to establish a distinction between the scales, and it also functions as a highlight that emphasizes the three-dimensional nature of the scales. We can also add shading to the underbelly, giving it more shape and form. We can do a similar thing where we add a gradient in each segment of the underbelly to emphasize its three-dimensional nature.
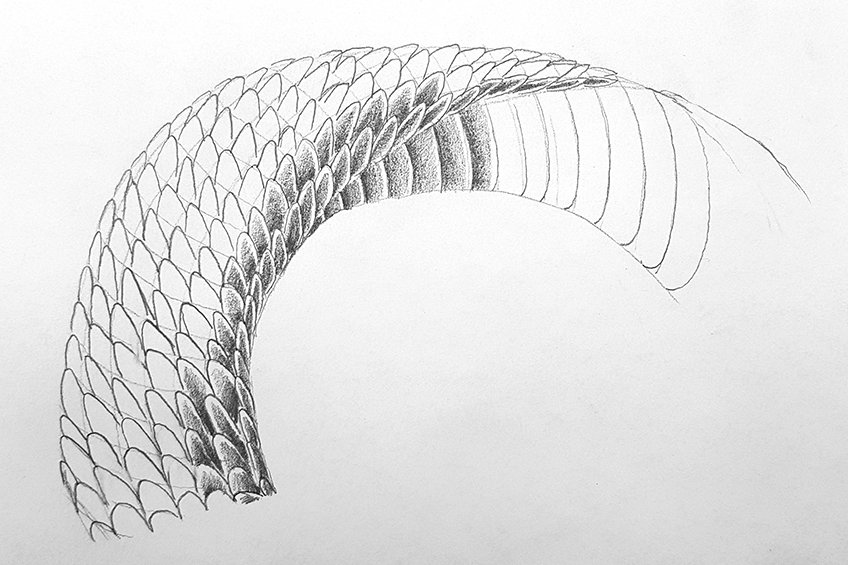
As we add in some light pencil shading, we want to be conscious of which side we will want the light source to be present. This will help to guide our darker shading process a little more smoothly.
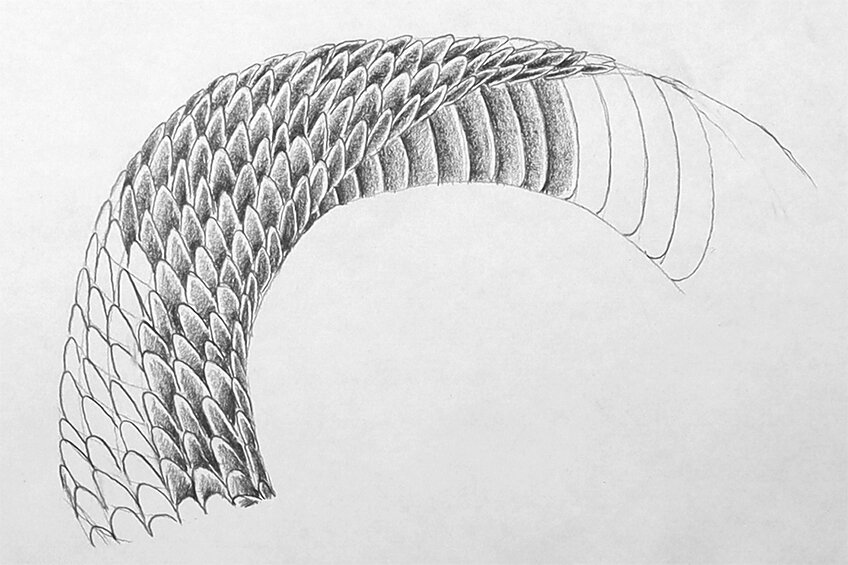
Step 4: Shading the Scales With Pen for Contrast
Assuming that the light source is on the left, let us start adding in some darker shading along the right side of the snake skin drawing. We always want to work from the darkest side toward the lightest side.
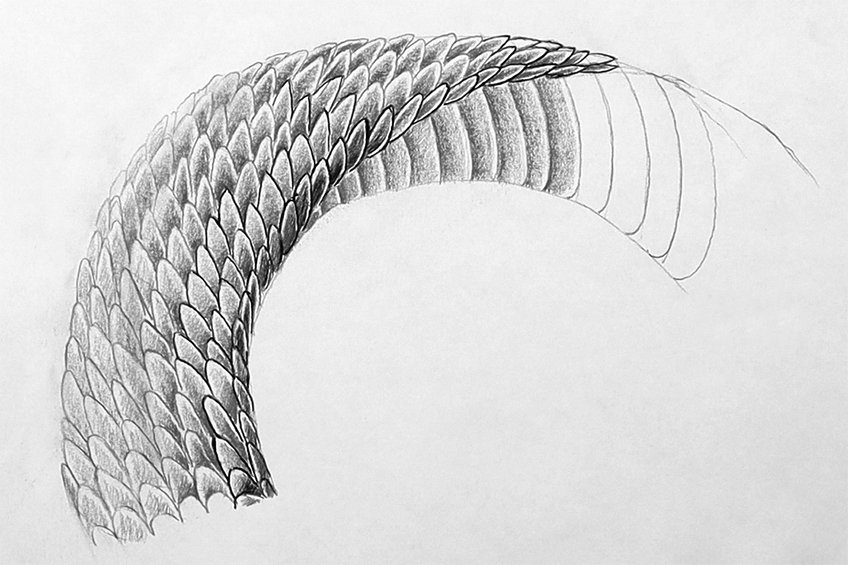
There are two ways to establish a gradient within the snake skin drawing We can darken scales on the shaded side or we can shade over the entire structure. It’s always good to the first start by darkening individual scales at first.
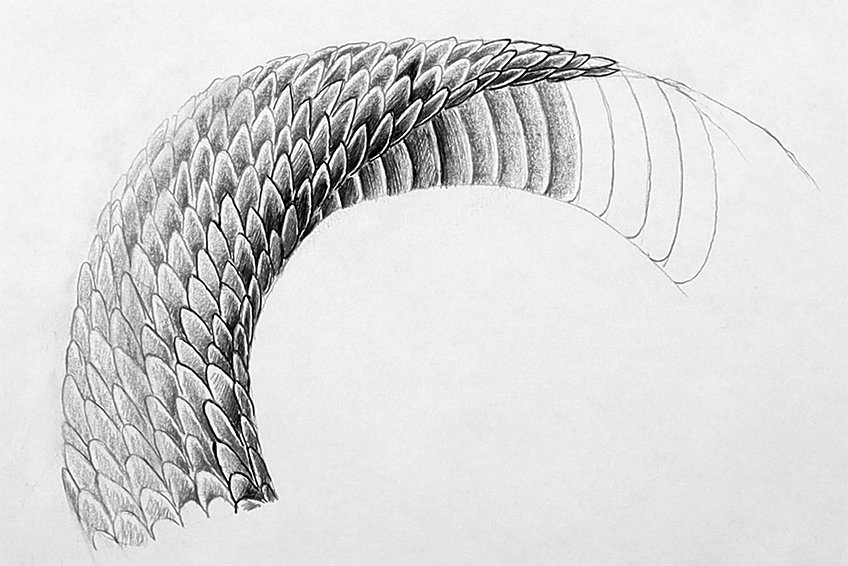
By working on individual scales, we can be a little more cautious about how the gradient will flow from darker to lighter areas within the snake scales drawing. Again, we can use the scales as rows that can slightly lighten as they get nearer to the light source.
The process does take longer but it is completely worth it when you take your time and pay attention to each scale.
By taking your time, you will have a high-quality result once you have completed the shading process. We will find that we can also come back to the shaded scales to darken them a little more if need be. This process is all about layering and patiently allowing the gradient in the structure to unfold.

Remember, we also want to be conscious of the curved nature of the structure, which means there will be subtle shifts between the dark and light areas. This is why we want to take our time going through each scale one at a time.
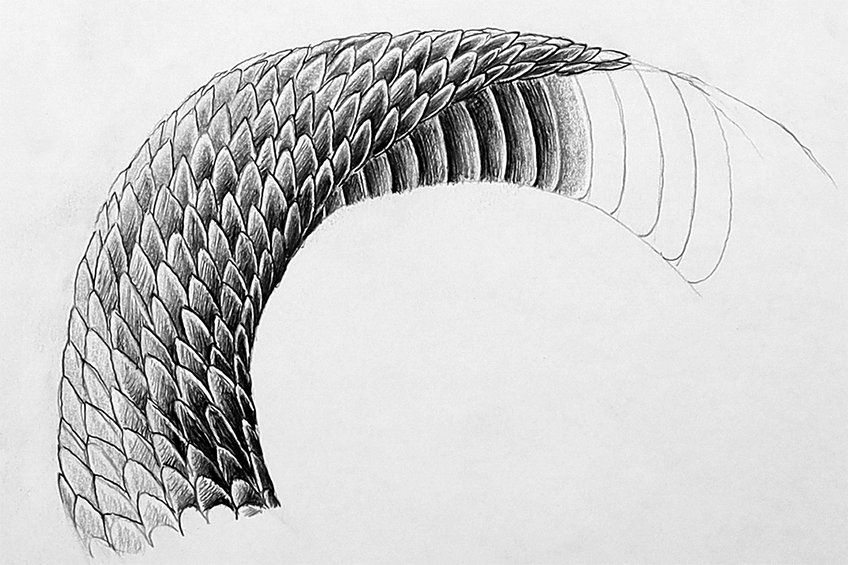
As you layer over your darker shading, each time starting from the darkest side of the structure, you will find that the gradient becomes more seamless.
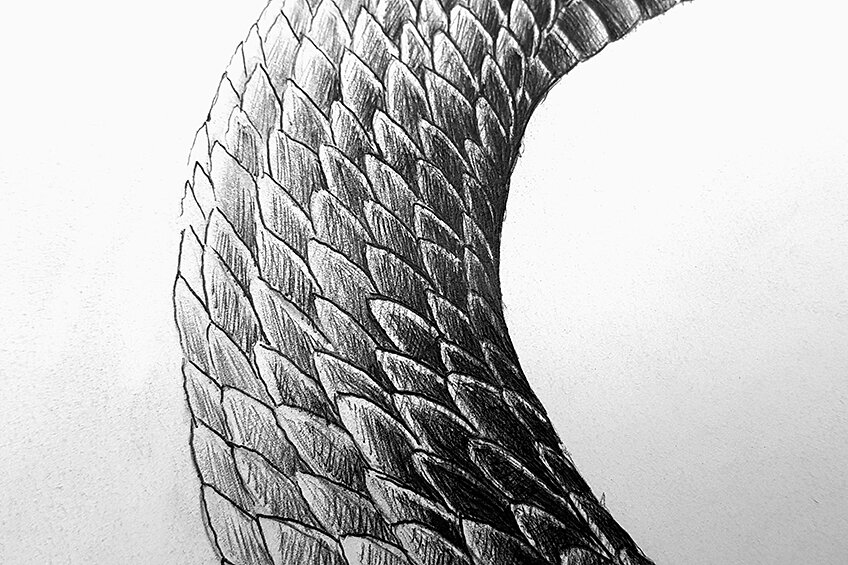
You just need to be patient with this shading process When you feel tired, also try to take breaks. It’s good to come back to the drawing with a refreshed perspective.
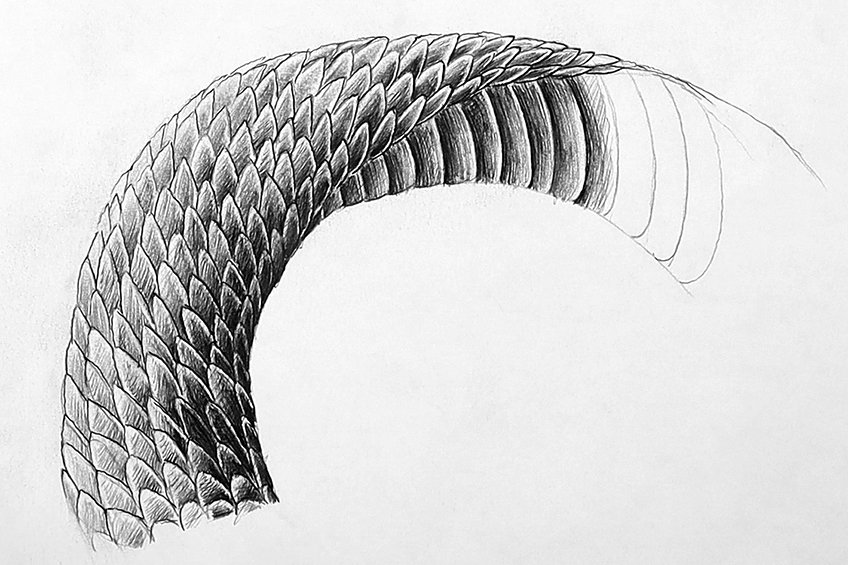
A snakeskin drawing takes time, but the more attention you give it, the more realistic the drawing will be. As long as you are intentional about which side the light source is, you can be more aware of which areas of the structure need to be darker.

Other than a little patience, that is how you draw a snake scales pattern. You can also do one last complete shading over the entire structure once you have added shading to the individual scales. This is the last addition to slightly darken the entirely-shadowed areas.
And there you have it, how to draw scales in a few simple steps.
Tips and Tricks to Remember
- Consider your light source. For a more realistic snake skin drawing, being aware of which side of the structure is more lit will help to establish a more interesting gradient in your shading.
- Work with curved grid lines. Remember, snakes move and twist, so curved lines work well to emphasize this organic movement in snakes.
- Work row by row. Think of drawing the scales and shading them as stacking bricks row by row. This way, you are less likely to make silly mistakes.
- Be patient. Most importantly, learning how to draw scales takes time, so try to be patient and take breaks if need be.
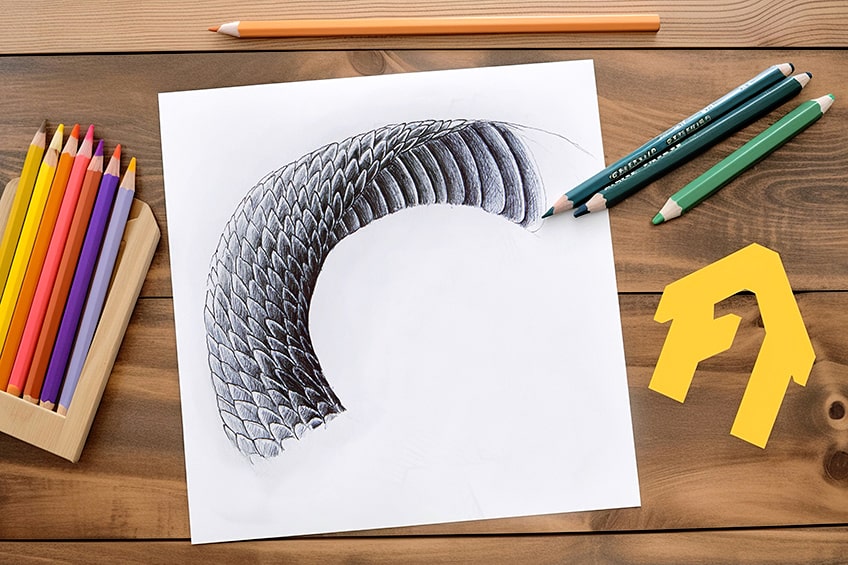
A snake scales pattern drawing is a great skill to have in your drawing toolkit, as it can be utilized in so many different ways. The snake pattern drawing process is also adaptable, which means you can use the same process but change the shapes of the scale for various different aesthetics.
Frequently Asked Questions
What Can You Use Scales For?
Snakeskin drawing provides you with a very unique set of skills because snake scales drawings can be adapted and applied to different creatures. Scales are synonymous with fantastical creatures and often can connote a creepy and scary nature within a creature. Scales can be used for fictional creatures such as dragons or they can be used as the surface of more natural and identifiable creatures such as fish. Other than a snake skin drawing, scales are a very specific texture that can be changed and tweaked in various ways and can be used as an aesthetic quality for various different creatures.
How Do You Shade in a Snake Scales Pattern?
When you establish the grid for each scale to be drawn within, you then can start to slowly work in each little spearhead shape. From there, you always want to shade from the bottom to the top of each little spearhead shape, making sure you leave some negative space around the edges. Leaving some space around the edges of each little spearhead shape will create a distinction between each scale. You also want to make sure that you are shading in scales a little darker if they are on a side that would be less visible to a light source. It will take time, but it will be worth it in the end!
Matthew Matthysen is an educated multidisciplinary artist and illustrator. He successfully completed his art degree at the University of Witwatersrand in South Africa, majoring in art history and contemporary drawing. The focus of his thesis was to explore the philosophical implications of the macro and micro-universe on the human experience. Matthew uses diverse media, such as written and hands-on components, to explore various approaches that are on the border between philosophy and science.
Matthew organized various exhibitions before and during his years as a student and is still passionate about doing so today. He currently works as a freelance artist and writer in various fields. He also has a permanent position at a renowned online gallery (ArtGazette) where he produces various works on commission. As a freelance artist, he creates several series and successfully sells them to galleries and collectors. He loves to use his work and skills in various fields of interest.
Matthew has been creating drawing and painting tutorials since the relaunch in 2020. Through his involvement with artincontext.org, he has been able to deepen his knowledge of various painting mediums. For example, watercolor techniques, calligraphy and lately digital drawing, which is becoming more and more popular.
Learn more about Matthew Matthysen and the Art in Context Team.
Cite this Article
Matthew, Matthysen, “How to Draw Scales – A Realistic Snakeskin Drawing Guide.” Art in Context. February 22, 2024. URL: https://artincontext.org/how-to-draw-scales/
Matthysen, M. (2024, 22 February). How to Draw Scales – A Realistic Snakeskin Drawing Guide. Art in Context. https://artincontext.org/how-to-draw-scales/
Matthysen, Matthew. “How to Draw Scales – A Realistic Snakeskin Drawing Guide.” Art in Context, February 22, 2024. https://artincontext.org/how-to-draw-scales/.


