


How to Draw a Puppy – Draw a Puppy That Is Playful and Cute
Puppies – they’re cute, they’re fluffy, and they’re downright irresistible! From their big, droopy eyes to their wiggly tails, these pint-sized pooches have a way of melting even the coldest of hearts. Whether you’re a lifelong dog lover or simply appreciate the joy that a playful puppy can bring, there’s no denying that these furry little bundles of energy are one of the most beloved creatures on the planet. So, if you’re looking for a pick-me-up, just spend a few minutes with a cuddly puppy and watch your worries melt away! Prepare yourself for a fun tutorial today, as you discover the step-by-step process of drawing a puppy. With your drawing kit in hand, let’s begin our simple puppy drawing adventure!
Draw a Puppy With Your Easy Step-by-Step Tutorial
Congratulations on your decision to learn how to draw a puppy! This is a great opportunity to let your creativity soar and create a lovable, furry companion on paper. Whether you’re a beginner or an experienced artist, drawing a puppy can be a fun and rewarding experience. To get started, you’ll need some basic drawing supplies like paper, pencils, and erasers. Take the time to study the proportions, features, and overall shape of a puppy. Don’t be afraid to make mistakes as practice makes perfect, and every stroke of the pencil brings you closer to your finished masterpiece. As you draw your puppy, try to capture its playful and energetic spirit, and don’t forget to add in some cute details like floppy ears and a wagging tail.
So get ready to unleash your inner artist and start creating your very own adorable puppy portrait! Check out the below collage, which demonstrates each step you will take to create a simple puppy drawing.

Step 1: Draw the Head of Your Puppy Drawing
Begin your simple puppy drawing, and draw an oval to represent the head of the puppy.

Step 2: Draw the Main Body
Overlapping the head, draw a second oval shape to represent the main body of the puppy.

Step 3: Add the Ears to Your Easy Puppy Drawing
On each side of the head, draw a smaller, overlapping oval shape to represent each of the ears.

Step 4: Draw the Legs
Begin this step, by drawing the rear thigh represented by an oval shape within the rear end of the main body. Repeat by drawing a smaller oval shape that will represent the paw. Continue by drawing the two front legs and paws, and a small half-moon circle between the two front legs to represent the rear partially visible paw.

Step 5: Add the Facial Guidelines
Draw a vertical, curving line in the center of the puppy’s face. Follow this by drawing three, horizontal crossing guidelines.

Step 6: Draw the Eyes and Nose
Use the previously drawn guidelines to aid you in positioning the two eyes. Do this by drawing one small circle, and one larger circle on the horizontal guideline.
Finish this step by drawing a wide, oval-shaped nose on the crossing mark of the guidelines.

Step 7: Outline the Head of Your Simple Puppy Drawing
In this step, continue using the previously drawn construction lines to aid you in outlining the puppy’s head.

Step 8: Continue to Outline Your Puppy Drawing
Continue to outline each of the ears, curving onto the head, of your puppy drawing.

Step 9: Outline the Main Body
Begin this step by, outlining the main body of your puppy drawing to create a more realistic look.

Step 10: Continue to Outline the Legs
Use the previously drawn construction lines to aid you in outlining each of the puppy’s legs.

Step 11: Outline the Paws
Continue to outline each of the paws and draw the separation lines on them. At the rear of the main body, draw the puppy’s tail.

Step 12: Detail the Facial Features
In this step, begin to outline the eyes, nose, and mouth lines on your simple puppy drawing. Continue to draw a second, small circle within each eye, and round the edges of the nose. Draw two additional curving lines, one above each eye, to represent the eyebrows.
Erase any remaining construction or guidelines to complete the step.
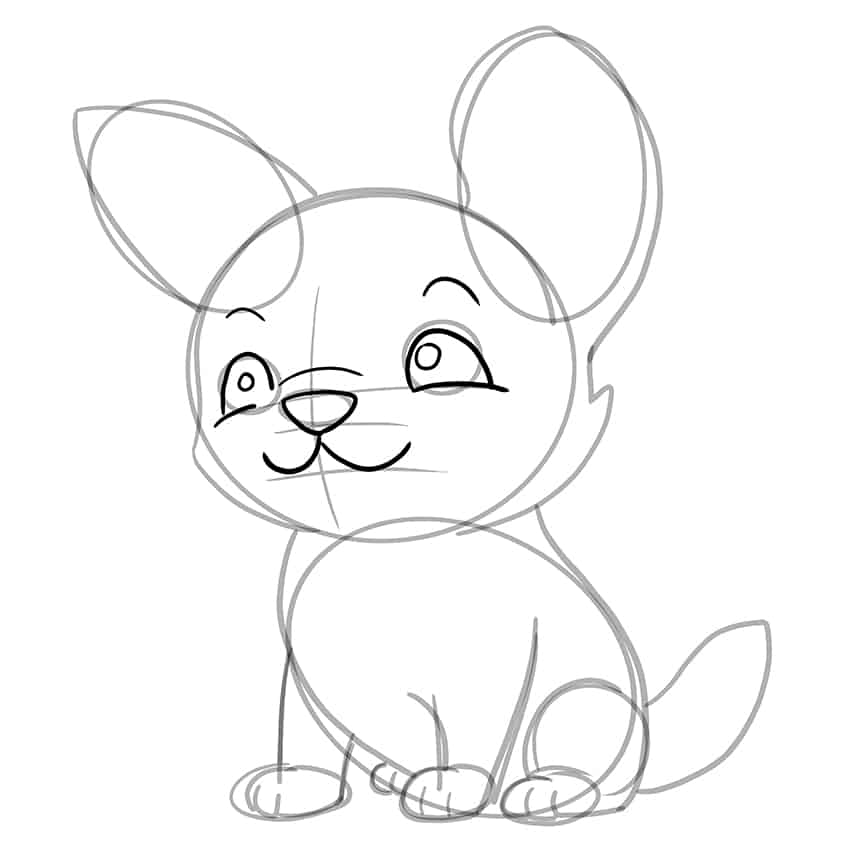
Step 13: Draw the Patterns on Your Puppy Drawing
Begin by drawing the inner earlobe on your simple puppy drawing. Follow this by drawing curving pattern lines throughout the face, side body, and the edge of the tail.

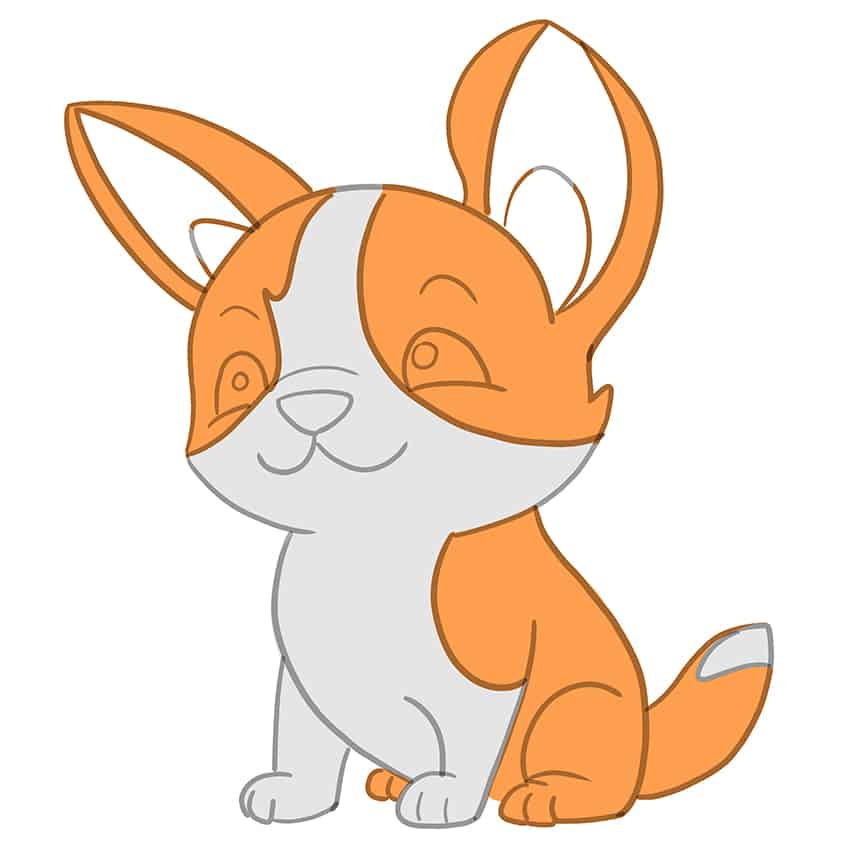
Step 14: Apply the First Coat of Color
With a fine, sharp brush and light orange paint, evenly coat the patterned areas. This includes the partially visible rear paw.

Step 15: Continue to Color Your Easy Puppy Drawing
Continue to use the same brush as previously and switch to gray paint, and evenly coat the remaining areas of the puppy.
Step 16: Color the Facial Features
In this step, begin to fill the mouth, nose, eyebrows, and eyes using a thin brush and black paint. Make sure you leave a small circle within each eye blank.

Step 17: Add Color to the Ears
Begin by using a fine, sharp brush and a darker shade of brown paint, and evenly coat each of the outer ear areas. Repeat using pink paint for the inner earlobes.

Step 18: Shade the First Color Coat
In this step, being to add fine, shading beneath the head, and between the tights and tail, using a thin brush and black paint. Switch to a small, soft brush, and softly add shading between the ears and facial features. Repeat using a blending brush to soften and spread the shading.
Note! Apply this shading only on the first coat of color completed in step 14.

Step 19: Continue to Shade and Highlight Your Drawing
Begin to add a highlighted area along the face, main body, and paws using a soft brush and white paint. Repeat using a blending brush to soften and spread the highlighted coat. Switch to a thin brush and a darker shade of gray paint, and add shading along the bottom facial structure, the belly, the tip of the tail, and between the paws.

Step 20: Shade and Highlight the Ears
Begin using a small, soft brush and a darker shade of brown paint, and add soft shading along the edges of the ear lobe. Repeat the step using a fine brush to emphasize the shading lines.
Use a small, soft brush and white paint, and add a soft highlight to your puppy drawing. Complete this by using a blending brush to soften and spread the coats.
Continue using black paint and a soft brush, and add soft shading within the pink inner earlobe area. Repeat once more using white paint for the highlights. Complete the step using a blending brush to soften and spread the coats.

Step 21: Add a Ground Shadow
With a small, soft brush and a shade of brown or gray paint, apply a soft ground shadow beneath the puppy. Use a blending brush to spread and soften the shading.

Step 22: Finalize Your Easy Puppy Drawing
In this step, remove any harsh outlines that are still visible. Where not possible, simply make use of a fine, sharp brush and the corresponding colors to trace those harsh outlines.

Well done on learning how to draw a puppy! Your newfound skills will undoubtedly bring a lot of joy to yourself and others. Now that you’ve got the basics down, it’s time to start experimenting with different breeds and styles. Try drawing a variety of puppies, from big, clumsy Great Danes to tiny, feisty Chihuahuas. Pay attention to the unique characteristics of each breed, such as their facial features, coat texture, and body shape. You can also experiment with different art styles, such as realism or cartooning, to create your own unique puppy art. Don’t forget to keep practicing and refining your skills, as every drawing you make will help you improve. Keep on drawing those puppies, and enjoy the wonderful world of art and creativity!
Frequently Asked Questions
How to Make My Puppy Drawing Look More Realistic?
Learning how to draw a puppy that looks realistic, it’s important to pay attention to the details. Start by studying the anatomy and proportions of a real puppy, paying close attention to the shape of its head, body, and limbs. Observe the texture and patterns of their fur, and try to replicate it as accurately as possible in your drawing. Pay attention to lighting and shading, and try to create depth and dimension by using light and dark values. Finally, add in small details like wrinkles around the eyes and mouth, and subtle changes in expression to bring your puppy drawing to life.
How to Capture the Personality and Energy of a Puppy in My Drawing?
Capturing the personality and energy of a puppy in your drawing requires a deep understanding of their behavior and movements. Watch real puppies play and interact, and take note of their body language and expressions. Try to convey their playful and curious nature through the pose and expression you choose for your drawing. Use dynamic lines and gestures to show movement and energy, and add in small details like a wagging tail or perked-up ears to add to the overall effect. Finally, don’t be afraid to inject a little bit of your style and creativity into the drawing to make it stand out.

Matthew Matthysen is an educated multidisciplinary artist and illustrator. He successfully completed his art degree at the University of Witwatersrand in South Africa, majoring in art history and contemporary drawing. The focus of his thesis was to explore the philosophical implications of the macro and micro-universe on the human experience. Matthew uses diverse media, such as written and hands-on components, to explore various approaches that are on the border between philosophy and science.
Matthew organized various exhibitions before and during his years as a student and is still passionate about doing so today. He currently works as a freelance artist and writer in various fields. He also has a permanent position at a renowned online gallery (ArtGazette) where he produces various works on commission. As a freelance artist, he creates several series and successfully sells them to galleries and collectors. He loves to use his work and skills in various fields of interest.
Matthew has been creating drawing and painting tutorials since the relaunch in 2020. Through his involvement with artincontext.org, he has been able to deepen his knowledge of various painting mediums. For example, watercolor techniques, calligraphy and lately digital drawing, which is becoming more and more popular.
Learn more about Matthew Matthysen and the Art in Context Team.
Cite this Article
Matthew, Matthysen, “How to Draw a Puppy – Draw a Puppy That Is Playful and Cute.” Art in Context. May 2, 2023. URL: https://artincontext.org/how-to-draw-a-puppy/
Matthysen, M. (2023, 2 May). How to Draw a Puppy – Draw a Puppy That Is Playful and Cute. Art in Context. https://artincontext.org/how-to-draw-a-puppy/
Matthysen, Matthew. “How to Draw a Puppy – Draw a Puppy That Is Playful and Cute.” Art in Context, May 2, 2023. https://artincontext.org/how-to-draw-a-puppy/.


Really charming and easy-to-follow tutorial — drawing a puppy can be tricky, but this guide makes it feel approachable and fun. I like how you break the process down into simple shapes first and then gradually add details, which helps a lot with proportions and overall structure. The step-by-step progression is clear and beginner-friendly. Adding a few tips on different fur textures or expressions could make it even better, but overall it’s a great and enjoyable guide to follow.