How to Draw a Budgie – The Best Step-by-Step Parakeet Drawing Tutorial
Budgies or parakeets are popular pets throughout the world. These brightly colored and intelligent birds are firm favorites among bird fanatics and they make wonderful subjects for artists. When learning how to draw a parakeet, you will be able to practice several important artistic skills, including perfecting proportions, adding delicate details and different textures, and using bright colors in a playful and exciting way. If you want to learn how to draw a budgie and practice these skills, collect your supplies, put on something comfortable, and follow along with our step-by-step parakeet drawing tutorial.
A Brief Introduction to the World of the Budgie
The humble budgie is a fascinating and highly intelligent bird. A species of parakeet, budgies can memorize sequences of sounds and can often repeat them. Most pet budgies will learn to speak a few words from their owners, and they are some of the most vocal birds. In comparison to humans who can register only 16 images a second, budgies have incredible vision and can register more than 150 images. Not only this, but budgies brains are able to count up to three and they can learn and compute basic sums. Budgies can sport a wide range of different colorings, with the most popular being yellow and green.
The Step-by-Step Budgie Drawing Tutorial
We have created this easy-to-follow tutorial for artists of all levels. While we have designed the tutorial on a drawing tablet, the tutorial is designed for any and all materials. If your chosen medium is watercolor, acrylic, or colored pencils, you can still follow the instructions with ease.
We begin the tutorial by laying down some construction lines to help us with the later steps. Regardless of your chosen medium, we suggest using a light HB pencil for these construction lines. The lighter the pencil the better, because you will need to erase them when we are finished using them..
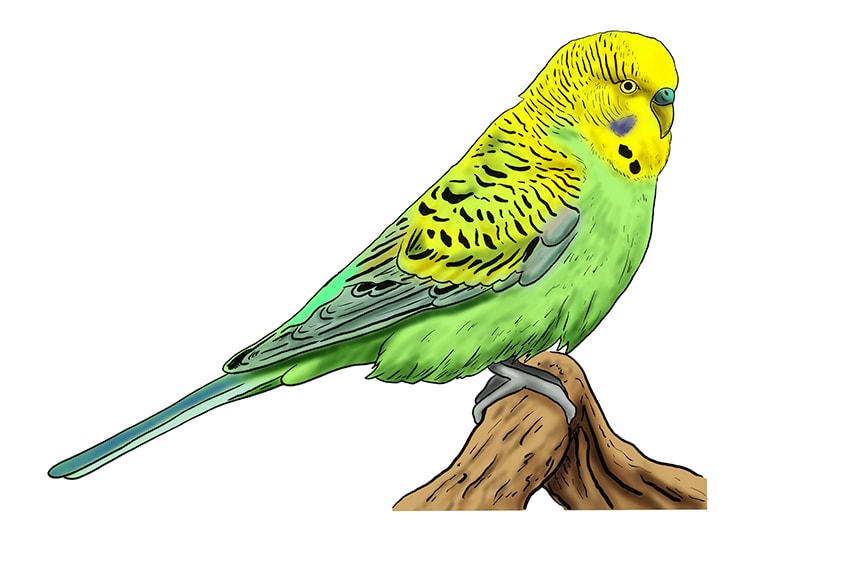
Step 1: Constructing the Budgie’s Body
In this first step, we are constructing the biggest part of the budgie’s body. Budgies have quite long bodies, and the best construction shape to represent this is a fairly elongated oval. We are drawing the budgie with its head to the right of our canvas, and if you would like to draw yours the other way, then you simply need to reverse all of the steps. The oval should be tilted with the top to the right.
The most important part of this first step is to ensure that your oval is in the center of your canvas. You also need to leave plenty of space all around the oval for the other parts of the budgie.
Step 2: Constructing the Budgie’s Wing
The next part of the budgie’s body we are going to plan out is the wing. Budgies have quite large and long wings that extend to their tails. We are also using an oval to represent the wing, but this oval needs to be longer and thinner than the one we used for the main body. Begin the top of the oval above the main body oval, and take it down to beyond the bottom end of the main body. You want the wing oval to overlap with the main body quite a lot.

Step 3: Constructing the Budgie’s Head
For the third step, you should use a slightly long circle to represent the budgie’s head. The perfect shape for the head is that of a slightly rounded egg. Draw this egg shape leaning in the same direction as the wing and main body ovals. You also want to make sure that the bottom of the head shape overlaps only slightly with the main body. The bottom of the head shape should overlap more with the top of the wing oval.

Step 4: Constructing the Budgie’s Feet
Budgies have quite intricate feet that many artists can find a little intimidating. As with all of the other parts of the budgie, you can use construction lines to make your life easier. Having the foundational lines to use as a basis when it comes to adding details can make you feel much more confident.
The construction lines for the budgie’s feet need to be drawn freehand, so you may have to erase and re-draw them a few times until you are happy with them. While erasing and re-doing your work may seem defeating, it is actually one of the best ways to practice your freehand skills.
Beginning just below the halfway line in the main body, draw two lines that curve down from the main body line towards the front of the canvas. The end of the bottom line should curve slightly backward. You also need to draw a small curved line in the other direction, beginning at the top of the bottom line. A little further down this bottom line, draw another, slightly longer curved line that also goes towards the back of the budgie.
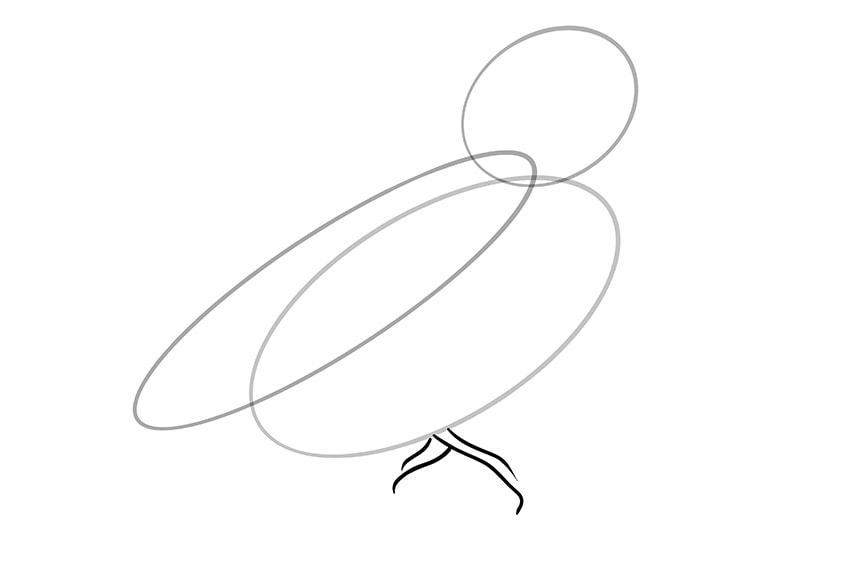
Step 5: Drawing the Branch
We have now constructed the budgie’s feet. The next step is to give the budgie something to stand on. In this tutorial, we are going to draw a branch for the budgie to perch on. Because we drew the feet in the last step, we can use them to help us design the branch. If you look at our example below, you will see that just above the top foot line we started a construction line for the branch that curves down. Under the back bottom claw, take another line down towards the back of the budgie. Take another line parallel with this last from the bottom of the front claw.
Of course, you do not have to draw your branch in the same way that we have. You have all of the artistic liberty to design your own perch for your budgie.

Step 6: Outlining the Budgie with Fine Lines
Now that we have drawn all of the construction lines, we can start to use them to draw the final outline of our budgies. When you have finished this step, you may be surprised at the transformation. From a collection of shapes to a fully-fledged budgie with a beak, eyes, wing feathers, and nostrils!
The best place to begin is with the budgie’s head. You can follow the top of the head construction line quite closely, but as it dips down towards the back, you can take the line straight down to meet the wing oval. Once you touch the wing construction oval, take the line down so that it dips into the oval, and crosses back out at the very end of it. Just beyond the end of the wing oval, you can curve the line around and bring it back up, following the underside of the wing oval.

Under the bottom of the wing outline, you can draw the tail with two long curved shapes. You can use some curved shapes to add fluff and texture around the base of the tail, and halfway up the wing. These curved shapes will help give the impression of feathers. Around the bottom of the main body construction line, you can use several long strokes that meet in points and curves. Just after you pass the feet construction lines, you can begin to use a smooth line to follow the construction line creating the budgie’s chest. Join this line with the head, with a slight bulge around the neck.
To draw the feet, use the construction line as your center line and trace around this line in even width on either side. You can add gentle curves to these lines to make them look more leathery and realistic.
On the front of the budgie’s head, draw a small upside-down teardrop shape for the beak. You can add a little bulge to the top of the beak, and add a little nostril. Just behind the beak, you can draw the budgie’s eye. Once you are happy with your outline, you can erase all the visible construction lines.
Step 7: Adding Details to Your Budgie
At this stage of the tutorial, we have the outline and it is time to add the details. Using a combination of small dots and short lines, create a feathered texture beginning above the eye and continuing all the way down the back. As you get further down onto the budgie’s wing, you can begin to make the lines thicker, until they become like patches rather than lines. After you pass the feather line in the middle of the wing, you can begin to use longer lines that flow down towards the very tip of the wing.
The exact number of lines and the thickness of them do not have to be exactly the same as in our example, as long as you are following the curves of the wings. If you like, you can add two little black spots on the bottom of the budgie’s neck, and just below these, create a line of tiny little lines to separate the budgie’s head from its body. You can also add some small lines in and around the budgie’s face, and add some additional texture to its beak.
Along the budgie’s chest, use fine hair-like strokes to add texture and give the impression of small fluffy feathers.

Step 8: Adding Detail to the Branch or Perch
Just as you used short lines to create texture to the wings and chest of your budgie drawing, you can use a series of different lines to texture the branch that the budgie is perching on. For the most part, these lines should follow the shape of the branch, but you can add curves and small knobs for variety and realism.

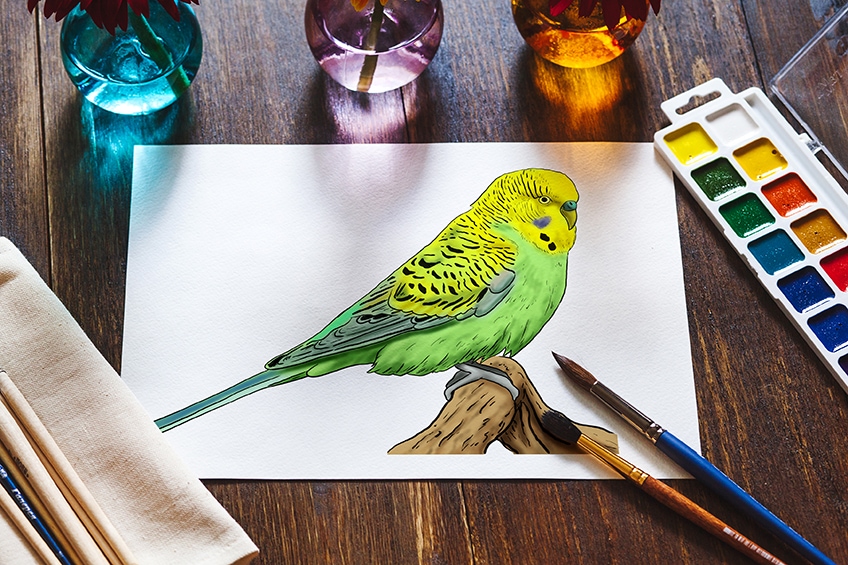
Step 9: Adding the First Layer of Color
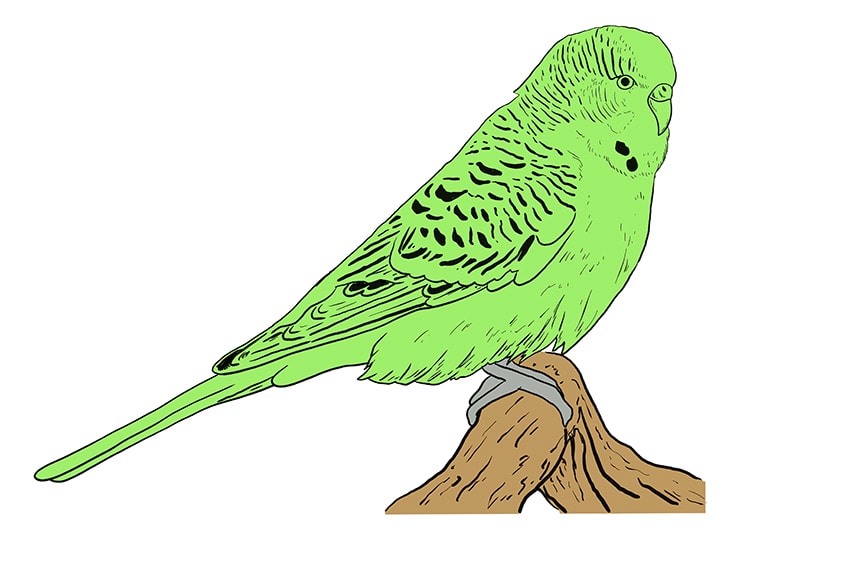
When it comes to adding color to a sketch, it is always best to begin by adding a single base shade. We then add highlights and other accent colors to bring the sketch to life. Depending on the colors you choose to use for your budgie, you may begin with a different base color to our sketch. We are beginning with a light green color, and we use it to color the entire body, head, and beak of the budgie.
We also used a light grey shade to color the budgie’s feet and a light brown shade for the branch.
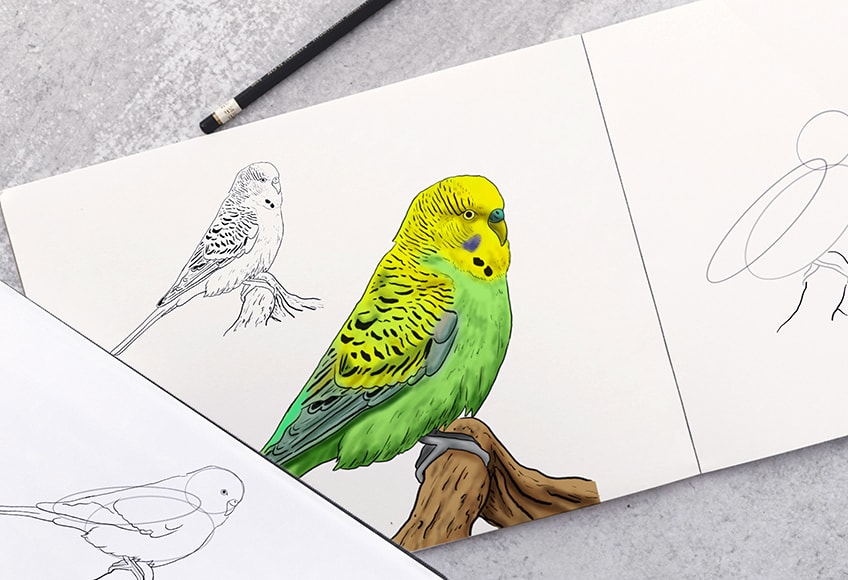
Step 10: Adding Additional Colors and Highlights
In this next step, you need to choose which color to use as your second primary shade. We have chosen a lovely bright yellow, and we are going to focus the yellow primarily on the budgie’s head. You can lightly take the secondary color down onto the wing, but it should gently fade into the green. Using a slightly dark grey shade, you can add some contours to the feet and perch.

Step 11: Adding the Third Coat of Color
In this step, with the grey shade that you used for the feet, add a soft layer on the bottom of the wing. You can also use the grey to add some shadows to the beak, the face, and to emphasize the textural patches on the bottom of the wing. Finally, you can use a light turquoise shade to color the tail feathers and blend this color out into the wing.

Step 12: The Final Shading and Highlighting
This is the last step of the tutorial, and you can begin by using your grey shade to gently add a shadow to the bottom of the budgie’s belly. You can use this light shade to add shadow along the bottom of the wing, and along some of the lines of feathers to make your parakeet drawing appear more three-dimensional. You can also use this grey shade to emphasize the budgie’s key features, including the eyes, beak, and tail feathers.
For the final part of this tutorial, use a light beach shade to add some highlights along the top of the wings and blend all the colors together.
Finished!
We have come to the end of the tutorial, and we hope you are feeling confident about your use of texture, color, and perspective. Even if your budgie drawing does not look exactly like ours, the more you practice, the more you will get the hang of how to draw a budgie.
Now that you have drawn a budgie, there is a whole world of other birds and animals to draw. We have a range of other drawing tutorials, so maybe we will see you there!
Frequently Asked Questions
Is It Difficult to Learn How to Draw a Budgie?
Although birds are often seen as slightly tricky subjects for an artist to capture, our simple and detailed parakeet drawing tutorial makes drawing these delightfully colorful birds very easy. In our budgie drawing tutorial, we take you through the drawing process from the construction lines to adding intricate feathered details.
What Is the Purpose of Using Construction Lines?
If you are accustomed to drawing freehand, starting to use construction lines may seem a little strange. Construction lines are, however, incredibly useful for ensuring that you have the right proportions and perspectives in your drawings. When you want to draw realistic animals in particular, using construction lines is an essential step.

Matthew Matthysen is an educated multidisciplinary artist and illustrator. He successfully completed his art degree at the University of Witwatersrand in South Africa, majoring in art history and contemporary drawing. The focus of his thesis was to explore the philosophical implications of the macro and micro-universe on the human experience. Matthew uses diverse media, such as written and hands-on components, to explore various approaches that are on the border between philosophy and science.
Matthew organized various exhibitions before and during his years as a student and is still passionate about doing so today. He currently works as a freelance artist and writer in various fields. He also has a permanent position at a renowned online gallery (ArtGazette) where he produces various works on commission. As a freelance artist, he creates several series and successfully sells them to galleries and collectors. He loves to use his work and skills in various fields of interest.
Matthew has been creating drawing and painting tutorials since the relaunch in 2020. Through his involvement with artincontext.org, he has been able to deepen his knowledge of various painting mediums. For example, watercolor techniques, calligraphy and lately digital drawing, which is becoming more and more popular.
Learn more about Matthew Matthysen and the Art in Context Team.