


How to Draw a Vampire – Create a Bloodthirsty Vampire Drawing
Vampires have been a source of fascination and fear for centuries, inspiring countless tales of horror and romance. These undead creatures are said to feed on the blood of the living and possess supernatural powers such as immortality, superhuman strength, and the ability to shape-shift into animals. From Bram Stoker’s iconic Dracula to the sparkly vampires of Twilight, popular culture has perpetuated the image of vampires as seductive and alluring, yet dangerous and deadly. Whether you believe in their existence or not, the legend of the vampire continues to captivate and intrigue people around the world. Get ready for today’s tutorial where we will take you step-by-step to create an easy vampire drawing!
How to Draw a Vampire in 33 Easy Steps
If you’re planning on starting our drawing tutorial on how to draw a vampire, there are a few key details to keep in mind. Vampires are typically depicted as tall, slender figures with sharp features such as angular cheekbones, a pointed nose, and piercing eyes. Their skin is often depicted as pale and lifeless, while their fangs are a defining characteristic that sets them apart from other mythical creatures. When drawing a vampire, it’s important to pay attention to the small details such as the texture of their clothing and the way their hair falls around their face. Consider incorporating dramatic lighting and shadows to add depth and dimension to your drawing. With a little bit of creativity and attention to detail, you can create a stunning vampire drawing that will inspire and captivate your audience.
Check out the below collage which depicts each step you will take to create a realistic and bloodthirsty vampire drawing!
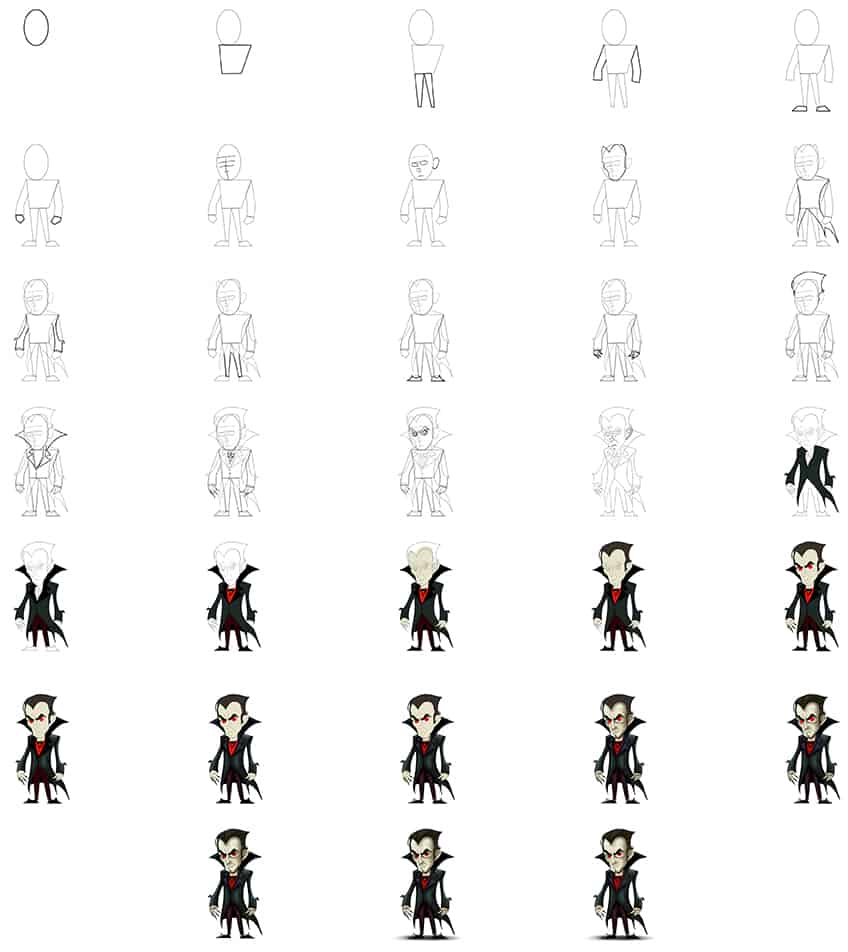
Step 1: Draw the Head
Begin your easy vampire drawing, by drawing an oval shape to represent the head of the vampire.

Step 2: Draw the Main Body of Your Vampire Drawing
Draw the main body of the vampire attached to the bottom of the previously drawn oval shape.

Step 3: Attach the Legs
Attached to the bottom of the main body, draw two separate legs at slightly different angles.

Step 4: Draw the Arms
On each side of the main body, draw the arm figures.

Step 5: Add the Shoes
At the bottom of each leg, draw the basic shape of each shoe pointing away from each other.

Step 6: Draw the Hand Guidelines
Attached to the bottom of each arm, draw the hand guidelines.

Step 7: Add the Facial Guidelines
Within the oval drawn in step one, draw a center guideline and four crossing horizontal guidelines.

Step 8: Now Draw the Facial Features
Use the previously drawn guidelines to aid you in placing the eyes, nose, mouth, and ear in a realistic position on your vampire drawing.
Make sure you draw the facial features using oval shapes and for the mouth, simply draw a curving line.

Step 9: Outline the Facial Shape
In this step, outline a more realistic-looking head and face for your easy vampire drawing. Use the previously drawn construction lines to aid you.

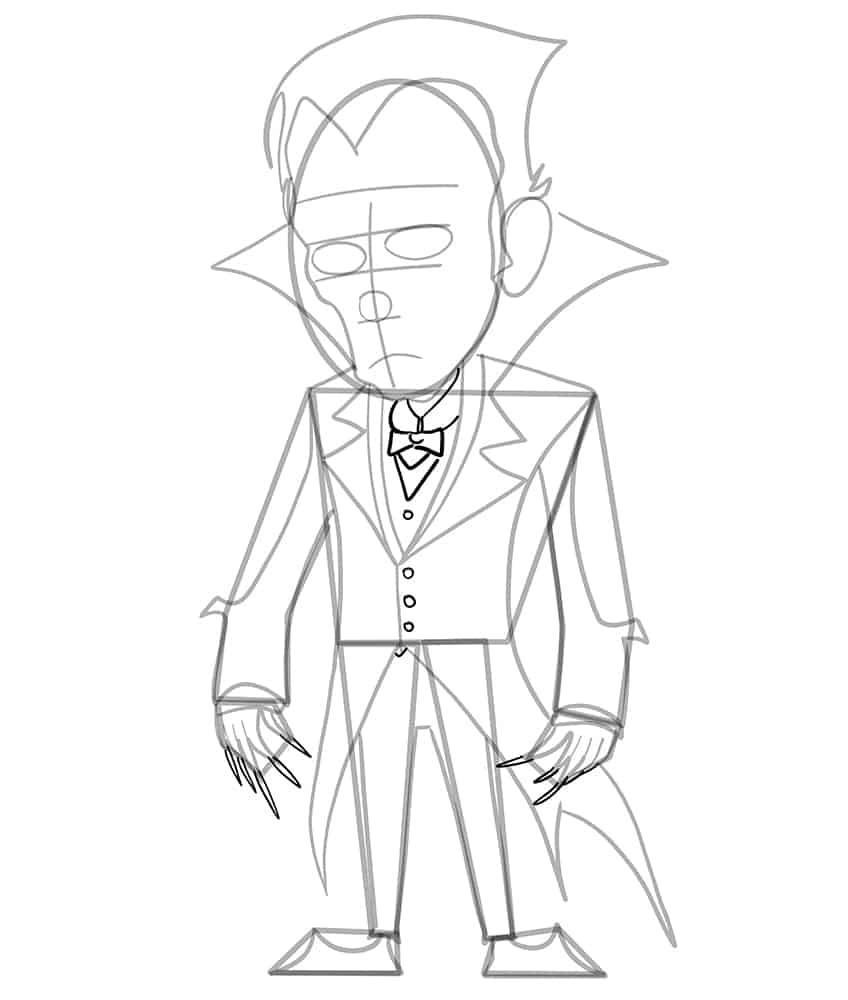
Step 10: Outline the Tuxedo on Your Vampire Drawing
Most vampires have very formal attire, so to complete the look, use the previously drawn construction lines to aid you in outlining the vampire’s tuxedo. It should cover the main body and lead outwards beyond the legs.

Step 11: Outline the Arms
Begin to outline both the arms and sleeves in this step. This will create a realistic look for your vampire drawing.

Step 12: Continue to Outline Your Easy Vampire Drawing
Use the previously drawn construction lines to aid you in outlining each of the legs on your drawing.

Step 13: Outline the Shoes
In this step, outline a pointy shape for each of the shoes.

Step 14: Continue to Outline the Hands
In this step, use the previously drawn construction lines to aid you in outlining each of the hands. Make sure that the fingers have a sharp-pointed end to them.

Step 15: Draw the Hair on Your Easy Vampire Drawing
Surrounding the facial structure lines drawn in step nine, draw the sharp-ended hair on your vampire.

Step 16: Add the Collar
Draw a dramatically large and sharp-ended collar on your vampire’s tuxedo.

Step 17: Draw the Bow Tie and Undershirt
Draw the visible undershirt collar and surrounding this, the small bowtie. Continue to draw the sharp nails onto each of the visible fingers.
Complete the step by drawing fine, round circles to represent the jacket buttons along the centerline.
Step 18: Detail the Eyes on Your Vampire Sketch
Use the construction lines and guidelines on the face to aid you in outlining the eye iris and pupil, including the wide curving eyebrows. Once completed, you are now ready to erase the still visible construction and guidelines.

Step 19: Structure the Face
Begin by drawing short, fine lines angled towards each other on the center area of the forehead. Continue by drawing the mouth line and the crease lines from the nose and under the eyes. Finish off by outlining the ear and earlobe.

Step 20: Apply the First Color Coat
Select a fine, sharp brush and dark gray paint, and evenly coat the tuxedo jacket.

Step 21: Color the Pants
Continue using the same brush as previously and switch to dark brown paint, and evenly coat the pants. Continue using black paint, and evenly coat the inner areas of the tuxedo jacket and collars.

Step 22: Add Color to the Undershirt
Begin this step and evenly color the undershirt, using a fine, sharp brush and red paint. Repeat using a dark shade of red for the ‘V’ neck, and cream paint for the collar of the shirt and the cuffs of the shirt. Switch to black paint to color the buttons of the shirt and jacket.
Continue using dark gray paint, and evenly coat the bow tie. Repeat using black paint on the shoes.

Step 23: Shade Your Vampire Drawing
With a thin brush and off-white paint, evenly coat the face, hands, and visible neck area.

Step 24: Color the Hair
Use the same brush as previously and gray paint, and evenly coat the hair on your vampire sketch.

Step 25: Add Color to the Eyes
In this step, begin to paint both eyes using red paint and a thin brush. Repeat using white paint to color the sclera. Continue using black paint to coat the eyebrows. Finish off using dark gray paint, and evenly coat the fingernails.

Step 26: Shade and Highlight the Tuxedo
Select a small, soft brush and black paint, and add soft brushstrokes within the tuxedo. Repeat using white paint for subtle highlights. Complete the step using a blending brush to give it a soft and faded look.
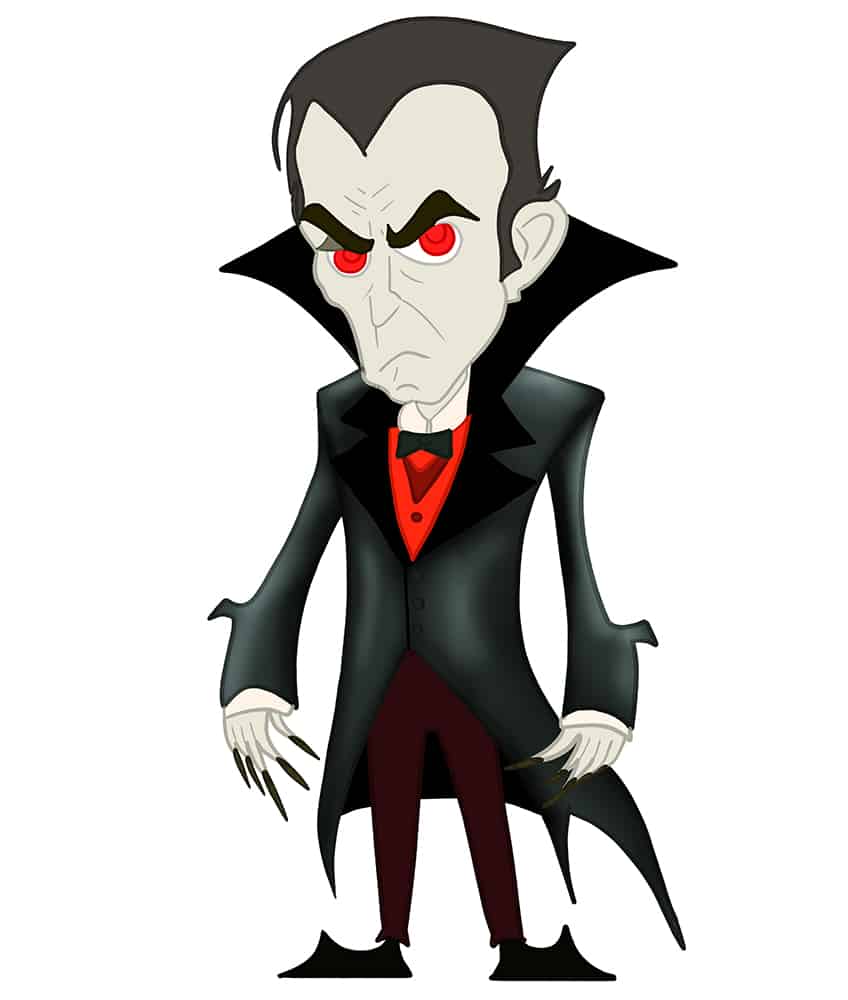
Step 27: Continue to Shade and Highlight Your Drawing
Continue using the same brush as previously and switch to black paint, and softly shade the majority of the pants and inner tuxedo collars. Repeat once more using white paint to lightly soften the areas.

Step 28: Shade and Highlight the Inner Shirt
Begin to apply soft shading to the edges of the inner shirt, bowtie, and cuffs, using a soft brush and black paint. Repeat using bright cream or white paint, and add soft highlights to the inner shirt and edges of each shoe. Switch to a blending brush to soften and blend the coats.

Step 29: Continue to Contour Your Easy Vampire Drawing
With a fine, sharp brush and black paint, go over the main texture lines such as the mouthline, earlobe, and nose on your vampire’s face. Follow this using a small, soft brush, and apply shading leading inwards from the surrounding outlines of the face, ear, and hands.
Use a blending brush to soften and spread this shading in a manner that enhances the facial structure. Complete this step using a soft brush and white paint, and add several highlight spots along the enhanced areas.

Step 30: Texture the Hair
Begin this step by applying fine brushstrokes leading from the front to the rear of the hair, using a thin brush and black paint. This should be done in stripes so that the first color coat acts as separation lines.

Step 31: Shade the Eyes on Your Vampire Sketch
Use a small, soft brush and black paint, ad apply soft shading to each of the eye pupils. Follow this by shading the nails, and repeat using white paint for a fine highlight.

Step 32: Add a Ground Shadow
In this step, apply shading beneath each leg using a soft brush and black paint. Switch to a blending brush to spread the edges of the shadow.

Step 33: Finalize Your Easy Vampire Drawing
This step is optional if you would like to create a seamless result. To do this, simply erase the visible harsh outlines. Continue using a blending brush to smoothen these areas.

Well done on completing your drawing tutorial on how to draw a vampire! Now that you’ve mastered the basics, it’s time to start adding your own creative flair. Consider experimenting with different facial expressions to convey different moods and emotions, such as anger or seduction. You could also play around with different color palettes to create a unique and striking visual impact. Try incorporating interesting background elements, such as a full moon or a spooky castle, to create a sense of atmosphere and mood. Remember, the key to creating a truly captivating vampire drawing is to infuse it with your own personal style and artistic vision. Keep exploring and pushing your artistic boundaries to create even more amazing artwork!
Frequently Asked Questions
How to Make My Vampire Drawing Look More Realistic?
To make your vampire drawing look more realistic, it’s important to pay attention to the small details. Start by studying real-life references such as photographs and videos of vampires to get a better sense of how their faces and body are structured. When drawing the vampire’s face, pay attention to the placement and shape of the eyes, nose, and mouth, and how they interact with each other. Use shading and highlights to create depth and dimension, and pay attention to the texture and folds in the vampire’s clothing. By taking the time to study real-life references and paying attention to the small details, you can create a more realistic and believable vampire drawing.
What Are the Key Features That Make a Vampire Look Like a Vampire?
Several key features make a vampire look like a vampire. One of the most defining characteristics is their fangs, which are used to suck the blood of their victims. Vampires are also often depicted with pale skin, as they are unable to tolerate sunlight. They may have sharp, angular features such as high cheekbones and a pointed nose, which give them a sinister and menacing appearance. Red or glowing eyes are another common feature, as well as long and flowing hair. When drawing a vampire, it’s important to pay attention to these defining characteristics to create a believable and recognizable depiction of this mythical creature.

Matthew Matthysen is an educated multidisciplinary artist and illustrator. He successfully completed his art degree at the University of Witwatersrand in South Africa, majoring in art history and contemporary drawing. The focus of his thesis was to explore the philosophical implications of the macro and micro-universe on the human experience. Matthew uses diverse media, such as written and hands-on components, to explore various approaches that are on the border between philosophy and science.
Matthew organized various exhibitions before and during his years as a student and is still passionate about doing so today. He currently works as a freelance artist and writer in various fields. He also has a permanent position at a renowned online gallery (ArtGazette) where he produces various works on commission. As a freelance artist, he creates several series and successfully sells them to galleries and collectors. He loves to use his work and skills in various fields of interest.
Matthew has been creating drawing and painting tutorials since the relaunch in 2020. Through his involvement with artincontext.org, he has been able to deepen his knowledge of various painting mediums. For example, watercolor techniques, calligraphy and lately digital drawing, which is becoming more and more popular.
Learn more about Matthew Matthysen and the Art in Context Team.


