How to Draw a House – A Fun and Easy House Drawing Guide
Artists and architects have always been drawn to sketching their houses, as well as their interiors. Our homes are places that we cherish. We can almost always visualize them from memory. Observing the architectural style of a house can tell us the history behind a home, as well as which era it was built in. There is no doubt that as artists we are still inspired to create artworks that celebrate the comfort of the home space. In this tutorial, we will learn how to draw a house using a few basic tools and techniques.
Step-by-Step Instructions on How to Draw a House
This tutorial will show you how to draw a house by guiding you through a series of steps. It is really important to get the first 10 steps right. This will help you set up the foundations you need to create a house drawing with perspective and dimension.
Once you have these first few steps down, you will have everything you need to simply enjoy the process of creating your house sketch.

List of Tools and Materials Needed for How to Draw a House
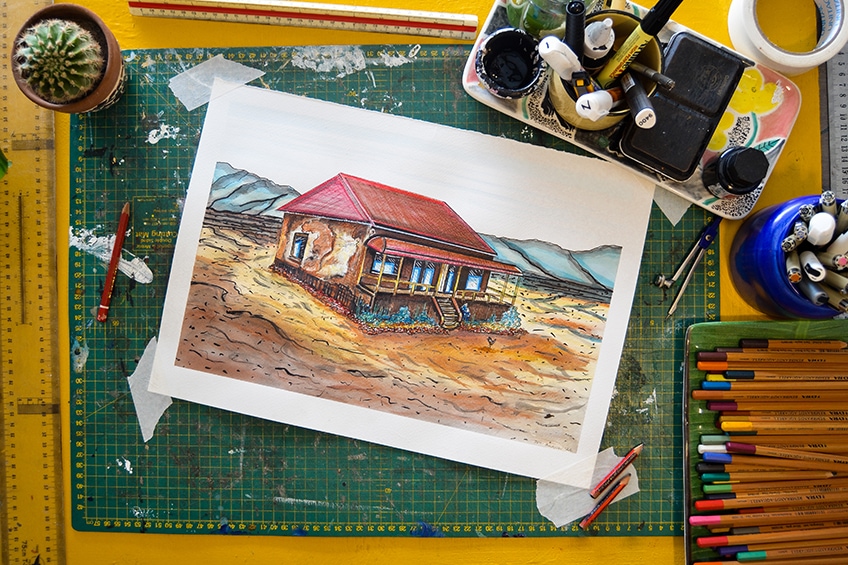
In this tutorial, you will need a few tools and materials to create your house sketch. You can use any medium you prefer working with. This tutorial will guide you toward creating a drawing of a house, or an old farmhouse, with a rather rustic and vintage style. We recommend using color to capture the full character of your house drawing. You will need the following tools and materials for this tutorial:
- Paper of your choice
- Drawing board
- Masking tape
- Pens or fine liners
- Variety of pencils
- Paintbrushes and container
- Ruler
- Drawing ink (optional)
- Inkpot or jar
- Watercolor pencils
- Paint of your choice (optional)
- Sharpener
- Eraser
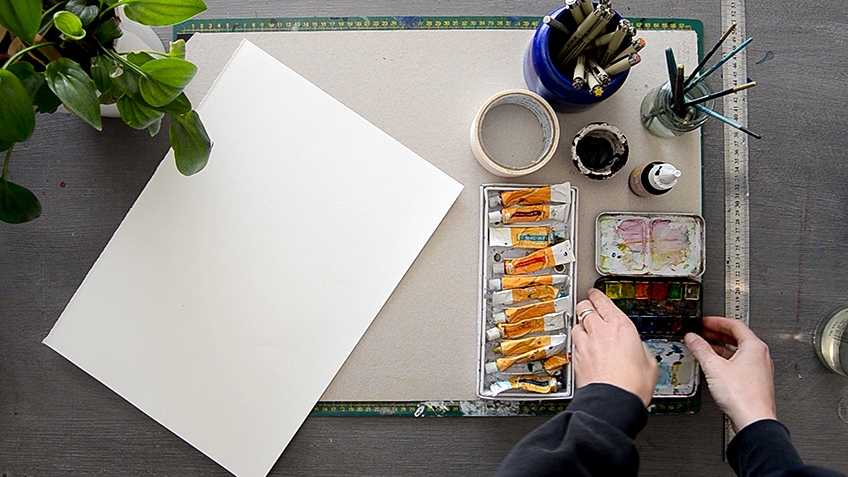
Step 1: Prepare Your Tools and Materials
Prepare your tools and materials and fix your prepared paper on your drawing board using masking tape or washi tape. If you are using watercolor paper, it is encouraged to pre-soak your paper.
Step 2: Draw a Horizon Line
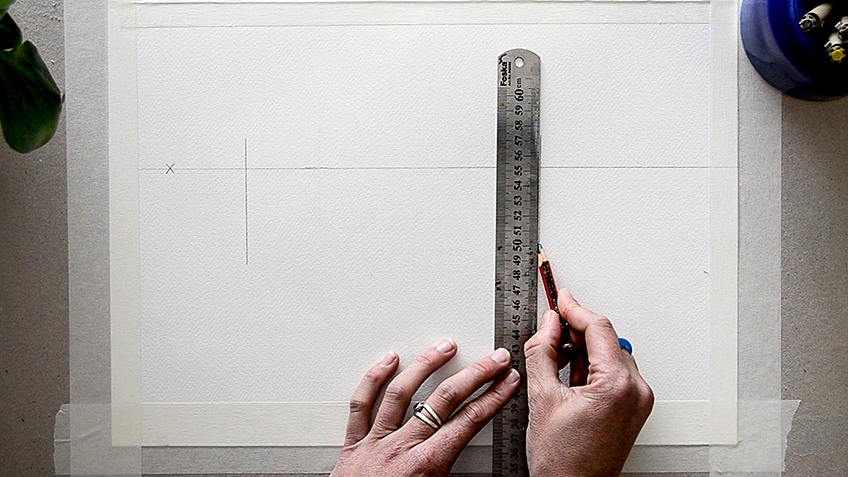
Draw a horizon line using a ruler and a pencil. Even if the horizon line is invisible in your house drawing reference image, it is a good idea to still place one down to find your vanishing point in the next step.

Step 3: Draw a Basic Vanishing Point on the Left of the Horizon Line Marked “X”
Draw a basic vanishing point on the left of the horizon line. You can mark this point with an “X”. This is the point from which all parallel lines recede or diminish out of sight.
In this tutorial, we will simply use “X” as a basic guideline for setting up the right angles and perspective in your house sketch.

Step 4: Draw a Short Vertical Line to the Right of “X”
Draw a vertical line about 1 inch to the right of the vanishing point. This line will run through the horizon line and act as the far-left edge of your house.

Step 5: Draw Another Short Vertical Line About 8 Inches From “X”
Draw another vertical line about 8 inches to the right of your vanishing point. This line runs through the horizon line and acts as the far-right edge of your house.
Step 6: Draw a Short, Middle Vertical Line About 4 to 5 Inches From “X”
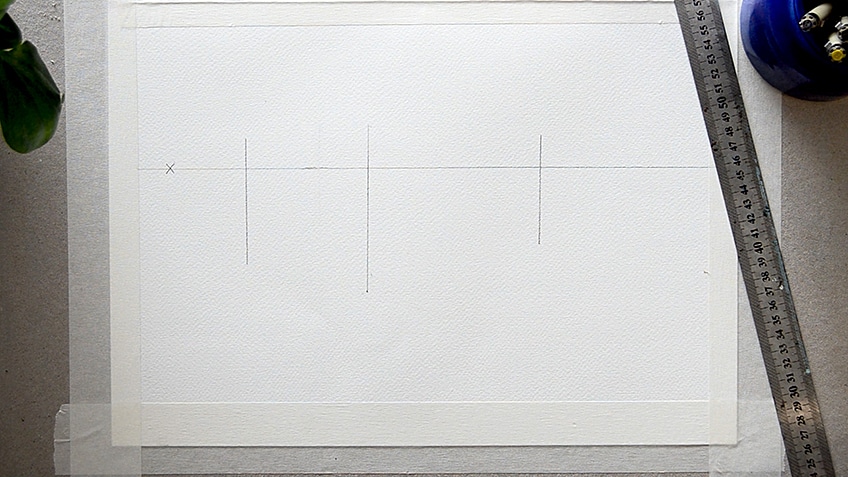
Draw a middle vertical line about eight to 4 inches away from your vanishing point. This line will act as the corner view of the house. Remember, is not entirely important to line up each angle correctly in these beginning stages.
Thus, there is no need to perfect your pencil work just yet.
Step 7: Draw a Diagonal Line From the Top of the Middle Vertical Line
Draw a diagonal line that runs from the top of the middle vertical line to the top of the left vertical line.

Step 8: Draw a Diagonal Line From the Bottom Left Vertical Line
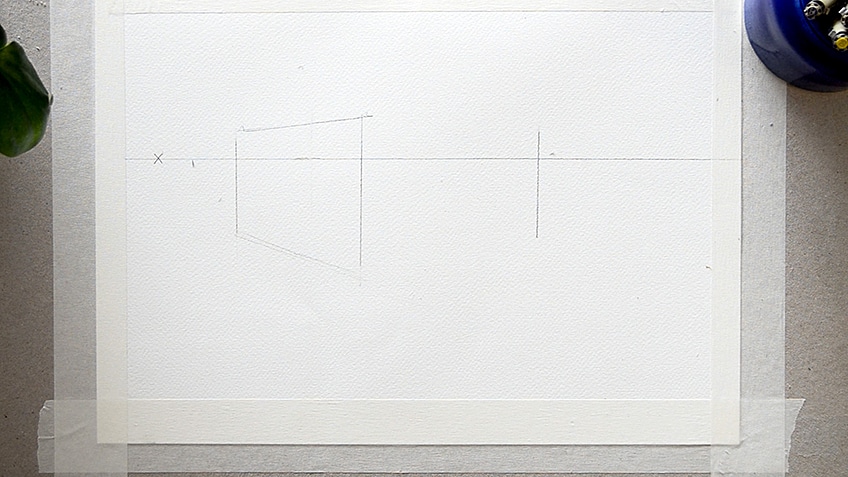
Draw a diagonal line that runs from the bottom of the left vertical line to the bottom of the middle vertical line.
Step 9: Draw a Diagonal Line From the Bottom Right Vertical Line
Draw another diagonal line that runs from the bottom of the right vertical line to the bottom of the middle vertical line. Adjust and erase the lines accordingly and refer back to your vanishing point.
This is to ensure that your angles are pointed in the right direction.

Step 10: Draw the Last Diagonal Line From the Top-Right Vertical Line to Close the Box
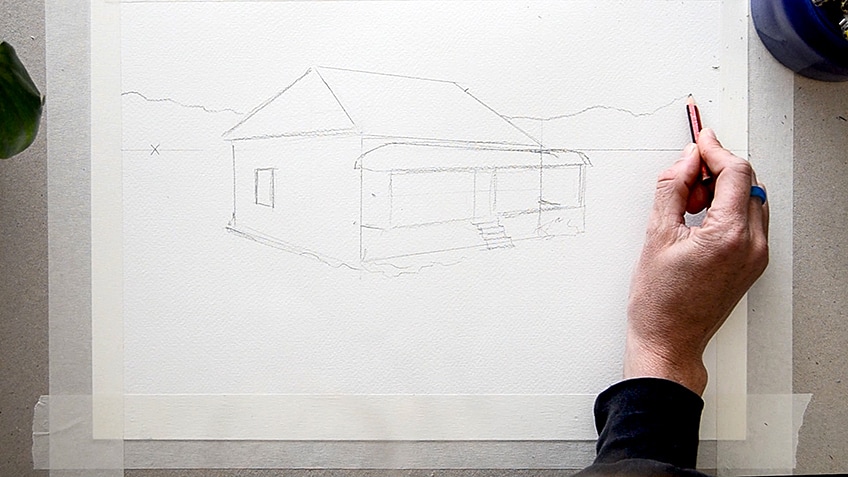
Draw one last diagonal line that runs from the top of the right vertical line to the top of the middle vertical line. This will create a solid outline of the shape of a box, which in turn, will act as a foundational sketch from which we build the house drawing.
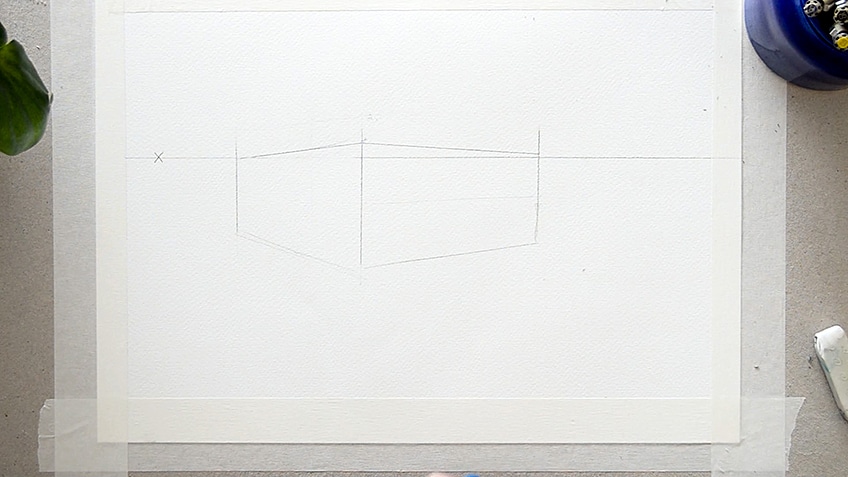
Step 11: Erase Any Unnecessary Pencil Lines
Now you can go ahead and erase unnecessary pencil lines. This includes the horizon line that runs through the middle of the house and any pencil planning that is not needed.

Step 12: Sketch the Lines to Create the Basic Angles of the Roof
Begin sketching in the lines to create the basic angles of the roof. Start by drawing a diagonal line that runs from the top of the middle vertical line at about 40 degrees to the left. From the top of this new line, draw a diagonal line downwards to meet the edge of the left vertical line from step four.
You will see that this closes the triangle to form the left side of the roof of the house.

Step 13: Sketch the Remaining Two Diagonal Lines to Create the Full Outline of the Roof
Using a pencil and ruler, sketch the remaining two diagonal lines. You can use the length of your pencil to help guide and set up your angles. First, draw the diagonal line that runs from the top of the right vertical line at around 30 degrees. Then, connect this new line with the top of the triangle created on the left.
This will form the solid outline of the roof for your house drawing.
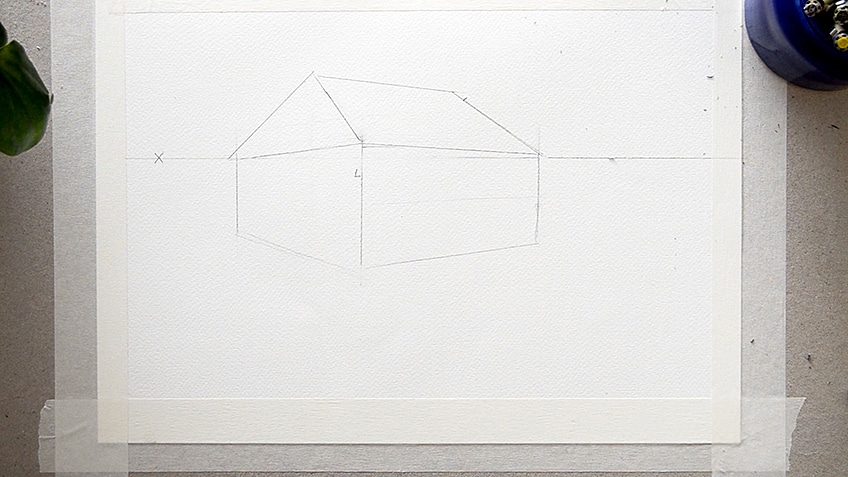
Step 14: Sketch the Front-facing Details of the House
Start sketching the front-facing details of the house. You can start working onto the finer details and features of the house. Each line should run parallel to the lines that you drew for the outline of the box. This means you should be working with the perspective you have already established in the steps above.
This is why it’s so important to get the initial steps right.

Step 15: Sketch the House’s Staircase
Sketch the staircase of the house if it is visible in your reference image. These lines can run parallel to the bottom of the house. You can draw as many as you need until it meets the ground level of your house.
You can also draw zig-zags down each side to give them perspective and dimension.

Step 16: Adjust Your Planning With an Eraser and Pencil
Adjust your planning with an eraser and pencil. It may take some time and practice to have an eye for true perspective, but there is no rush so take your time and sketch until you are happy with the look of your house drawing.
This tutorial, after all, features an old farmhouse, so there is space for it to appear slightly rustic and rickety.
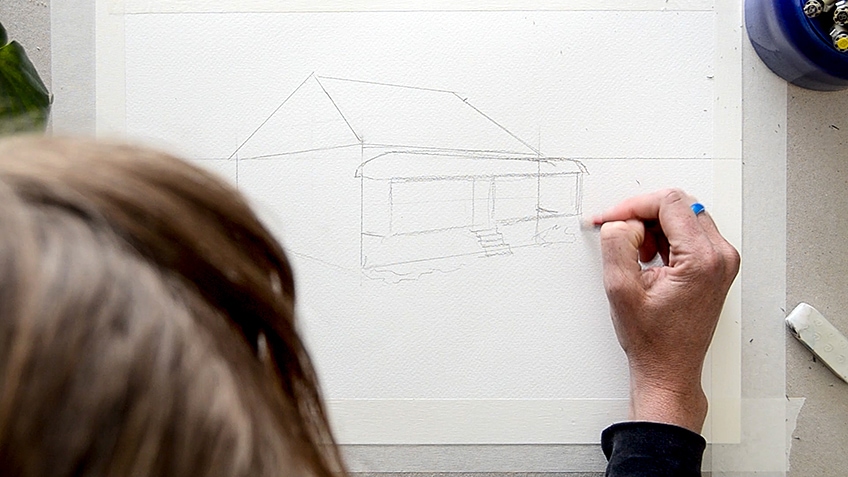
Step 17: Sketch the Left Window of the House
Sketch the basic outline of a window on the left side of the house. To do this, draw a rectangle within the left side of the house using the angled perspective of the house’s outline.
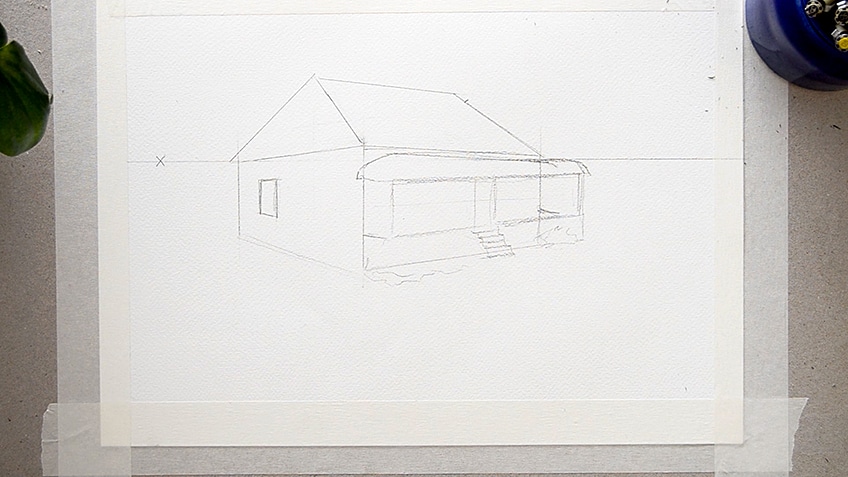
Step 18: Sketch the Landscape Behind the House
Begin sketching the outline of the landscape behind the house. In this tutorial, the artist has drawn a basic line to represent a mountain scene that runs above the horizon line.
Step 19: Continue Adding Details to the Front of the House
Continue adding details to the front-facing side of the house. This includes any pillar, windows, doors, banisters, and other woodwork that might feature in your house drawing.
If needed, correct some of your main lines by defining them further using a ruler and pencil.

Step 20: Define Your Planning and Add More Detail to the House
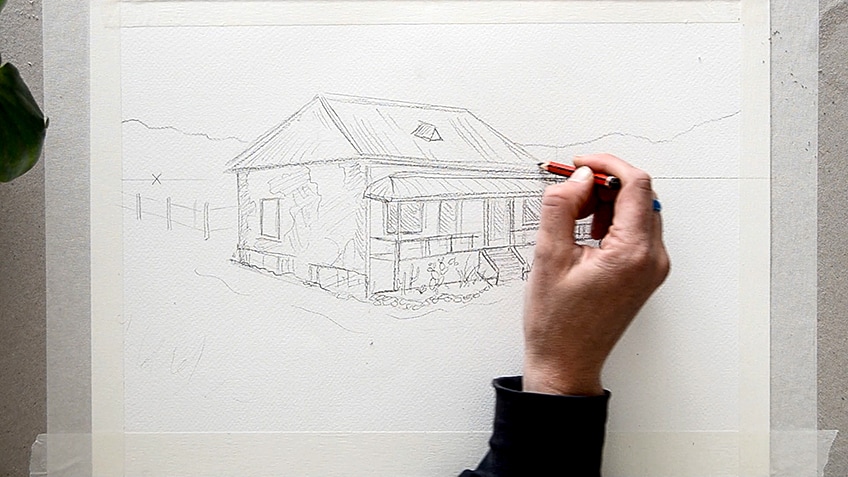
Define your planning across the whole drawing and add more detail with a darker pencil. You can start adding texture to your walls by sketching lines using hatching and cross-hatching techniques. Then, darken your windows slightly by filling them with a pencil.
You can now add some detail to the garden.
This includes plants, bushes, and rockery. Then, draw and define the staircase that runs into the garden space. Continue sketching freely until you are ready to move on to the next step.

Step 21: Sketch the Details of the Roof
Sketch in the lines that feature on the roof. You can also draw tiles, and wooden slats, or leave the space free of texture.
Step 22: Add the Last of the Details to the Garden and the Surroundings
Add the last of the details to the garden and the surroundings. The garden isn’t necessarily the central focus here, but it will tell you a lot about where our house is situated based on what you decide to include around it.

Step 23: Fill the Shadow Areas of the House Sketch Using Ink or Fine Liner
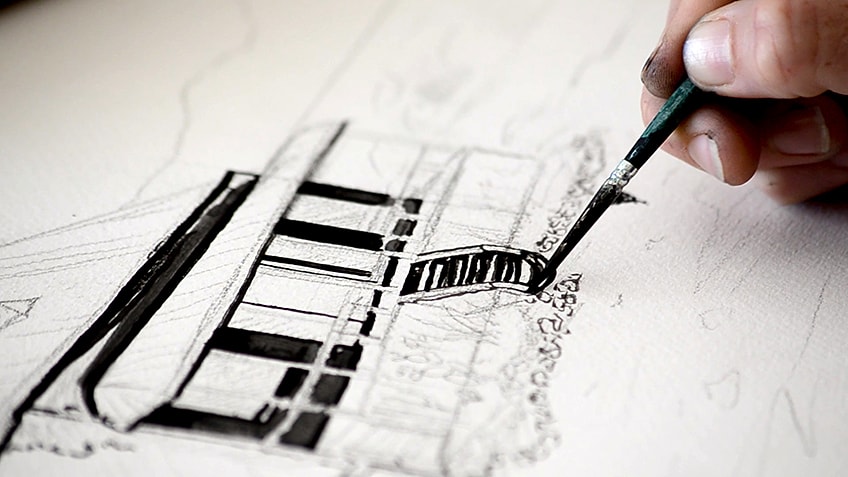
Now we are ready to work into our shadows. Using drawing ink, begin filling the shadow areas of your house. You can also continue using your fine liners, markers, or any medium of your choice. Working with the ink here should be fun and experimental. Enjoy the process of working free-hand across your planning. Follow the lines you have drawn with a paintbrush and fill them with volume using the ink as if it is paint.
You can create subtle textures and tonal values by diluting the ink with water.
Step 24: Dilute the Ink and Paint the Background Details
Using a larger paintbrush and ink, fill the background layer to place the house within the landscape. Continue adding detail to the surroundings of the house including any bumps and shadows on the road.

Step 25: Erase All Pencil Lines
Erase all pencil lines throughout the whole drawing. You can leave this step out if you are using pencils for your drawing of a house.

Step 26: Add the Last Details With Ink and Fine Liner
Add the final details of ink to your house drawing. This includes drawing subtle lines with a fine liner in the ground to show that it is made of gravel and tiny marks to create the sense that there are rocks and stones on this rough terrain.
In these final stages, it is good to look at the composition and tonal balance within your drawing.

Step 27: Add Color to the House Drawing Using a Medium of Your Choice
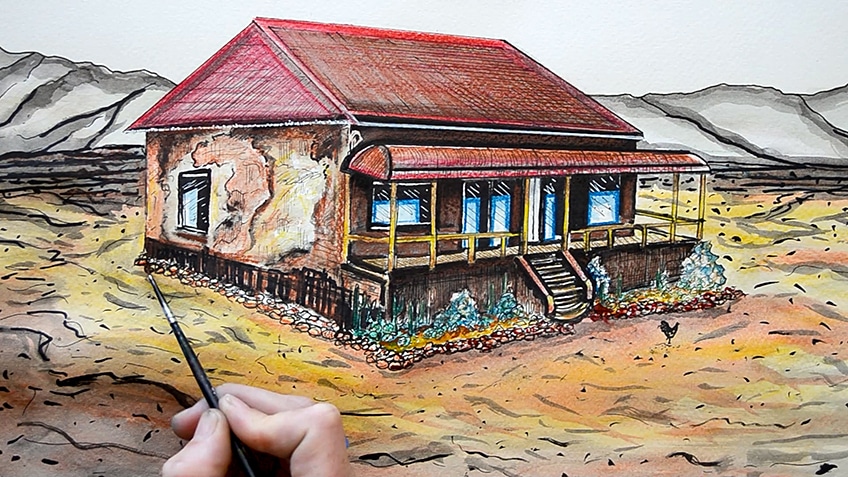
Add color to your house sketch using a medium of your choice. In this tutorial, the artist has chosen to add touches of color with watercolor paint and pencils. Start by adding subtle, neutral colors first, such as a rusty red roof, dusty yellow sand, and sky-blue windows. If you are using watercolor pencils, you can activate your pencil work with water and a paintbrush, just as the artist has done in the video tutorial.
Color will add that last bit of vibrancy and character you may be looking for in your house drawing.
Step 28: Allow Your Artwork to Dry, Remove the Masking Tape, and Sign
Allow your drawing to dry fully. Then, remove the masking tape carefully by slowly peeling the tape outwards and away from your paper. Go ahead and sign your finished house drawing.
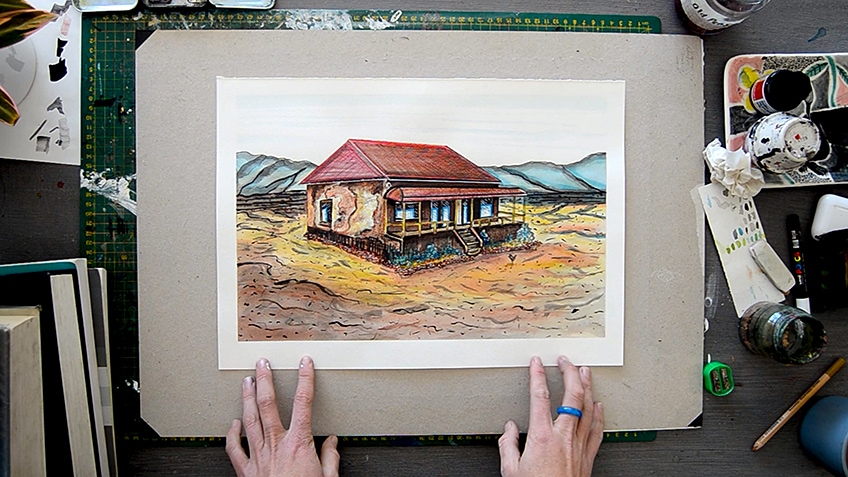
Drawing a simple house can be an easy task for artists at any level. Drawing a house with true perspective and dimension is not necessarily an easy task. However, using the steps above, you will have everything you need to create a realistic drawing of a house. This is one of those tutorials that we really encourage you to return to, especially if you would like to improve your architectural drawing skills and continue practicing how to draw a house.
Take a look at our house drawing webstory here!
Frequently Asked Questions
How Do You Draw a Three-Dimensional House?
To create a three-dimensional house drawing, you will need to make use of vanishing points. A vanishing point is the point at which parallel lines diminish out of sight. In this tutorial, the artist uses just one vanishing point as a basic reference point from which to draw a three-dimensional house.
How Do You Draw a House Shape?
You can start learning how to draw a house by drawing a rectangle first and then a triangle on top of this rectangle to create the shape of the roof. These two shapes will act as the basic outline for a house drawing. It is encouraged to follow this tutorial if you would like to learn how to draw a house with more dimension and perspective.
How Do You Draw a One-Dimensional House?
You can draw a one-dimensional house by using a single vanishing point, a horizon line, and frontal planes. This will make your house appear more dimensional with true perspective.

Demi Bucklow is an independent artist and photographer living in Cape Town, South Africa. Since graduating from the University of Cape Town in 2018 from Michaelis School of Fine Art with a degree specializing in fine art photography, she currently works as a freelance artist, content creator and writer. Demi’s particular interests explore a range of multimedia illustration, collage art, photography and videography, darkroom processing and stop-motion animation. Her work is an exploration of nature and its phenomenon – somewhere between art and space.
Artistic practice presents the ability to communicate a vision. It is through techniques of pointillism and realism that form, and substance are explored as a metaphor for matter; super-imposing a thousand marks and points until an image is formed before our eyes. From illustrations to surrealist landscapes, Demi translates corporeality – mixing the obtuse and vacuous with the astute and expressive which leads to a mixture of irrevocable pondering over what is and what could be.
Learn more about the Art in Context Team.


