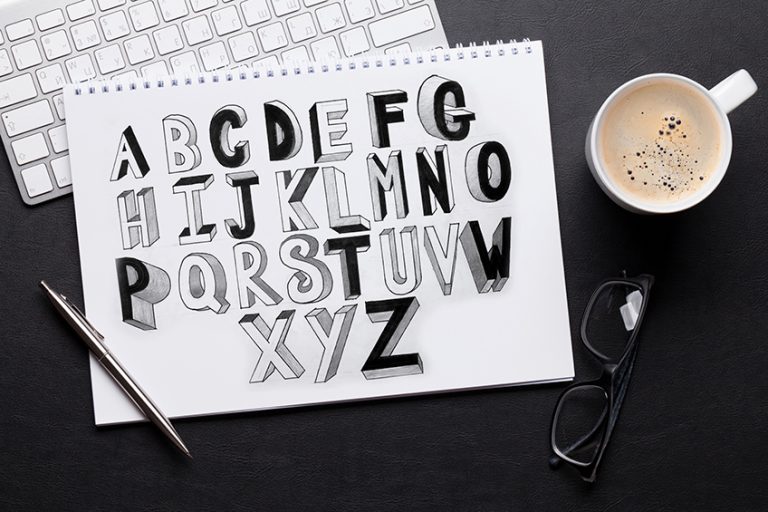
Optical Illusion Drawing – How You Use Optical Illusions in Art?
Optical illusion drawings are always a great way to enhance your drawing skills as it provides the unique opportunity to use precise measurements in conjunction with shading techniques. Often optical illusions are seen as strange intricate drawings that are difficult to create due to their mind-bending effects. However, in this tutorial, we will explore some interesting optical illusion sketches that can be completed in a few easy and simple steps. Optical illusions can also significantly add to strange and abstract drawing ideas because of their strange three-dimensional effects. Utilizing these 3D illusion drawing techniques in various artworks can be a great addition to surrealist and abstract-themed artwork. Many benefits come from knowing how to draw illusion sketches providing artists with a unique set of skills within their drawing repertoire.
An Easy Guide to Drawing Optical Illusions
Optical illusion drawings are not difficult but some are slightly easier than others. That being said, we will go through the process of drawing various easy optical illusion artworks that can be broken up into digestible steps. When creating a 3D illusion drawing, we will find that it is more a matter of patience and precision. As long as we approach the drawing process with patience, we will find that creating illusion drawings is simple and fun. In this easy optical illusion art tutorial, we will also only need a few simple materials:
Necessary Materials
Illusion drawings are quite simple to draw and require the simplest of tools to do so. In this tutorial on how to draw illusions, we will only need a pencil, pen, marker, and ruler. We will also want to make sure we have an eraser for any silly mistakes made along the way. Other than that, any paper will do. You will also need to make sure that you have a space where you can focus and engage with each step of the tutorial. All the materials can be found through the links below:
- Pencils
- Copic Marker
- Ballpoint Pen
- Eraser
- Good Paper (200 g/m – 250 g/m recommended)
Step-by-Step Instructions for Easy Optical Illusion Artworks
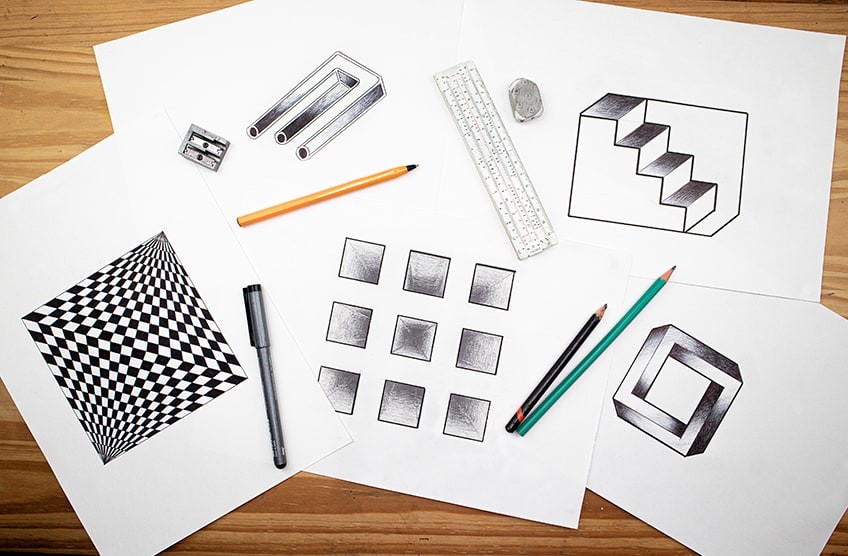
In this tutorial, we will look at how to draw five unique optical illusions, some more simple than others but all of them are easy. We will break down the drawing process into a few simple steps for each optical illusion giving us the best possible chance to create a beautiful optical illusion drawing. Now that we know what to expect, let’s get started with this optical illusion drawing tutorial.
How to Draw an Impossible Triangle
What makes optical illusion drawings so unique is the strange way light and shadows interact with warped three-dimensional objects. In many ways, three-dimensional rules are broken which results in a seemingly impossible object. The best way to introduce this idea is with the impossible triangle.
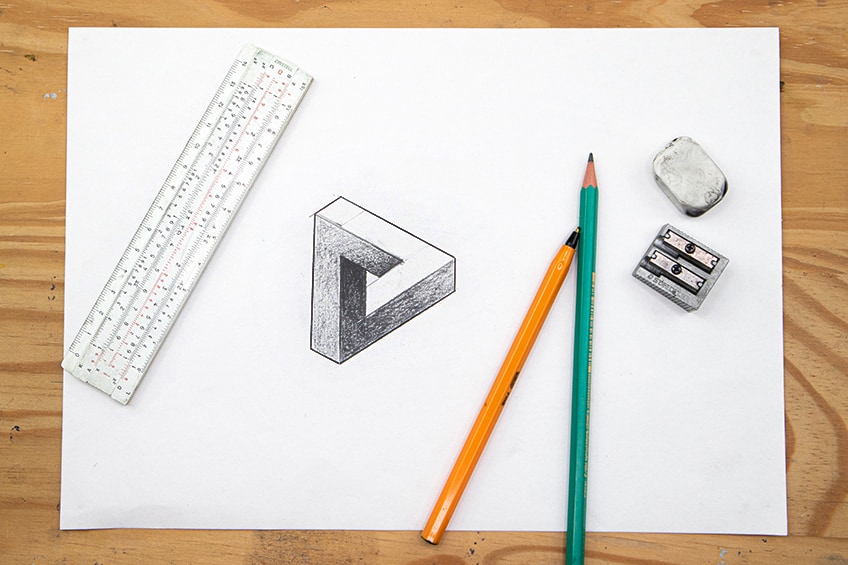
Step 1: Drawing the L-Shaped
Using your ruler and pencil, you want to start by drawing two lines parallel to one another in a vertical direction. We will want to draw an L-type shape. Make sure the lines are all the same in width between one another and that the L-shaped is the same in length for both the vertical and horizontal sections.
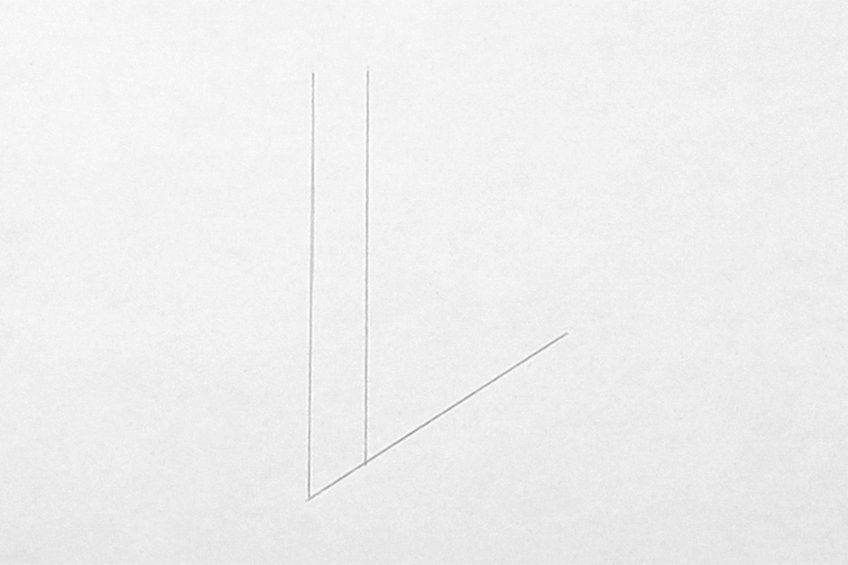
Once you have your two vertical parallel lines, you can connect another two parallel lines to the bottom of the first two at the corners. They should be the same in width with the bottom two moving in a diagonal direction to create an L-shape that is the same in length as well.
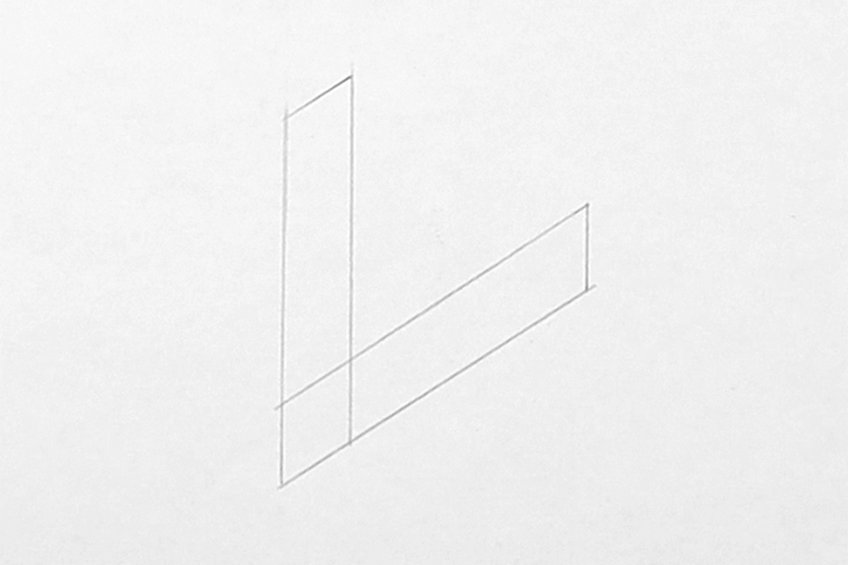
Step 2: Making the L-Shape Three-dimensional
Now that we have this two-dimensional L-shape we want to add lines to make it three-dimensional. We do this by creating a set of small diagonal lines that all move in the same direction from each corner of the L-shape. Just make sure to keep the width of lines always the same.
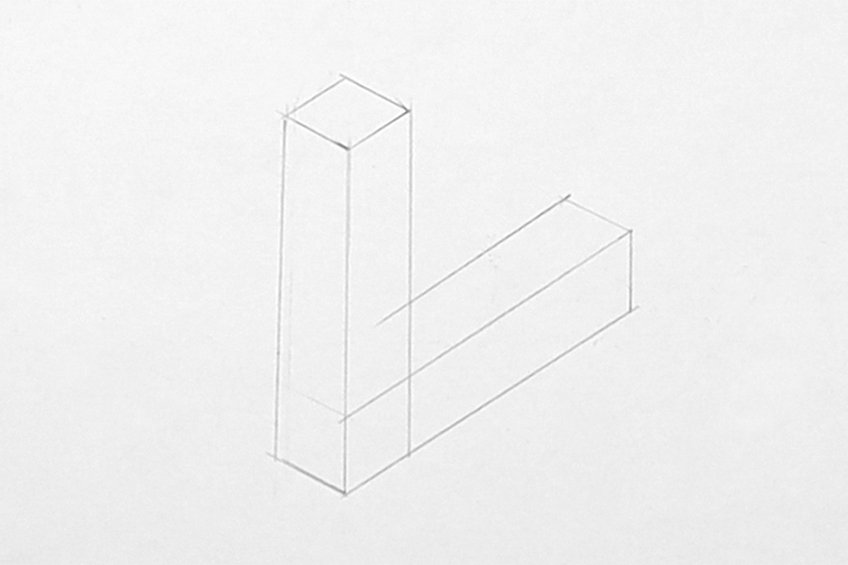
Step 3: Adding Connecting Lines
We now want to add lines from the top of the L-shape to the end of the L-shape. We want to use the three-dimensional diagonal lines to guide the placement of these connecting lines. We want to make sure the width of the lines always remains the same.
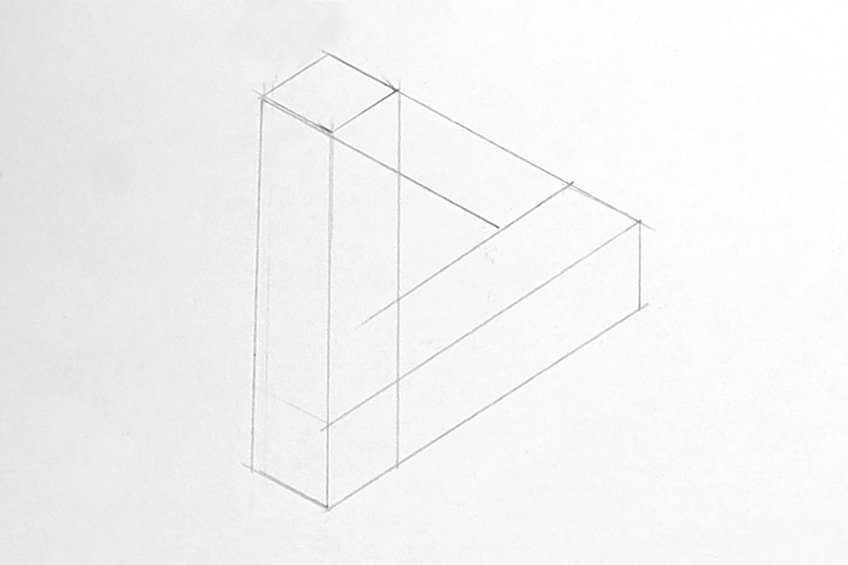
We now want to draw another connecting line that runs parallel underneath the first two using the same width as before. By doing this, we will give the connecting lines three-dimensionality, making the structure flow in an infinite loop.
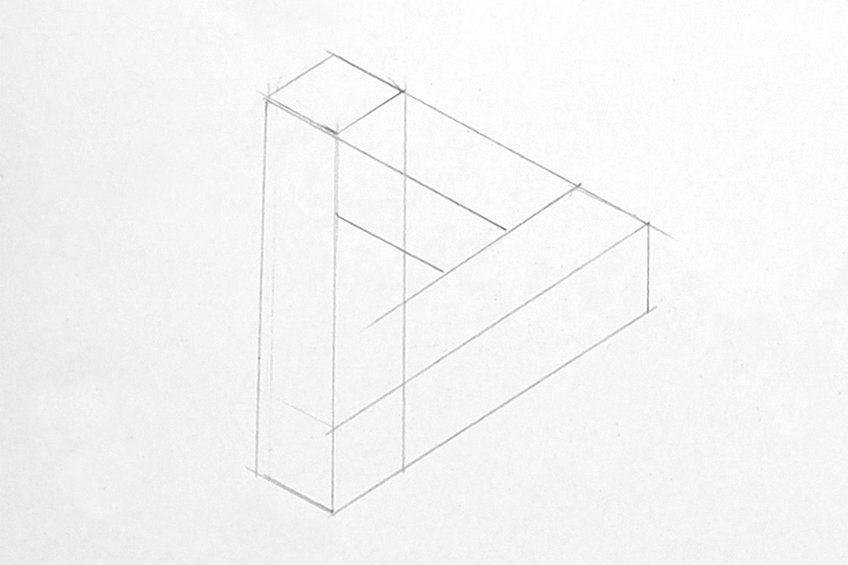
Step 4: Erasing Lines Inside the Triangle
Now that we have this triangle with even lengths and widths, we want to erase the lines inside the shape to accentuate the infinite loop. We only want to erase the lines inside the top of the shape and the section that runs vertically inside the middle of the shape.
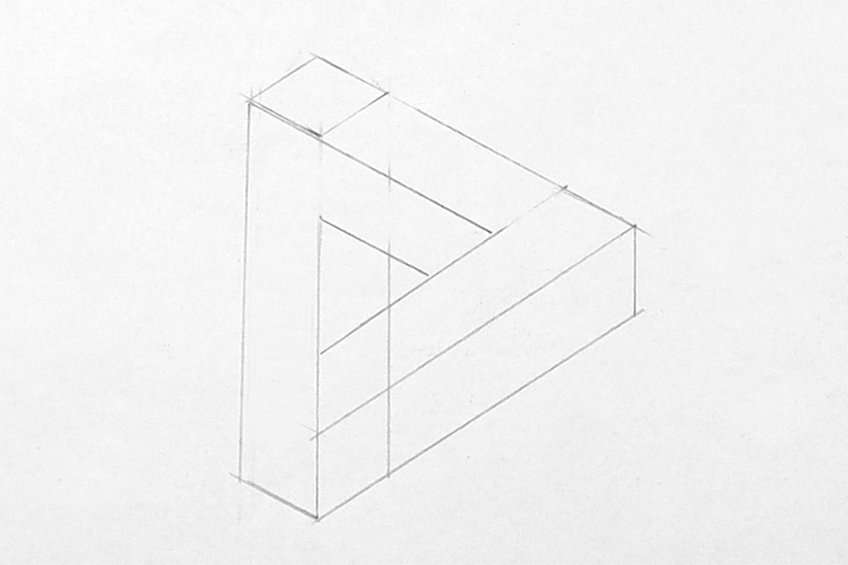
By erasing the lines inside the middle section and top section of the triangular shape, we will start to see the impossible triangular shape appear in three dimensions.
Step 5: Adding Shading for More Three-Dimensionality
To further emphasize the three-dimensional quality, we can add shading to certain parts of the triangular shape. Starting with the middle section, you can add shading that has a dark to a light gradient that flows through the triangular shape.
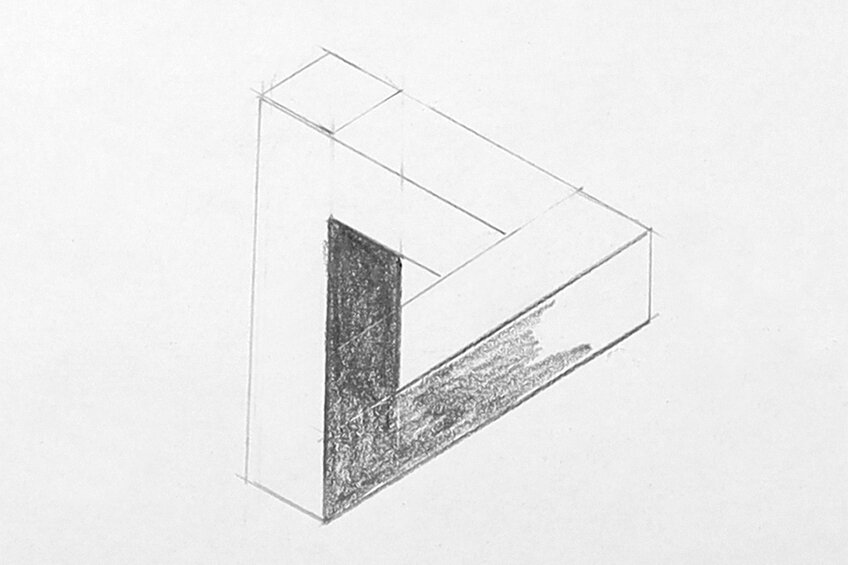
We can add another gradient of shading from the other corner of the triangle, but this time keeping it slightly lighter. This way, we will be left with three different shades on each part of the triangular shape.
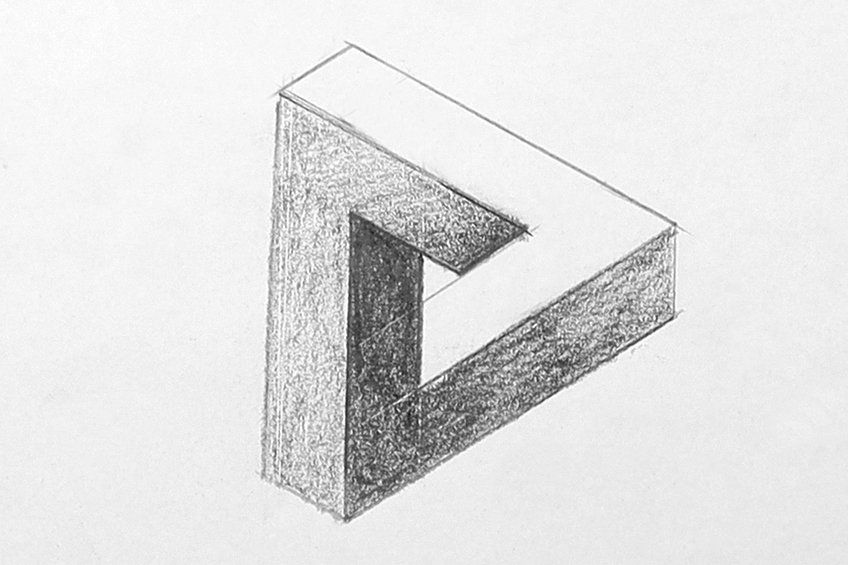
We want to make sure that we have three different tonal values in each part of the triangular shape to emphasize its three-dimensionality.
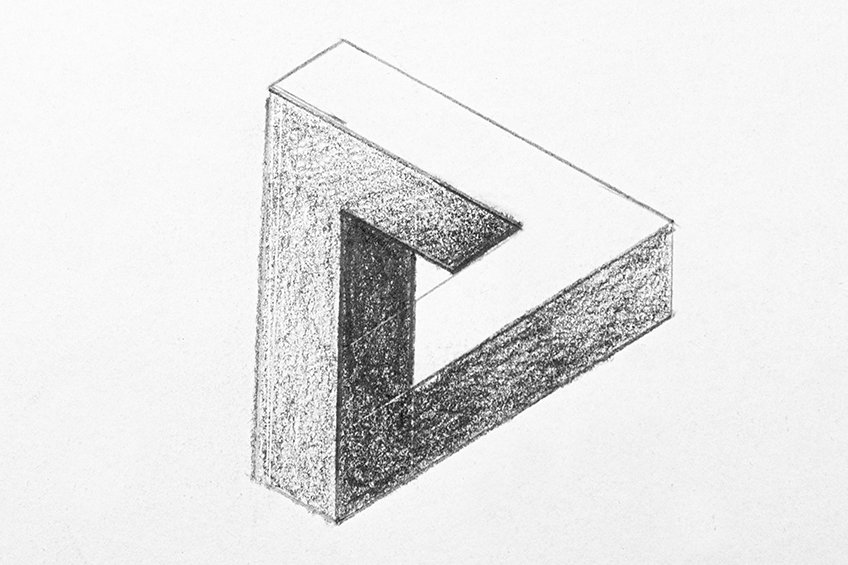
And there you have it! A simple step-by-step process on how to draw an impossible triangle.
How to Draw an Impossible Trident
The impossible trident is perhaps the most recognizable optical illusion drawing. This is a great illusion drawing that is both interesting and complex but so simple to draw. Let us break down the process of drawing the impossible trident.
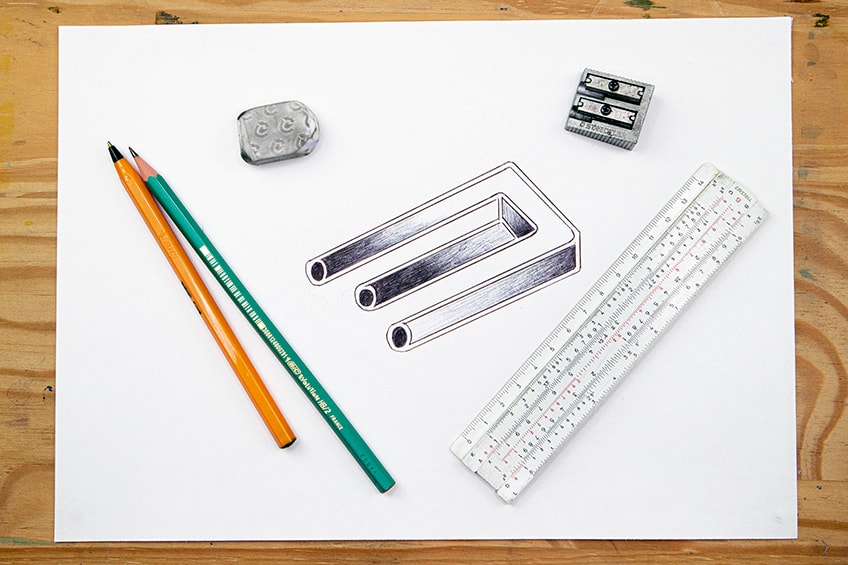
Step 1: Drawing the Individual Rods
Using your pencil and ruler begin to draw a rod shape that moves in a diagonal direction. We want to make sure that the end of each rod is rounded and that they are all the same in width.
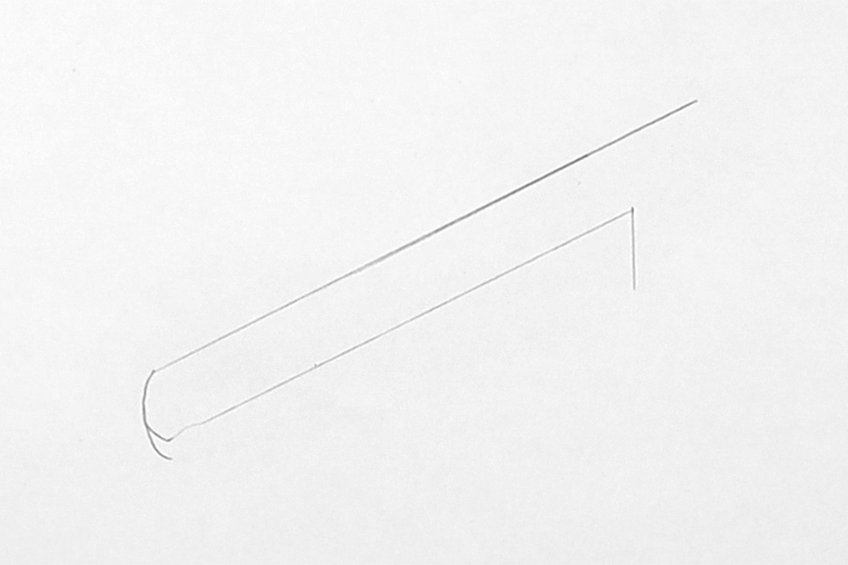
We want to draw three rods, with each one beneath the last slightly shortened. By doing this we will create a sense of depth in the trident. However, we won’t draw the third one now as it will connect by the use of connecting lines.

Step 2: Adding Connecting Lines
We now will connect the bottom line of the bottom rod to the inside of the top rod. However, the line doesn’t touch the top rod but flows along the inside of the top rod’s shape whilst remaining parallel to the top rod’s lines.
This line will flow along the inside of the top rod and then come out, bend downward and flow into the top line of what will become the third and lowest rod. Take some time with this and make sure each rod is the same in width.

Carrying on with the same line, we want to connect that line to the back of the trident, creating this square shape as a base of the rods. We should start to see the trident forming more clearly at this point.
We should be able to see that the rod can connect with a single line, whereby the bottom line of the bottom rod flows into the back of the trident and the top line of the top rod. We can also connect the bottom line of the top rod to the top line of the middle rod with a vertical line.

Step 3: Adding Three-Dimensionality to the Trident
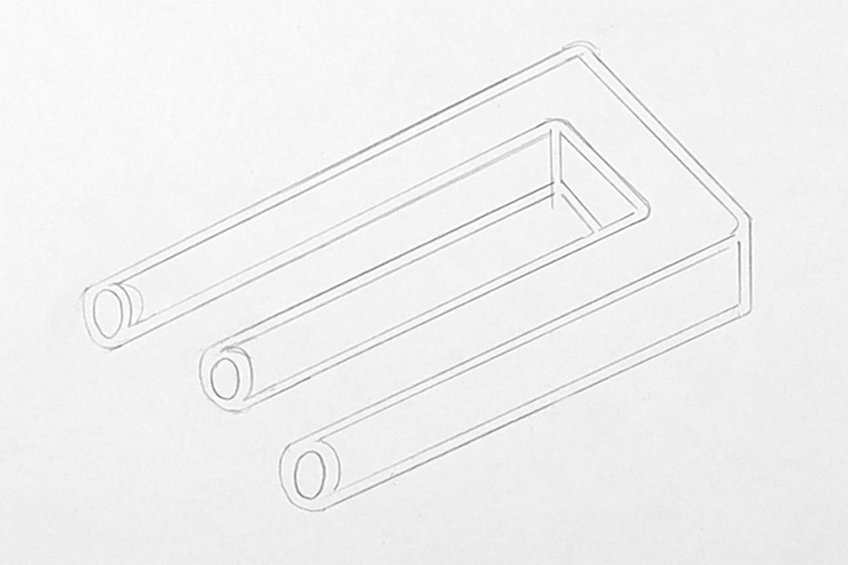
We now want to draw cylindrical shapes within each rod, giving it a three-dimensional effect. we create this cylindrical shape within each rod with parallel lines that run along the inside of each rod. We want to make sure that the lines curve at the ends of each rod within the trident shape, giving the ends a rounded shape.

As we do this within each rod we will find that the bottom two can be closed at their back ends with a straight line. The top rods inside lines should still flow through to the outside lines of the bottom rod.
From there, we can draw a circle inside the ends of each rod to emphasize the cylindrical shape of the rods a little further. We can also give the trident more three-dimensionality by adding shape to the inside section at the base of the trident by the middle rod.
Step 4: Outlining the Trident
Using a ballpoint pen we now want to outline the structure of the trident to define the form of the shape a little more.
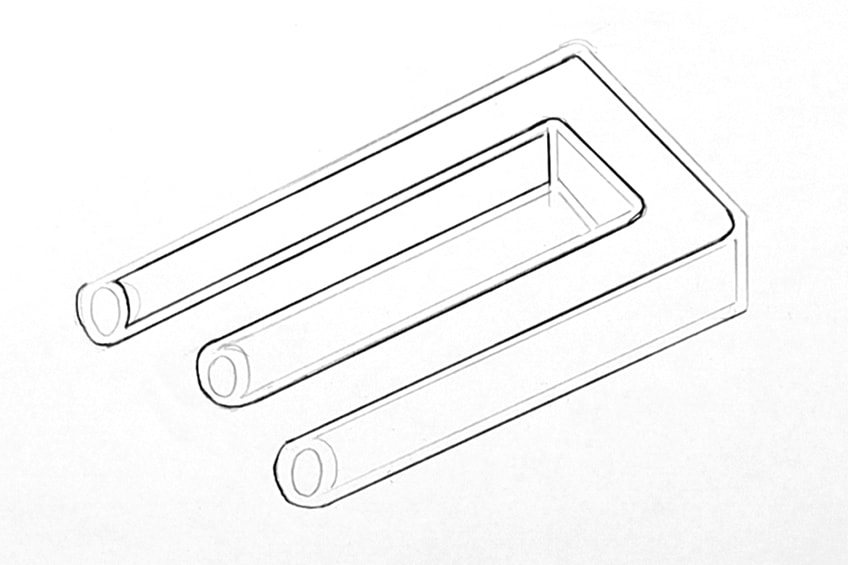
Make sure you patiently go over the lines with your pen, using a ruler for the straight lines.
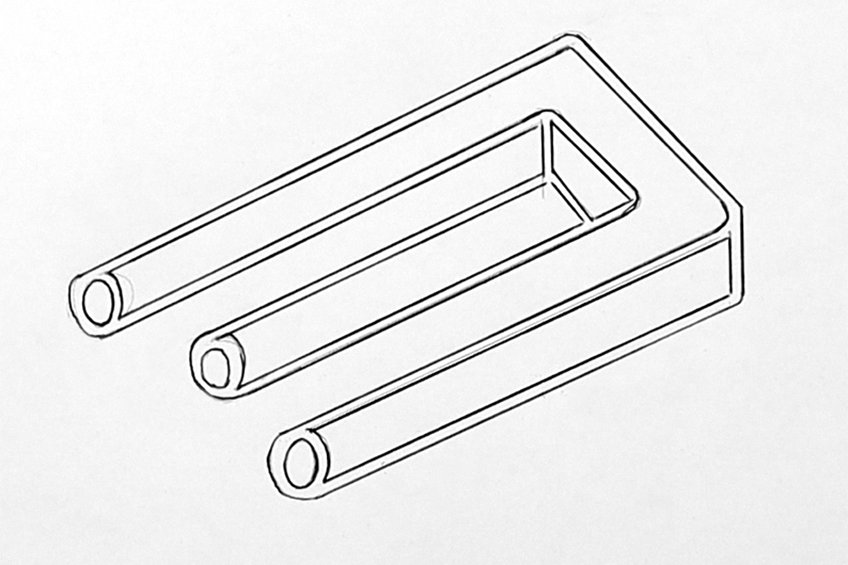
At this point, we should have an impossible trident optical illusion drawing that is outlined. We now want to emphasize three-dimensionality with some shading.
Step 5: Adding Shading to the Trident
We can now color the circles at the end of each rod black with our pens. We can also start to add shading to each rod creating gradients that flow from dark to light.
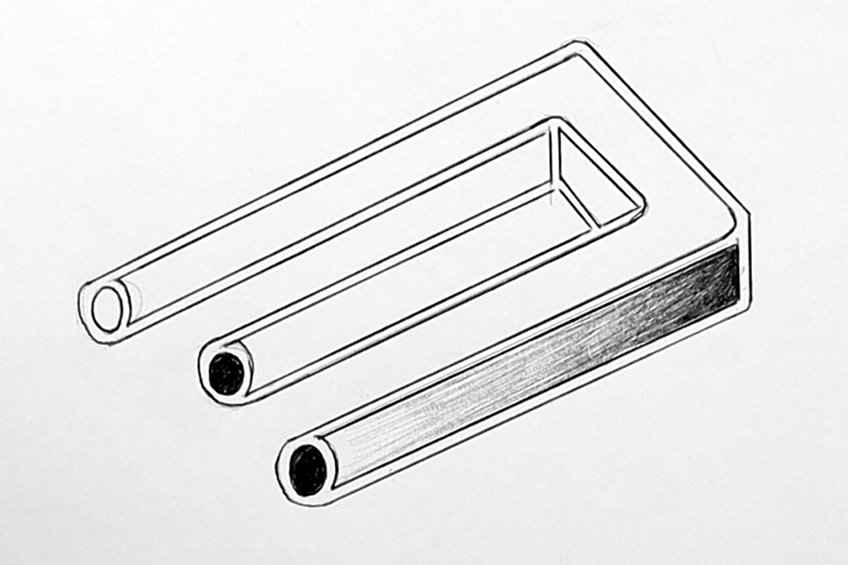
This step is more intuitive and should be done according to how you would like to shade the trident. Play around with different shading directions within the trident to emphasize the strange effect in the impossible trident.
Try creating a seamless gradient within each rod of the trident. This will emphasize the three-dimensional quality of the impossible trident.
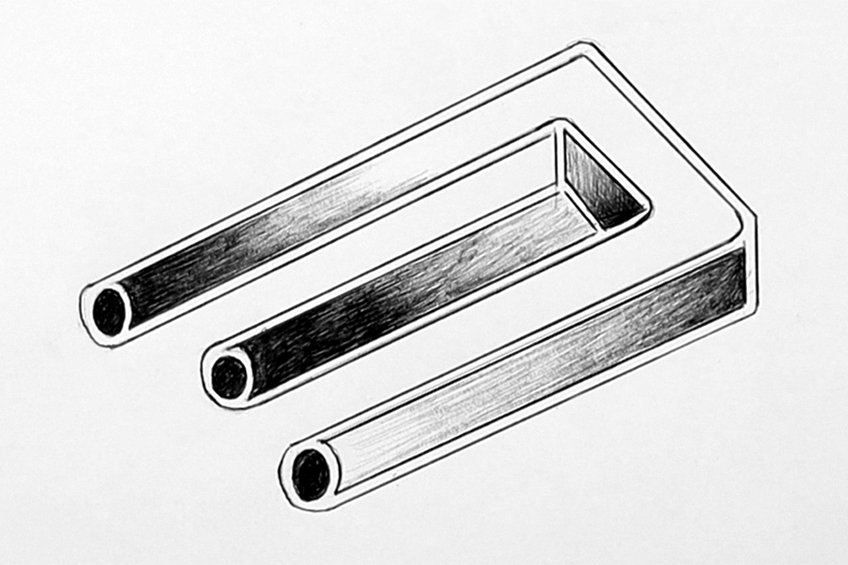
Take your time and see how the lines flow and where they should be closed off. Otherwise, there you have it – a simple few steps on how to draw an impossible trident!
How to Draw a Distorted Chess Board
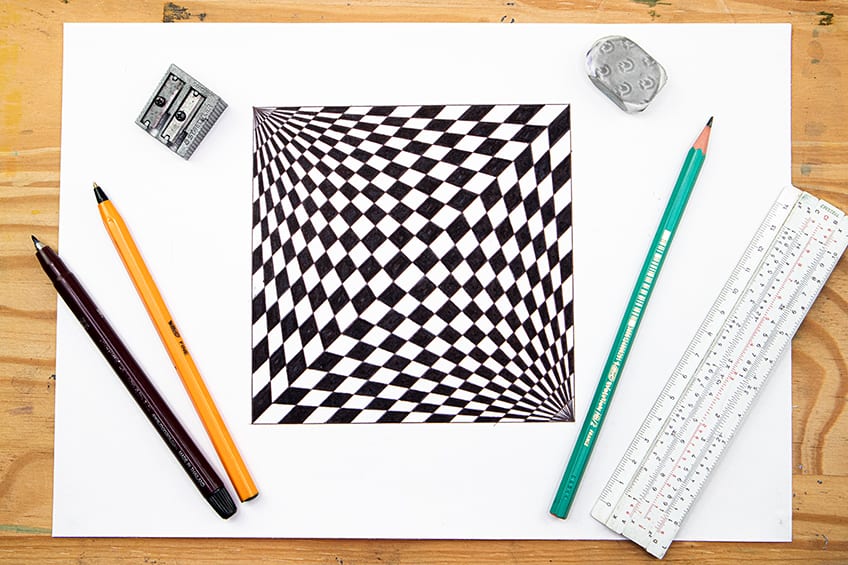
The distorted chess board is a less common optical illusion but it is fun and easy to draw. The 3D illusion drawing creates a strange effect when looked at for a long time. Let’s see how we can create this simple illusion drawing.
Step 1: Drawing the Square
We start by drawing an even square that is whatever size you would like. However, we want to make sure that it is even in length and width. From there, we can draw a diagonal line connecting to opposite corners in the square.
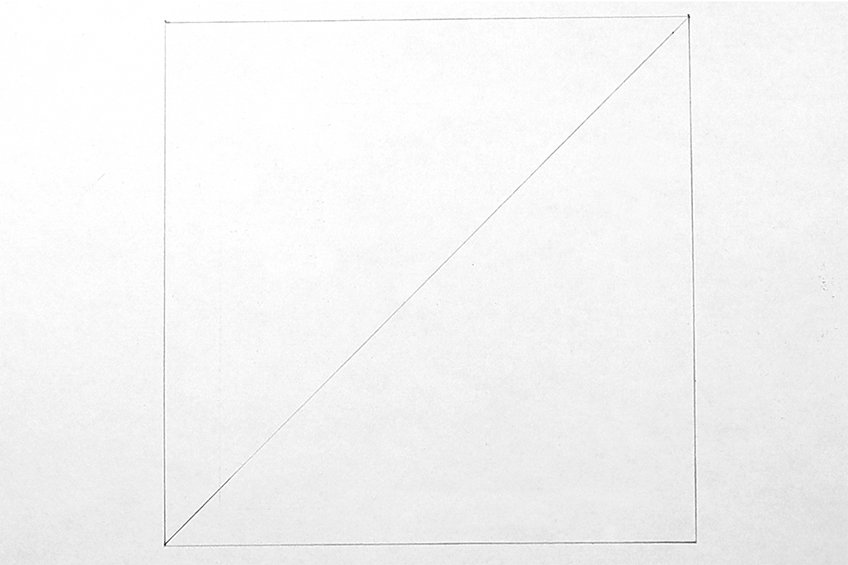
We then want to add evenly measured increments along all sides of the square and a long diagonal line within the square. We want to add a little dot of evenly measured increments that correlate with the size of the square.
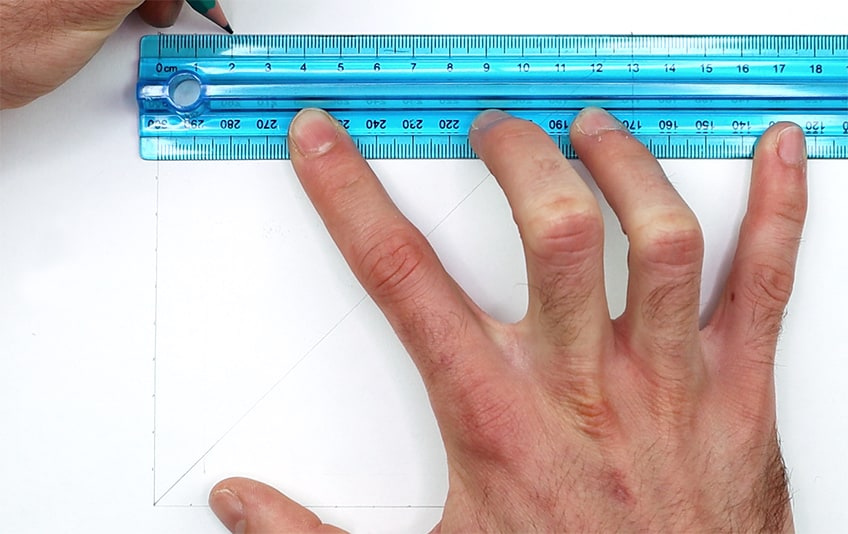
This means that if your square is 16 cm, use a set of 1- or 2-cm increments along the edges of the box. This way, once we start drawing our lines, they will connect seamlessly in the square.
Step 2: Adding in Lines
From each corner of your square on either side of the diagonal line, you will connect a straight line from the corner to each measured increment along the diagonal line.
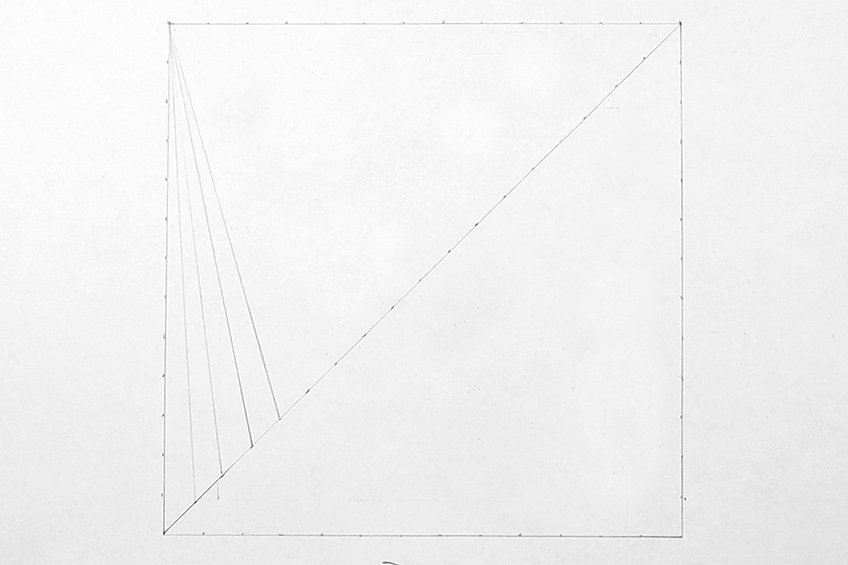
We want to take our time using our rulers to connect lines from the corners of the square to the dots along the diagonal line within the square.

We then can proceed to do the same on the other side of the diagonal line, connecting a straight line from the corner of the square to the dots along the diagonal line in the square.
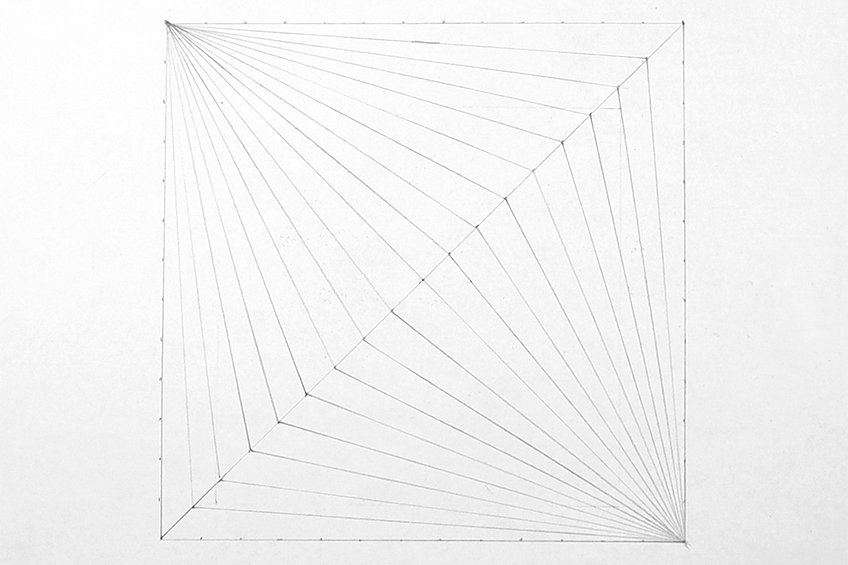
From there, we want to connect the dots with straight lines that run parallel with the diagonal line. We can do this on either side of the diagonal lines, resulting in a set of lines that cross over perpendicularly to the others that flow from the corners of the square.

Step 3: Outlining the Square With Ballpoint Pen
To make the process of filling in the chess board optical illusion much easier we want to go over the lines with a ballpoint pen. By doing so, we give ourselves more distinct lines to color within.
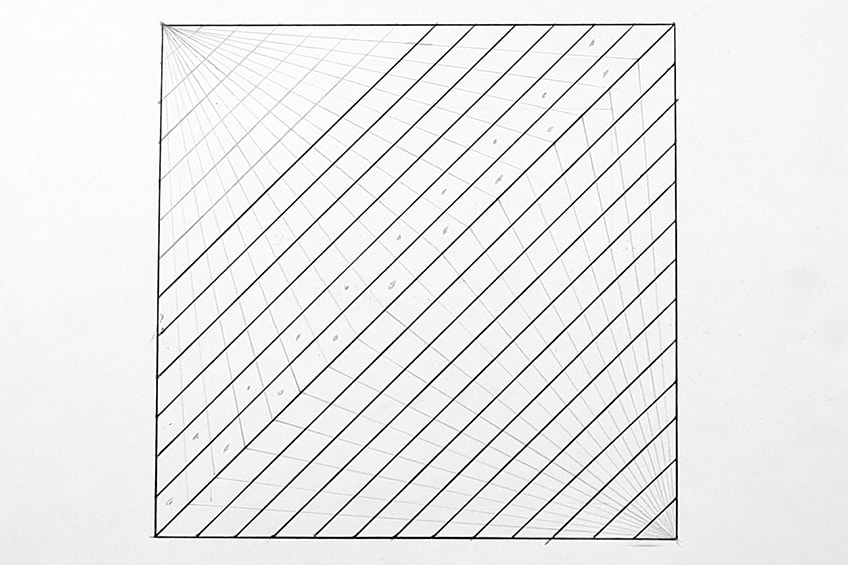
Make sure you use your ruler and slowly go over all the lines. We want to make sure every line is emboldened with a pen.
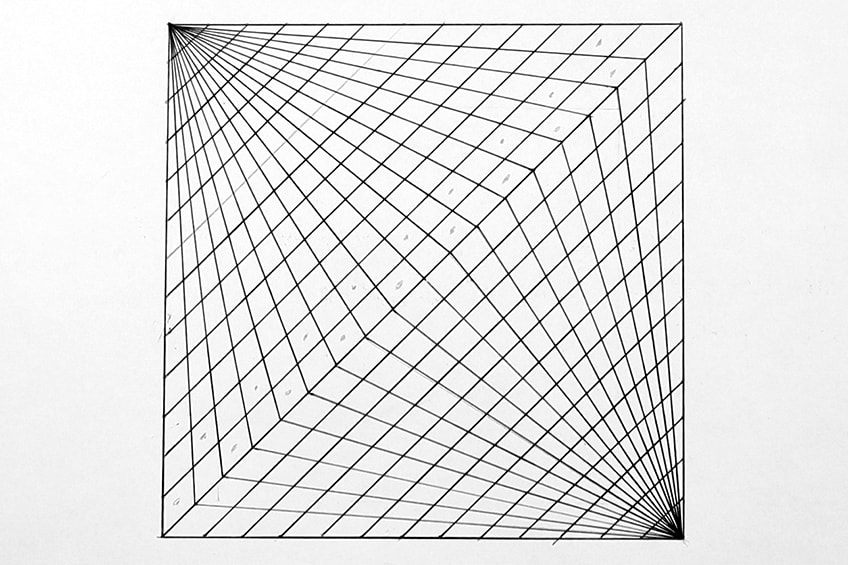
You want to make sure you take your time so that there aren’t any silly mistakes made with your pen.
Step 4: Filling in the Chess Board
Using a marker, we want to start on one side whereby we fill in the squares with the chess board sequence. Try going row by row, first just marking which square is to be filled in.
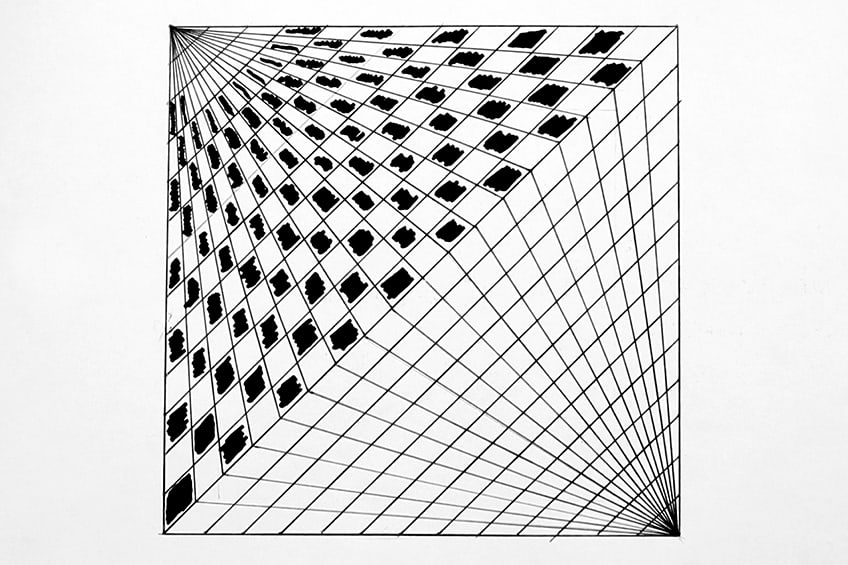
Once you have done so, a good suggestion would be to work from the small corners to the middle of the chess board. You want to take your time making sure you don’t color in the white squares.
The more patient you are, the more likely you are to not make any silly mistakes. Make sure you use a ruler to keep the edges of each square clean.
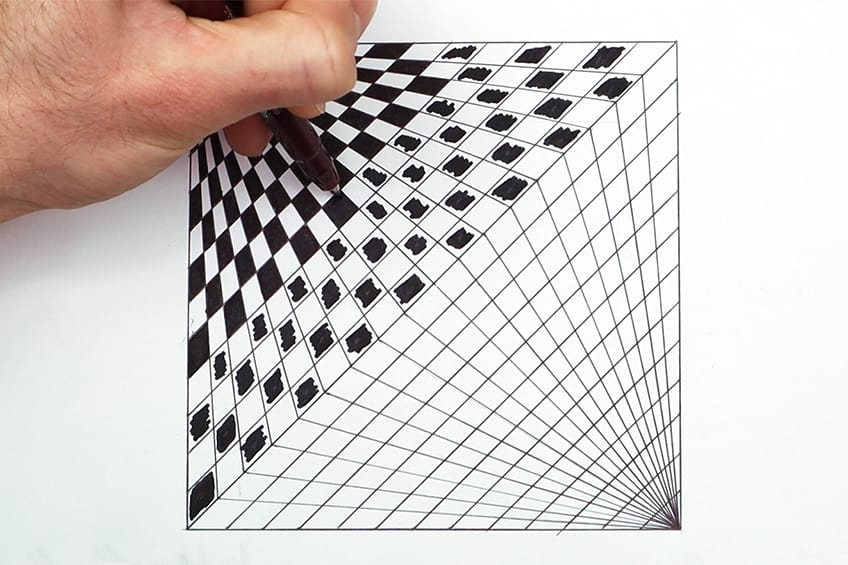
You want to make sure that you don’t smudge any ink as you fill in the correct blocks of the chess pattern. A good suggestion would be to use a piece of paper under your hand as you draw.
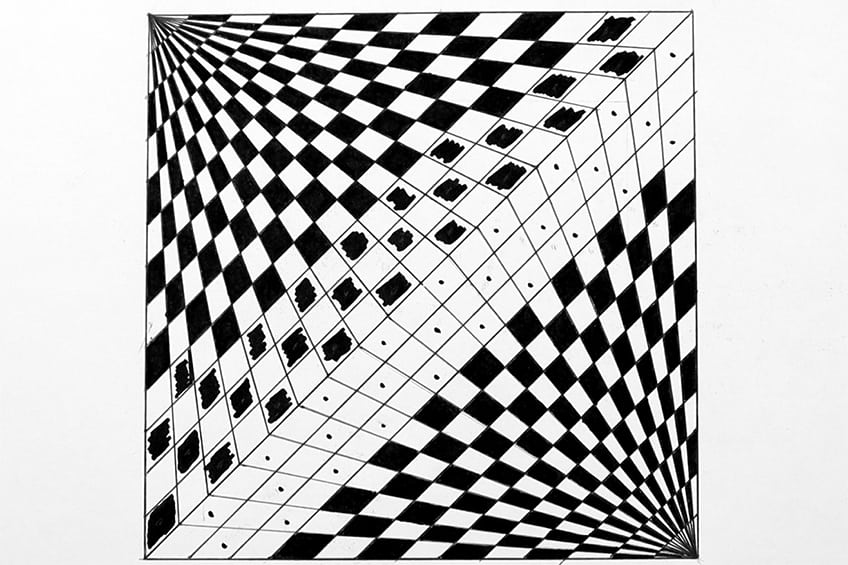
And there you have it! Once you have completed filling in the correct blocks, you will have an obscure chess board optical illusion drawing.

How to Draw a Corridor Illusion
The corridor illusion is another less popular optical illusion drawing, however, this one puts your shading to the test. When drawn correctly, the corridors give the effect of moving into the paper, fading into a void. Let’s see how we can create this strange optical illusion effect.
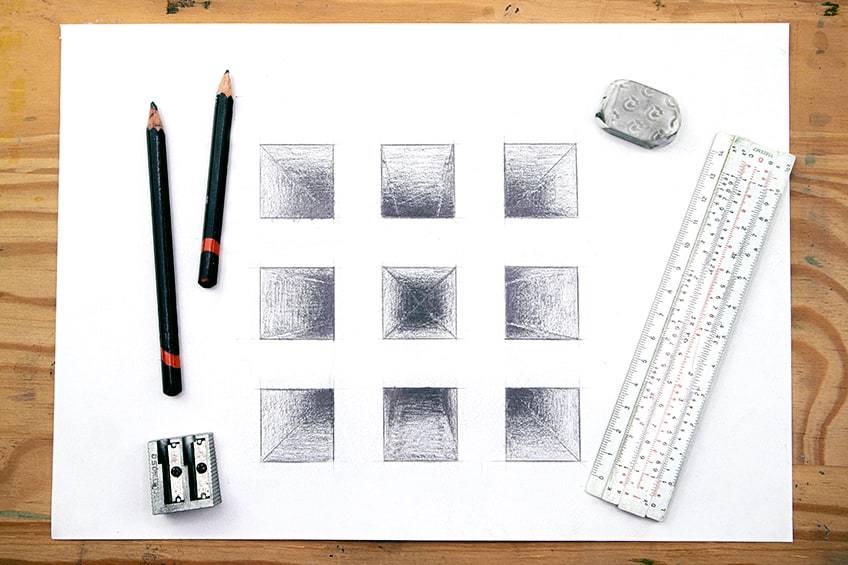
Step 1: Drawing a Three-by-Three Square
We want to start by creating a three-by-three columned and rowed square. we want to make sure that we draw a square that can be divided perfectly into three both in length and height.
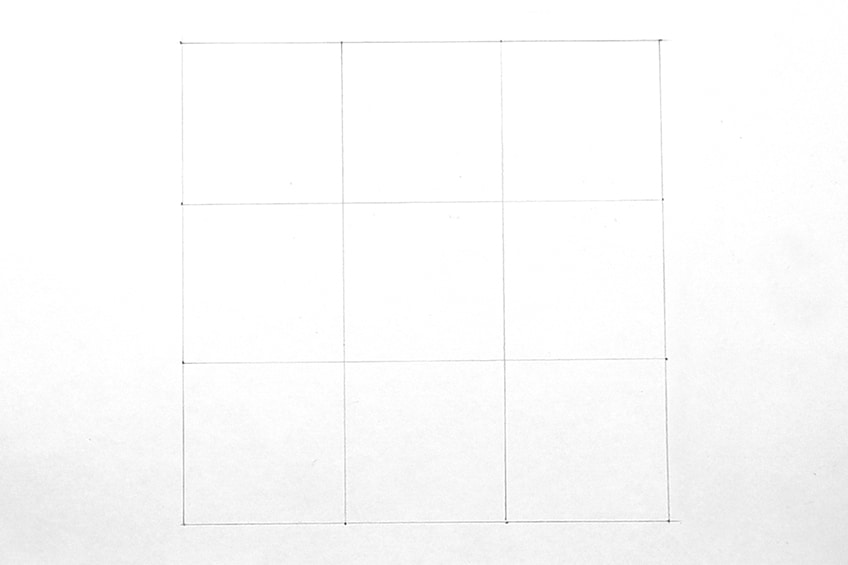
Step 2: Drawing Smaller Squares Within the Squares
Once we have our nine squares, we want to use a 1 cm width and draw a square within each of the larger squares. If we use the same width in each square, we should find that the far corners all align with the center square.
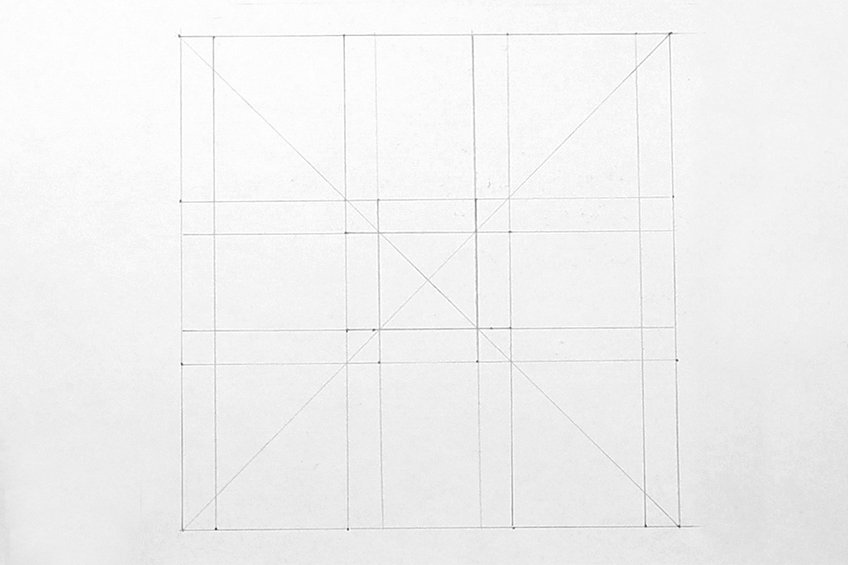
Make sure you spend time on this using your ruler and the same width for each square so that they are accurate. You can draw a line from opposite corners to see if they intersect perfectly in the middle square, if they do then they are accurate.
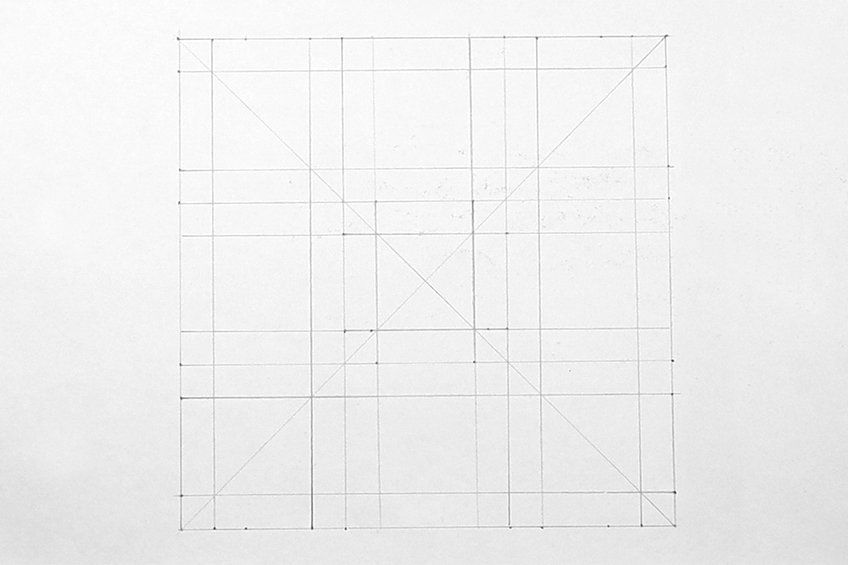
Step 3: Drawing Shading Guidelines
Using our pencils, we can now start to outline all the smaller inner circles within the square. We should have a total of nine evenly-sized squares at this point.
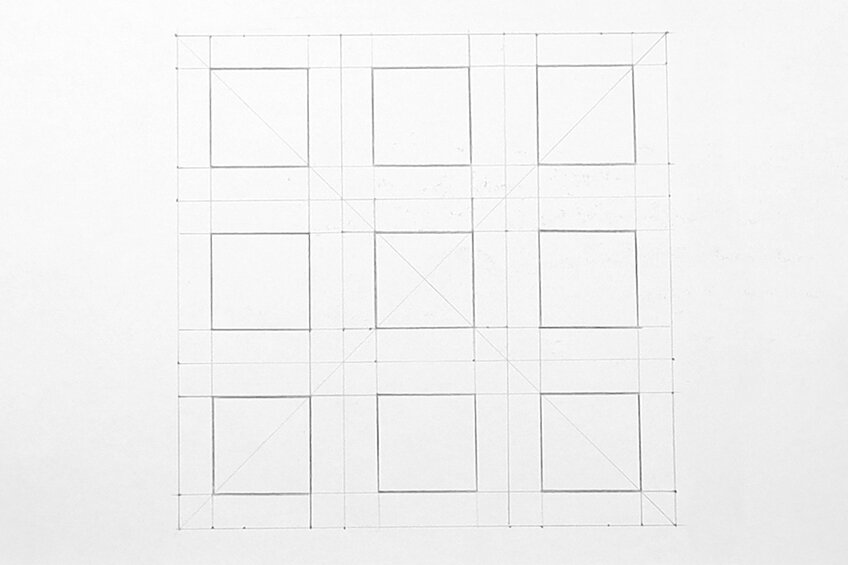
We now want to draw a straight line in each square that aligns with each corner of each square to the center point of the middle square. However, we want to only keep the lines visible in the squares, which means we should be left with a corridor effect in each square.
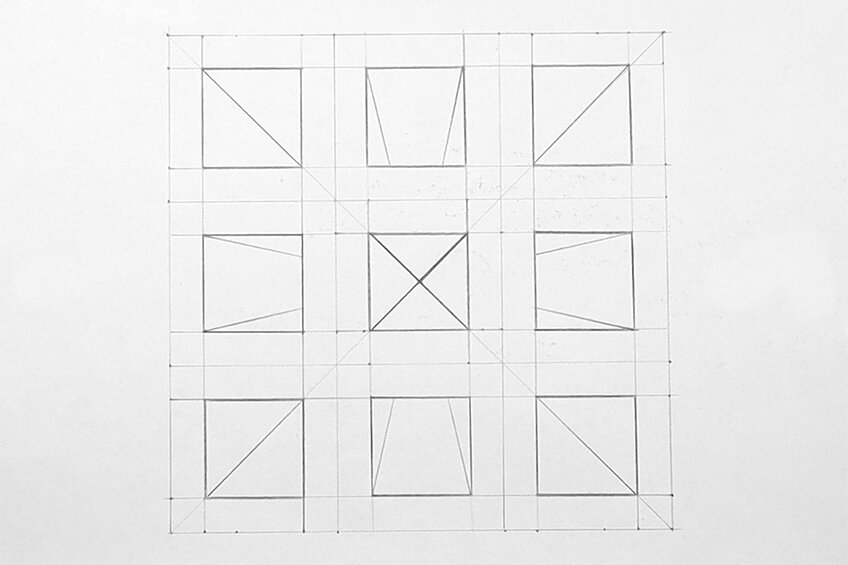
Step 5: Shading Each Square
Now that we have our squares and corridor lines, we now want to use our pencils and shade a gradient from dark to light. We want the darkest part of the shading to be positioned in the corner of each square closest to the center square.
Another good suggestion is to consider the planes of each corridor. this means that each corridor will have both a vertical and horizontal plane either the roof or floor.
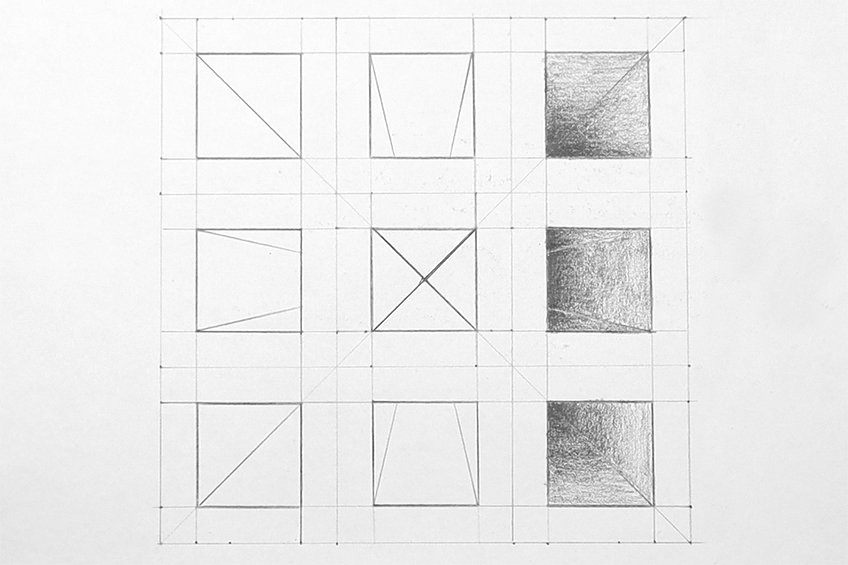
We want to make sure that we shade along the horizontal and vertical planes of each corridor, making sure the shading aligns with the correct plane. The only square where all planes will be visible is the center square, which means we will shade in a square-like pattern.
Take your time with each square making sure each one has a seamless gradient of shading. Make sure that you use paper under your hand if necessary – this way, you are less likely to make any silly mistakes.
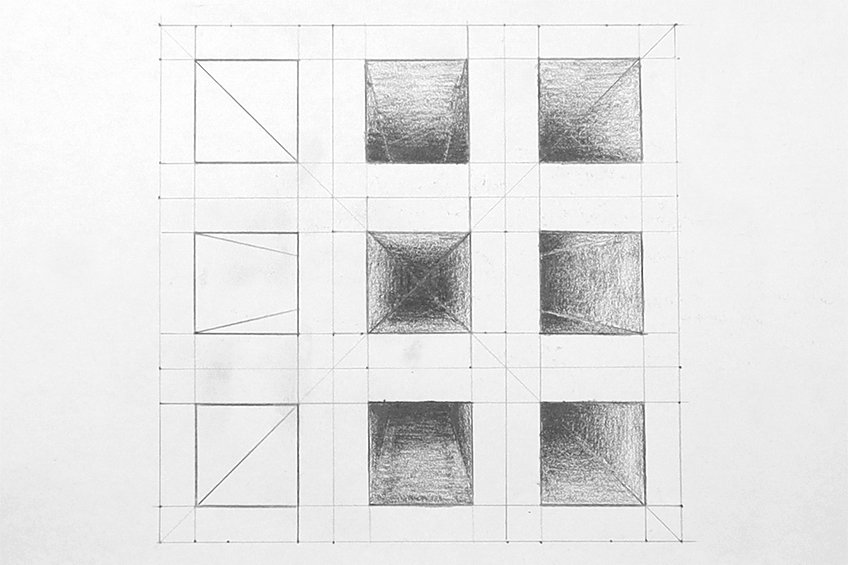
As you shade in each corridor, you will start to see how the effect of depth starts to appear within the optical illusion drawing.
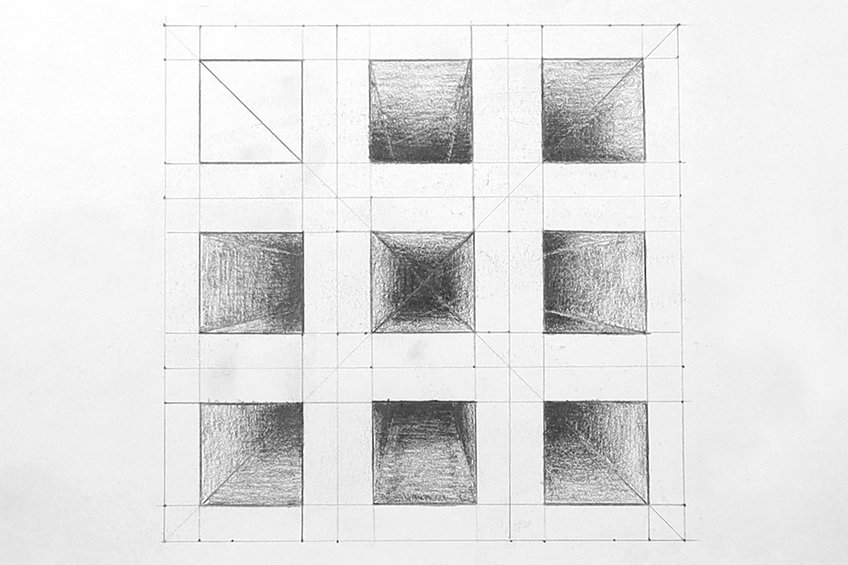
Once you have shaded in each square, you should have a set of corridors that fade into darkness. And there you have it – a basic few steps for creating a unique corridor illusion!

How to Draw an Impossible Square
Another great illusion that is simple and easy to draw is the impossible square. This illusion is another popular one that gives the strange effect of an infinite loop in the form of a square. Let’s see how we can create this strange illusion drawing.
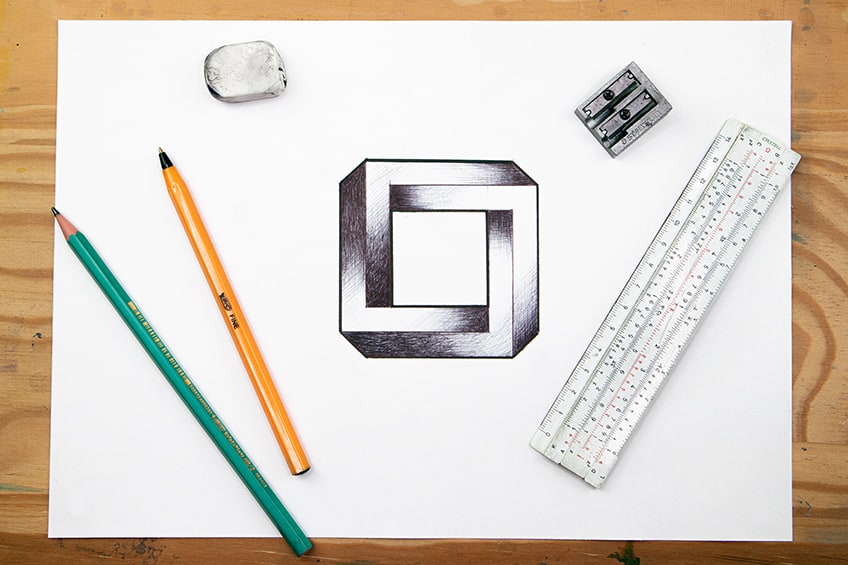
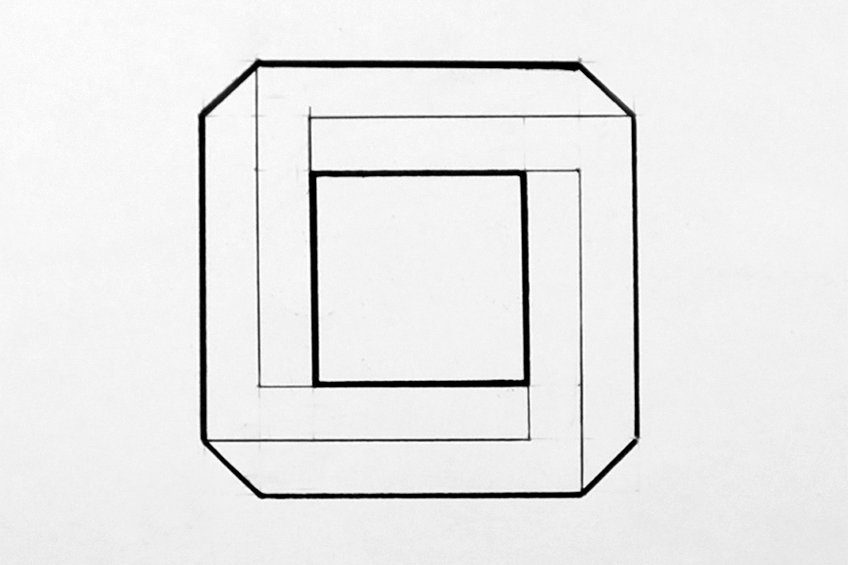
Step 1: Drawing Squares Within a Square
Let us start by drawing a simple square with our pencils. We want to make sure that we draw an evenly sized square both in width and length.
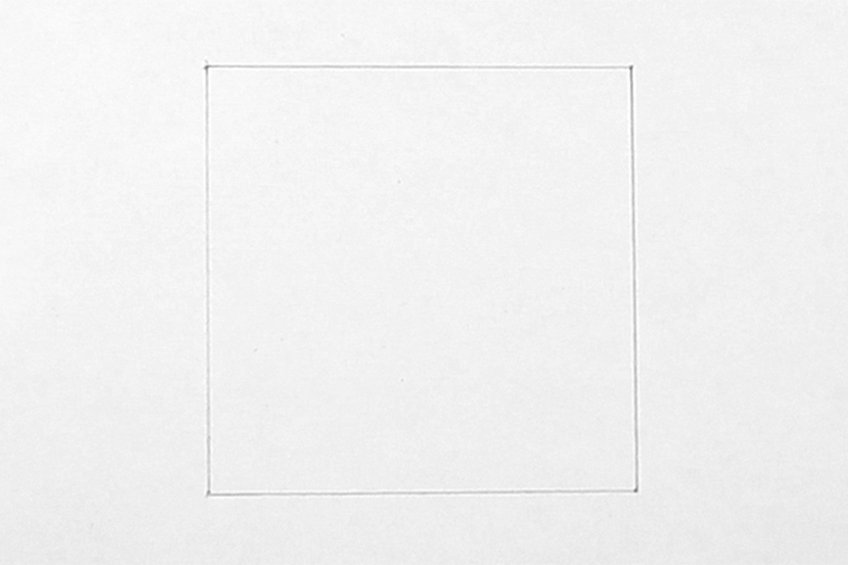
From there, we want to draw another two squares, each one1 cm in width from the last one. We should at this point have three lined squares, all intersecting at 1 cm widths as they get smaller.

Step 2: Cutting the edges of the Largest Square
We now want to erase the edges in a diagonal fashion of the square that is on the outside. We can do this at the intersection points of the outer and middle square lines where they create a perpendicular point.
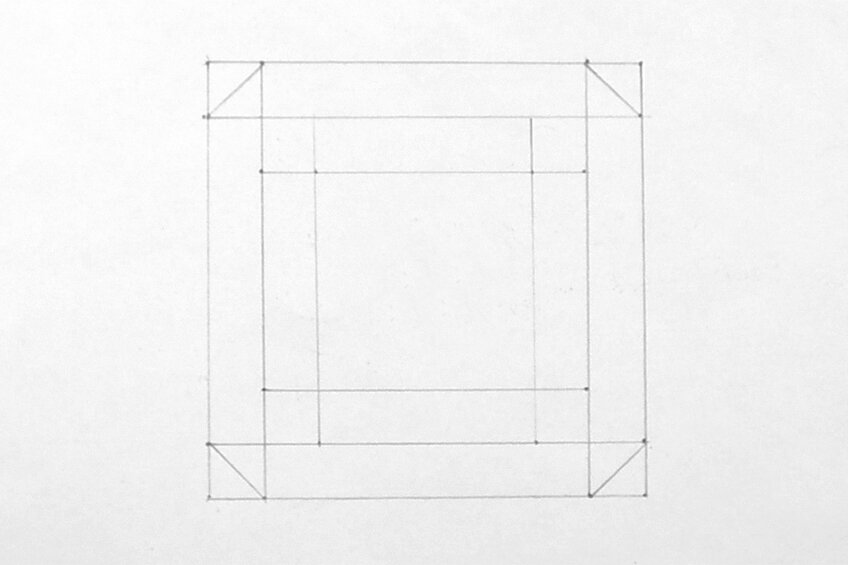
We do this by drawing diagonal lines that are also 1 cm in width from the perpendicular corners of the first square and middle square. This can be measured as a 1 cm distance from each corner in width and length from the outer corners of the largest square.
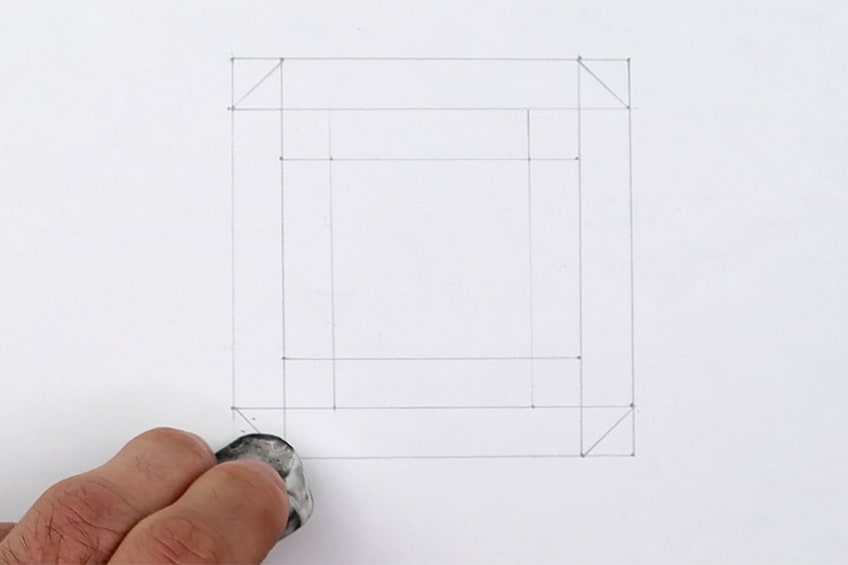
From here, we should have an octagonal shape with long sides and short corners. We should still have two more squares on the inside of the largest one with each one centimeter in width from the last.
Step 3: Outlining the Impossible Square Shape
From here, we want to start forming the impossible square shape by outlining the octagonal shape with a ballpoint pen.
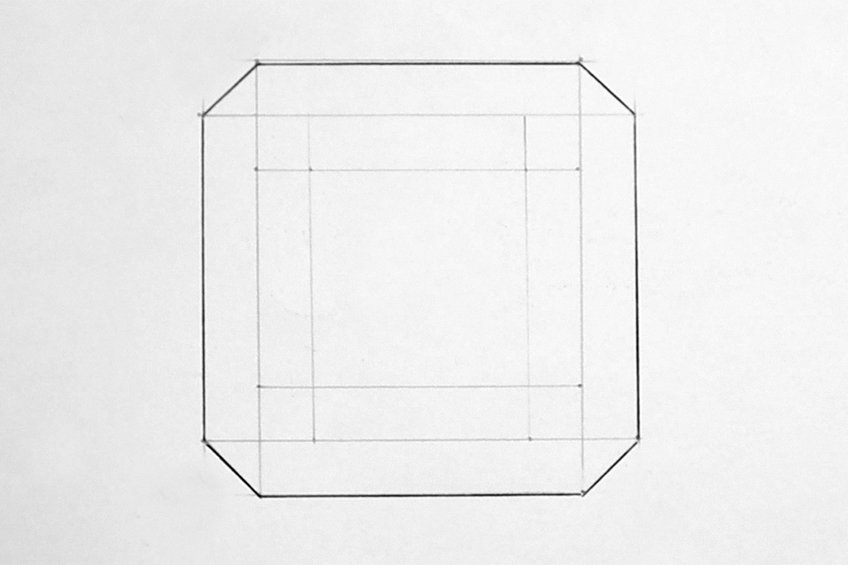
We can also outline the inner circle that is the smallest within the octagonal shape.
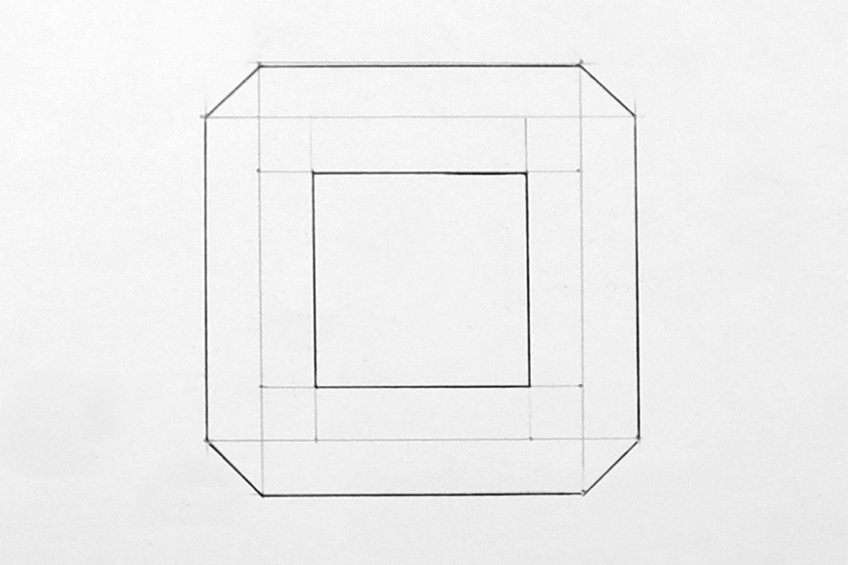
We now want to draw a set of 90-degree lines starting from the highest corner at the left point of the octagonal shape. This line will go down vertically and then along the bottom horizontal line of the inside square and stop at the vertical line of the inside square.
Once you draw a 90-degree line, you will find that as you rotate through the shape, we should have four of these 90-degree angles rotating through the shape. From there, we want to erase any pencil lines inside the shape.
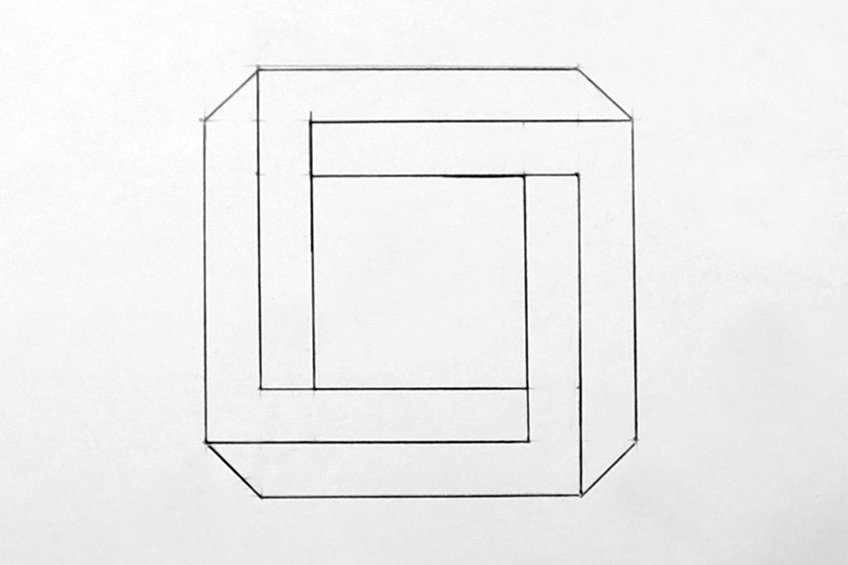
From there, we can embolden the outer octagonal shape and inner square again. we want to just make the shape more distinct and clearer with a black marker. At this point, we should see the visible impossible square shape.
Step 6: Adding Shading to the Impossible Square
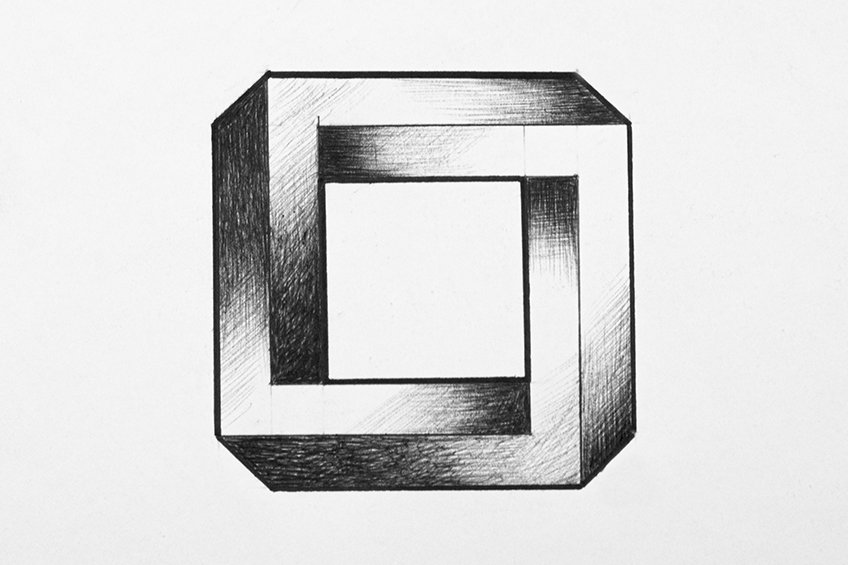
To further the three-dimensional optical illusion effect within the impossible square, we can add in some shading. We do this by starting at one point in the square and creating a gradient of dark to light with our ballpoint pens.
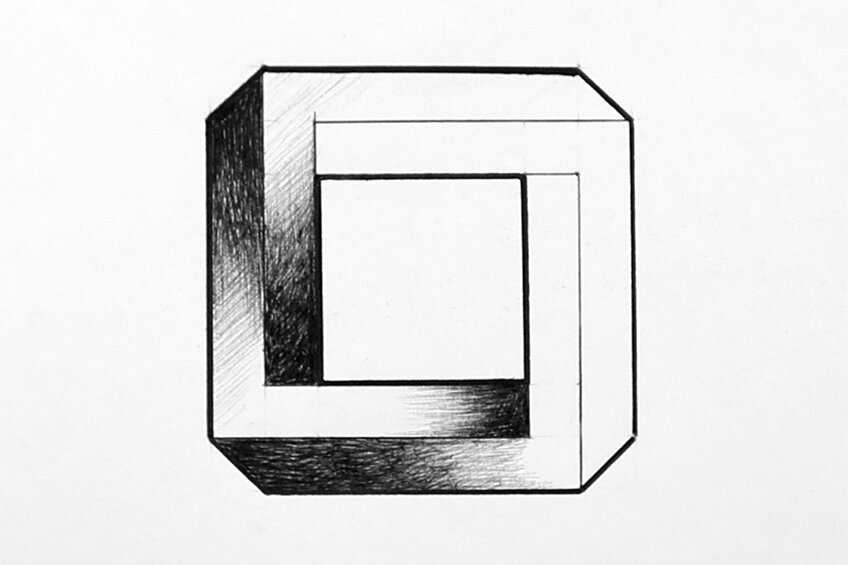
You want to rotate through each section in the shape one by one, adding in shading that flows in opposite directions. By adding shading to the square, you will find that it emphasizes the three-dimensionality of the optical illusion. And there you have it- how to draw an impossible square!
How to Draw an Impossible Staircase
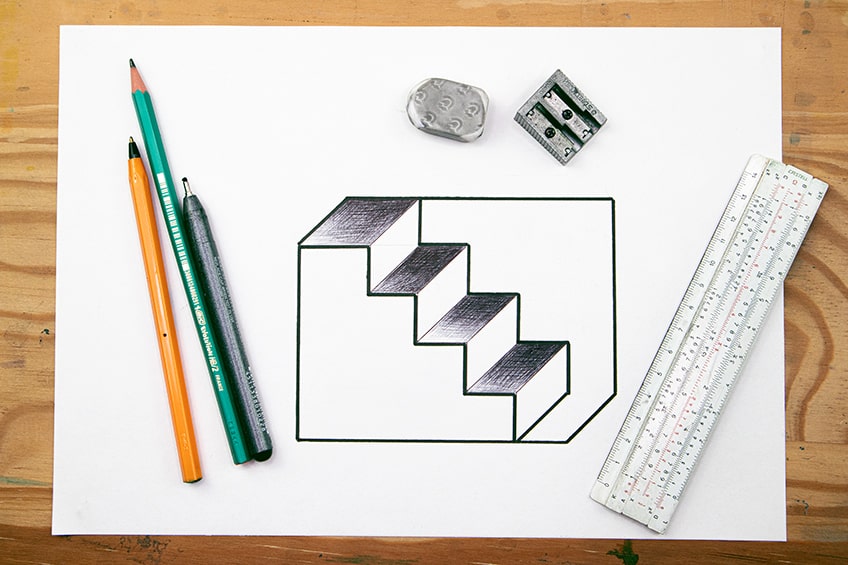
The last optical illusion we will draw is perhaps the simplest, yet very disorienting. Out of all the illusion sketches, this one is perhaps the most usable within various artwork ideas. Let’s see how we draw the impossible staircase.
Step 1: Drawing the Guidelines
We want to start by drawing an evenly measured square that is the same in length and width. Try to use an even number to construct your square, such as 16 cm by 16 cm.

From there, we will want to start creating stairs by creating 2 cm increments along the horizontal and vertical axis of the square.
As we make one vertical and horizontal set of rows in the square, we will continue to make them on top of the last set. By doing this, we will slowly construct intersecting lines that use the same 2 cm increments.
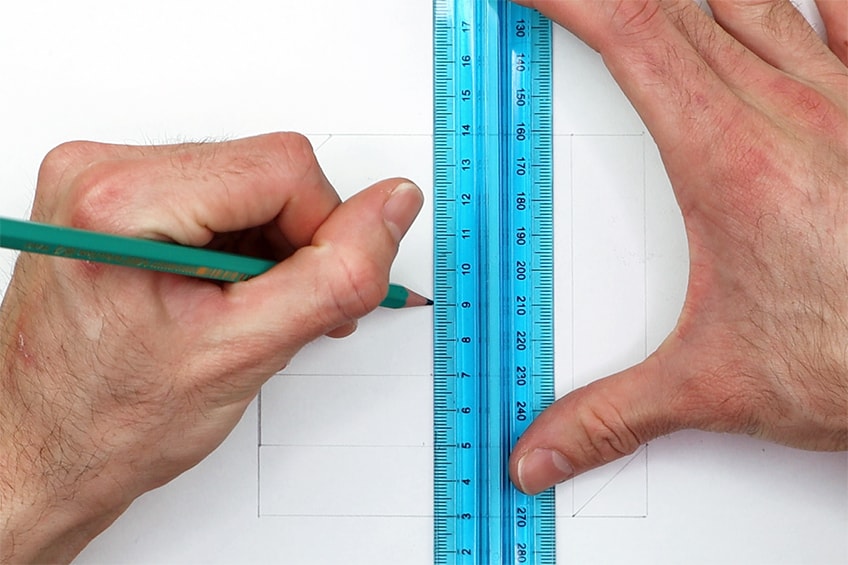
Step 2: Creating the Staircase
You want to work your way from one corner to the opposite corner on the other end of the square. Once you are done you should easily be able to outline a staircase shape. You can erase any other unnecessary lines around the staircase.

Step 3: Creating the Impossible Staircase
At the bottom of the last step, you want to draw another 2 cm horizontal line extending out from the bottom corner of the bottom stair.
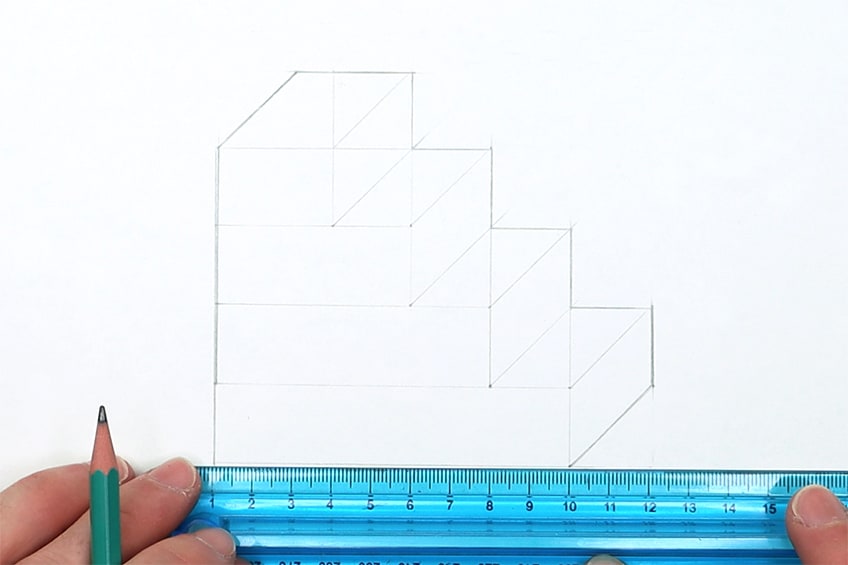
You then want to continue that line diagonally in a parallel 2 cm width with the bottom stair. Keep drawing a parallel line along the bottom stair until you get to the vertical part of the bottom stair.
Once you get to the vertical part of the bottom stair, extend that vertical line until it reaches the same horizontal plane as the top horizontal line of the top stair. You then can connect that line to the top right corner of the top step with a horizontal line.
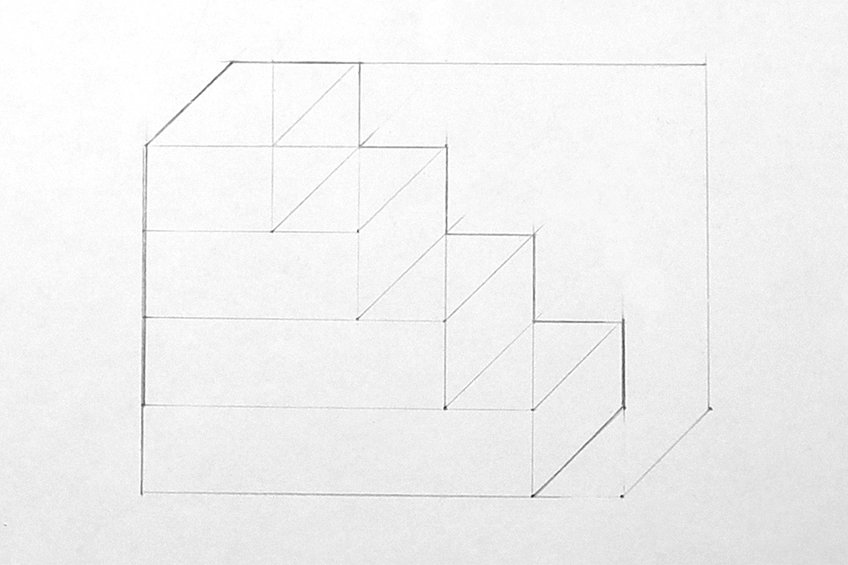
Step 4: Outlining the Impossible Staircase
From here, we want to use our ballpoint pen to outline the impossible staircase shape. We can start by outlining the stair structure and then the lines connected to and surrounding the stair structure.
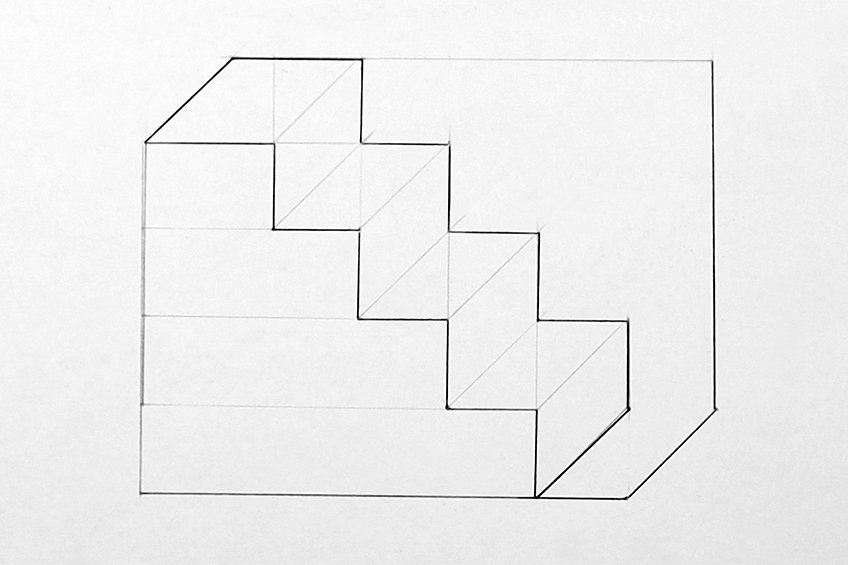
Step 5: Shading the Steps
We should have the impossible staircase at this point; however, we want to emphasize its topical illusion quality with some shading. We can do this by shading every second step with our ballpoint pens.
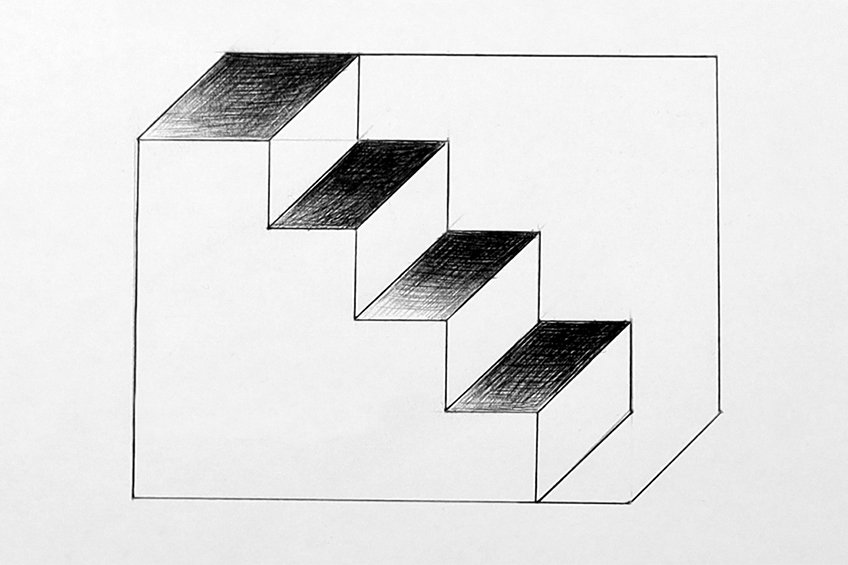
Once you have shaded every step, you will have a strange impossible staircase illusion drawing. And that’s how you draw an impossible staircase in a few simple steps.

There you have it, a few simple optical illusion drawings that can be drawn in a few simple steps and can be used in all sorts of artworks!
Tips to Remember
- Use your ruler. Always use a ruler when drawing straight lines for these optical illusion sketches.
- Think intuitively. Once you start the drawing process, you will find that the images start to appear before completion if you follow the steps correctly.
- Consider the flow. As you complete each illusion drawing, you want to consider how each of their forms flows according to the rules of three dimensions.
- Use precise measurements. If there are precise measurements to use, never deviate from them.
- Utilize shading. By utilizing shading in your illusion drawings, you will find that it further accentuates the three-dimensional qualities of the image.
This tutorial on how to draw illusions gives you insight into a few tips and tricks that make 3D illusion drawings effective. In many ways, you will find that you will make little mistakes and need to retry and that is okay, it will take a little practice. However, once you have grasped how to create the illusion sketches, you can utilize them in various artworks in all sorts of ways.
Frequently Asked Questions
How Do You Shade Optical illusions?
There are many ways to utilize shading within optical illusions because they are often three-dimensional structures. A good way of shading is to utilize the concept of three tonal values. This means that you can incorporate a different shade on the three different surfaces as the illusions will often have, height, length, and depth. This will create an effect of maximum, medium, and minimum contrast in a single object, which will emphasize its three-dimensional quality. Secondly, you can shade in opposite directions along different planes. By shading different sections in opposition directions, it can create a strange effect in the optical illusion drawing, making it weirder and disorienting,
How Can You Use Optical Illusions in Art?
Optical illusion drawings are also great features that can be incorporated into other artwork ideas. In many instances, you can use the strange three-dimensionalities of various optical illusion sketches to create backgrounds or surfaces for characters and objects to be placed upon. Their strange disorienting qualities can be a great addition to surrealistic artwork ideas, whereby they can create a landscape that deviates from conventional rules. Artists such as M. C. Escher and Salvador Dalí are great examples of how these structures can be used as focal points or features within various types of artworks.
Matthew Matthysen is an educated multidisciplinary artist and illustrator. He successfully completed his art degree at the University of Witwatersrand in South Africa, majoring in art history and contemporary drawing. The focus of his thesis was to explore the philosophical implications of the macro and micro-universe on the human experience. Matthew uses diverse media, such as written and hands-on components, to explore various approaches that are on the border between philosophy and science.
Matthew organized various exhibitions before and during his years as a student and is still passionate about doing so today. He currently works as a freelance artist and writer in various fields. He also has a permanent position at a renowned online gallery (ArtGazette) where he produces various works on commission. As a freelance artist, he creates several series and successfully sells them to galleries and collectors. He loves to use his work and skills in various fields of interest.
Matthew has been creating drawing and painting tutorials since the relaunch in 2020. Through his involvement with artincontext.org, he has been able to deepen his knowledge of various painting mediums. For example, watercolor techniques, calligraphy and lately digital drawing, which is becoming more and more popular.
Learn more about Matthew Matthysen and the Art in Context Team.
Cite this Article
Matthew, Matthysen, “Optical Illusion Drawing – How You Use Optical Illusions in Art?.” Art in Context. February 17, 2023. URL: https://artincontext.org/optical-illusion-drawing/
Matthysen, M. (2023, 17 February). Optical Illusion Drawing – How You Use Optical Illusions in Art?. Art in Context. https://artincontext.org/optical-illusion-drawing/
Matthysen, Matthew. “Optical Illusion Drawing – How You Use Optical Illusions in Art?.” Art in Context, February 17, 2023. https://artincontext.org/optical-illusion-drawing/.


