How to Make Skin Color – A Guide on Painting Skin Tones
Mixing and creating natural skin tones is always a challenge. If you are a portrait artist, or just want to enhance your painting skills, then you will need to know the basics of flesh tones and how to mix them. Mixing paint is never an easy task, and knowing how to make skin color adds a new element of difficulty. However, with the right tricks and tips behind you, getting an accurate flesh color does not have to be a challenge. We will explore some of the best techniques on how to make skin color below.
Basics on How to Mix Skin Tones
Knowing how to make skin color is a process that will differ slightly depending on the medium you are working with. Different paints will respond differently to mixing, with unique processes being required for each. To achieve the most accurate skin tones, you will need to pay careful attention to the properties of the type of paint you are working with.
Method 1: Basic Skin Tone Mixing with Yellow, Red and White
- Combine cadmium red, yellow ochre, and titanium white in equal parts
- Incorporate ultramarine blue or burnt sienna in small amounts to achieve darker shades
- Introduce more cadmium red for a warmer effect or more yellow ochre for cooler undertones
- Add additional titanium white to lighten the overall color

Method 2: Burnt Sienna Base
- Begin with a light flesh tone by mixing burnt sienna with white
- Introduce cadmium yellow medium or cadmium red for medium skin tones
- Darken the tone using small amounts of ultramarine blue or purple
- Add white to the base to create highlights

Mixing Recipes for Different Shades of Skin Color
| Skin Tone Color | Skin Tone | Mixing Recipe |
|---|---|---|
| Light Skin Tone | Base of Titanium White, small amounts of Yellow Ochre and Cadmium Red Light, touch of Ultramarine Blue or Burnt Umber as needed | |
| Medium Skin Tone | Equal parts Burnt Sienna and Raw Sienna, bit of Cadmium Red Light, adjust with Titanium White or Burnt Umber | |
| Olive Skin Tone | Mix Yellow Ochre and Burnt Umber, small amount of Ultramarine Blue, adjust with Titanium White and Cadmium Red Light | |
| Dark Skin Tone | Base of Burnt Umber or Burnt Sienna, add Ultramarine Blue, Cadmium Red Light for warmth, Yellow Ochre to adjust brightness, lighten with Titanium White if needed | |
| Tanned Skin Tone | Equal parts Burnt Sienna and Raw Sienna, small amount of Cadmium Red Light, adjust with Titanium White or Burnt Umber | |
| Deep Dark Skin Tone | Base of Burnt Umber, add Ultramarine Blue, Alizarin Crimson or Cadmium Red Deep for warmth, small amount of Yellow Ochre |

How to Make Skin Color with Acrylic Paint
Acrylic paint is very sensitive and achieving the perfect mix of colors is never an easy task. Be careful here, because when acrylic paint is wet, the colors will seem a little bit lighter than when they dry. Try to make the color slightly lighter so that it will match your desired color when it dries a bit darker.
It can be challenging to recreate the exact same skin tone again with acrylic painting. If you need a large amount of paint, then it might be best to mix a big batch at once. Otherwise, try to make detailed notes about how much of each color you added. Just be careful when adding black, as it can produce a very dark and muddy effect when mixed into certain paints. We suggest using black very sparingly.
Remember, you can always add more black, but taking it out is very difficult.
The color mixing chart for acrylic paint can be huge, but this all stems from just three colors. When mixing acrylic paints, start with the primary colors. Put out a blob of red, yellow, and blue on your palette, with a blob of white as well. Now you can mix an even portion of each primary color together to create a darker brown shade. This will be the basis of basically any skin color.
Now that you have the basic undertone, you can modify this to get an exact shade. It is easy to lighten your acrylic paint, but darkening it to the right shade is a challenge. This is why starting with a dark tone is best.
Add some white for lightening the tone, or use your primary colors to achieve highlighted effects. Blue will make the paint darker, red adds a bit more blush, and yellow lightens and brightens the color. You can play around with this a bit until you perfectly refine the skin tone.
Skin Color with Oil Paints
With oil paints, there is a massive range of colors to choose from. There are also many different skin tones out there. This leaves you with a multitude of options for mixing the perfect shade.
You could follow the same approach listed above for acrylic paints. Otherwise, another method is to start with a vermillion red hue and combine some yellow ochre. This produces a shade of orange. Then, mix in some ultramarine blue for a bit of depth and darkening. Now you can add some titanium white for a good basic skin tone. This can be refined by adding different primary colors in various proportions.
You could also start with a green base, which is achieved by mixing together yellow and blue. This can be modified with small doses of orange or red in order to lighten the tone a bit. From here you can add white, darken again with blue, and so on.
Knowing how to make skin color with oil paints does not have to follow any specific formula. As there are so many different paints available, you will have to just play around a bit before achieving the right outcome.
Skin Color with Watercolors
Mixing watercolors provide a unique set of challenges. These paints dry lighter than what is perceived on the palette, so don’t be afraid of a paint tone that seems a little bit too dark. Using black and white needs to be done with plenty of caution when using watercolors. White watercolors can change the translucence of the skin tones, while black can create a muddy effect. Darkening with watercolors is best done with brown paint instead of black.
When learning how to make skin color paint with watercolors, you should begin with yellow, red, and blue. Unlike the other types of paints, you will need to start with a majority of yellow, a small bit of red, and a tiny dot of blue. This will produce a kind of orange-brown color, which is a good base.

You can further refine this by adding very small amounts of red, yellow, blue, and even green. Watercolors are very sensitive, so be careful with every new addition. Play around with this until you reach the correct flesh tone. This can then be modified to create different light and blush variations.
When mixing watercolors, it is a good idea to have a bit of test paper ready. As you create new tones, paint a small bit on the test paper to see how it comes out. Watercolors dry pretty quickly, so you can quite easily get a good idea of what you will be painting with.
Painting Skin Tones
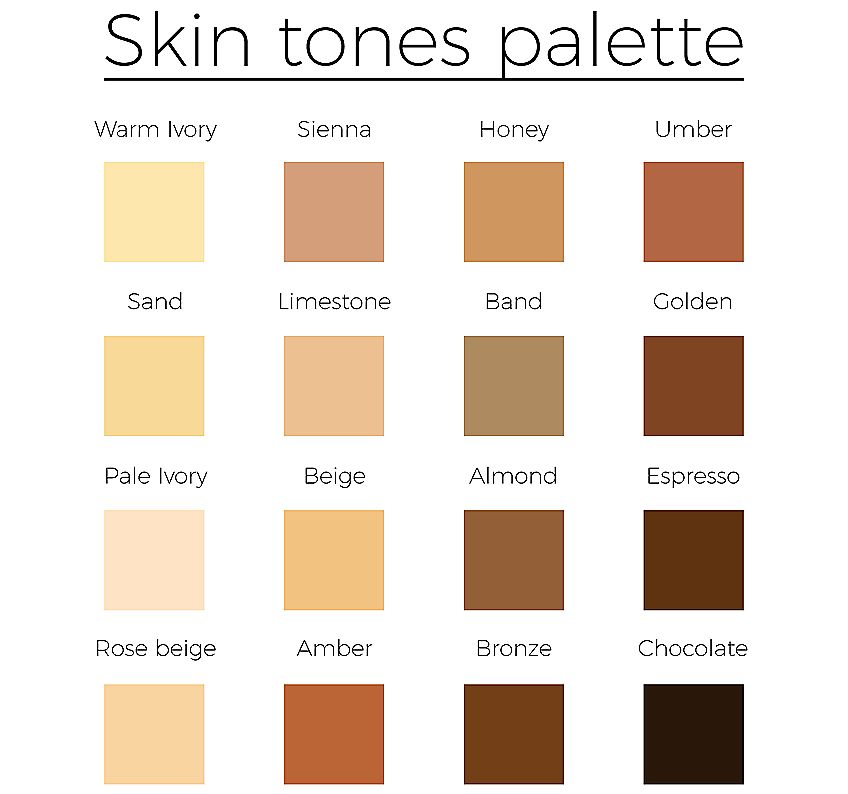
Learning how to make skin color is obviously a very broad skill, as there are so many different skin variations. While skin color can include a seemingly endless amount of tones, the basic shades can be divided into three levels: light, medium, and dark. From here, you can branch off of each shade to achieve the exact result you are after.
Mixing Light Skin Tones
Mixing lighter flesh colors follows the same basic process of how to make skin color with acrylic paint. Start by mixing equal portions of yellow, red, and blue. Now, you can use white, yellow, or both to lighten this color.
With light skin tones, you can add quite a significant amount of white. Adding red or yellow in various proportions will create more of a “tan” or “blush”. Blue is what will darken the skin tone, so use it sparingly.
Mixing Medium Skin Tones
Mid-range skin tones involve a larger number of color variations. This means that you will need to use more paints and combinations. When thinking of the skin color mixing chart, you can include the colors burnt umber and raw sienna here.
With medium colors, start by mixing red and yellow to form a shade of orange. This can slowly be adjusted with small quantities of blue paint. Be careful here, as it is difficult to take out the blue once it has been added.
If you are taking the paint on the darker side of the skin color mixing chart, a very small amount of black can be used too. This should be done until the correct base tone is achieved.
Knowing how to make skin color accurately comes down to the highlights and adjustments you add. The raw sienna and burnt umber can be mixed together to form a darker shade. This can be used in place of blue to create a more olive type of shade. A small amount of green can also be added here.
After that, it is just about experimenting. Add in red, yellow, and olive variants until you reach the correct shade. With medium skin tones, highlights are often created with yellow instead of white.
Mixing Dark Skin Tones
Knowing how to make skin color in darker shades is often the most difficult process to get right. For dark shades, start with purple, red, yellow, burnt umber, and raw sienna on the palette. Create a mixture of equal parts of raw sienna and burnt umber for the first base undertone. Then mix equal parts of yellow and red together for the other base color. Slowly mix these two together to form a good base shade to work with.
Now, you can start to create highlights and details. Purple can be used to add depth and darkness. Avoid using black as this will ruin the base coat by muddying it. You could consider using dark grey instead.
Red and yellow can be used for highlights and rosiness. Creating darker, lighter, and warmer tones are difficult to achieve here because there are more color variations involved. Just be sure to add very small increments of each color each time, and do not be afraid to create a fairly wide range of different flesh tones.
Variations in Painting Skin Tones
Learning how to make skin color never ends at a single shade. While each person has a unique skin color, there can also be multiple varieties of that color involved in a single person’s face. This can be due to shadows, light, and blush. When learning how to make skin color with paint, you will always need to create several different variations to each color.
Creating Blush Tones
Once you have made the base color, you will need to create a family of tones around this. An important feature of a skin tone is that of the blushed aspects. These can be used to fill in rosy cheeks or to add more accurate detail in parts of the face and body that are being hit by the sun.
When learning how to make skin color blush, never just add a dab of red or pink on top of the skin. Rather, a unique color needs to be created and blended into the surrounding skin tones. This is usually achieved with hints of red, yellow, or white.
Tinted Light Skin Tones
Skin color is also affected by light. Depending on the shadows involved in the painting, you might need to have a wider variety of light and dark shades of the base color. Lighter varieties can be achieved by adding white or yellow, darker can be created with blue or purple, or even grey. As mentioned earlier, always be very careful when adding black.
When learning how to make skin color with acrylic paint, you should get your base color first. Then it is a good idea to create different varieties of this by adding slightly more of each primary color. So, you get the base skin tone, then the base with blue, the base with yellow, and the base with red. This color mixing chart for acrylic paint will provide a great framework for various light-tinted skin tones.
Tips on How to Make Skin Color With Paint
- Always be cautious when darkening a color. It is much easier to add a darker tone than to take it out. When darkening, do so in very small increments
- Avoid using black where possible. Rather opt for blue or purple as a dark shade.
- Some paints will dry to a slightly lighter or darker color. It is always a good idea to have a piece of test paper with you to try out colors before using them on your final painting.
- Having a photograph of the desired skin color next to you is always a good idea for using as a reference point.
- Unless you are painting Lego or a cartoon, there is no single skin color on each person. Always take some time to create a range of different skin tones to be used for details
Frequently Asked Questions
What Colors Make Skin Color?
The skin color mixing chart really only needs the three primary colors and a bit of white. These colors will provide a good foundation for creating any variant or skin tone you can imagine.
What Oil Colors Make Skin Color?
When painting with oil colors, you only need red, yellow, blue, and white for creating skin tones. However, additional colors like different orange, green, and brown shades can be used.
How Do You Make a Dark Skin Color?
Instead of using black, darker skin tones can be reached with additions of blue and purple. This provides more depth and darkness, instead of muddying the color.

In 2005, Charlene completed her Wellness Diplomas in Therapeutic Aromatherapy and Reflexology from the International School of Reflexology and Meridian Therapy. She worked for a company offering corporate wellness programs for a couple of years, before opening up her own therapy practice. It was in 2015 that a friend, who was a digital marketer, asked her to join her company as a content creator, and this is where she found her excitement for writing.
Since joining the content writing world, she has gained a lot of experience over the years writing on a diverse selection of topics, from beauty, health, wellness, travel, and more. Due to various circumstances, she had to close her therapy practice and is now a full-time freelance writer. Being a creative person, she could not pass up the opportunity to contribute to the Art in Context team, where is was in her element, writing about a variety of art and craft topics. Contributing articles for over three years now, her knowledge in this area has grown, and she has gotten to explore her creativity and improve her research and writing skills.
Charlene Lewis has been working for artincontext.org since the relaunch in 2020. She is an experienced writer and mainly focuses on the topics of color theory, painting and drawing.
Learn more about Charlene Lewis and the Art in Context Team.
Cite this Article
Charlene, Lewis, “How to Make Skin Color – A Guide on Painting Skin Tones.” Art in Context. December 18, 2020. URL: https://artincontext.org/how-to-make-skin-color/
Lewis, C. (2020, 18 December). How to Make Skin Color – A Guide on Painting Skin Tones. Art in Context. https://artincontext.org/how-to-make-skin-color/
Lewis, Charlene. “How to Make Skin Color – A Guide on Painting Skin Tones.” Art in Context, December 18, 2020. https://artincontext.org/how-to-make-skin-color/.