How to Draw a Mouse – A Beginner’s Mouse Drawing Tutorial
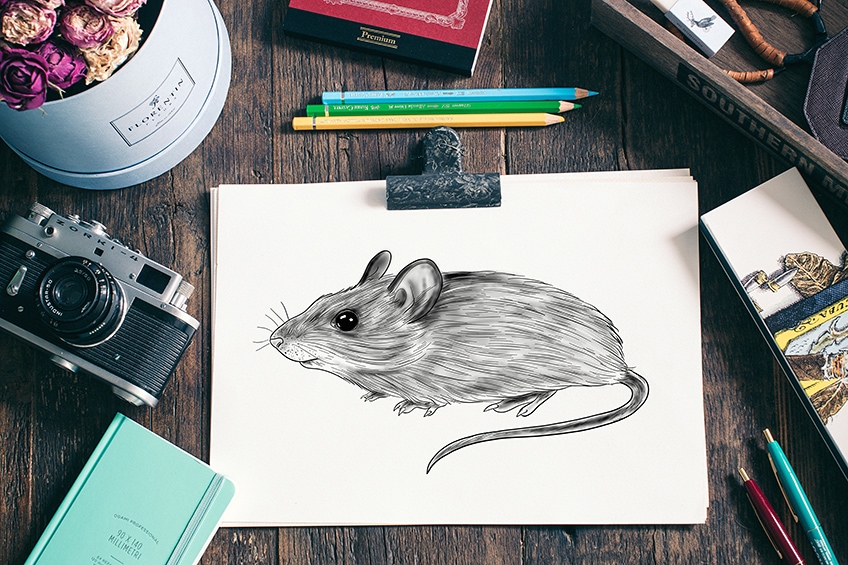
Mice are some of the cutest creatures around, but have you ever thought about drawing a mouse? If you have, then this will be a great learning process for you. Thankfully, we have an artist in residence that has created a wonderful tutorial for drawing a cute mouse easily with simple techniques. Collect your supplies for drawing, settle in, and let’s get down to drawing!
An Introduction to the Little Mouse
Despite what most people think, the mouse is considered to be a very clever (albeit small) creature. Mice can talk to each other in complex ways using facial expressions, voices, and smells, and they have a lot of empathy with a massive capacity for emotion and a high level of curiosity. They are also very neat animals, with intricate underground houses that they keep tidy, with specific areas for keeping food, sleeping, and going to the toilet.

Step-by-Step Instructions on How to Draw a Mouse
Now that we have shown you just how intelligent these tiny creatures can be, we can start to learn how to draw them! If you have followed one of our animal tutorials before, then you will already be familiar with the supplies you will need. Alternatively, have a look at the following supplies need for mice drawing below.
Supplies Needed
Even though we have a list of supplies here, you can do this tutorial using your favorite medium, whatever that may be. If you like to use a drawing tablet as a graphic artist, you can also use this tutorial with that. You can also use this mouse drawing tutorial with watercolor paints. The quickest way to follow along with this tutorial is to use a pencil on paper, more specifically:
- A piece of paper or a pad for drawing
- An artist’s pencil set
- A rubber eraser
Step 1: Constructing the Body of Your Mouse Drawing
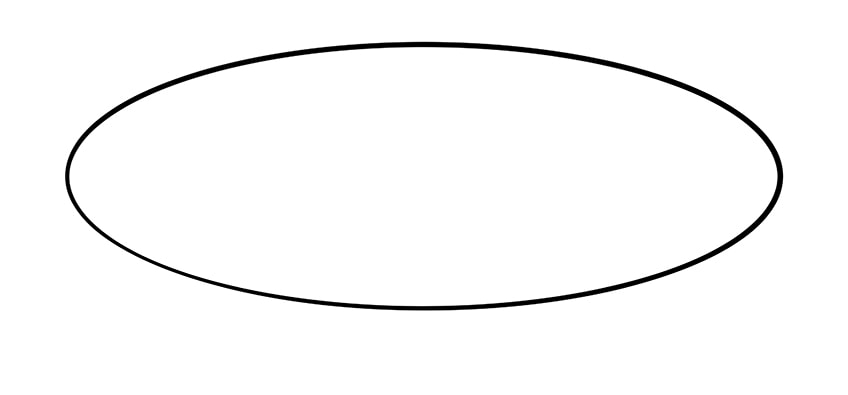
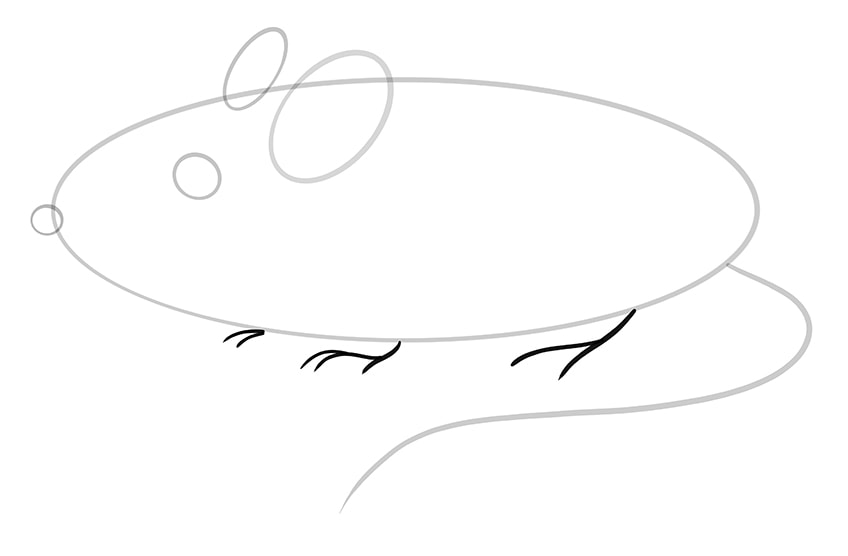
As usual, we will start by constructing the main piece of the mouse’s body. We like to begin drawing an animal by constructing shapes and lines in order to create the right sense of perspective and proportions. Realistic mouse drawing should look as authentic as possible, and our process is a good way to make sure of that. We will start off our mouse drawing by using an expanded oval shape that sits horizontally in the middle of the page or drawing space.
Make sure that you leave plenty of space around the oval so that we can add all of the other body parts.
Step 2: How to Draw a Mouse’s Ears
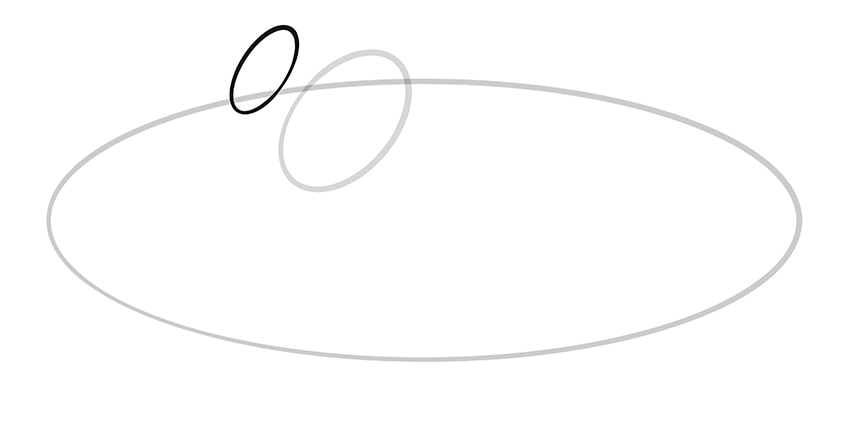
Next, we will put down the construction lines for the shapes of the mouse’s ears. Start by drawing an egg-like oval that is angled a bit towards the back of the body’s oval. It should be placed at about a third of the way into the main oval, with only the top corner jutting out of the main body.
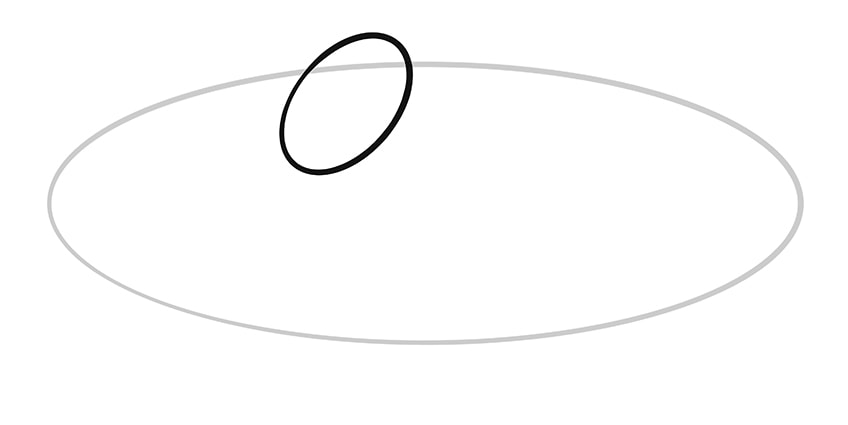
Create another, smaller oval at a similar angle to the previous oval you just drew. It should be slightly behind the bigger one and most of it should stick out of the main body. These two ovals will form the ears of our mouse drawing.
Step 3: The Eye of Your Mouse Drawing
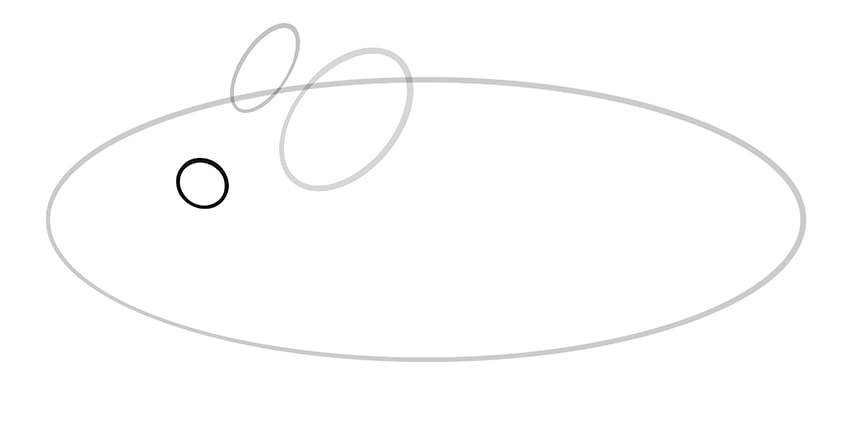
This is a very simple part of mice drawing. Draw a small circle inside the main body’s oval towards the bottom left of the two ears. The circle can be made to be a slight oval, with the angle direction opposite to that of the ears. The small circle is the outline of the eye, bringing our mouse into vision.
Step 4: How to Draw Your Mouse’s Nose
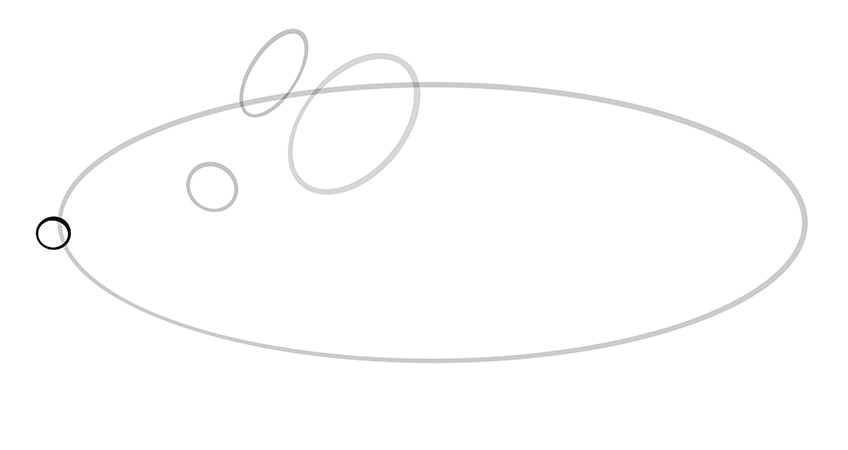
A smaller circle should be drawn next, helping us to create the mouse’s nose. Draw the circle just below the central point of the body’s oval in the front of the ears and eye. Most of it should stick out of the main oval.
By this stage, you should be able to see our little mouse drawing coming to life!
Step 5: Drawing Your Mouse’s Tail
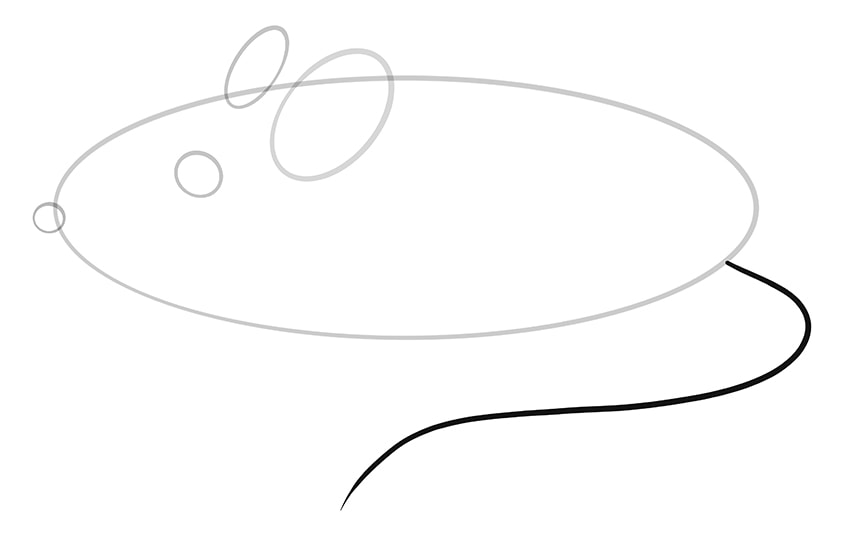
Let’s create the line to construct the mouse’s tail, which we will flesh out later. Begin the line for the tail just under the back middle point on the main oval of the body. The line should look like a “2”, though more curved, and the line should taper off at the end to form a point.
Step 6: How to Draw a Mouse’s Feet
This step will begin with the feet of our mouse drawing. We can only see three of the four feet from this perspective – one is hidden behind the body. Draw a curved line for the back foot from the lower side of the body’s oval. It should start a bit away from the tail line. You should also add a toe to this back foot. Do the same steps for the front foot, with two toes added. The back front foot (on the far left of our drawing) will just be showing two toes sticking out.
Step 7: Drawing the Final Outline of Your Mouse
Once all of the basic construction lines have been drawn, we will create the final outline of our mouse. With a darker pencil, we can start to line the shape of our mouse more finely. Start with the front of the mouse, detailing the nose and beginning to join it to the main body, with a bit of a dip in the top part of the nose to form a snout. Then, draw a thick line down from the nose, using it to make a mouth line towards the body’s oval. From the line of the main oval for the body, draw a line down and move it in slightly.
The ear’s construction ovals can be followed quite closely, but don’t copy in the bottoms of the ears.
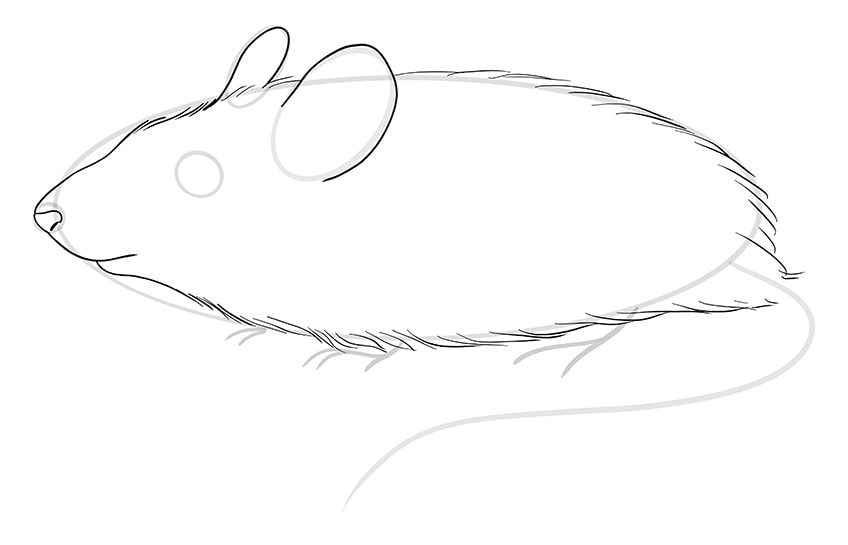
When the face is outlined in a thick line, the rest of the outlines should be drawn with short lines to make them seem like fur. You will want these short fur lines to outline the mouse’s body, bending towards the back. The nearer you get to the back, the lengthier these strokes can be. As you reach close to the tail line, leave the same space on either side without putting any fur on the tail just yet.
You can also create an additional nose piece by detailing a small curve in the nose circle. Mice drawing is easy when you follow the right steps.
Step 8: Adding Detail to Your Mouse Drawing
Once the main shape of the mouse is outlined and drawn, it is time to add detail. This part may be intimidating to some, but we will show you how to draw a mouse easy by adding some details to make your mouse appear more realistic.
We can add detail to the tail by fleshing it out with two curved lines that move towards the feet. Start at the fur gaps and outline the construction line, tapering to a point that is sharp and detailed. Use even spacing on both sides of the construction line.
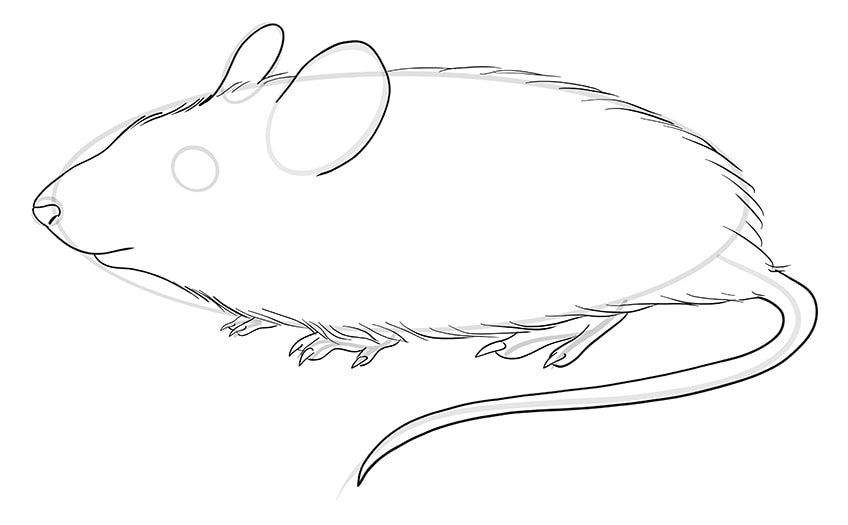
Similarly, flesh out the feet by outlining your lines and drawing in the shape of the mouse’s feet. Once all of the toes have been outlined, you can draw the pointy claws on the toes, sharp and curved. The curved claws should point downwards, giving that authentic animal claw perspective.
By this time, your mouse should be looking almost like a real rodent!
Step 9: How to Draw a Mouse’s Facial Features
Now we can start to detail the eyes, ears, and nose by drawing their inner shapes. Begin by giving the eyes their inner shape detail and creating the eye’s pupil. Then draw another circle around it with a bit of a bulge in the front. The whiskers can be drawn by adding a few curved lines on either side of the mouse’s face, giving that characteristic mousey look.
Tip: The whiskers on the other side of the mouse’s face should aim upwards to give them the correct visible perspective from our current viewing angle.
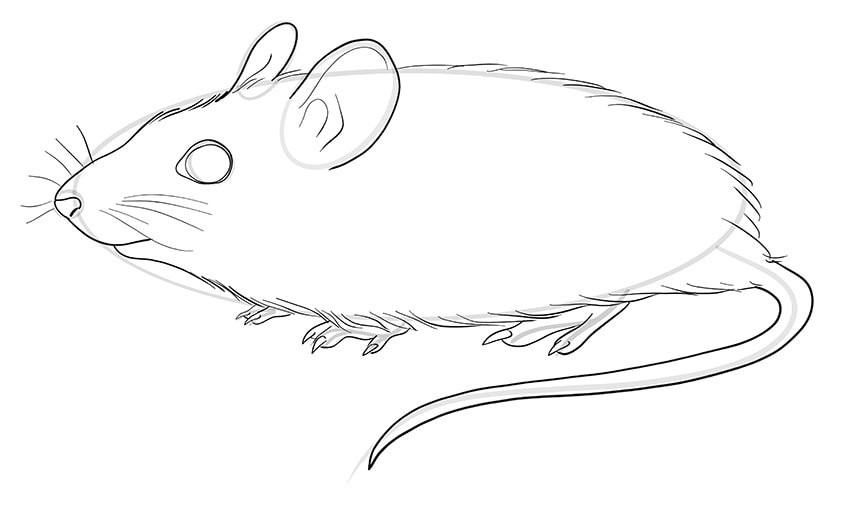
In the ears, you can draw a curved line at the bottom that creates the inner shape of the ear, ending where it begins to drop down the back. Two little curved lines at the bottom of the big ear will add more depth. The back ear just needs a small curved line that moves up the center. Once this part is done, we can erase all of the construction lines that are still visible.
Step 10: Creating the Furry Coat of Your Mouse Drawing
Always start at the nose with the fur as it is the best way to look authentic. Draw a mixture of long and short curvy strokes that flow with the mouse’s body shape. The fur should create a continuous wave as opposed to a chaotic cluster.
Tip: Follow the curves of the mouse’s body with the fur lines to perfect the look of the fur.
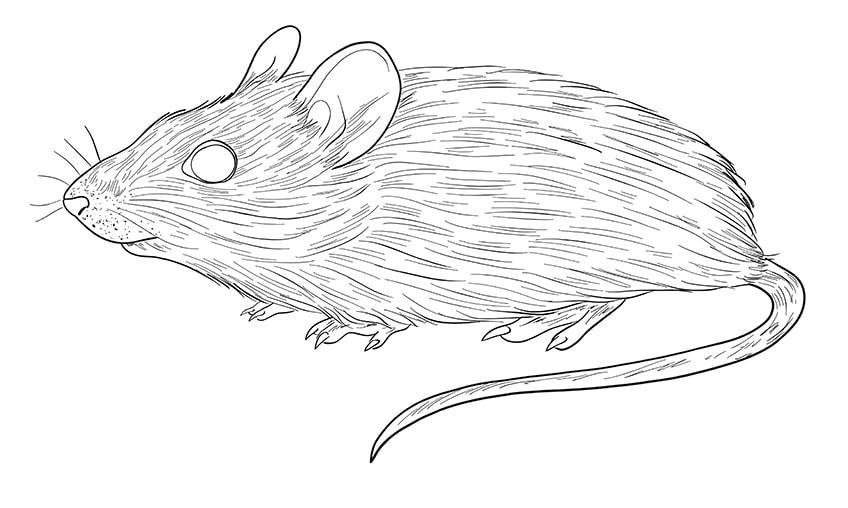
For realistic-looking details, create fur that reaches into and around the ear. Curved strokes around the tail and feet can be added to create more detail. The details can be short lines, spots, or longer strokes.
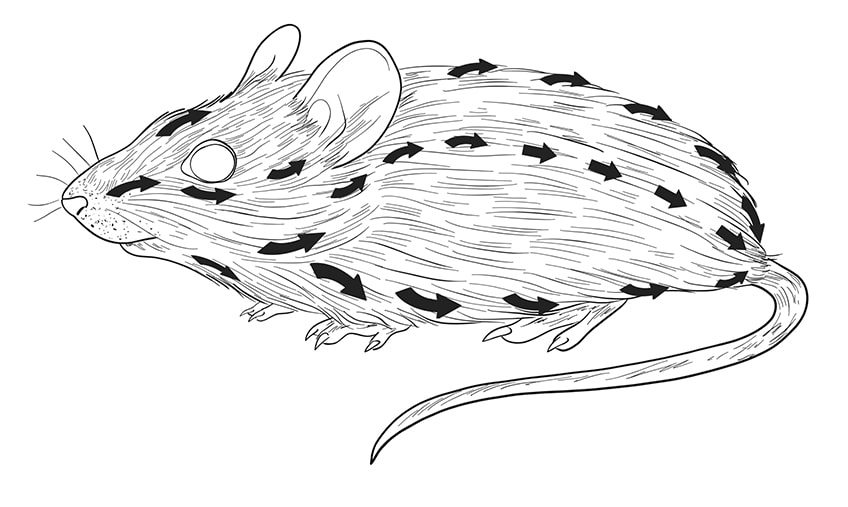
Do not rush the process of creating the detailing as we reach the end of this tutorial on how to draw a mouse step by step. It is the part that breathes life into the mouse, so be thorough and take your time with it. We have shown some arrows on the example below to help you follow the curves of the body, ensuring that the fur looks as realistic as possible.
As you can see, the direction of the fur flows in three different ways.
Step 11: Final Details and Shading
The very first finishing touch is to color in the eye, making it black. You can leave three small white light reflections to give a good deal of realism. Using a darker pencil, cotton tip, or brush, add some gentle shading to the mouse. Also, follow the flow of the fur direction to make it more realistic. A cotton swab works very well on pencil drawings, or if on a tablet, just use a darkening brush.
Our mouse looks beautiful, furry, and friendly!

Some of the most important bits to be shaded are the edges of the ears, along the tail, behind the ear, along the back, and on the top of the feet. Don’t shade the inside of the ear, the nose, or the bottom of the mouth. You can also use a sharp edge of an eraser to wipe thin lines in the direction of the fur, adding more depth.
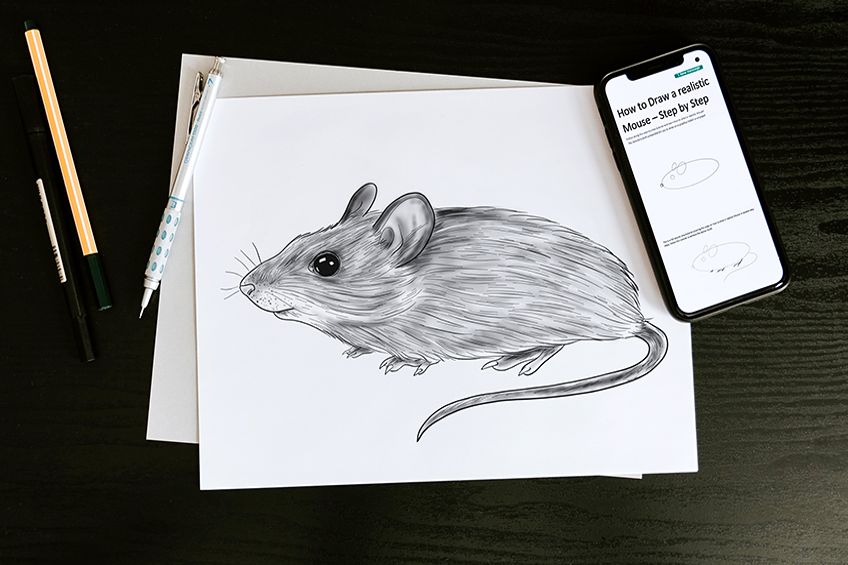
And there you have it! You have finished our tutorial on how to draw a mouse step by step, teaching you how to create a beautiful mouse with ease. We hope that it taught you a lot and that you enjoyed working through it with us. Keep creating, keep practicing your drawing, and keep inspiring yourself with new projects every day.
Frequently Asked Questions
Am I Able to Learn How to Draw a Mouse Easy?
Learning to draw a mouse is easy and this tutorial makes it very intuitive. The steps are all clearly explained and you can follow each part with ease. We like to make learning how to draw a mouse easy for any artist.
Can I Use Construction Lines for Mouse Drawing?
Yes, we love to use construction lines in all of our drawing tutorials. They help us to create the right proportions and perspectives. They help with dimensions, create specific shapes, and are easy to use and draw.
Can I Use a Tablet When Learning How to Draw a Mouse?
For sure! This tutorial is created for all artists to learn from easily, and with any medium that they would like to use. The mouse we have created is wonderful and easy to draw – you’ll be able to follow and create it any way you want.
Matthew Matthysen is an educated multidisciplinary artist and illustrator. He successfully completed his art degree at the University of Witwatersrand in South Africa, majoring in art history and contemporary drawing. The focus of his thesis was to explore the philosophical implications of the macro and micro-universe on the human experience. Matthew uses diverse media, such as written and hands-on components, to explore various approaches that are on the border between philosophy and science.
Matthew organized various exhibitions before and during his years as a student and is still passionate about doing so today. He currently works as a freelance artist and writer in various fields. He also has a permanent position at a renowned online gallery (ArtGazette) where he produces various works on commission. As a freelance artist, he creates several series and successfully sells them to galleries and collectors. He loves to use his work and skills in various fields of interest.
Matthew has been creating drawing and painting tutorials since the relaunch in 2020. Through his involvement with artincontext.org, he has been able to deepen his knowledge of various painting mediums. For example, watercolor techniques, calligraphy and lately digital drawing, which is becoming more and more popular.
Learn more about Matthew Matthysen and the Art in Context Team.


