How to Draw a Christmas Tree – Bringing the Holidays to Paper
Learn how to draw the perfect Christmas tree with our step-by-step tutorial. Start with a simple triangle and add whimsical branches, decorating them with baubles and tinsel details. Ideal for artists of all levels, this guide will help you create a festive masterpiece that captures the magic of the holiday season.
A Step-by-Step Guide to Drawing a Christmas Tree
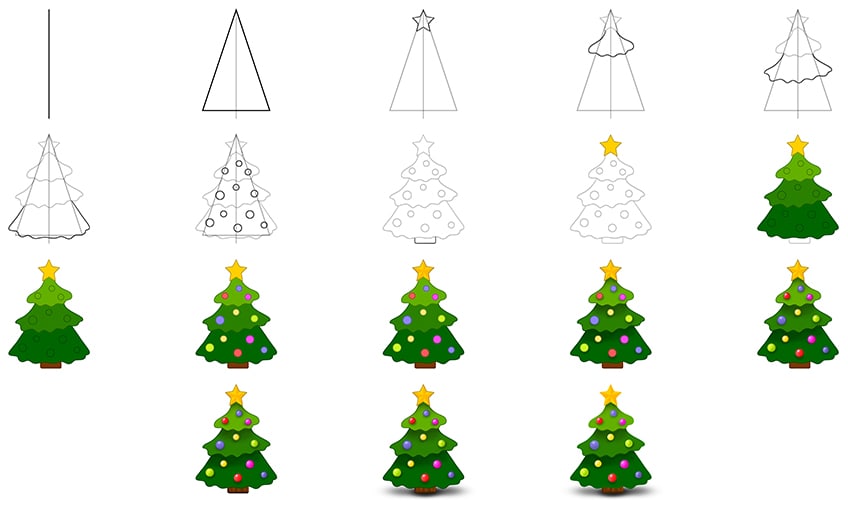
The above collage shows each step taken to achieve the final result, and you, too, will be able to draw and paint a Christmas tree!
Step 1: Draw the Centerline
Start by identifying the midpoint of your drawing space. Then, sketch a vertical centerline to symbolize the trunk of the tree.

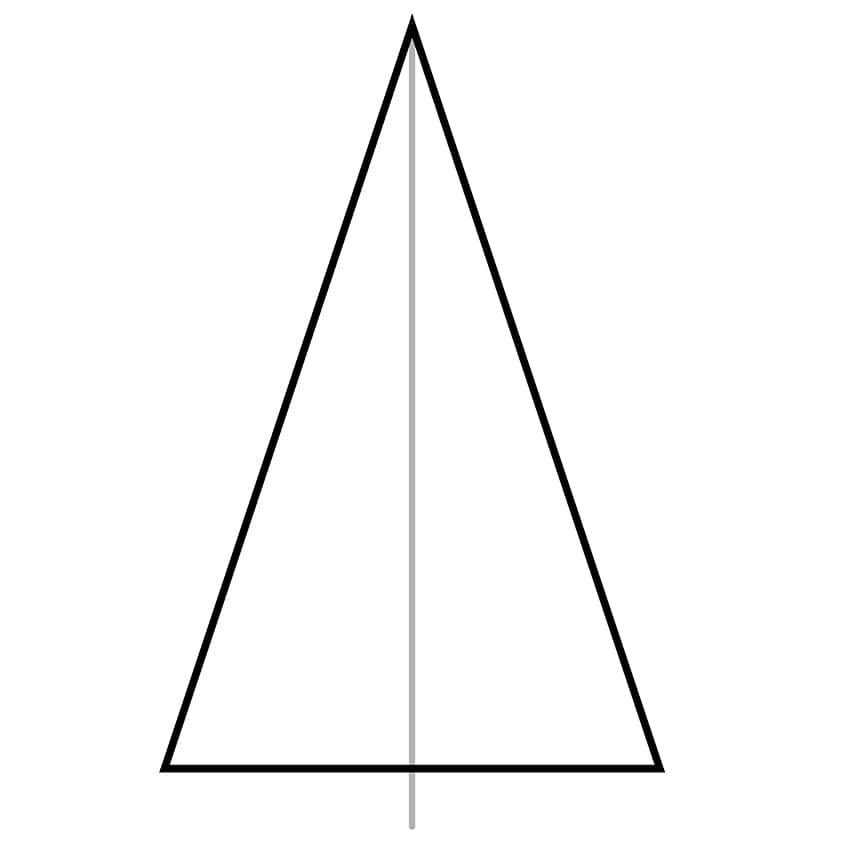
Step 2: Draw Your Christmas Tree Sketch Shape
Draw a triangle that has its center point matching the vertical line previously drawn to split the triangle into two equal parts.
Step 3: Add the Top Star on Your Christmas Tree Drawing
At the top of the tree draw the five-point star using the center line and the triangle to aid you in drawing the star perfectly centered.

Step 4: Draw the Tree Top
Draw the top portion of the tree beneath the star and extend from a narrow spread to a wider spread. Continue to draw gentle waves to represent the tree top shape.

Step 5: Add the Mid-Base to Your Christmas Tree Sketch
Below the previously drawn top part of the tree, simply repeat the step and draw the middle area of the tree. This should be wider and spread with the width of the triangle.
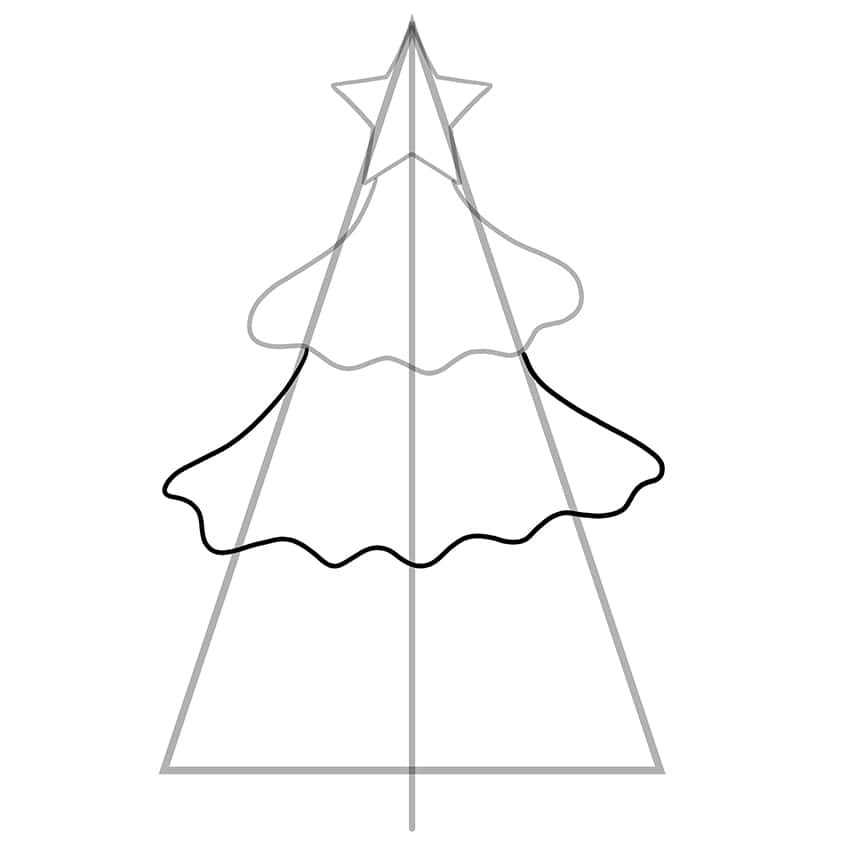
Step 6: Continue onto the Lower Base
Draw the lower tree base with the widest spread along the width of the triangle. Repeat the previous step and draw gentle waves on the lower end.

Step 7: Draw the Christmas Tree Ornaments
Draw several circles within the three sections of the Christmas tree to represent the ornaments on the tree. Erase any still visible construction lines.

Step 8: Add the Visible Trunk to Your Christmas Tree Drawing
Beneath the lower base of the tree draw the partially visible tree trunk.

Step 9: Color the Star in Your Christmas Tree Sketch
Utilize a fine, sharp brush and apply a uniform coat of yellow paint to cover the star evenly.

Step 10: Continue to Color Your Drawing of a Christmas Tree
Continue with the same brush and begin with the brightest shade of green to color the top base. Then switch to a darker shade of green for the middle base, and finally use a dark shade of green paint for the bottom base.

Step 11: Color the Trunk
Employ a sharp brush along with brown paint to uniformly cover the tree trunk.

Step 12: Color the Ornaments in Your Christmas Tree Sketch
Employing the same brush and a variety of your favorite colors to fill each of the ornaments evenly, here we chose to use purple, red, pink, yellow, and bright green paint.

Step 13: Structure the Star
With a thin brush and a light shade of orange paint, begin to apply to half of each star point. This technique will lend a realistic 3D effect, enhancing the overall structure of the star.

Step 14: Shade Your Christmas Tree Drawing
Use a small, soft brush and black paint to add soft shading between each of the ornaments. Continue onto each of the layers of the tree including the top, middle, and lower base areas.

Step 15: Shade and Highlight the Ornaments
With the same brush and black paint, add a soft shading within the surrounding edges of each ornament. Repeat this step using a blending brush to spread and soften the shading. Complete the step by using white paint to add a soft glow or shimmer to each ornament.

Step 16: Texture the Bark on Your Drawing of a Christmas Tree
For a textured bark effect, employ a small, soft brush and black paint to horizontally shade the lower section of the bark. Then, with a fine, sharp brush and black paint, incorporate delicate vertical lines along the bark. Repeat the process using a brighter brown or white paint for added depth and detail.

Step 17: Apply a Ground Shadow
Shade beneath the Christmas tree using a small, soft brush and black paint. Complete the step by using a blending brush to spread and soften the shading.

Step 18: Finalize Your Drawing of a Christmas Tree
Where outlines are still visible, erase them; if not possible, use a fine, sharp brush and the corresponding color/s to trace the outlines, creating a final seamless result.

Congratulations, creative soul! You’ve officially unwrapped the gift of drawing a Christmas tree, and let me tell you, your artistic journey has added a sprinkle of festive magic to the season. Your dedication and imagination have turned a blank canvas into a holiday masterpiece. Each stroke and detail reflects not just a tree, but the warmth of your spirit and the joy you’ve poured into your creation. Remember, art is a journey, and you’ve just taken a sparkling step. Embrace the uniqueness of your artistic expression, and continue to let your creativity shine like the star atop your beautifully drawn Christmas tree. The world is brighter with your creative touch!
Frequently Asked Questions
What Are the Basic Steps to Draw a Christmas Tree?
Drawing a Christmas tree is a joyous process. Begin with a simple triangle for the tree shape, extend branches outward, and then infuse the festive spirit by adorning it with ornaments and a gleaming star atop. How to draw a Christmas tree will be easy with our fun and exciting drawing tutorial!
How to Add Decorations to My Drawn Christmas Tree?
Personalize your Christmas tree by drawing small circles for ornaments and adding playful tinsel with wavy lines. To complete the festive look, create a star or a unique tree topper that adds that special touch.
How to Make My Christmas Tree Drawing Look More Realistic?
Matthew Matthysen is an educated multidisciplinary artist and illustrator. He successfully completed his art degree at the University of Witwatersrand in South Africa, majoring in art history and contemporary drawing. The focus of his thesis was to explore the philosophical implications of the macro and micro-universe on the human experience. Matthew uses diverse media, such as written and hands-on components, to explore various approaches that are on the border between philosophy and science.
Matthew organized various exhibitions before and during his years as a student and is still passionate about doing so today. He currently works as a freelance artist and writer in various fields. He also has a permanent position at a renowned online gallery (ArtGazette) where he produces various works on commission. As a freelance artist, he creates several series and successfully sells them to galleries and collectors. He loves to use his work and skills in various fields of interest.
Matthew has been creating drawing and painting tutorials since the relaunch in 2020. Through his involvement with artincontext.org, he has been able to deepen his knowledge of various painting mediums. For example, watercolor techniques, calligraphy and lately digital drawing, which is becoming more and more popular.
Learn more about Matthew Matthysen and the Art in Context Team.


