


How to Draw Letters in 3D – A Dimensional Hand-Lettering Tutorial
Learning how to make letters 3D is a skill that will enhance your hand lettering. Understanding how to form letters in three dimensions is a great addition to lettering, as it gives the text an interesting quality. Learning how to draw 3D letters can turn normal text into artwork. By adding more dimension, we give letters more character, we create a 3D letter drawing rather than a written word. 3D lettering is also great for design, understanding the principles of three dimensions can be utilized in all types of lettering, including 3D letter drawing designs done with digital applications. Let’s start with our in-depth step-by-step tutorial.
An Easy Guide to Learning How to Draw Letters in 3D
In this tutorial, we will be covering the basics of how to transform normal letters into three dimensions. This is an entry-level guide on how to make letters 3D block letters, also suitable for kids.
We will find that the process is quite simple and once we understand the general principles of how letters are turned into 3D letters, we will develop an instinct for adding dimension to letters from here on out. You will only need a pen, pencil and eraser, as well as a ruler and that’s it.,
What to Know Before Drawing Letters in 3D
There are a few key concepts we want to be acquitted with before getting into the process of drawing 3D block letters. Creating 3D lettering means e need to understand how three dimensions work. To understand how three dimensions work and how they are applied to lettering, let us look at the key concepts that will prepare us for making our 3D letter drawing designs.
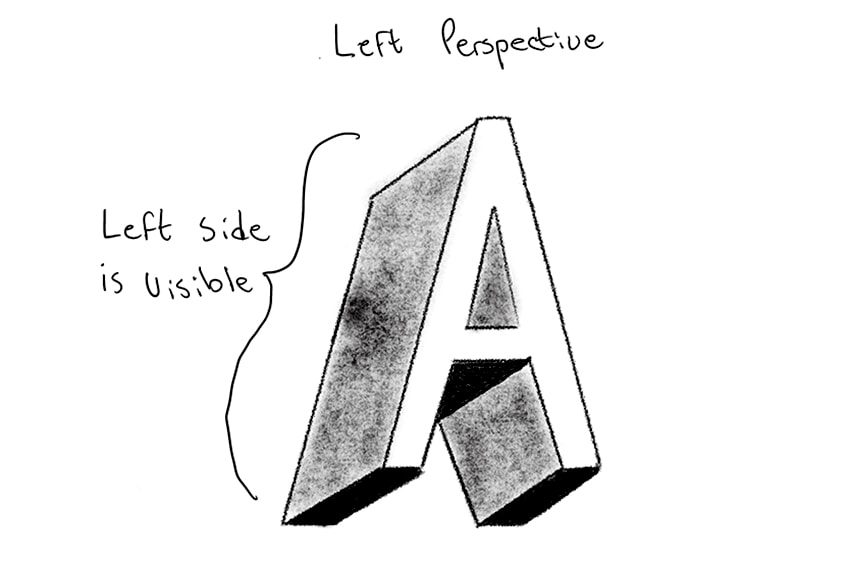
Perspective
The three dimensions of the perspective will define the three dimensions and from which direction the letter is being viewed. This means if we are looking at the letter from a left-point perspective, we will see the dimension on the left side of the lettering. The direction of the perspective defines where we add the three-dimension to the letters.
If you hope to complete craft projects where you need paint that will work well for any number of surfaces, then craft paint is your go-to! The consistency is smooth, creamy, and easy to use.
For instance, we can see that if we draw the 3D on the left side of the letters, it means we are seeing the letters from a left point perspective.
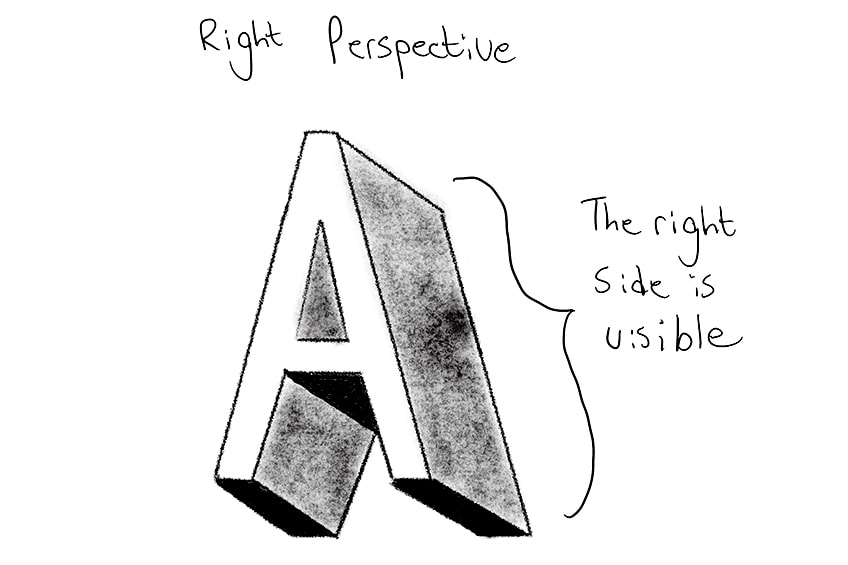
However, if we are seeing the letters from a right-point perspective, this means that we will see the three-dimensional qualities of the letter on the right side. This concept applies to all angles of the letter. This means if we look at a letter from a right low point perspective, we will see both its right side and the bottom of the letter as well.
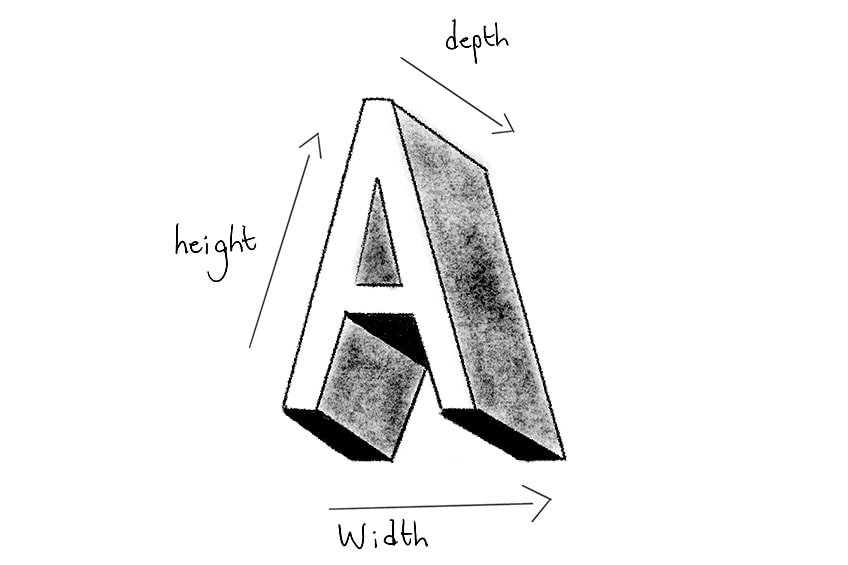
The Three Dimensions
Height, length, and depth. These are the three different dimensions that make 3D lettering look three-dimensional. For a letter to look three-dimensional, it needs to have width, where the letter is wide enough to some degree. This means the letter needs to extend in a sideways direction.
If you hope to complete craft projects where you need paint that will work well for any number of surfaces, then craft paint is your go-to! The consistency is smooth, creamy, and easy to use.
The letter also needs to have length. This is what makes the letter look as if it is extending forward or backward.
Lastly, the letter needs to have height, which is how the letter extends upward or downward. Once we have a chosen direction, we understand from which perspective we are viewing the letter. This will determine the direction of our three-dimensional lines.
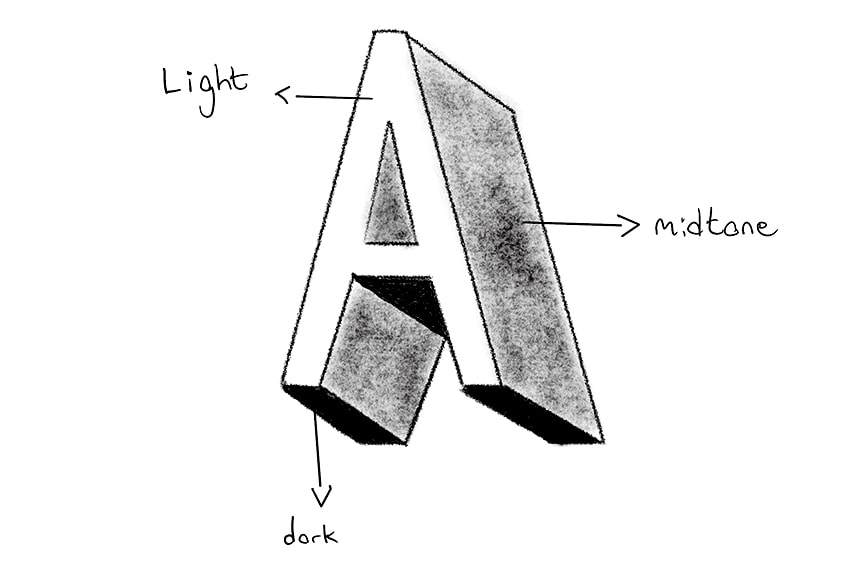
Light
When adding dimension to the letters, we want to define the dimensions with shading. We can do this by imagining that the parts of the letter that are the lightest would be the parts of the letter that are the most exposed to a light source. Using a three-shade approach can give the text a more realistic quality.
If you hope to complete craft projects where you need paint that will work well for any number of surfaces, then craft paint is your go-to! The consistency is smooth, creamy, and easy to use.
This is a great way to enhance the 3D lettering, giving the dimensions a more realistic look, by incorporating light, mid-tone, and dark tonal range.
Step-by-Step Instructions on How to Draw Letters in 3D
In this tutorial, we will first go through the fundamentals of turning letters into three-dimensional letters. This means we will first take a look at the concepts of height, depth, and length, to gain an understanding of how they are represented in a letter form. We will also look at how understanding the perspective from which we look at a letter, will determine how the three dimensions are represented within the letter.
If you hope to complete craft projects where you need paint that will work well for any number of surfaces, then craft paint is your go-to! The consistency is smooth, creamy, and easy to use.
We will look at how we use light to add shading to different aspects of the letter to enhance the 3D letters.
Once we understand these principles, we will go through a set of step-by-step instructions that describe how to apply this principle to a simple cube shape, as well as letters with and without curves. Lastly, we will be introduced to an exercise where we draw a 3D alphabet. This is so that we can practice in our own time, which will help us to keep our 3D lettering skills fine-tuned. Now that we know what to expect, let us go through the tutorial on how to draw letters in 3D.
Drawing a Three-Dimensional Cube
Now that we know what to expect, let us apply these concepts to a simple shape. Defining how these concepts are present within a simple shape will help to prepare you for applying them to more complicated shapes such as letters.
If you hope to complete craft projects where you need paint that will work well for any number of surfaces, then craft paint is your go-to! The consistency is smooth, creamy, and easy to use.
However, once we know the process of application on a simple shape, we can take that process and apply it to any 3D lettering.
Step 1: Drawing the shape
Let us begin by drawing a simple square. Begin by taking your pencil and ruler and drawing a simple square shape. You can make the square the same length on all sides, making it simple for the exercise.
Step 2: Adding Dimensions
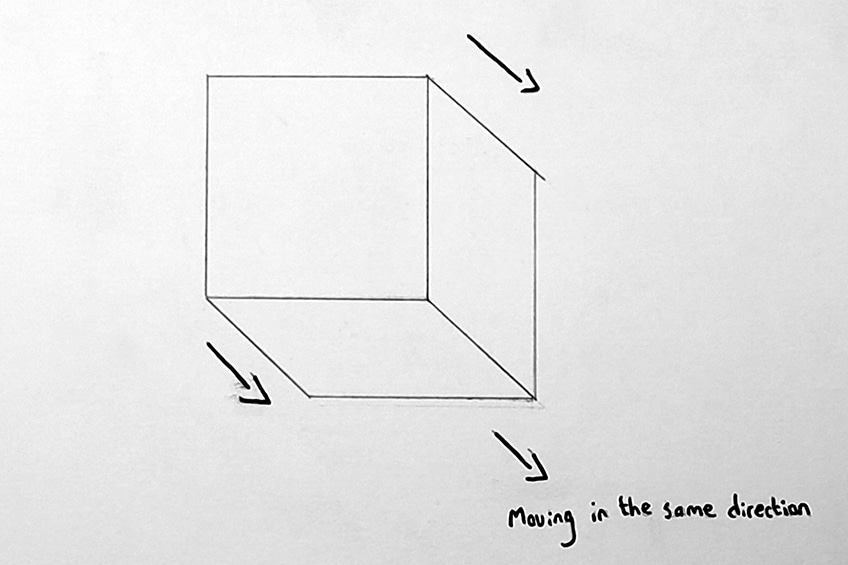
From here we will choose a direction in which our dimension lines will go. Let’s make the lines go in a downward direction toward the right of the page. With a square we can already see that there is height and length, however, we want to now give it depth making it three-dimensional.
If you hope to complete craft projects where you need paint that will work well for any number of surfaces, then craft paint is your go-to! The consistency is smooth, creamy, and easy to use.
We do this by drawing a set of lines from each corner of the cube moving in the same diagonal direction.
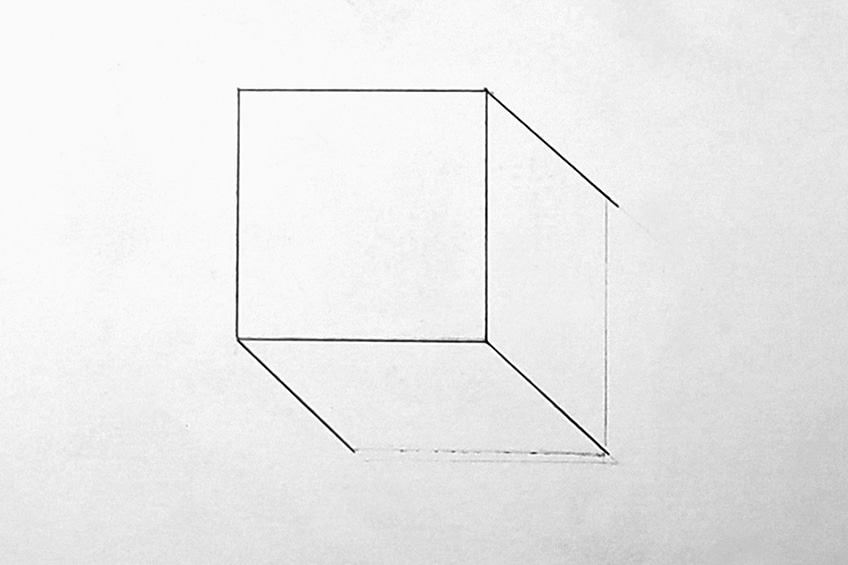
From here, we connect those lines by drawing a vertical and horizontal line that runs parallel along the bottom of the cube and the side of the cube. As we draw these lines, we will find them intersecting with the diagonal lines, giving the square three dimensions turning it into a cube.
If you hope to complete craft projects where you need paint that will work well for any number of surfaces, then craft paint is your go-to! The consistency is smooth, creamy, and easy to use.
An important note to remember is that as long as lines run parallel with each other, the three-dimensional quality of a shape will always be correct.

We can see that, as all the depth lines run diagonally and parallel in the same direction, this will make the cube shape accurate. This applies to all lines that indicate height and width as well. Whenever you add lines that indicate depth, you can connect them with other lines that run parallel with the height and width lines.
Step 3: Adding Shadows to the Cube
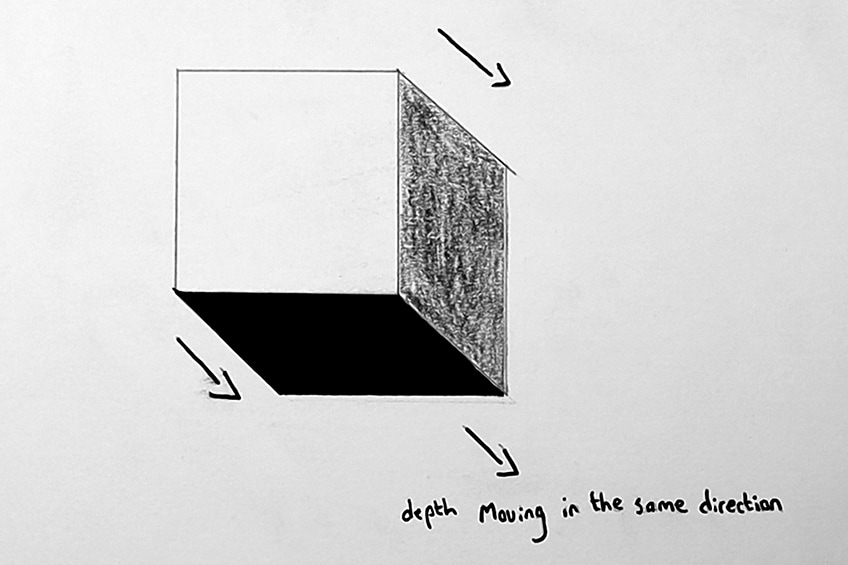
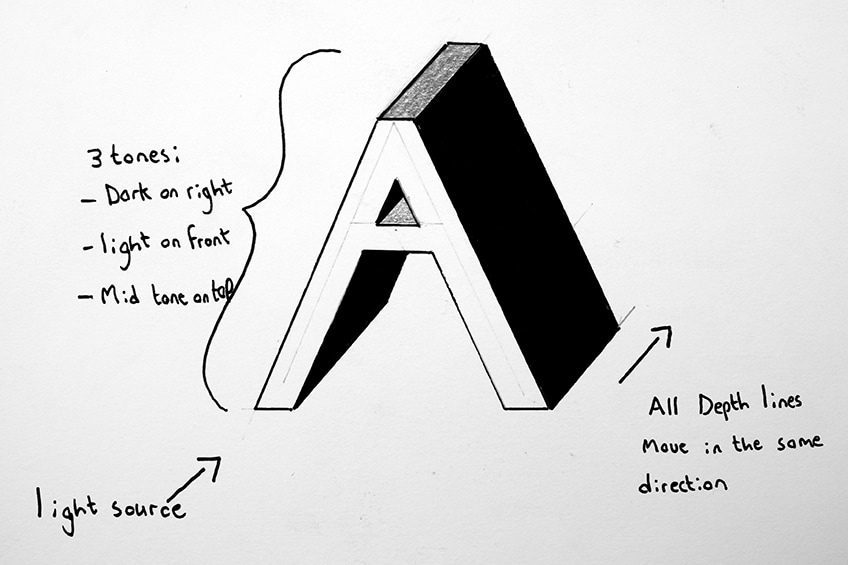
Using a three-shade rule we will see how the cube becomes a bit more three-dimensional. If we imagine the light source to be directly in front of the cube, we can imagine that it will impact the color of each side of the visible cube. Using three tones, such as a dark, mid-tone, and light tone can define the shape better. You also don’t need to worry about figuring out the light source first.
If you hope to complete craft projects where you need paint that will work well for any number of surfaces, then craft paint is your go-to! The consistency is smooth, creamy, and easy to use.
You can add three shades to any part of the letter, and it will define the light source once shaded in.
This is the process of transforming a two-dimensional shape into a three-dimensional shape. Using this method, you can transform any shape into three dimensions, including letters. That being said, let us see how we can apply this to straight and curved letters.
Drawing Three Dimensions in a Letter With Straight Lines
Using the three-step process of turning a two-dimensional shape into a three-dimensional shape, let us see how we can do the same for letters. We will use the same process as we did for the cube to turn letters into three 3D block letters.
To keep the process simple, we will create some simple block lettering, and apply the three steps, turning it into a three-dimensional block letter.
Step 1: Drawing the Letter
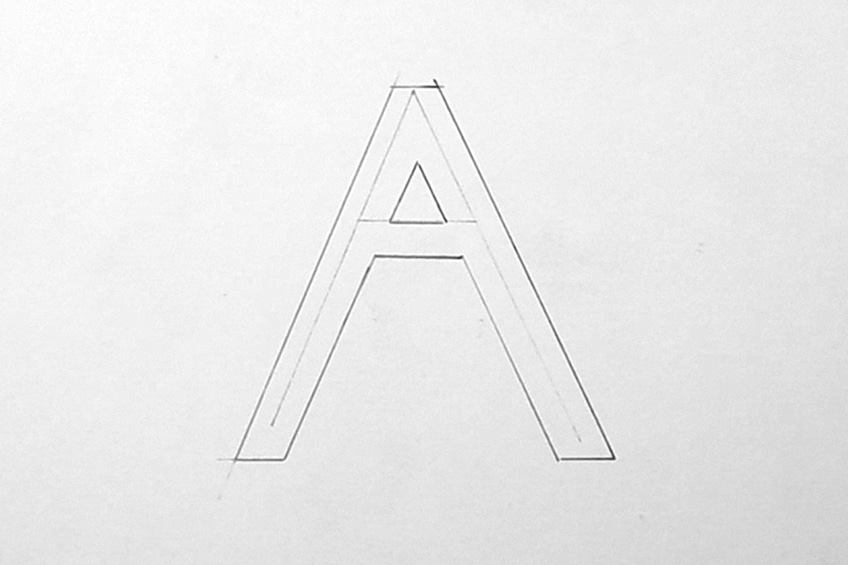
Let us begin by taking our pencils and drawing a simple line letter “A”. We will use the letter “A” to demonstrate the process because it has sharp edges. We want to know how the process can be applied to straight letters, and later on curved letters.
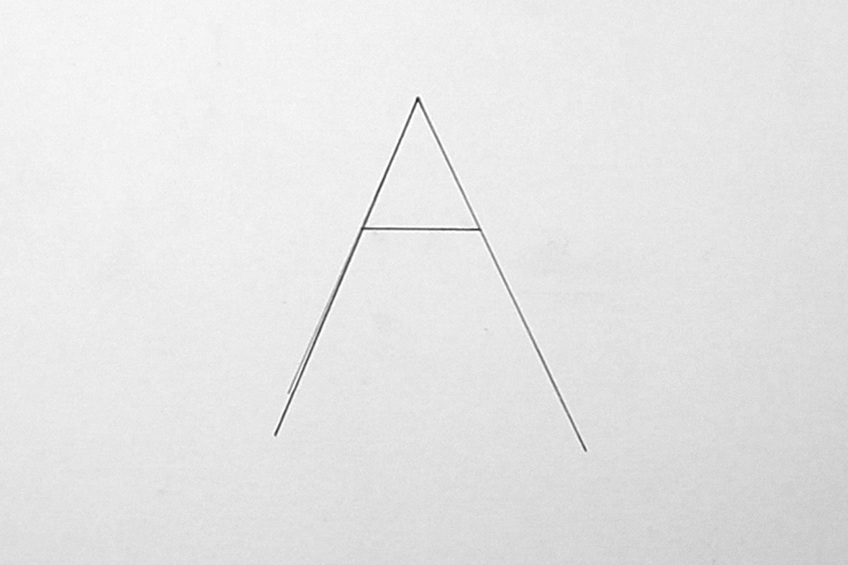
Once we have our letter drawn in a line version, we can proceed to apply the block letter process of outlining the line letter. As we outline, we want to keep a little gap between the outlined lines and the letter line.
If you hope to complete craft projects where you need paint that will work well for any number of surfaces, then craft paint is your go-to! The consistency is smooth, creamy, and easy to use.
By doing this, we give the letter more width and body.

Once we have made a thicker letter, after we have outlined the initial written letter, we can then erase the lines within the outlined lines. We should be left with a thicker letter A. Make sure you make the letter block-styled, this way we can use the corners to guide us when making diagonal depth lines.
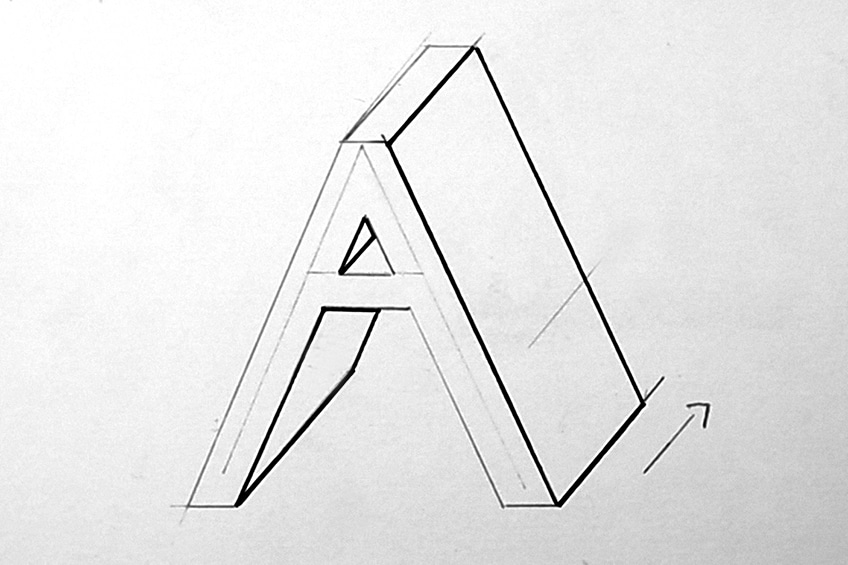
Step 2: Adding Dimensions
From here we can add dimension lines. Again, when a shape is two-dimensional it already has height and length. What we are doing is giving the shape depth, which makes it three-dimensional. We can do this by drawing diagonal lines from every corner of the letter A, that move toward the same direction.
If you hope to complete craft projects where you need paint that will work well for any number of surfaces, then craft paint is your go-to! The consistency is smooth, creamy, and easy to use.
Let us draw these diagonal lines toward the top right corner.

From there, we want to then connect those lines by drawing parallel lines that run along the lines that indicate height and length within the letter. As we do this we will intersect with the diagonal lines, which will give the letter three dimensions. You can use a marker to enhance the boldness of the depth lines, giving you a clear indication of the shape of the letter.
If you hope to complete craft projects where you need paint that will work well for any number of surfaces, then craft paint is your go-to! The consistency is smooth, creamy, and easy to use.
Remember, as long as each set of separate dimensional lines is parallel to one another, the letter will look accurate.
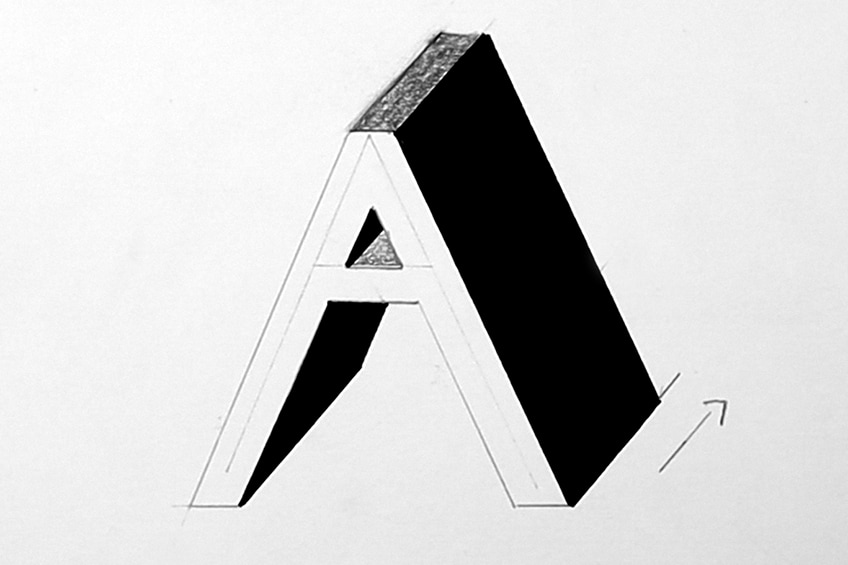
Step 3: Adding Shading to the Letter
Once our letter is drawn in its three dimensions, we can begin to add different shades to the letter. We want to make sure that each section of the letter that faces the same direction is the same in color. For instance, all the right sides of the letter should be the same in tonal value. Let’s color in all the sides that face the right direction with our black marker.

Keeping with the three-tone principle, we can choose which sides want to be darker or lighter. As long as you remember that all sides of the letter that face the same direction should always be the same color or shade.
If you hope to complete craft projects where you need paint that will work well for any number of surfaces, then craft paint is your go-to! The consistency is smooth, creamy, and easy to use.
That is how you add dimension to a letter, turning a two-dimensional letter into a three-dimensional letter!
If you hope to complete craft projects where you need paint that will work well for any number of surfaces, then craft paint is your go-to! The consistency is smooth, creamy, and easy to use.
Two things to make sure you remember is that each set of dimensional lines should always run parallel to one another. Secondly, all sides of the letter that face the same direction should be the same in shade or color.
Drawing Three Dimensions in a Letter With Curved Lines
We will now proceed to draw a new letter using the same principles, however, this time we will be drawing a letter with curves. Drawing a letter with curves changes the shading process a little bit. This is because there are no distinct edges in some parts of the letter, meaning we must create a gradient that changes from one shade to another.
However, the rest of the process is the same, but let us go through the different steps to see how we do this.
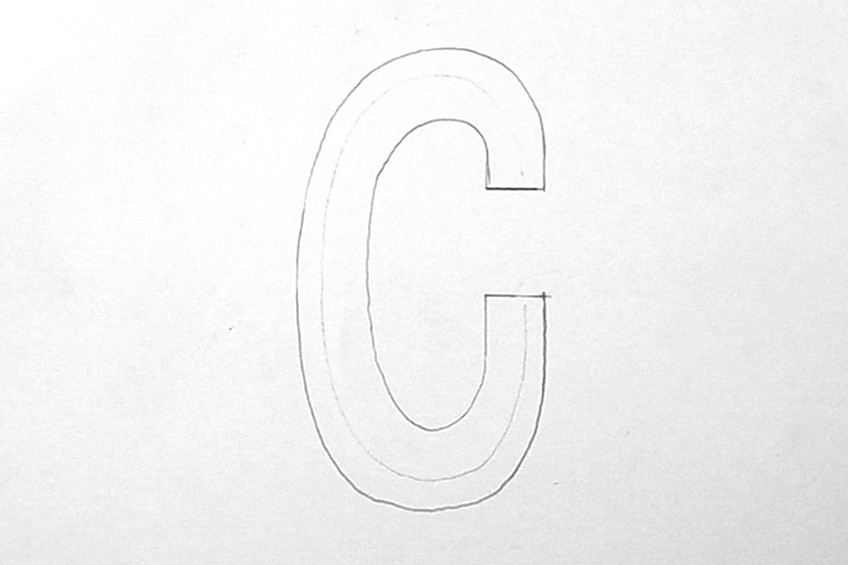
Step 1: Drawing the Letter
Let us begin by drawing the letter “C” with our pencils. We can follow the same block lettering process where you draw the letter in a simple line style, which you then proceed to outline around to create a thicker letter.
If you hope to complete craft projects where you need paint that will work well for any number of surfaces, then craft paint is your go-to! The consistency is smooth, creamy, and easy to use.
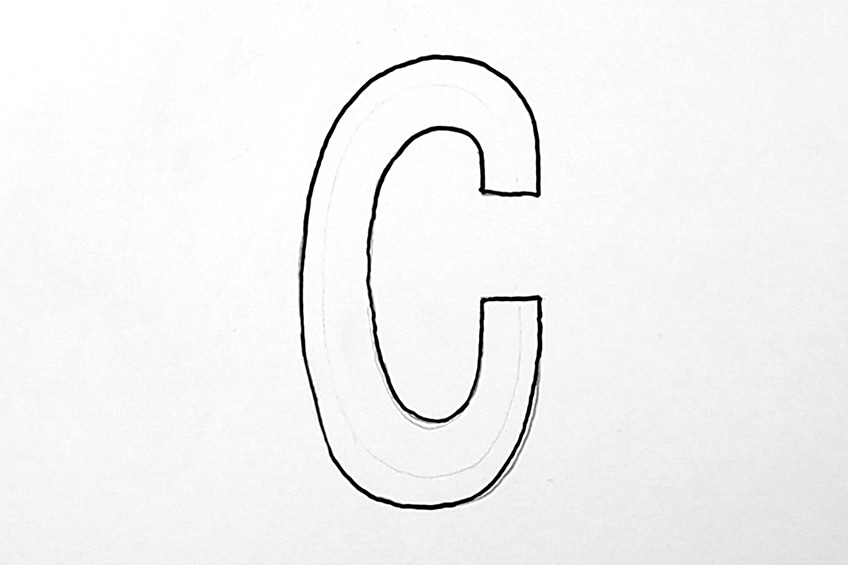
Once you have created the thicker letter outline, you can erase the line inside the letter “C” outline. We should be left with a block letter “C”.
Once we have our letter “C” written out in pencil, we can then carry on by taking our micron marker and outlining the text. You could do this at the end of the whole process or the beginning, it doesn’t matter.
If you hope to complete craft projects where you need paint that will work well for any number of surfaces, then craft paint is your go-to! The consistency is smooth, creamy, and easy to use.
However, sometimes it’s nice to do it earlier on so that you have clearer guidelines to work within.
Step 2: Adding Dimensions
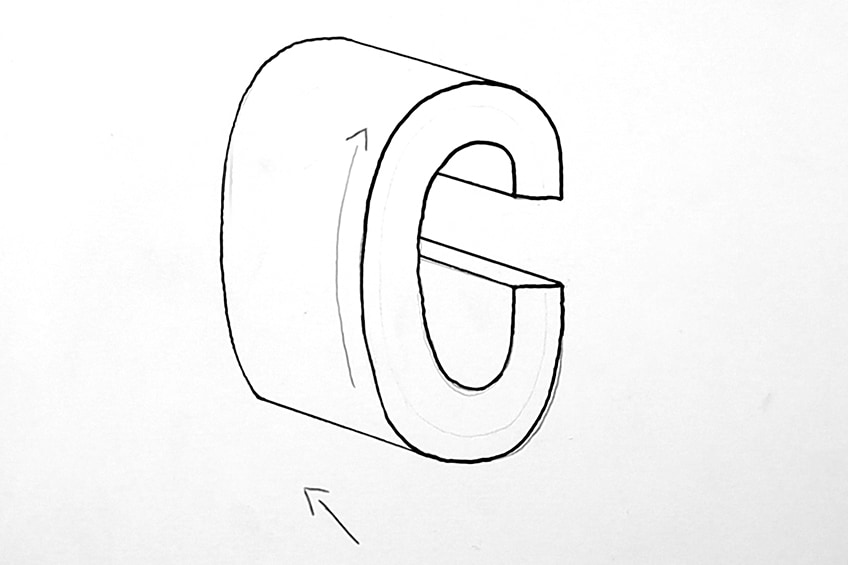
We begin by drawing diagonal lines in a direction that we choose; these lines will indicate depth. The letter already exists as a two-dimensional shape, having both width and height, we just need to give it depth. We want to draw from the corners at the end of the letter shape first.
If you hope to complete craft projects where you need paint that will work well for any number of surfaces, then craft paint is your go-to! The consistency is smooth, creamy, and easy to use.
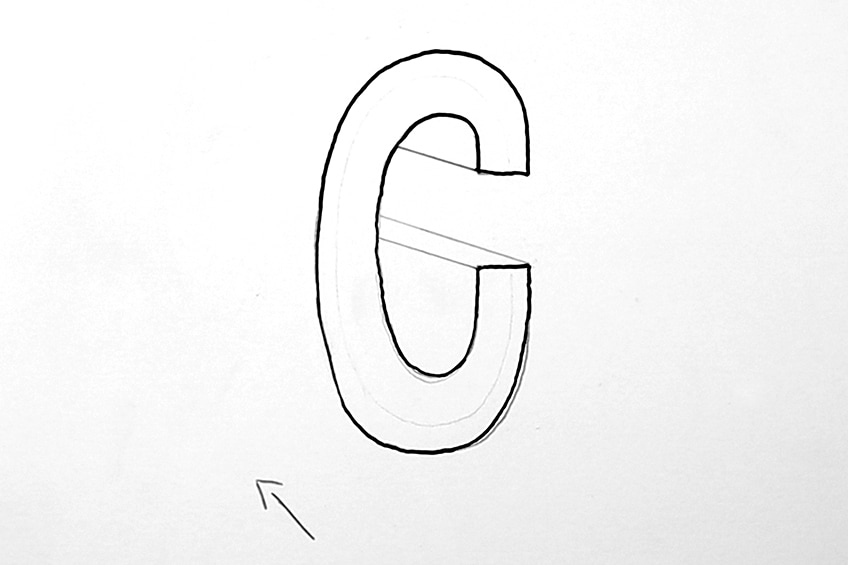
From there, we want to add a line at the bottom of the letter. We know that the bottom of the “C” shape doesn’t have an edge, however, we want to draw a line from the bottom of the curve of the “C”. Again, make sure that this depth line moves toward the same direction as the other depth lines.
We also want to make sure that all depth lines are parallel with one another.
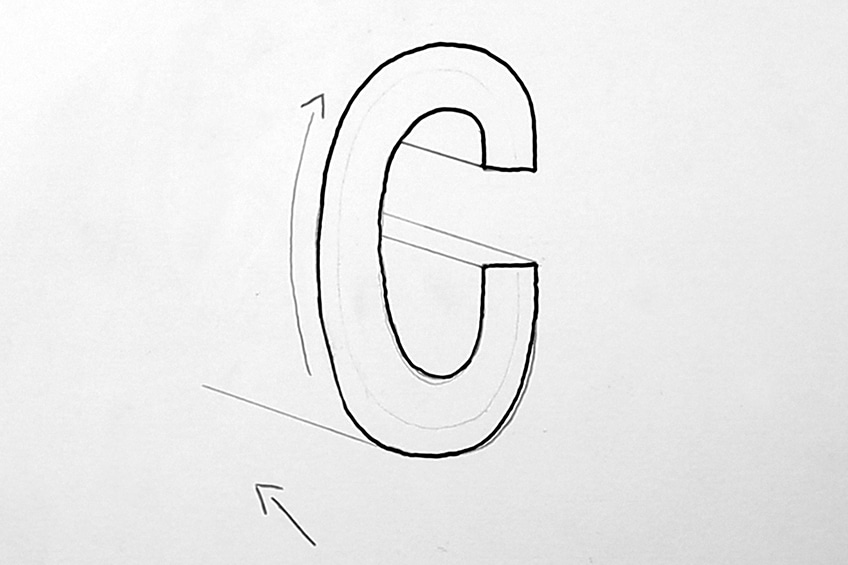
From here, we want to add another height line to the letter. IF we follow the rule of keeping each set of lines for each dimension parallel, we will find that it makes the process easier. So, when we draw a height line parallel with the shape of the letter, we will find that it intersects with the depth line naturally.
If you hope to complete craft projects where you need paint that will work well for any number of surfaces, then craft paint is your go-to! The consistency is smooth, creamy, and easy to use.
Just make sure you draw lines parallel to one another and you will be fine.

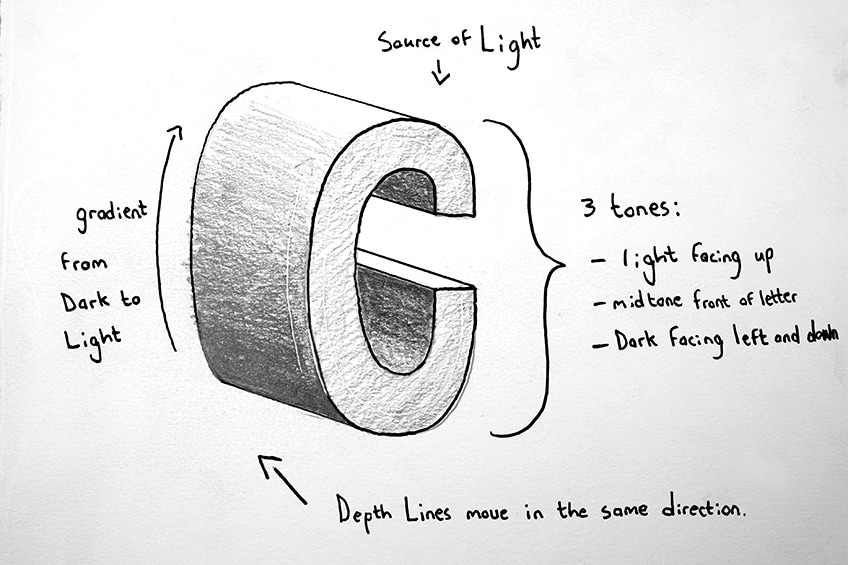
Following the parallel lines rule, will allow the lines of our letter to intersect which will make the letter look natural. Remember that all depth lines are parallel with one another and that this rule applies to each set of lines for each dimension. From there, we can go over our letter with our markers to embolden the letter.
Step 3: Adding Shading to the Letter
Adding shading is the same for curved letters wherever the letter has straight surfaces. However, the only area in which adding shading differs is in the curve of the letter. We still apply the same three-tone rule, using a dark, mid-tone, and light tone for each dimension. This time, however, there is a gradient from the bottom or side of the letter to the top.
This means we will make a seamless gradient that transitions from one tone to another.
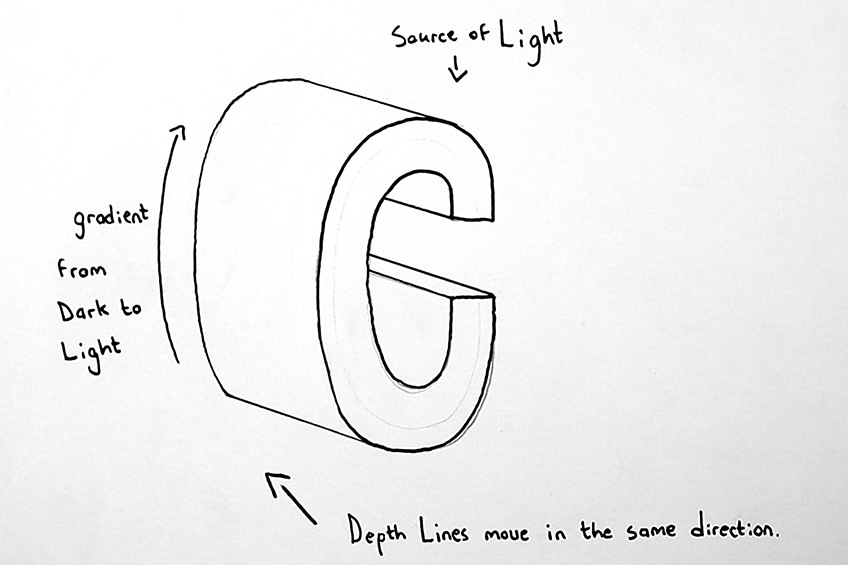
It’s quite simple, let’s say the light source is above the letter. This means that the lightest tone will be on any surfaces facing up. You can keep all these surfaces white, however, you can shade with your pencil the mid-tone for the front of the letter and a darker tone for any surfaces facing down.
If you hope to complete craft projects where you need paint that will work well for any number of surfaces, then craft paint is your go-to! The consistency is smooth, creamy, and easy to use.
Along the curved side of the letter, you will shade a seamless gradient that transitions from dark to light as the letter curves from the bottom to the top.
The principle is still the same, just a slight modification in the way you create a transition from different tonal variations within the curve of the letter. This is something to practice though. Which can be applied to all letters that have a slight curvature. However, choosing which sides of the letter are lightest and darkest is completely up to you.
Remember that each set of dimensional lines should always run parallel to one another. Secondly, all sides of the letter that face the same direction should be the same in shade or color. Now let us explore this concept with an exercise.
Drawing a Three-Dimensional Alphabet
Now that we know the method of turning two-dimensional letters into 3D lettering, we can now explore different ways of applying these principles to a 3D alphabet. We will now create an alphabet using the 3D principles of dimensions, perspective, and light to create different variations within each letter of the alphabet.
If you hope to complete craft projects where you need paint that will work well for any number of surfaces, then craft paint is your go-to! The consistency is smooth, creamy, and easy to use.
This is an exercise for you to explore different thicknesses of letters, different directions for depth lines, and how you add the different shading tones. Let’s go through a few steps to guide us through the exercise.
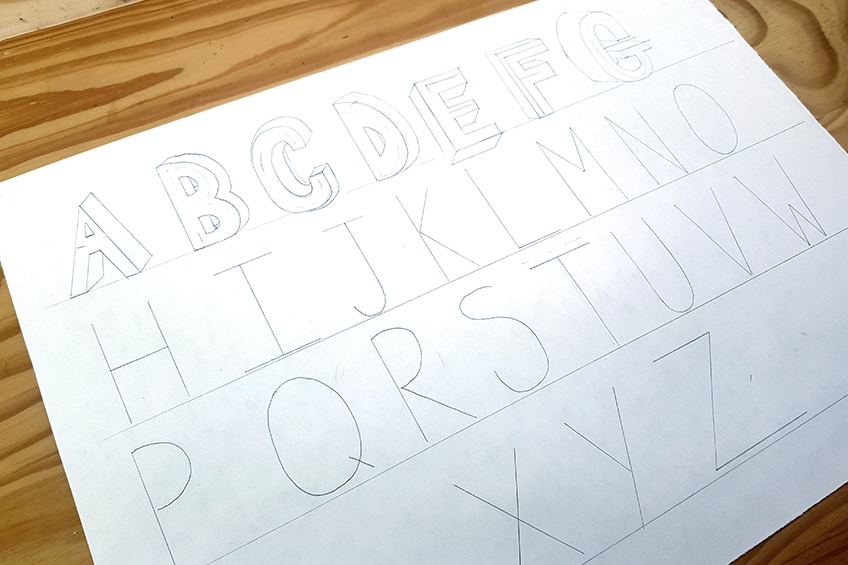
Step 1: Drawing the Letters
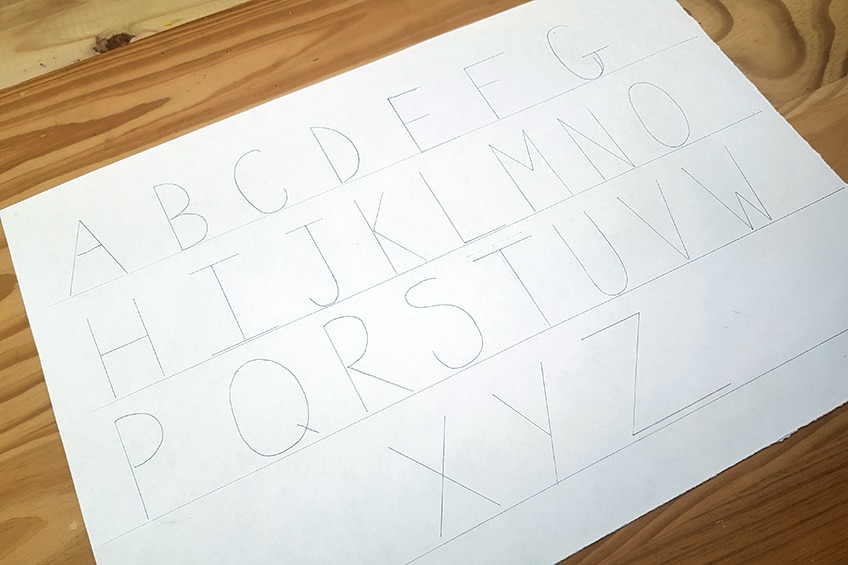
Let us begin by drawing the letters of the alphabet on a page, this can be however large you want it to be. Make sure you start by first writing out each letter in a simple line style to size them and space them nicely. We want to make sure we have enough room between all letters; this way, we can explore our 3D lines going in all different directions for this exercise.
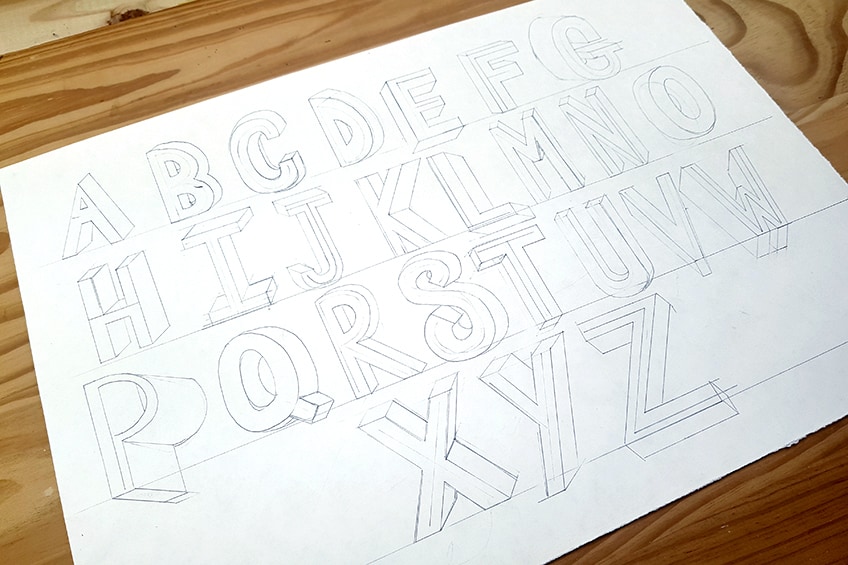
Step 2: Adding Dimensions
Since we understand how to make our letters thicker, we can do this for each letter and then apply the principles of dimension. We want to move from one letter to the next, choosing which direction we want to add depth lines. Explore how deep you want the letters to appear. This exercise is intended for you to explore, now that you understand the process of adding dimension to your letters.
As you add dimension to each letter, try to slowly go through the process of applying each step to each letter. Try different directions for your 3D lettering when you add the depth lines. Explore making the letters move in all sorts of directions.
As you add lines of depth to each letter remember that you want to keep all sets of lines for each dimension parallel with one another. All lines that indicate depth should be parallel and move in the same direction.
If you hope to complete craft projects where you need paint that will work well for any number of surfaces, then craft paint is your go-to! The consistency is smooth, creamy, and easy to use.
The same applies to lines for height and width. Take your time on the curved letters.
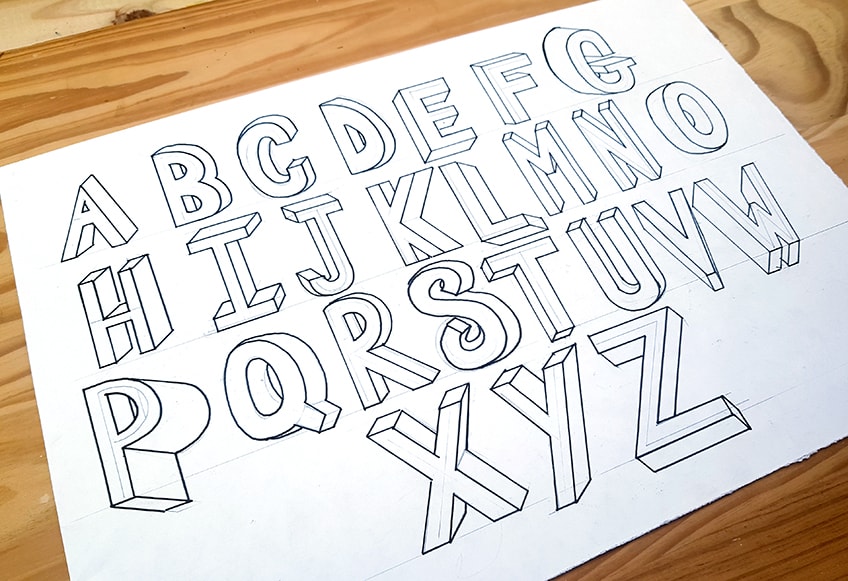
Once we have gone through each letter, exploring different variations of 3D lettering, we can go over our letters with a marker to embolden the text. You don’t have to do this but when learning how to shade in 3D it can be quite helpful for the lines to be distinct.
If you hope to complete craft projects where you need paint that will work well for any number of surfaces, then craft paint is your go-to! The consistency is smooth, creamy, and easy to use.
Take your time going over each letter, especially with the curved letters.
As you do this, remember that when we begin to shade, you can use the three-tone rule however you please. This means you don’t need to always choose a direction for the light source. When adding in the different shades, the process will naturally create a light source.
Step 3: Adding Shading to the Letters
From here we can allow ourselves to be playful with both our markers and pencils as we shade in each letter. Remember that you can use both your pencil and marker in tandem with each other to create the three-tone variation within a letter.
If you hope to complete craft projects where you need paint that will work well for any number of surfaces, then craft paint is your go-to! The consistency is smooth, creamy, and easy to use.
This means that the black marker would be the darkest tone, and you can create lighter tones with your pencil.
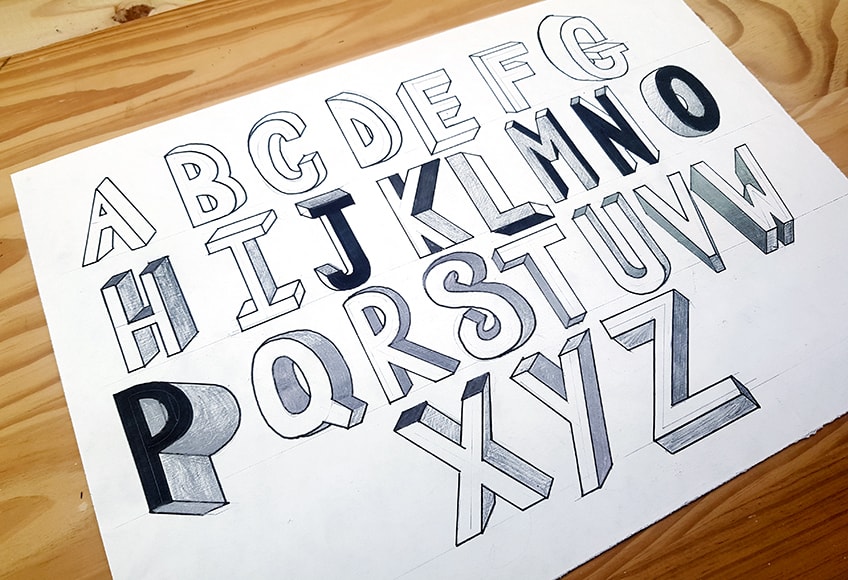
Try various sequences such as making the face of the letter black, with mid-tones along the side and lighter tones on top. Try applying each of the different variations of the three tones.
The aim here is for you to explore variations with adding shading into your 3D lettering.
Giving the letters different shading sequences will give the letters different perspective qualities. This is because as we add shading to each letter that is drawn in a different direction, we are illuminating the letter with our shading. This makes the letter seem as if it has been lit from different directions. It’s a great way to see how shading enhances the 3D quality of a letter.
Something to note about the curved letters is that you should always create seamless gradients in the curve of the letter parallel with the dimensional lines. For instance, if you are shading along a diagonal axis for the depth lines, try to keep your shading diagonal. This will give the shading a more accurate quality.
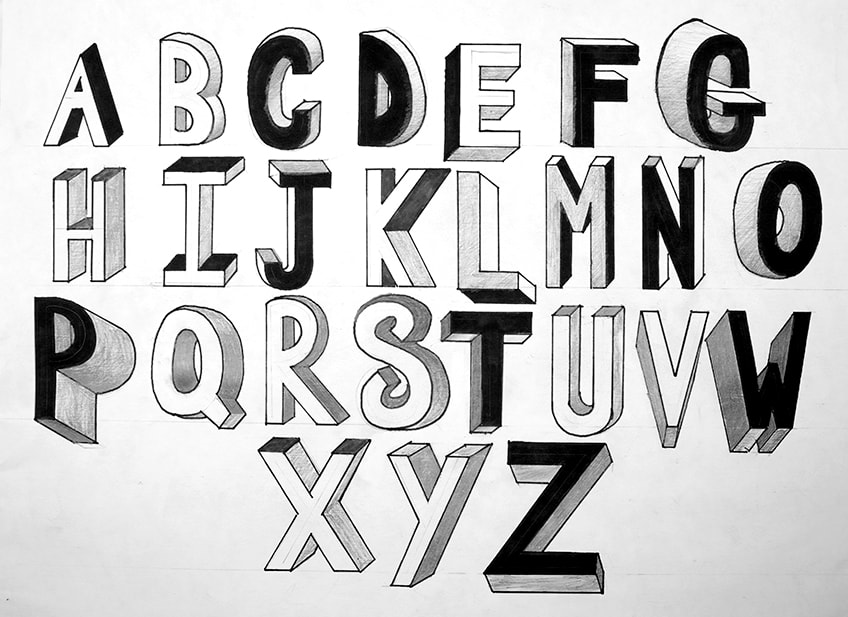
Most importantly, make sure you play around with how you shade in each letter. Explore sequences but also explore making letters darker or lighter. This means you can make a range of shades from dark to light that is relatively light or dark altogether.
Be sure to use this exercise to experiment and explore your 3D lettering.
Tips to Remember
- Make sure you use your ruler. Using the ruler to create straight seamless lines is essential when creating 3D lettering.
- Take your time with curved letters. Creating the curved sides of letters requires a gentle approach, so take your time with these kinds of features within letters.
- Remember the light source. As you shade in different areas of the letters, remember that the same surfaces will always be the same in shade.
- Always work with three different tones. Using three tones distinguishes different aspects of the 3D lettering.
- Have fun with different perspectives. Drawing the three-dimensional lines in different directions can be a fun thing to explore in a 3D alphabet exercise.
- Always remember the parallel lines rule. All lines that indicate depth are parallel and move in the same direction. This applies to lines for height and width.
Learning how to draw letters in 3D is quite simple once you understand the fundamental principles. Breaking the 3D lettering process into its key principles can help us understand how to turn any lettering into three-dimensional shapes. 3D block letters are a great way to learn as the lettering shape is simple and we can easily apply the dimensional lines, giving us a good introduction into the process of 3D lettering. However, this principle can be applied to all styles of lettering. Once you understand, the three dimensions, perspective, and light, you can turn any lettering styles into 3D letter drawing designs.
Frequently Asked Questions
How Do You Shade 3D Letters?
Use three-tone shading in 3D lettering to enhance visibility. Apply three different shades to different dimensions, allowing flexibility in the shading order for added detailing.
What Are the Key Principles of 3D Lettering?
Key principles for 3D lettering involve understanding three dimensions (height, width, depth) and their impact on perspective. Choose a light source side and apply three shades for shading.
What Is the Purpose of 3D Lettering?
Learning 3D lettering is crucial for creative fields like hand lettering and graphic design. It provides foundational knowledge for forming letters and adding dimensions, enhancing lettering skills and allowing for unique and refined designs.

Matthew Matthysen is an educated multidisciplinary artist and illustrator. He successfully completed his art degree at the University of Witwatersrand in South Africa, majoring in art history and contemporary drawing. The focus of his thesis was to explore the philosophical implications of the macro and micro-universe on the human experience. Matthew uses diverse media, such as written and hands-on components, to explore various approaches that are on the border between philosophy and science.
Matthew organized various exhibitions before and during his years as a student and is still passionate about doing so today. He currently works as a freelance artist and writer in various fields. He also has a permanent position at a renowned online gallery (ArtGazette) where he produces various works on commission. As a freelance artist, he creates several series and successfully sells them to galleries and collectors. He loves to use his work and skills in various fields of interest.
Matthew has been creating drawing and painting tutorials since the relaunch in 2020. Through his involvement with artincontext.org, he has been able to deepen his knowledge of various painting mediums. For example, watercolor techniques, calligraphy and lately digital drawing, which is becoming more and more popular.
Learn more about Matthew Matthysen and the Art in Context Team.
Cite this Article
Matthew, Matthysen, “How to Draw Letters in 3D – A Dimensional Hand-Lettering Tutorial.” Art in Context. June 22, 2022. URL: https://artincontext.org/how-to-draw-letters-in-3d/
Matthysen, M. (2022, 22 June). How to Draw Letters in 3D – A Dimensional Hand-Lettering Tutorial. Art in Context. https://artincontext.org/how-to-draw-letters-in-3d/
Matthysen, Matthew. “How to Draw Letters in 3D – A Dimensional Hand-Lettering Tutorial.” Art in Context, June 22, 2022. https://artincontext.org/how-to-draw-letters-in-3d/.


