How to Draw Rocks – Create a Realistic Rock Drawing
Drawing rocks is a really fun exercise, it develops a unique observational skill that can help enhance your drawing skills. With realistic rock drawings or even simple rock sketches, we will find that light is a key concept that can help refine the drawing. Drawing rocks can also be used as a feature for other landscape drawings. Learning how to draw rocks also helps with understanding different textures. As we go through the process of drawing rock texture, we will find that rocks are quite abstract and can be all sorts of shapes and sizes, However, paying attention to light and its interaction with different textures is what will contextualize the rock as a rock.
An Easy Guide to Drawing Rocks
In this tutorial, we will go through the different processes of drawing rock with pen and pencil. We will be breaking down the fundamentals of how rocks are formed and what makes them look the way they do. Any realistic rock drawing is simply an obscure object, whereby light interacts with its surface to create strange and interesting shadows. This is how we understand different types of rock, as different textures will cause different light refractions which create different shadow formations. However, once we understand the fundamentals of what makes a rock look the way it does, we will gain more confidence in our realistic rock drawing.
Preparation
We want to place ourselves in a space that is conducive to focusing. This is so we can focus and pay attention as we learn how to draw rocks. Even though the tutorial is quite simple and easy to follow we still want to engage and bring our attention to each step as we go through the tutorial. We will break down a few fundamental principles so we will need some time delegated to this tutorial. We also want to make sure that we have all our materials nearby and ready for use. Lastly, make sure you have your source material nearby, you can either print this out or draw directly from your phone or perhaps a tablet.
Step-by-Step Instructions on How to Draw Rocks
As we learn how to draw rocks, we want to understand the fundamental key concepts that make a rock look the way it does. This means that we will first look at how light interacts with some basic shapes and how this causes shadows to appear. The second thing we will look at is how we can form our realistic rock drawing through the reconstruction of simple shapes. Specifically, paying attention to how we can morph normal shapes into obscure ones that could be portrayed as a rock. Lastly, we will learn how to draw rocks, using a source image that guides us step by step. Learning how to draw rocks will require focus on various areas within the source image. So perhaps use a smart device where you may be able to zoom in and focus on certain moments in the image.
Stage 1: Drawing Shadows and Objects
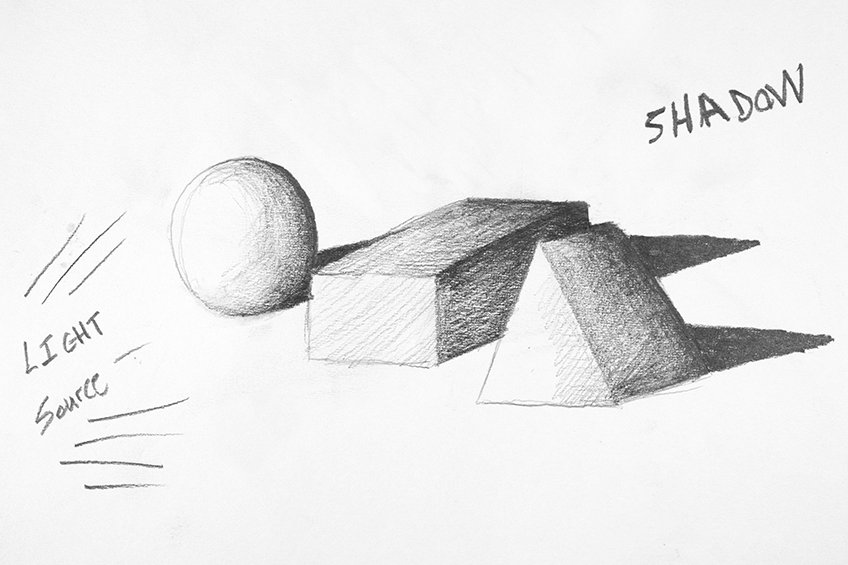
Learning how to draw a boulder or a rock requires the fundamental knowledge of how shadows and objects work together. To learn how to draw rocks we are essentially learning how to draw shadows, and understand how they function to complex objects like a rock. Let’s begin by drawing some simple three-dimensional shapes such as a pyramid, a ball, and a block.
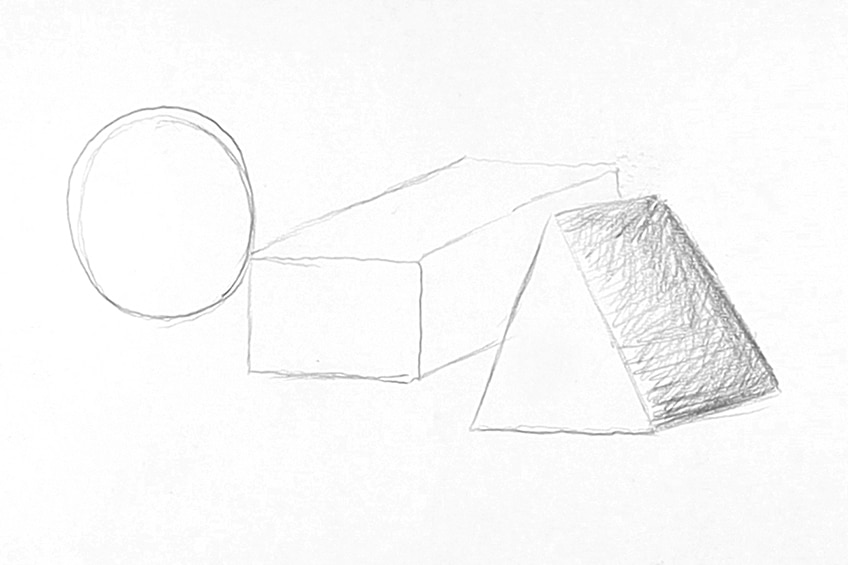
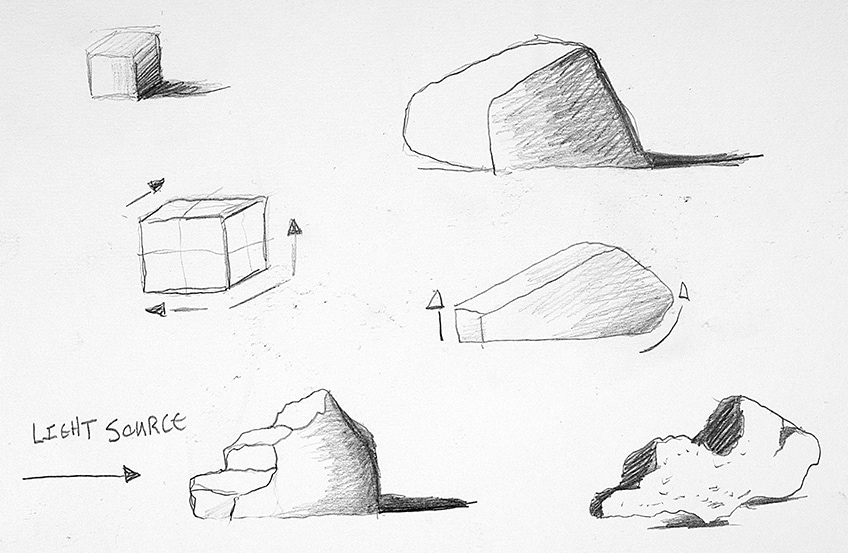
Let us imagine that there is a light source coming from the left side of the page. What this means is that the right side of the objects, or the side of the objects that are not exposed directly to the light source will be darker in relation to the side that is. This is because the light is struggling to interact with the entirety of the object since it is coming from a single direction.
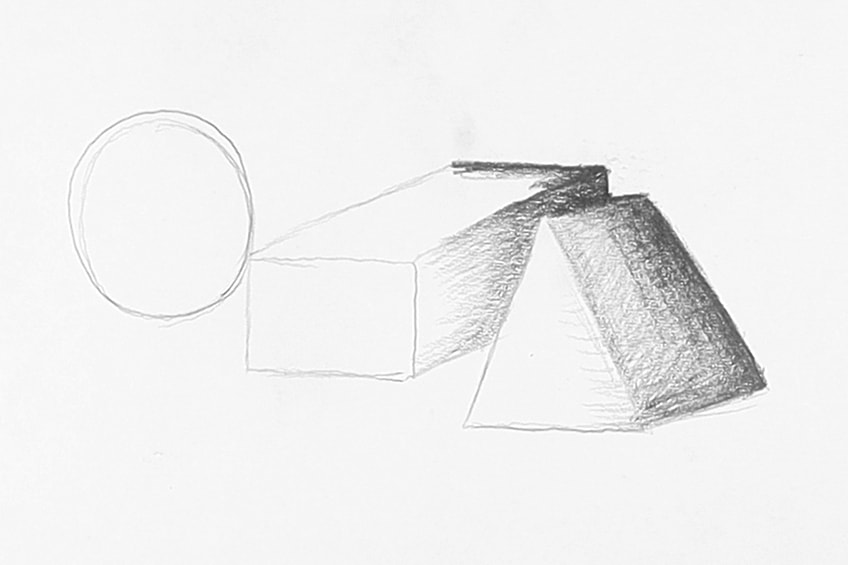
What this means is that we will use our shading as a means of creating the shadow qualities of an image. This means that we want to use our pencils and pens, as a tool, to darken the parts of an object that would have less exposure to light. This is why we want to pay attention to which direction the light source would be coming from.
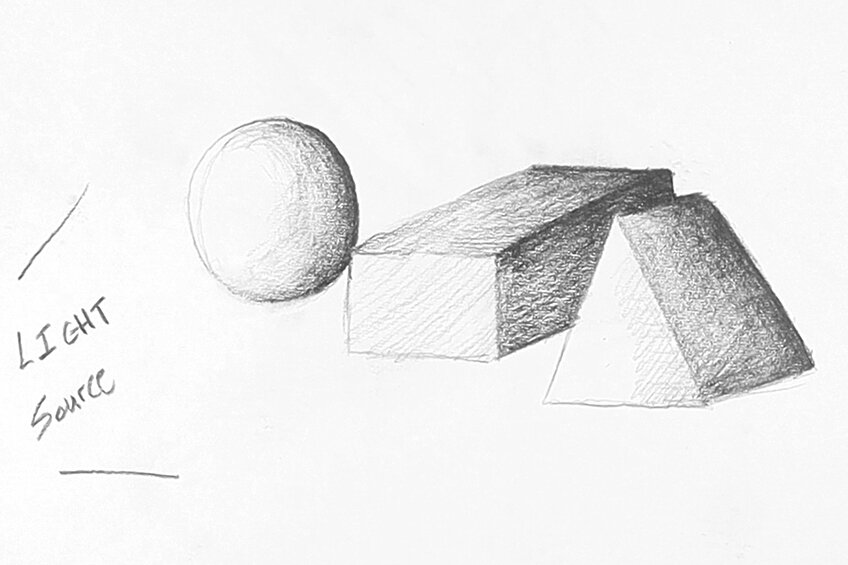
With shading, we are not creating a single dark color that covers the whole object. Rather, what we want to achieve is a gradient effect. The gradient describes how an image is slowly becoming more exposed to light from its darkest point. This means we want to shade the darkest parts where there would be no light and slowly lighten the shading as it nears the light source.
Lastly, shadows are often cast on the floor or nearby surfaces when an object is exposed to a light source. This means that the objects will have shadows that fall on the floor or any surface nearby at the opposite side of the light source. These can take many forms and can be complex when dealing with rock as we will see.
Stage 2: Understanding How Rocks are Formed
Before we move into the part of the tutorial, where we draw a pile of rocks from a source image, let us focus on how rocks are formed from basic shapes. Consider what we just learned about the concept of light in relation to a cube. We understand that the cube has a three-dimensionality to it which will result in a specific interaction with a light source.
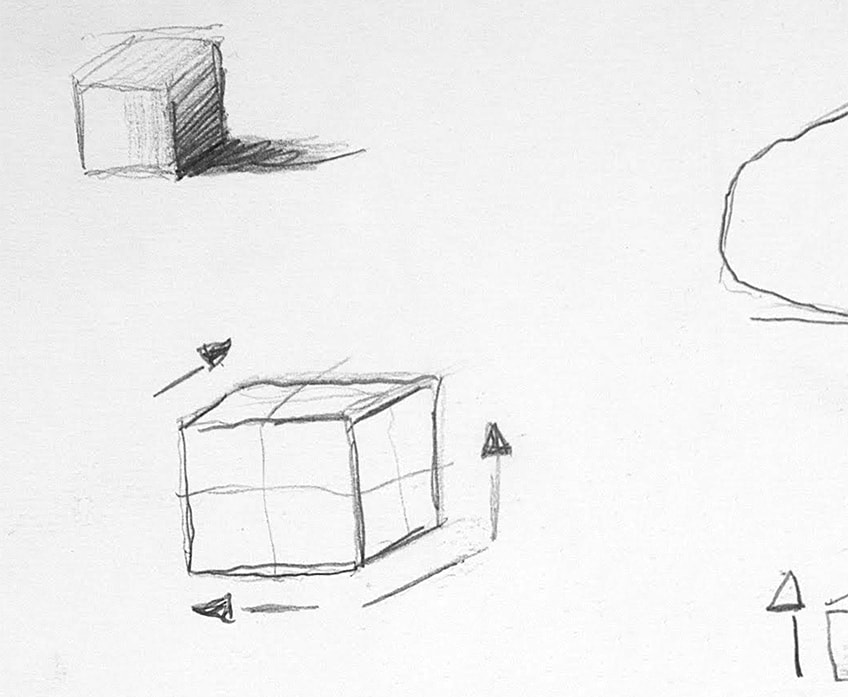
Rocks, whatever their shape may function in the same way. However, how we can achieve the variety of shapes that rocks come in can simply be a reshaping of the basic shapes we already understand. For instance, we can take the general shape of a cube and morph it into something more triangular. If we give it the three-dimensionality of height, width, and length we can then apply the same concept of light and its interaction with the object.
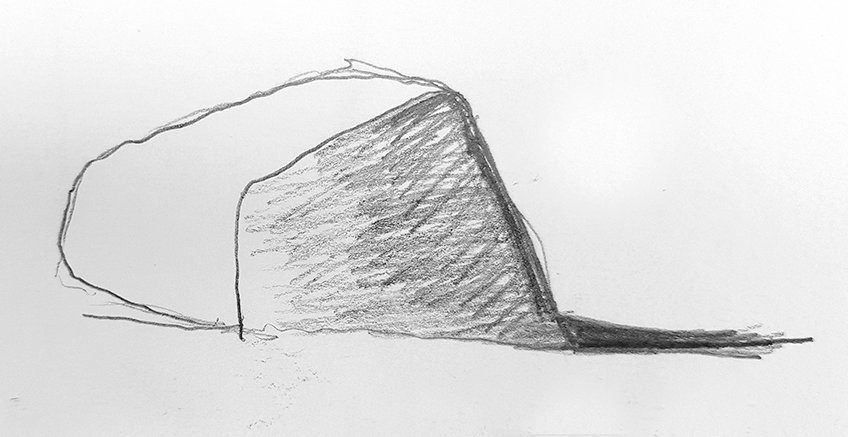
This three-dimensional quality is what determines how the light will interact with the object. If we then know from which direction our light source is coming, we will then know where the shadows will form. This means we can slowly morph our shapes in all kinds of ways. As long as we apply three dimensions to it we can then have a realistic interaction between light and the object.
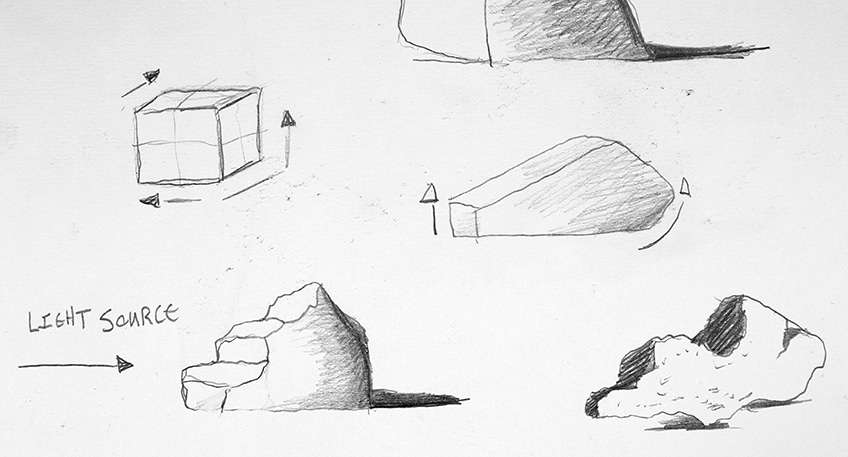
With the dimension, a key thing to remember as well as the concept of perspective. The angle at which the rock or object is being perceived will also influence its shape. This means that the rock can have various deviations and textures in its structure because it is seen from a particular angle. This will influence the shadow and the shape of the rock.
How we morph objects can vary in many ways. If you keep the concept of the cube and its three-dimensional quality in your mind you can become quite playful with how you make interesting forms. These forms will then start to look abstract which, by then, can be classified as rocks. Rocks are abstract, but as long as we understand dimensionality and light, we can create a vast variety of different shaped rocks.
Stage 3: Drawing a Pile of Rocks
We will now proceed to learn how to draw rocks using a source image as a reference. This is where we can apply all the little concepts explored in the rock sketches. We now will learn how to draw rocks using pen and pencil, building on the concepts we have learned.
Step 1: Light Sketch of the Rocks
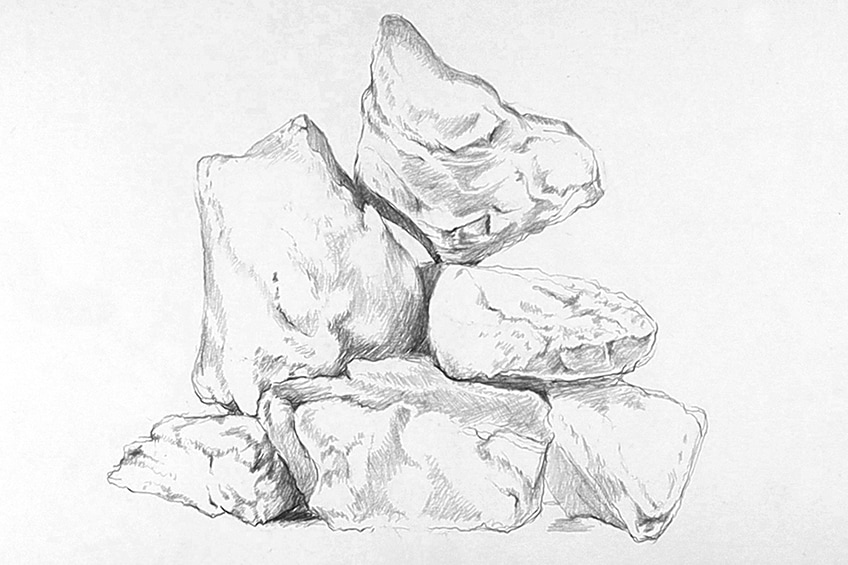
Let us begin by creating a light sketch of the image with a Hb pencil. As we examine our source image let us try to focus on the shape and outline of each rock. Consider each rock’s size in relation to the others that are placed around it. We want to spend time on getting the size and shape right as it will help the process of shading.
As you carry on forming the general shapes of the rock, a good suggestion is to spend some time analyzing your source in between applications of marks. The more we analyze our source image, the better we will understand how the form of each rock is placed in the pile.
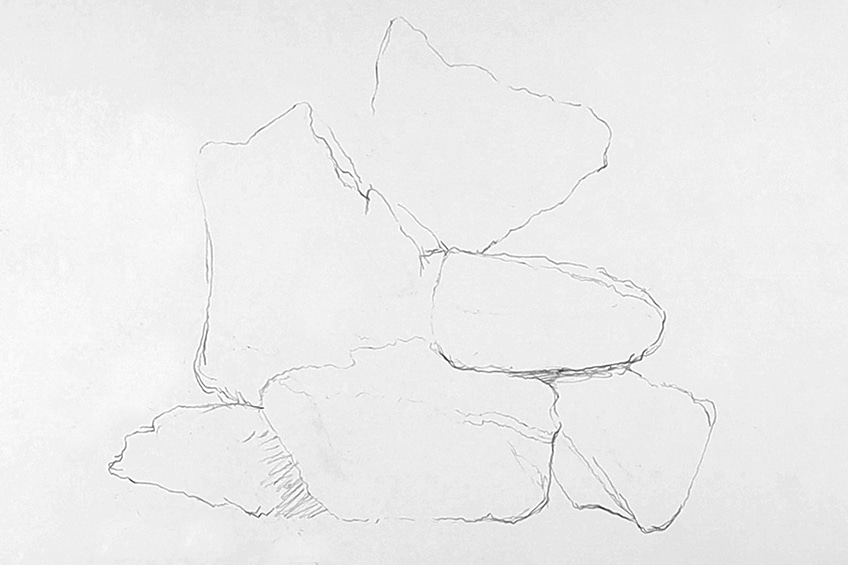
Remember the concept of light and three-dimensionality as you make light shading marks that indicate shadow. You want to analyze your source image and take time with this process. This will slowly start to form the rocks into three-dimensional objects.
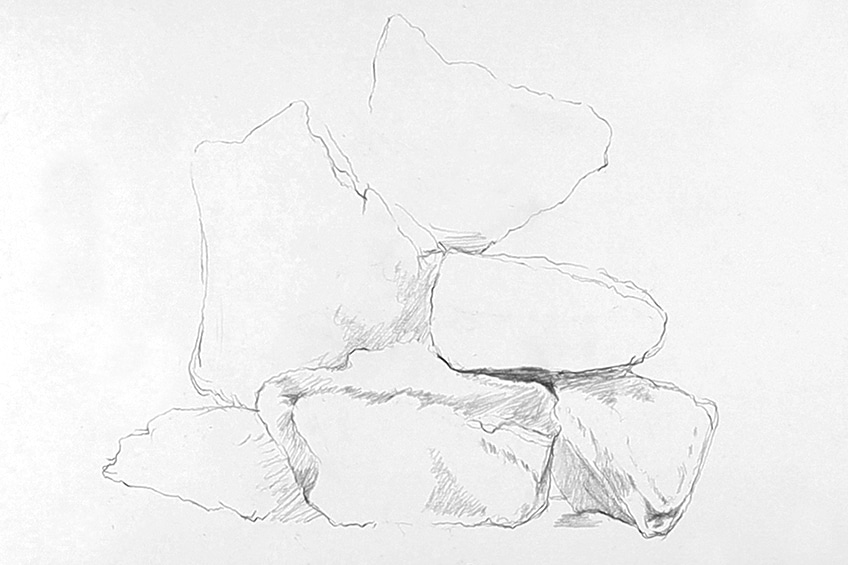
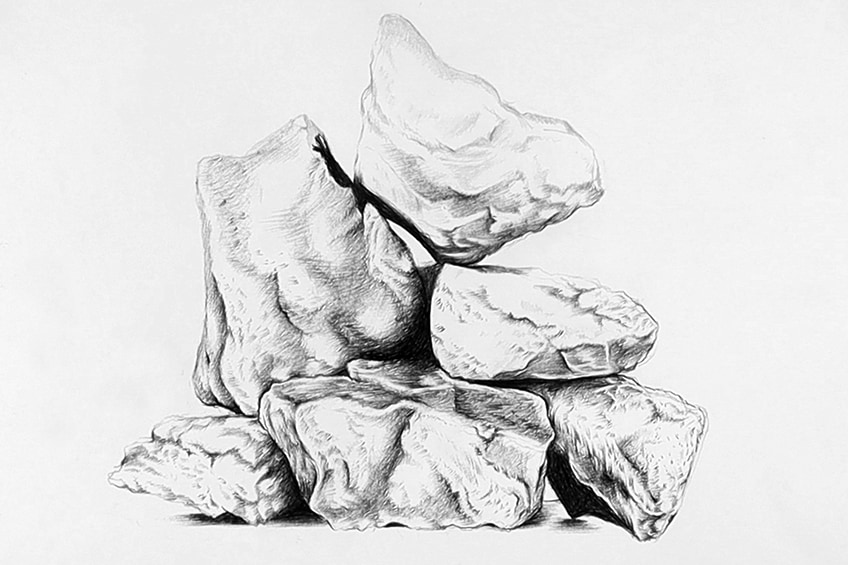
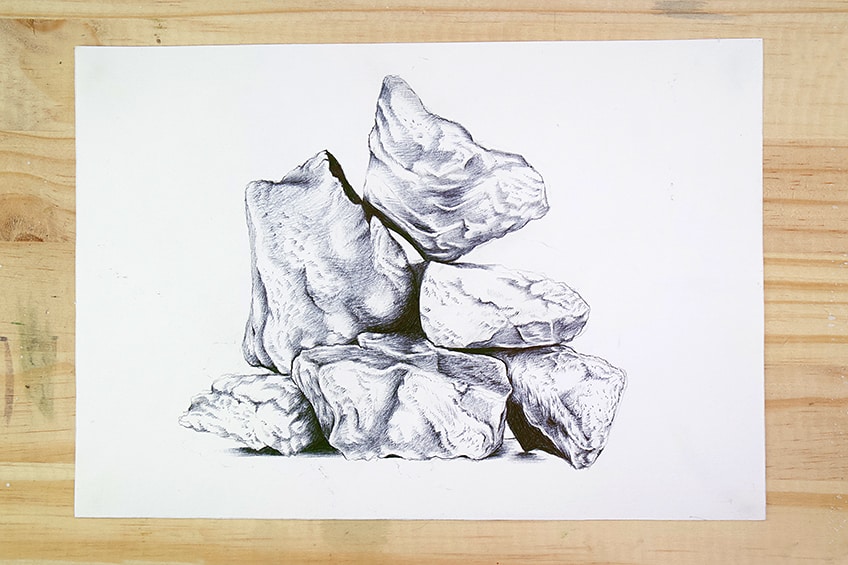
The source image depicts a series of granite rocks, which come with smaller and intricate details. For this exercise, let us not get hung up on trying to replicate every single little detail. We simply aim to understand the form of the rocks and how the light and shadows reveal the general shape and larger details of each rock.
Step 2: Light Pencil Shading of the Rocks
Slowly start to use the features of the rocks, which you examine in your source image, to help you navigate where to shade. We can use both a Hb and 2B pencil for this part. The Source image depicts the light source to be above the rocks as we can see various shadows from within the grouping of the rocks.
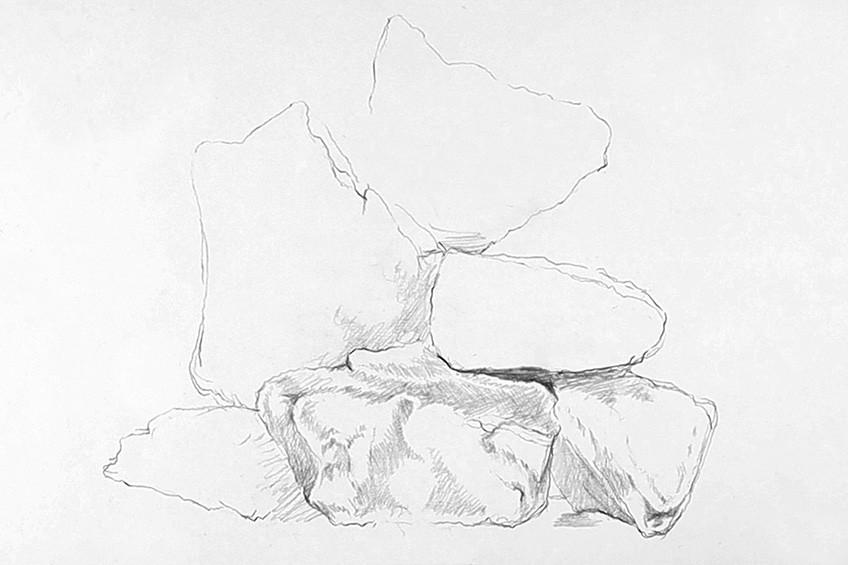
Again, a good suggestion is to analyze your source image and slowly work through each rock independently. By doing so we can pay attention to how each rock is defined in three dimensions according to how the light is interacting with it.
In step 1 we focused on the shape and outline of the rocks, making sure we got the scale and placement of each rock correct. Now we want to slowly work through each rock and focus a little more on its forms and details. Again, we are not trying to replicate every little detail in each rock but rather how the shadows define their general shape and texture.
Again, as you work your way through each rock consider the light source within the image. For this particular image, we can see that the light source is depicted above the rocks. This is creating moments of shadow in between each rock as they lean against one another.
As we shade, we want to pay attention to how each rock has a unique formation. The form of each rock is governed by the way the light is interacting with them. This also defines the shadows within the rock and how the dark to the light ratio between moments of shadow and exposed rock are represented within the drawing.

For example, let us look at the highest rock on the pile. We can see that its form is slightly different from the other rocks as its features are seen as slates along its facade. We only know this because the light is revealing the shadows on the rock which are defined by its features.
So as we work our way through each rock try to notice how the darkest shadows are formed within the source image. If we focus on the source image, we can see that the darkest shadows appear black. This is called maximum contrast, which means that there is a massive difference in tonality between the darkest and lightest parts of the rock. Remember this for later steps where we will shade darker.
As we carry on lightly shading, what we are doing is we are subconsciously setting the foundations for where we will shade in the darker with our pens. When shading with a pen, it is always important to set up a good foundational level with pencil marks. This is why we want to focus on this stage as we shade with our pencils.
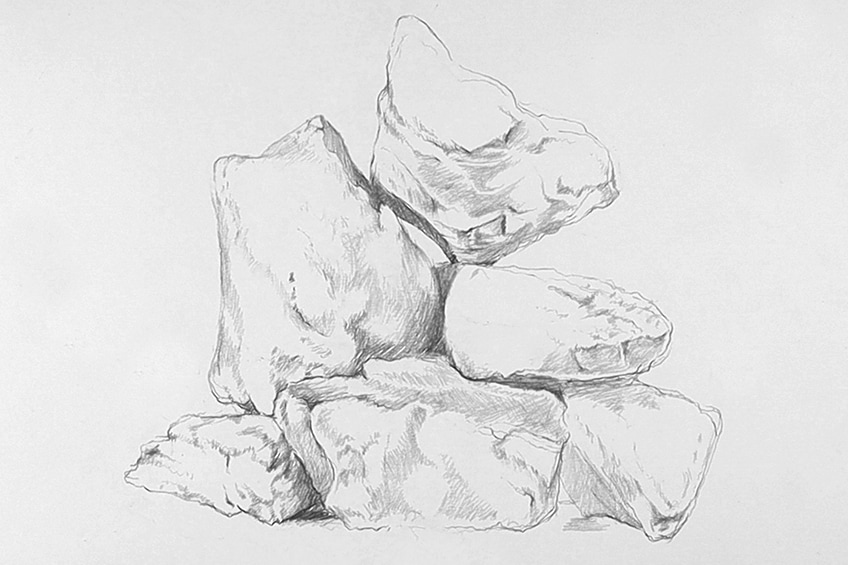
Remember, this is not about perfecting the tiny details on each rock, rather it is a process of understanding the general shape of the rock and its features. We want to know how to place the shadows on each rock based on their surfaces and the deviations. There are techniques that we can use with our pens to create the quality of texture, however, try to consolidate the general shape and form of each rock before moving on.
Step 3: Shading With Pen
Shading with a pen is quite similar to shading with a pencil. To achieve seamless gradients is more a matter of what pen we use. This is why we use a ballpoint pen. Let us proceed with the shading part of the tutorial by moving through each rock. A good place to start is from the bottom up.
Again, we are dealing with maximum contrast within this image, this is due to the shadows that are formed within the pile of rocks produced by the light source. We achieve these dark shadows by slowly layering pen marks over one another again and again until we reach the total value required.

When shading in these dark areas within the image, don’t be afraid to make the darkest shadows dark by coloring in with your pen. However, as you proceed to do so, pay close attention to your source image. With a pen, very similar to a pencil, the way we lighten our gradients is by the amount of pressure we apply to the pen.
As you look at the pencil marks you have made and you compare them to the source image, notice the various tonal values as you analyze both your drawing and the image. See how the shadows on the rock create these dark moments in the rock which can be defined by a larger surface area of shading. Whereas the lighter moments in the rock can be defined by fewer marks and simple line work.
Learning how to draw rocks in a pen comes with an attentiveness to the various pressures you apply to your pen as you draw. As you slowly work your way through your drawing, attending to each rock, consider the deviations of each rock and how they interact with the light source. This will affect the way you apply your shading, whether it is to darken with more pressure or to lighten with less.
Another interesting feature to consider within this particular source image is how the shadows form on the ground, underneath the rocks. Notice how the shadows are spread out on the floor beyond the points of contact between the rock and the floor. Defining the rocks to be larger than that of the points of contact.
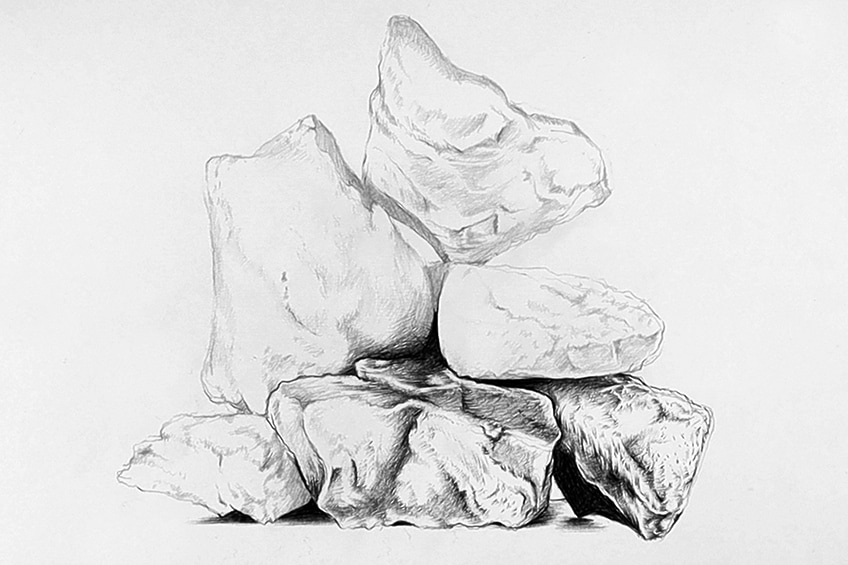
A good technique to consider as you shade and add details with your pen is the surface areas. As you draw darker marks and define the shadowy areas of the rocks, we often are working with adding more marks. Whereas, with the lighter areas of the rock, we are adding fewer marks. This is a great way to suggest the finer details of the rock as opposed to drawing every single little detail themselves.
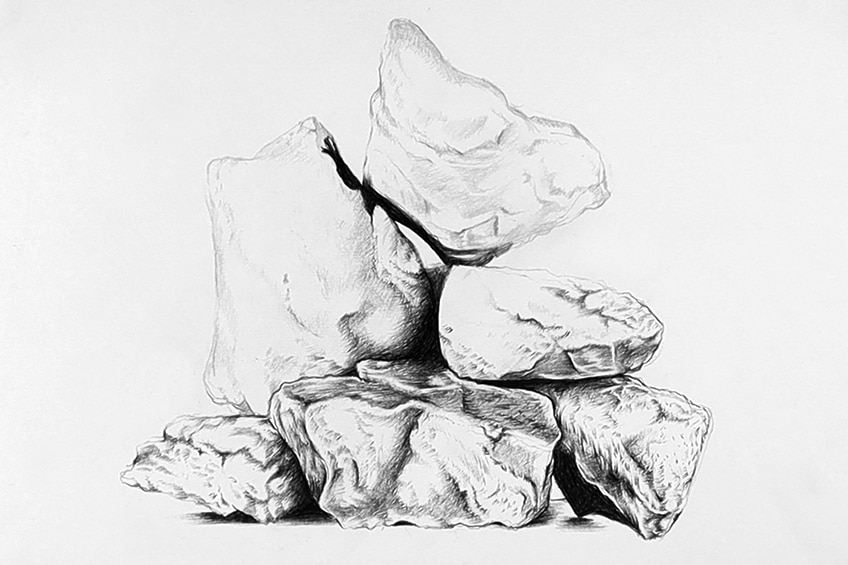
Each rock within the pile is slightly different. Paying attention to the subtle differences in the deviations of each rock will help you to draw a more realistic rock drawing. What I mean by this is that drawing rock texture isn’t always about perfecting every little detail, but it is about seeing what are the significant attributes of the rock that make it look the way it does.
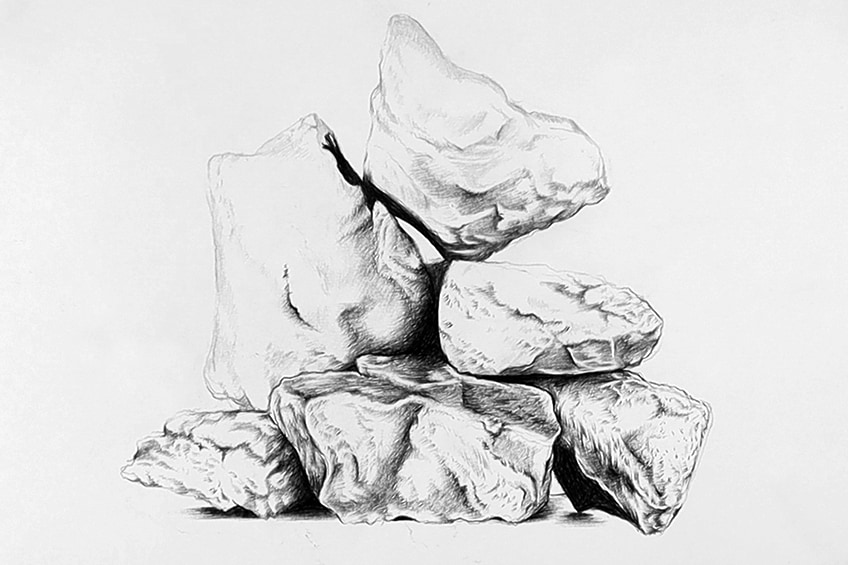
We can also be playful with how we use our shading techniques within the rocks. To create a lighter quality in the rock a good suggestion is to use hatching. For the smaller details that define the rock’s texture, we can use cross-hatching to make little indentations in the rock. For more information on drawing, techniques check out (Insert link to drawing techniques)

Remember, drawing is a skill to be practiced. This means it takes time. So, allow yourself to take the time you need to slowly attend to each rock as you shade. Especially with a pen, we want to be extra cautious as we apply our marks.

We should be coming to the end of our drawing at this point. We have discussed light, we have discussed perspective, and we have discussed dimension. You have all the tools to analyze the source image and develop a drawing using the skills you have learned in this tutorial. Drawing rocks is not difficult, it just requires the right information that can assist you throughout the process. There you have it! A tutorial on how to draw rocks.
Tips to Remember
- Take your time, it is important to take breaks rather than rushing a drawing.
- Try analyzing your source image before making a mark
- Rocks are simply objects defined by shadow. We want to pay attention to the shadows on the rock.
- Make sure you spend time on the pencil sketching part of the tutorial. This will make it easier to use a pen to shade in the image.
- When drawing with a pen, keep a piece of paper nearby for scribbling off excess ink in between each application.

Learning how to draw rocks can take time. Allow yourself to explore the different ways in which you can utilize the skills you have learned in this tutorial. Drawing different rock textures does not have to be a task of perfecting the finer details. Rather, try to see the larger shape of the rock you would like to draw and how its facade defines its cracks and deviations by the way light interacts with the surface. Most of all keep having fun and practicing, at the end of the day drawing is a skill that takes time.
Take a look at our rock drawing webstory here!
Frequently Asked Questions
How Do You Draw Realistic Rocks?
Drawing rock is a matter of understanding the type of rock. Once we understand the type of the rock, we can then have a better understanding of how light will interact with its texture and surfaces. Different rocks have different textures; however, we only understand that in a drawing format by seeing how the light defines the texture through the shadows that it forms. This is where we utilize our shading to classify the shape and form of the rock. We technically shade wherever there would be shadow formation. We don’t need to get hung up on the finer details of rocks, just because this can take time and is a different approach to drawing rocks. However, to draw a realistic rock drawing in a more simple and digestible way is by understanding light and its interaction with the surface of the rock.
How Do You Draw Rock Textures?
There are all kinds of different rock textures to draw. In this tutorial, we draw a pile of granite rocks. Knowing what kind of rock you are drawing changes the approach to the drawing. This means we analyze the surface of the rock in our source image, giving us a better understanding of how the rock is formed through the process of drawing. So, paying attention to the source image that displays the rock you are drawing is essential to your drawing.
Matthew Matthysen is an educated multidisciplinary artist and illustrator. He successfully completed his art degree at the University of Witwatersrand in South Africa, majoring in art history and contemporary drawing. The focus of his thesis was to explore the philosophical implications of the macro and micro-universe on the human experience. Matthew uses diverse media, such as written and hands-on components, to explore various approaches that are on the border between philosophy and science.
Matthew organized various exhibitions before and during his years as a student and is still passionate about doing so today. He currently works as a freelance artist and writer in various fields. He also has a permanent position at a renowned online gallery (ArtGazette) where he produces various works on commission. As a freelance artist, he creates several series and successfully sells them to galleries and collectors. He loves to use his work and skills in various fields of interest.
Matthew has been creating drawing and painting tutorials since the relaunch in 2020. Through his involvement with artincontext.org, he has been able to deepen his knowledge of various painting mediums. For example, watercolor techniques, calligraphy and lately digital drawing, which is becoming more and more popular.
Learn more about Matthew Matthysen and the Art in Context Team.
Cite this Article
Matthew, Matthysen, “How to Draw Rocks – Create a Realistic Rock Drawing.” Art in Context. February 7, 2023. URL: https://artincontext.org/how-to-draw-rocks/
Matthysen, M. (2023, 7 February). How to Draw Rocks – Create a Realistic Rock Drawing. Art in Context. https://artincontext.org/how-to-draw-rocks/
Matthysen, Matthew. “How to Draw Rocks – Create a Realistic Rock Drawing.” Art in Context, February 7, 2023. https://artincontext.org/how-to-draw-rocks/.






L’explication est très bien . avec remerciements renouvelés.