

How to Draw Feet – Feet Drawing Tutorial in 8 Steps
Feet are the weirdest part of the body. They are responsible for our mobility and equilibrium. This is because they are a complex body part with various tendons, muscles, and bones, all of which are working together to serve as a foundation for the stabilization of our bodies. Feet drawings, similar to hand drawings, are a great body part to draw. In a way drawing feet serves as a perfect exercise, to help you refine your understanding and representation of the anatomy. Drawing feet does not have to be an impossible task. By breaking it down into steps, we can slowly and attentively represent feet through a drawing. We break it down by learning the components of the foot. Learning how to draw a foot takes time, this tutorial requires patience and focus, with that being said let us see what we will need.
Necessary Materials
When learning how to draw complicated objects, such as various anatomical structures, it is best to use tools that are conducive to the best results. In this tutorial, we will be using a light blue pencil for the beginning stages and graphite pencils for the finer details. The light blue pencil will enable us to produce an under-layer that will set up our drawing process with graphite pencils.
Graphite pencils provide us with a broad range of different shades. This means that the pencils will enhance your capability of having smooth gradients. It is important to learn the process of smooth shading in this tutorial. This is because it will give you foundational knowledge for achieving various gradients through different pressures applied to different pencils. here is what we will need:
All Items are available in full drawing packs on Amazon: copy and paste the URL link below to see the full drawing kit.
- Set of pencils (Derwent Graphic Pencils Recommended)
- Light blue pencil: for the beginning stages
- Eraser
- Sharpener
- Good paper (200 g/m – 250 g/m recommended)
- Source material (could be from your phone or a printed image)
Preparation and Source Image
When we start our drawing, you must have good paper. I recommend 200/250 gsm paper. GSM refers to the thickness of the paper. A good suggestion is a fairly thicker paper (thicker than printer paper) because it deals well with erasers, pencils, and general drawing processes. It will also look way more beautiful as a finished product as the heavier paper tends to absorb graphite better.
Make sure you have your paper and your pencils all set out. It is good to keep your sharpener and eraser nearby and ready for use. These two items are essential when correcting mistakes or needing to make your pencil sharp for finer details. Don’t forget, your eraser can be used as a tool to make interesting marks as well.
Source Image
In this tutorial, We will be using an image displayed on an iPad as a reference image. It is important to learn different ways of drawing using different source materials, especially using digital devices.

Using a digital device for reference, like a phone or tablet, can help us adapt our ability to scale objects. When we use a device that is smaller than our actual drawing paper it becomes tricky to draw from them as a reference. However, it is important to develop this skill. By doing so, we will strengthen our abilities to understand scale and composition.
Time to Draw
Before we begin our drawing we should have our drawing tools ready, as well as our source image, which should be placed in front of us ready to be referred to. Once we have all the necessary material prepared we can begin to draw.
Step 1: Perspective and Scale
Let us consider two essential points before we start the actual drawing. When we draw, what we are doing essentially is representing something. When we represent something realistic we want to depict qualities that are familiar to our perception. Both perspective and scale are essential to understand when trying to depict something realistic in a drawing format.

Perspective
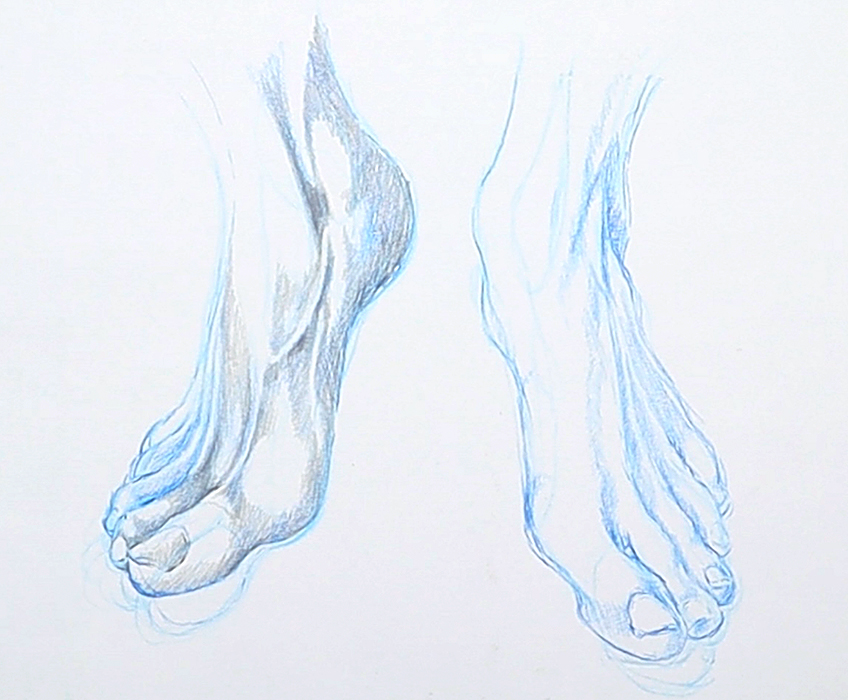
Understanding foot perspective is essential. In this tutorial, We will be using an image that depicts the foot from two different angles. You can draw feet from a variety of angles. However, if you use the image in this tutorial as a reference we’ll be drawing two feet from two particular angles.
We will be drawing a foot from an angle directly from the front of the foot, as the toes press down whilst the heel is raised. It is always helpful learning how to draw feet from the front. The other foot is from the side-front angle, where we see the inside of the foot moving along to the front of the foot near the toes.
Insert source image
Drawing feet from various angles, such as the side and front, helps us to understand foot perspective much better. By learning to draw more than one angle of a foot, we will gain a better knowledge of the foot as a structure.
Different perspectives help us to see the difference in shadow, bone structure, and movement. The foot is similar to the hand, however, it does not have the same dexterity as a hand. This means the foot’s movement variety is much less than that of the hand. The hand is quite capable of all kinds of movements, however, the foot is quite linear in its mobility. This is important to note because it helps guide our drawing into a final accurate depiction. If we are to draw a foot we need to understand its functionality from different perspectives.
Scale
As previously mentioned, we need to grasp the scale of our objects, this will help us to position the feet correctly on our drawing paper. When drawing feet, we need to consider the size difference between the different aspects of the foot. However, the scale does become tricky when we work with different perspectives.
In a sense, a toe can seem larger than the forefoot based on a particular perspective that we are looking at the foot from. All these concepts we need to take into consideration when placing our shapes down on our drawing paper. This is why it is good to analyze our reference image before we begin drawing. With that said let us get started.
Step 2: Shapes
This is where we begin to draw. Using your light blue pencil, try to identify the general shapes in the feet of your source image and begin to draw them on your drawing paper.

Start by looking at your source image and then go back and forth between your source image and drawing paper as you begin putting down shapes. Try to identify the general shapes that make up each foot.

If you are using a device as your reference source, perhaps try zooming in on different aspects of the feet to get a better depiction of the shapes present in the feet.


By constantly referring to our source image we can have a more accurate comparison in the end. Shapes set the foundational forms of the feet.


Step 3: Lines
Once we have placed our shapes on the paper we will now use the blue pencil to merge the shapes. This step is about bringing the shapes together.


Think of this process as an outlining process, when we outline around our shapes they begin to merge. Don’t be afraid to use your eraser during this stage, mistakes will occur during this part. By merging the shapes we will start to see that our feet will become apparent.


Step 4: Identifying the Light Source
Understanding light is always an essential part of drawing something realistic. When you look at objects around you, what you associate with the concept of reality has everything to do with how light reflects and deflects off of objects. This concept is the same with drawing, and what makes a drawing look realistic.

By looking at our source image take note of how the feet interact with light and shadow. Where are the shadows cast? Which part of the feet is light or dark? And where are the gradients between the darkest and lightest moments?

These are the types of questions to ask yourself. By identifying your light source try to begin the under-layered shading with your blue pencil. You can use either darker and light blue pencils, however, this is unnecessary. Under-layered shading is the process of shading with our blue pencil, which will provide a type of template for darker shading later.

Analyze your feet in the source image and see how the shadows are formed and cast in the image. Take your time with this step. Do not be afraid of using your eraser, this is a tool to keep on hand during this process, if you do make a mistake feel free to erase it. This is where we turn our feet sketch into a slightly more realistic representation of the feet.
Try to mimic these different gradients with your blue pencil. At this stage, we are not perfecting our shading but simply just beginning to make shading marks that help us to understand where to shade darker later.

This step is a great way of learning how to grasp the light in your source image and then applying it to your drawing without worrying too much about mistakes. We do this so it is easier to shade darker in the later steps as the blue will fade away once we shade over it.
Step 5: Indicative Marks
Using our blue pencil we will begin to make indicative marks. This step intends to suggest that you faintly make marks that indicate different details of the feet. Think of this step as a way of lightly drawing details.

The aim is to make marks that show that the nail is on the toe or that creases and kinks will be in the bend of the foot and so on. We do this to help indicate where we will go over these marks with graphite pencils later.

By this, what is meant is that the foot has bones, nails, and creases. Each aspect is moving in a particular direction based on the aspect in which we are viewing the feet. We are applying faint marks such as lines that represent these different aspects and where on the feet they are placed.

Try to apply faint marks that indicate the general aspect of the foot which will become more detailed in later stages. An important concept to grasp here is the aspect ratio. For instance, consider the shape of the nail, or how much of the nail is present from the aspect in which the image depicts the feet. Always consider the aspect you are viewing the object from before placing a mark.

It is important to keep the marks as light as possible at this point, this way we can still rectify any mistakes with ease. It is really important to grasp the perspective of the foot. By doing so, we can, as accurately as possible, represent the source image onto our drawing paper.


Step 6: Light Shading
Drawing feet is a task that requires attention to detail. We begin the process of making the feet detailed by starting with light shading. Here we are going to start shading the feet with our graphite pencils.

We can keep the shading fairly light still at this point. Use a range between H- 1B pencil.
Try your best to use your blue under-layered shading as a way to guide this process.

Shading is a process of layering. By placing the light graphite shades over our blue under-layer, we will create a substance-like quality in our drawing. This is another way of making the drawing resemble a life-like quality.

Consider all aspects of the feet and attend to each of them. From the nails, working your way through the toes to the mid-foot, try your best to mimic the qualities of the feet in your source image
Make note of the pressure you apply to your pencil, keep it gentle. A good tip is to place a piece of paper under your drawing hand so that you don’t unintentionally smudge your drawing in the process of shading.

The aim is to keep your shading at a mid-tone range. Mid-tone being, between your light blue under-layer and the darkest shades, which we will achieve with darker pencils in later steps.
Similar to how we are applying lighter graphite shading over our blue layer, so we will with darker graphite shades over this mid-tone shading.
Take time with this step. Remember, realistically drawing something takes time so try your best to be patient. It is also okay to use your eraser if you feel that you have made a mistake.

This step is all about merging the mid-tone shades into the blue shading. It should begin to evolve into an image that resembles the feet and all their intricacies. When shading mid-tones focus on the more difficult details. Try to analyze moments such as veins, bones, and creases.

For instance, take your time to slowly apply a mid-tone shade in areas where the veins create a shadow. Consider the ankles and how the bones’ shadows are more starkly contrasting than the veins of the feet.
A rule of thumb is that if the object is soft their gradients are more smooth whereas if the object is hard, like bone, there tends to be a more distinct difference between light and shadow.

Step 7: Darker Shading
This step is where we apply the darkest shade to the drawing. Similar to how we added lighter shades over our blue pencil under-layer, this is where we will apply the darkest parts over our mid-tone shading. We can do this by slowly working from a single aspect of each foot. A good suggestion is to start with the toes and slowly work through the whole foot.
Use your previous shading steps as a guide for applying the darkest shades. Consider how the mid-tone shading describes a gradient. For instance look at the shading, you have done with your mid-tones and apply your darkest marks to within the darkest areas of the mid-tone shading.
This step also requires patience. We do this by noticing the gradients in your mid-tone shading and then applying the darkest marks according to where the gradients would naturally become darkest.

Remember, the darkest moments are the areas of the feet where light would struggle to penetrate. This part of the drawing is about trying our best to understand the shadows that the feet cast. Remember to use paper under your hand for this part. This is where we have the highest chance of accidentally smudging our drawing.
We can only understand the shadows if we understand which direction the light source comes from. For instance, the source image in this tutorial depicts a light source coming from the top left. However, because I have an image under soft light, it casts soft shadows on the feet of my source image.
The harsher the light the more contrasted the shadows will be. This shadow casting affects even the smallest of details such as the creases and veins.

Veins are important in this step. Try to concentrate on how your source image depicts veins. Veins require a lot of attention. They are especially important at this stage because we want to gently depict the contrast that is displayed in our source image.

Veins are not harsh lines but rather soft lines. The reason for this is because they are softly and smoothly pushing the skin outward. They have softer contrasts because they bulge quite gently. This is not always the case, consider the two feet of my drawing.

The left foot displays a more gentle contrast in the veins and the right foot seems starker in its contrast in the veins. That being said, it is still a good principle to remember when drawing soft or hard objects, that their shadows are also dependent on their substance.
However, when we look at bones, their bulge from underneath the skin is harsher. This is because bones are hard, which means they’ll produce a more direct bulge with a more direct gradient. Light struggles to get around a harder object. Try to consider the object’s substance when shading the darkest part of your drawing.

The same principle applies to different aspects of the foot. Always consider what the substance of the object is, whether it is soft like veins or hard like bones. This concept may help guide you in your process of shading especially during the process of applying your darkest shades.

Step 8: Finalising our Shading
Now we can begin to perfect our shading. At this step, we should use our erasers and the full variety of pencils we have available.

If there are darker shades where there shouldn’t be, feel free to erase them softly and reapply a new shading mark. This is why it is essential to have your eraser ready for use throughout the whole tutorial.
We should have established a sense of how the shading should be applied based on the aspect of the foot concerning its light source. Going from our under-layer to mid-layer and finally our darkest layer we should have an understanding of how the shades progress in each aspect of the feet.

We can begin to insert our shadows according to our reference image. The shadows that the feet cast on the floor should help contextualize the feet in their surroundings.

The feet in the tutorial’s reference image display the shadowing in a way that helps the viewer to understand the positioning of the feet. One foot is tilted up, pressed on the toe or midfoot, whilst the other is flat on the ground.


Shadows generally have a slight fade the further they are from the object that casts them. Keep this in mind when drawing the gradients of your shadows.

Feel free to spend time here until you are satisfied with the result. There is no single way of drawing or shading, however, these steps are just guides to help you. This is why you should try to keep your eraser and sharpener nearby.

These tools are not just for mistakes but could be used strategically to make marks. Remember to erase any unnecessary marks around your drawing. You can also keep the blue layer present in the drawing as it creates a multilayered effect on the drawing. And there you have it, how to draw feet in a few steps.

Tips to Remember
- Drawing takes time, allow yourself the time to work on your drawing.
- Spend time on each step and consider the aim of each step.
- Keep note of the pressure that you apply to your pencil marks. This is why we try to keep the drawing as light as possible in the beginning. We want to make it easier to place darker marks the further we get into the drawing.
- Consider where exactly the light source is coming from. Also, is the light source really strong or is it soft? Either one is going to affect the shadows on the object and therefore how you may draw them.
- Try to understand the difference between stark contrast and soft contrast. This often occurs within the finer details where compositions are different. For instance, bones are harder which might produce a starker contrast. Whereas veins are softer which may result in a more soft contrast.
- Take note of the perspective of your source image. Some members of the foot might be in the foreground of the image which may make them seem larger than other aspects of the foot.

It is essential to get the earlier steps right before we do the later steps. This is because once we grasp the concept of both perspective and scale, we will have a more accurate process of drawing something realistic. Once we grasp these concepts and start placing the marks for our drawing, we will see that the drawing process itself becomes easier. This is because we have taken the time and truly considered our source image and the way the objects are depicted in them. When we do this we place our shapes and lines down more accurately, which serves as a helpful guide when we shade. These early marks demarcate the areas that we will shade, making it easier for us to do so.
Frequently Asked Questions
How Do You Get Better at Drawing Feet?
There is no secret, it just takes practice. However, this is why it is emphasized in the beginning that drawing feet from more than one perspective is a great way of getting better. By doing various perspective drawings we gain better insight into how the feet work as a structure.
How Do I Get Better at Shading?
By understanding our light source, we can understand where shadows should be placed. This is how real-life objects interact with light, so if we can mimic this principle as accurately as possible we will be able to draw an object in a way that seems realistic.
How Do I Make My Feet Drawings Realistic?
Similar to how we understand light as a guiding principle we need to apply this principle to the structure of the foot. If you consider tendons, bones, skin, and veins they all have different compositions. For instance, a bone is harder than a vein which means that it might develop a more prominent shadow. This is a helpful principle to remember when focusing on the finer details.

Matthew Matthysen is an educated multidisciplinary artist and illustrator. He successfully completed his art degree at the University of Witwatersrand in South Africa, majoring in art history and contemporary drawing. The focus of his thesis was to explore the philosophical implications of the macro and micro-universe on the human experience. Matthew uses diverse media, such as written and hands-on components, to explore various approaches that are on the border between philosophy and science.
Matthew organized various exhibitions before and during his years as a student and is still passionate about doing so today. He currently works as a freelance artist and writer in various fields. He also has a permanent position at a renowned online gallery (ArtGazette) where he produces various works on commission. As a freelance artist, he creates several series and successfully sells them to galleries and collectors. He loves to use his work and skills in various fields of interest.
Matthew has been creating drawing and painting tutorials since the relaunch in 2020. Through his involvement with artincontext.org, he has been able to deepen his knowledge of various painting mediums. For example, watercolor techniques, calligraphy and lately digital drawing, which is becoming more and more popular.
Learn more about Matthew Matthysen and the Art in Context Team.
Cite this Article
Matthew, Matthysen, “How to Draw Feet – Feet Drawing Tutorial in 8 Steps.” Art in Context. March 3, 2023. URL: https://artincontext.org/how-to-draw-feet/
Matthysen, M. (2023, 3 March). How to Draw Feet – Feet Drawing Tutorial in 8 Steps. Art in Context. https://artincontext.org/how-to-draw-feet/
Matthysen, Matthew. “How to Draw Feet – Feet Drawing Tutorial in 8 Steps.” Art in Context, March 3, 2023. https://artincontext.org/how-to-draw-feet/.


