How to Draw Shoulders – A Step-by-Step Guide to Drawing Shoulders
Learning how to draw shoulders is a unique task. The shoulders and neck formation has an interesting flow. This feature of the male anatomy can display an interesting combination of human anatomical components interacting with each other. Learning how to draw shoulders should be contextualized by surrounding features, such as the neck and chest. We never want to draw something in complete isolation, rather, it is better to put structures together so that we get a more holistic idea of how they are situated on the body.
Preparation
We want to make sure we have all these materials as each component will be important through this process of drawing. We will be drawing from the source image within this tutorial, which you can either draw directly from your phone or tablet.
Whichever device you want is fine, however, using a tablet or an iPad is generally the better option. You may also print the image out if you feel that this might be easier. With our materials and source image near and ready for use let us begin.
Before We Draw
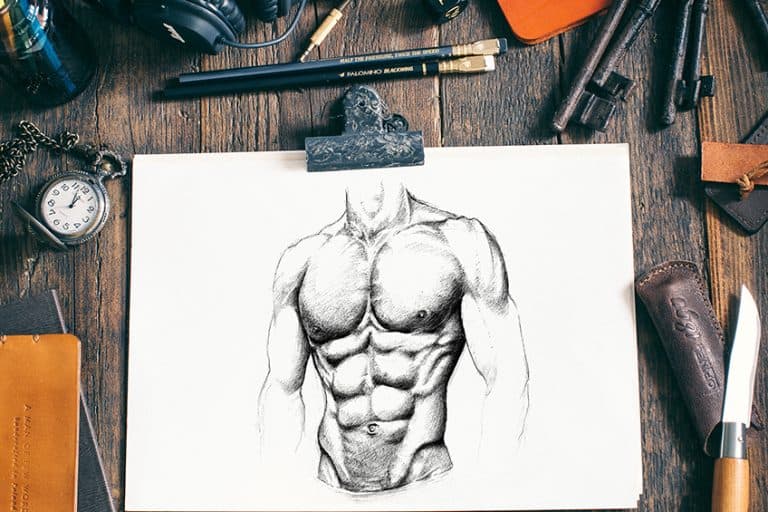
Let us take a moment to consider our source image before we begin the drawing process. Learning how to draw shoulders and learning how to draw a neck is the same. However, muscular shoulders and neck are a specific composition. In this tutorial, we will be drawing a muscular shoulder and neck.
There are many ways to know how to draw necks, however, drawing a muscular figure is a great way to learn the ebbs and flow of shadow casting.
With muscular figures, the protrusion of muscle generally causes an interesting shadow casting for a shoulder and neck drawing. This shadow formation is what will guide our drawing and shading process as we go through our tutorial. With that said, let us begin.
Step 1: Measuring and Grid Marks
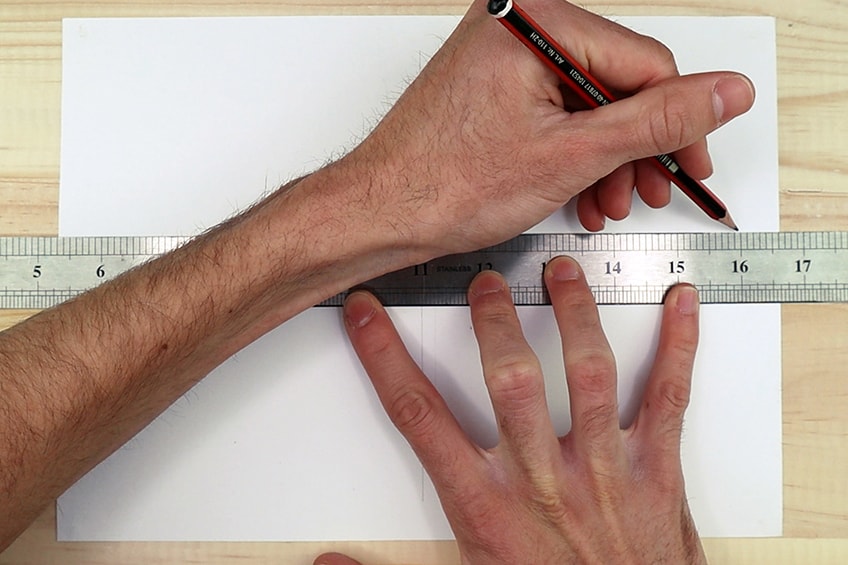
With a ruler and a pencil, we will begin to draw a horizontal line slightly above the middle of our page. We find the center of the page by measuring the page both horizontally and vertically, then dividing that measurement in half. Once we have drawn our horizontal line we can then draw a vertical line down the page through the horizontal line.
Step 2: Shaping the Form
It is always a good idea to start with the neck drawing first. Knowing how to draw necks is about getting the width right. With your H pencil, refer to your source image and begin to draw a part of the neck on both the right and left sides of the vertical line.
This process is simply a task of looking and drawing. We need to see the length of the neck as a way of measuring the rest of the shoulders.
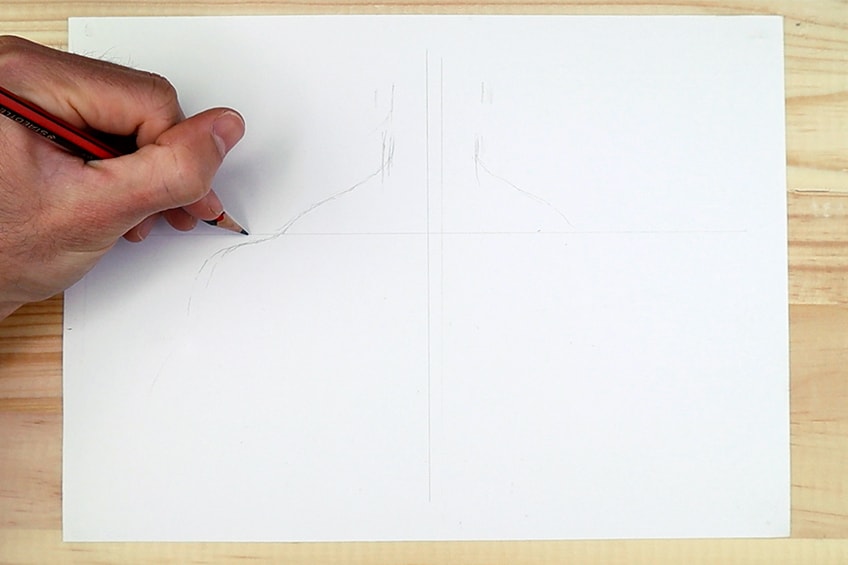
As we refer to our drawing let us notice the collarbones. Notice how the collar bones create a partition between the neck area and the chest. These bones are relatively the same in length across the body but slightly differ in their shape and motion. The neck muscles drawing process should be formed with a pencil first. With your H pencil, begin to draw the collar bones as you refer to your source image. Take your time trying to get it right.

As we observe the neck we can see that the adam’s apple and the indentation between the two collar bones give us a sense of proportion. Use the components of the body to help your placement of these components within your neck drawing. As we also observe the outer shoulders we can see that they are quite rounded, however, their height is similar to the width of the upper shoulder.

As we proceed with drawing shoulders, consider your source image and see how the image displays its height compared to other scales of the different anatomical components. This is a helpful way to keep your body proportionally measured and seemingly accurate in its size.
Keep your eraser in use during this step as the aim here is a series of trial and error drawing marks until we get it right.
Step 3: Filling In Shadow
As we carry on with drawing shoulders and the neck drawing part of this tutorial, we will begin to fill in some shadows on the body. With your HB pencil lightly start to draw the shadowing on the shoulders and chest area. If you analyze the source image we can see that the shadowing around the shoulders varies. Same for the chest, we can see the shadowing down the center of the chest, creating a partition between the right and left chest.
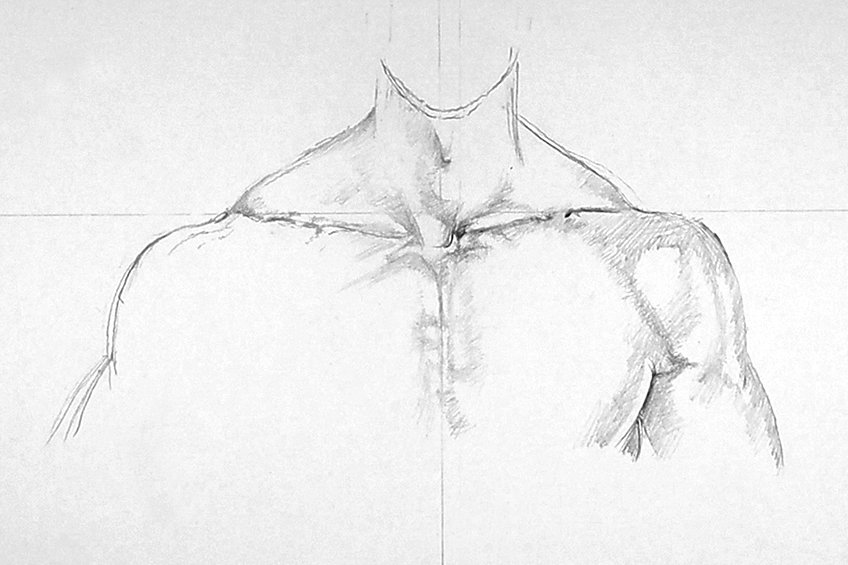
Analyze the source image and see how the shadows describe lines on the body. Shadows become easier to draw when we see them as lines on the body to follow with our pencils. Look at the source image and see how the shadows are lines that move between the chest, along with the collar bones, and through the neck. This is the core principle we want to follow when drawing shadows.
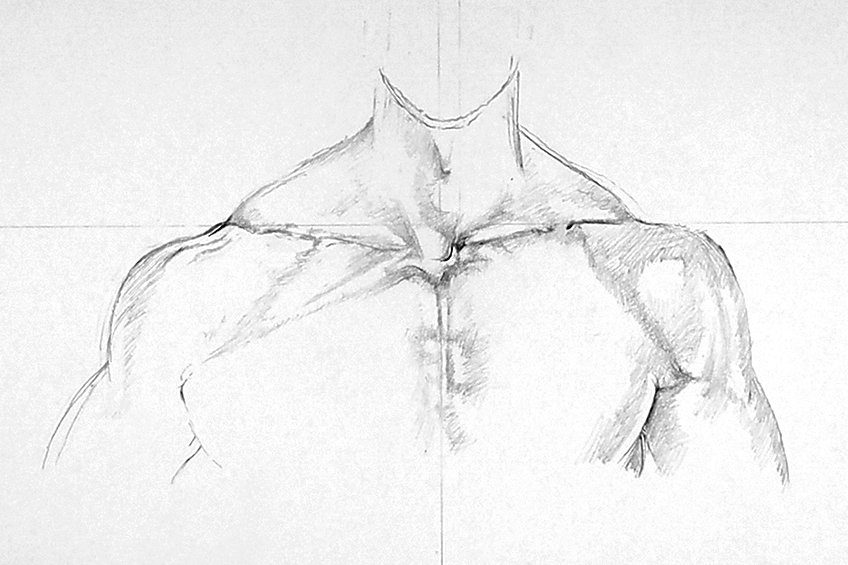
If you notice the muscular formation on the chest in the source image, we can see that the muscle formation is quite uniquely different on both the right and left chest. As we draw our shadows we want to mimic these shadow motions as best as possible. So spend time on the back-and-forth between your drawing and your source image.
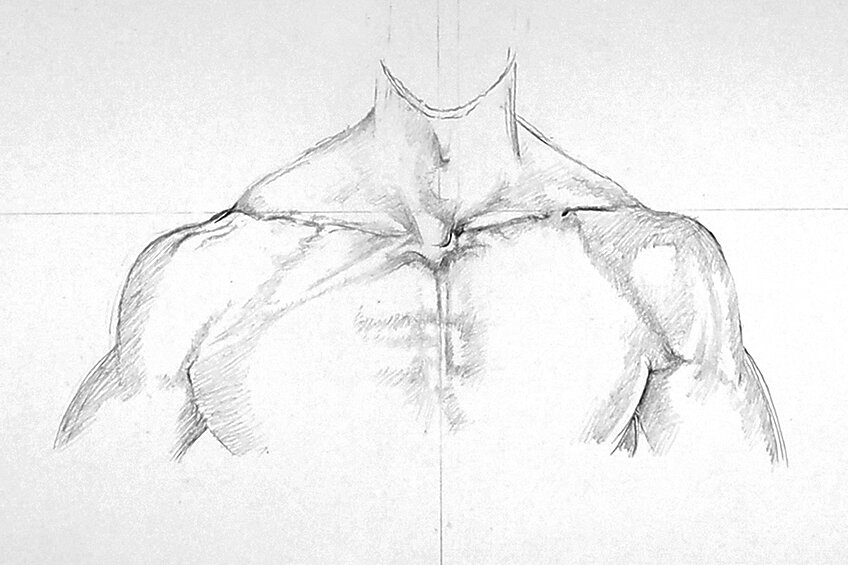
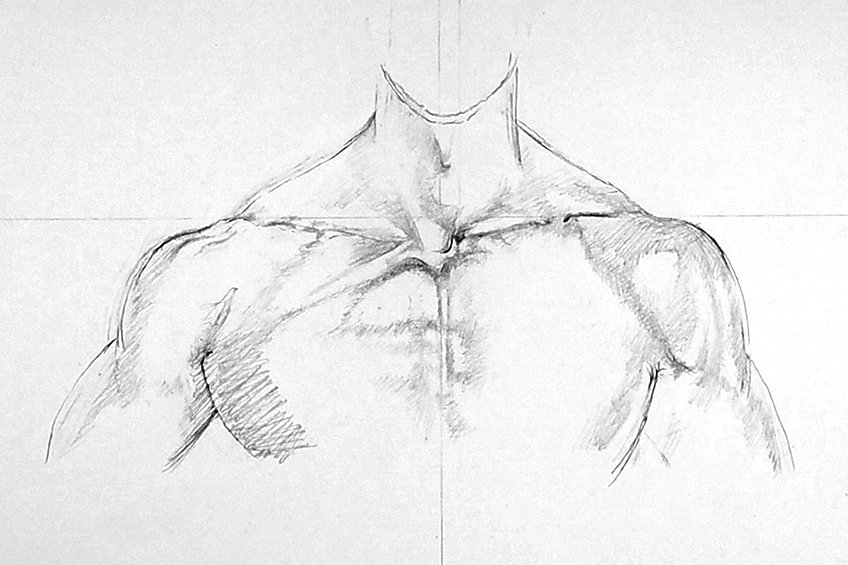
Within the chest area, around the shoulders, and under the armpits, we can see that shadows vary in tonality. We want to try and mimic these formations of shadowing on the body as best we can with our pencils before shading them in with a pen.
Take your time analysing your source image and cautiously apply these shadows around the body.
Step 4: Shading In Shadow
Let us begin our shading process in the neck area. With your ballpoint pen begin to make faint pen marks near adam’s apple moving to the indentation between the collarbones, also known as the jugular notch.
Keep your hand light, a good suggestion is to keep a piece of paper next to you to scribble on with your pen, allowing the flow of ink to run smoothly before making a mark on your drawing.
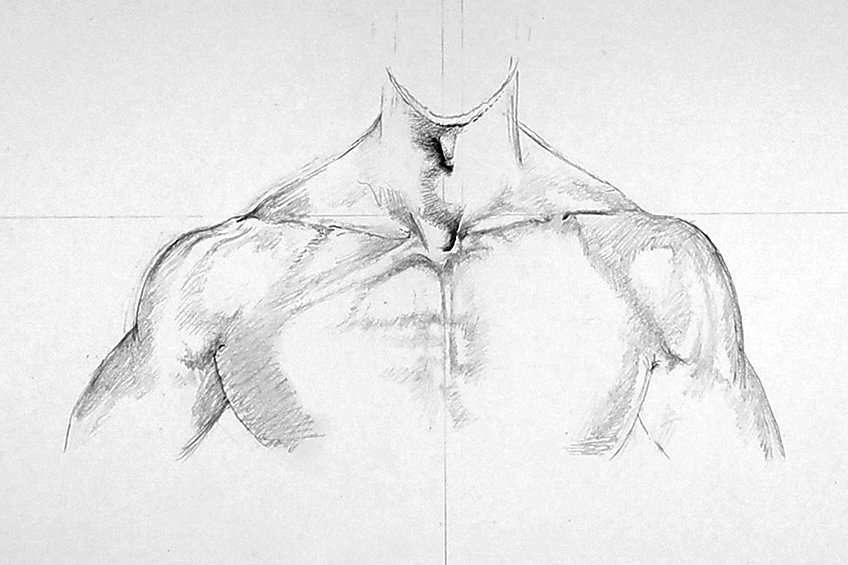
We want to move along the neck and follow the shadowing that we see in our source image. The shadowing should be like paths that we have drawn with our pencils. Then, as we shade with our pens, we should move along those paths shading over them. Going from the neck, try to use the pencil marks in tandem with the source image shadows to guide your shading process.
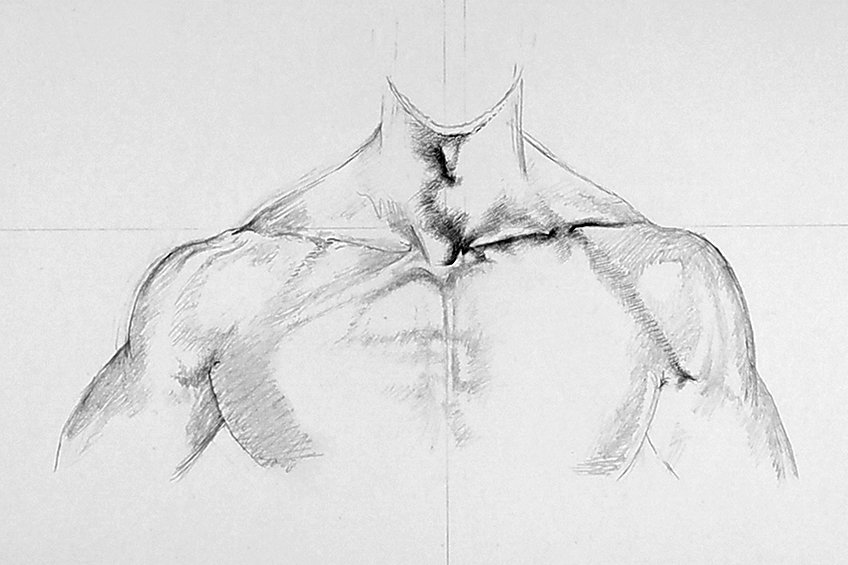
As we move along the right shoulder we can see that the pen strokes we make should become longer. We want to keep our pen marks light. As we shade with our pens it is always best to keep the marks we make as light as possible, giving us a better chance of fixing any mistakes through this process of shading.
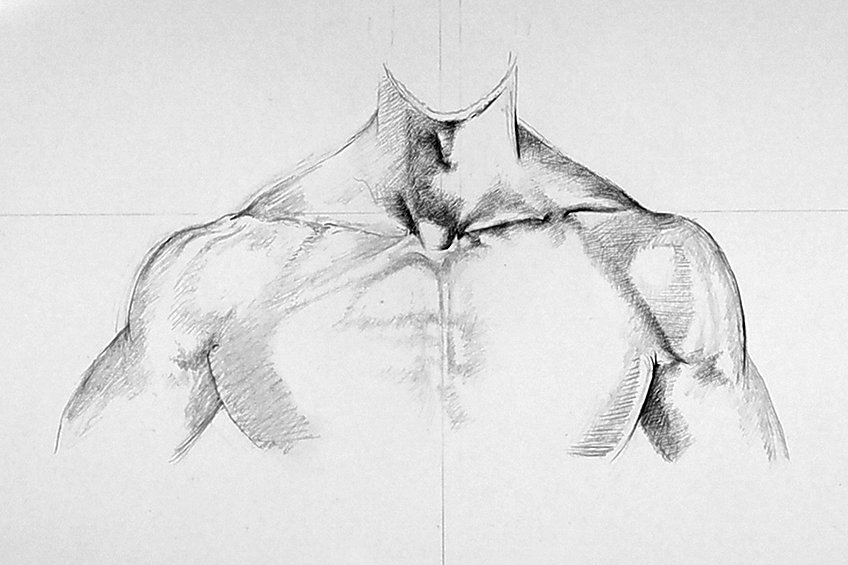
Notice the indentation that is developed by the shadowing on the right shoulder separating it from the chest. This indentation runs down to the armpit and shows how the shoulder protrudes outwardly. We can proceed to shade this shadow with our ballpoint pens. Use a piece of paper under your hand during the shading process.
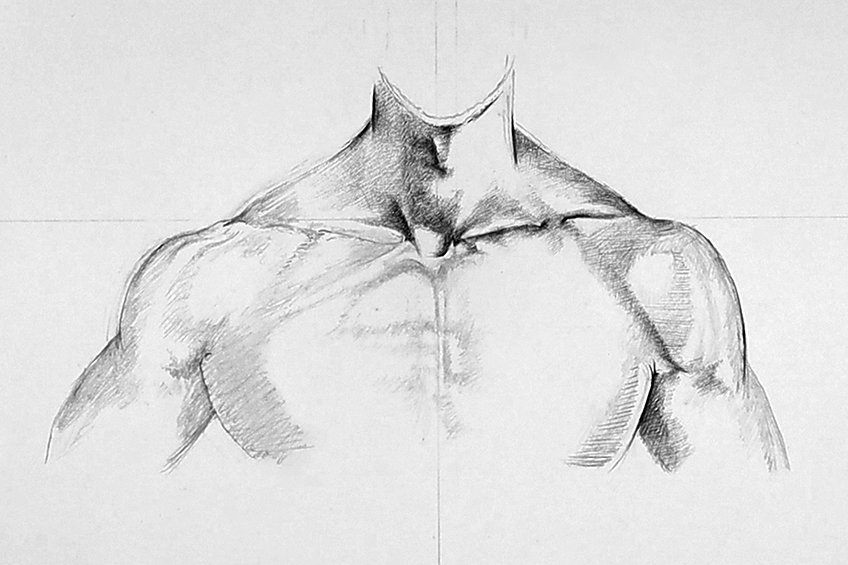
Let us now go back to the neck area and shade another layer over the shadows of the neck. The source image should guide you in the tonal variations of your shadows. The shadows are slightly darker around the neck area in the various indentations, so let us shade over the already existing pen marks to bring these shadows out.
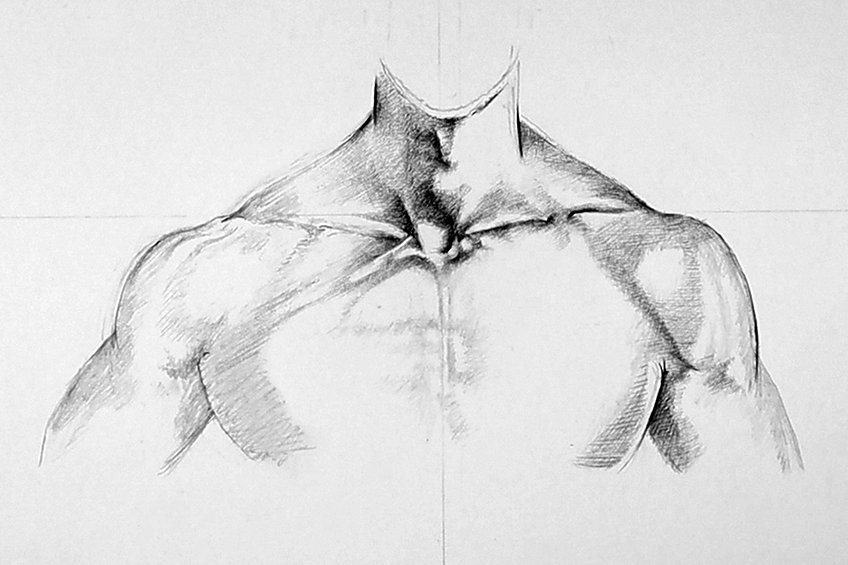
As we shade we can move to the left side of our body. Notice that the left chest has a triangular-type muscle that protrudes outwardly near the collarbone. Analyze the tonal variation of the shadowing on the left side of the chest for better direction.
Keep your shading light around the chest in general as we will refine the shading later.
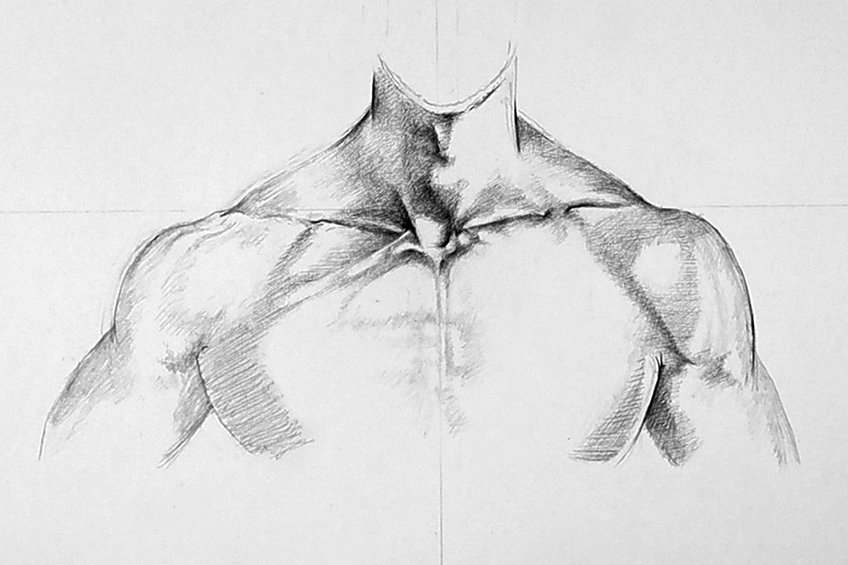
We should have a slightly shadowed figure at this point. We can also attend to the armpit area, near the inner arm parts. This is where the shadowing is quite dark as it is situated under the arm where light struggles to penetrate. We can fill in this area with our ballpoint pen.
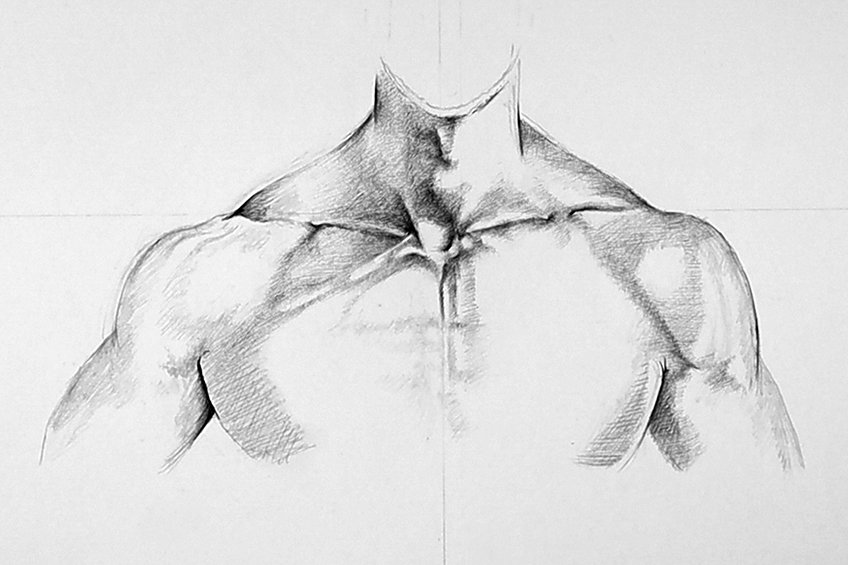
Step 5: Refining the Shadows
Let us begin with a reanalysis of our source image and reflect on the shadows we have already shaded in with our pen. Now with your ballpoint pen, we want to gently and cautiously shade over our existing shadows with another layer.
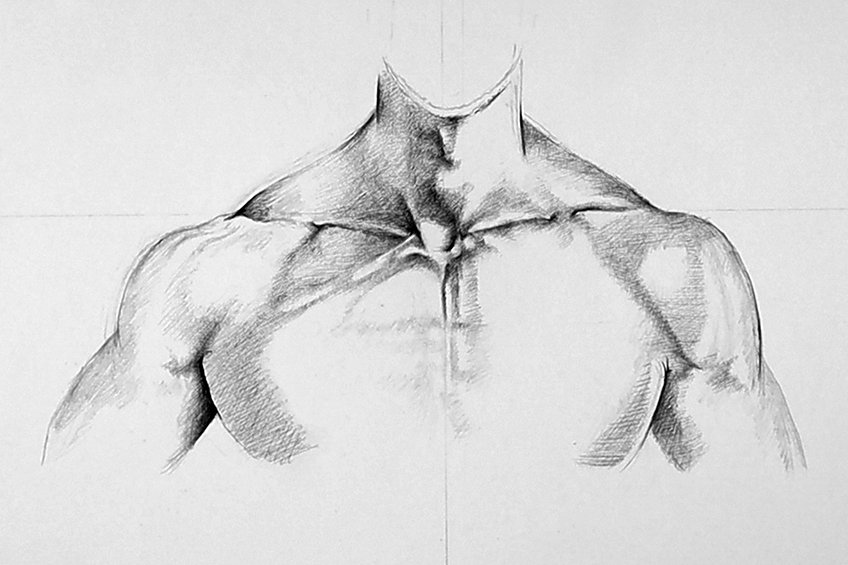
Let us move through the chest indentation down the middle of the chest. If we look at our source image we can see that the shadowing is very peculiar in this area. What we want to do is begin shading over our pencil marks with our ballpoint pens. Try to notice how the shadows are dark in the middle of the chest and sprout outwardly, creating a shine effect.
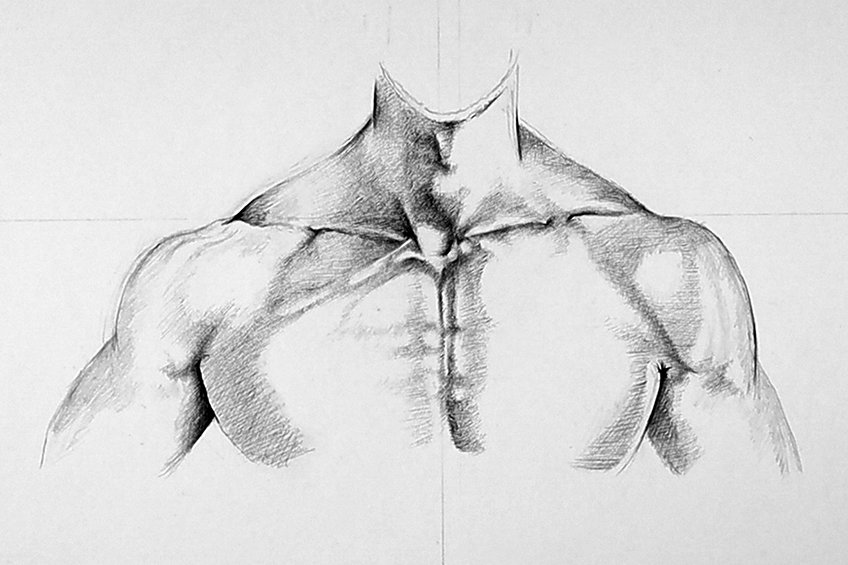
The shadowing in the middle of the chest is slightly darker on the right pectoral muscle more so than that of the left pectoral muscle. See how the shadows develop from dark to light from the middle indentation of the chest. The aim here is to lightly shade over our pen marks as we refer to our source image.
The source image is the guidance of how we refine the shadows and develop the tonal variation in the body by layering pen marks over one another.
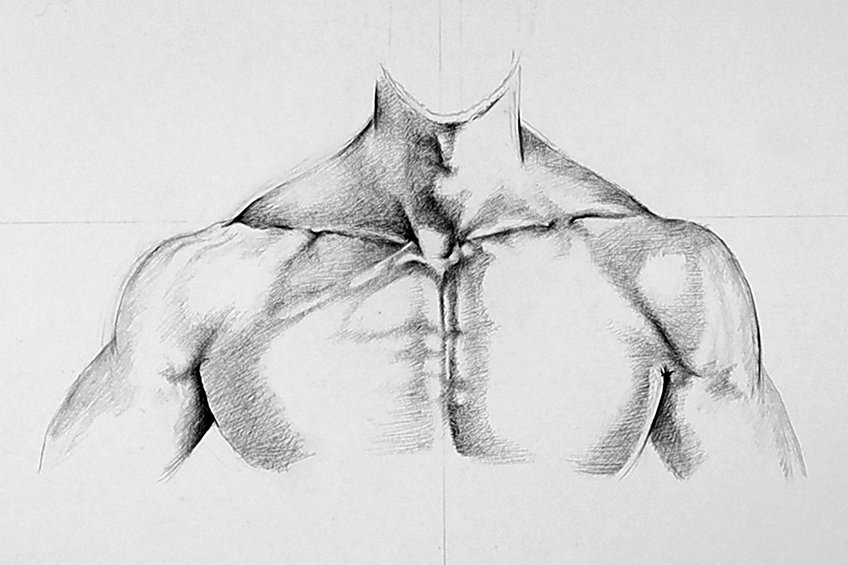
As we refer to our source image and see the shadow formation on the neck area, focus on the darker moments under the adam’s apple and in the jugular notch. These areas produce a slightly darker shadowing. The same can be said for the collarbones as the bones create a stark protrusion which makes the shadowing in these areas of the neck slightly more dark.
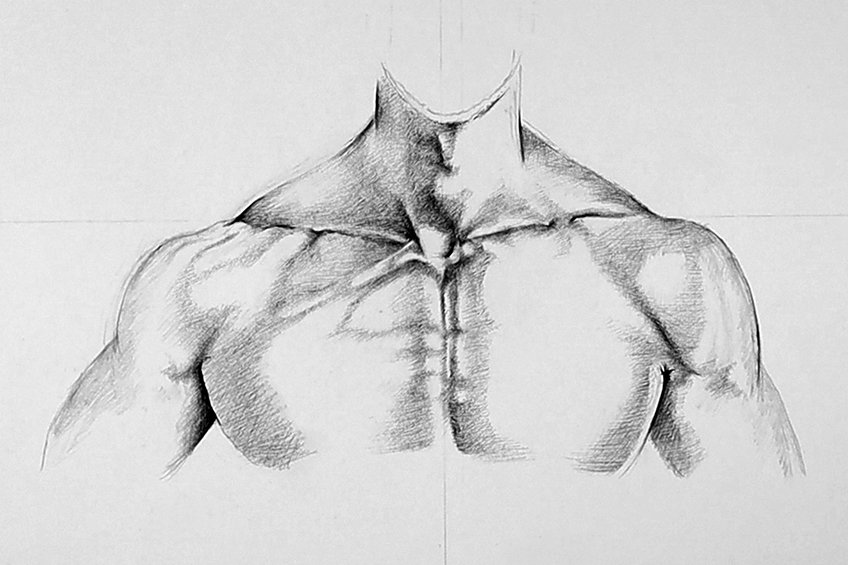
We can once again reexamine our source image. It is always good to take a step back to observe the shadowing in the source image and compare it to our drawing. Notice how the shadowing gets lighter on the edges of the shoulders as they are more exposed to light. Keep your shading light with your ballpoint pen around the shoulders.
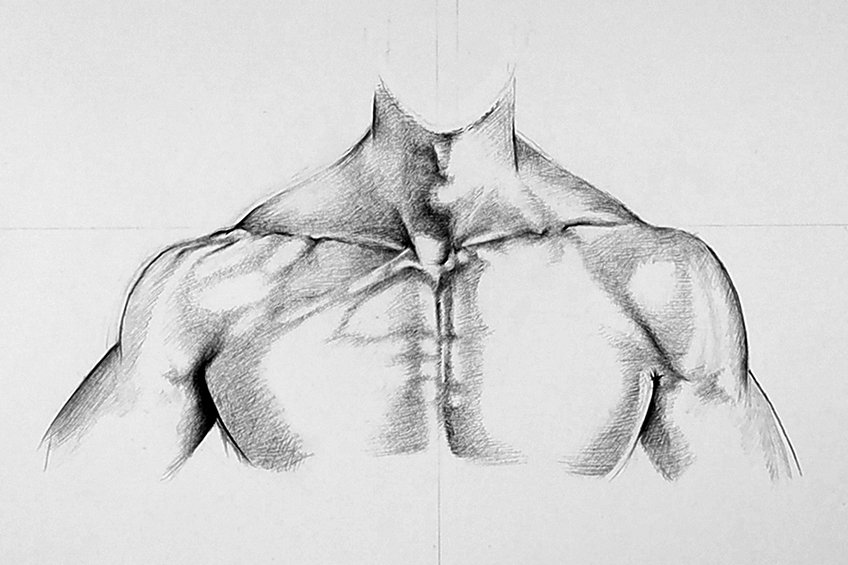
Notice that there is more light on the right side of the neck, which means that the neck is slightly darker in its tonality. Use the shadows that run up the center of the neck through the adam’s apple to be the partition of shadow gradients.
Slightly shade the left side of the neck with your ball point pen until it reaches the tonal variation needed.
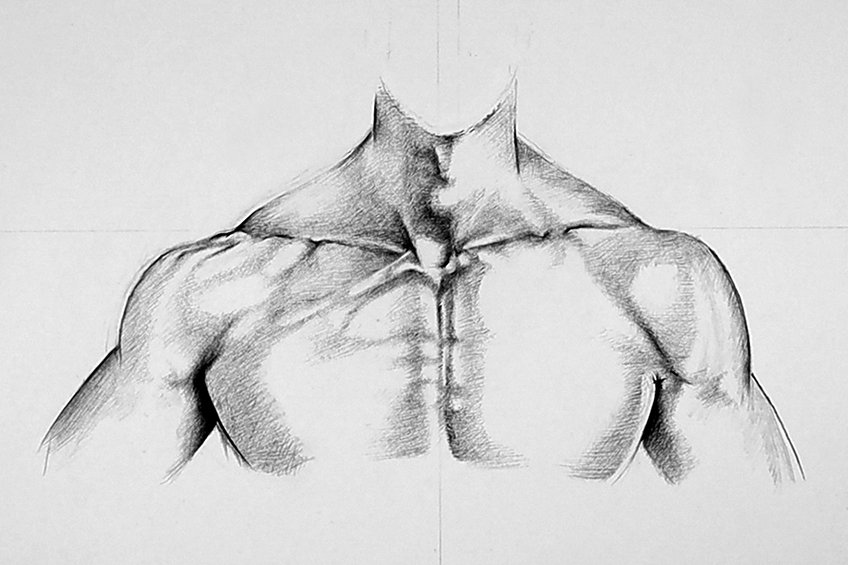
Go through all your shaded areas of the body until you feel that you have attended to all of them. Remember, shading with a pen is a process of layering, it is a slow application of layer by layer. We should analyze the source image to see how our shadows compare in tonality to one another as we proceed with our drawing.
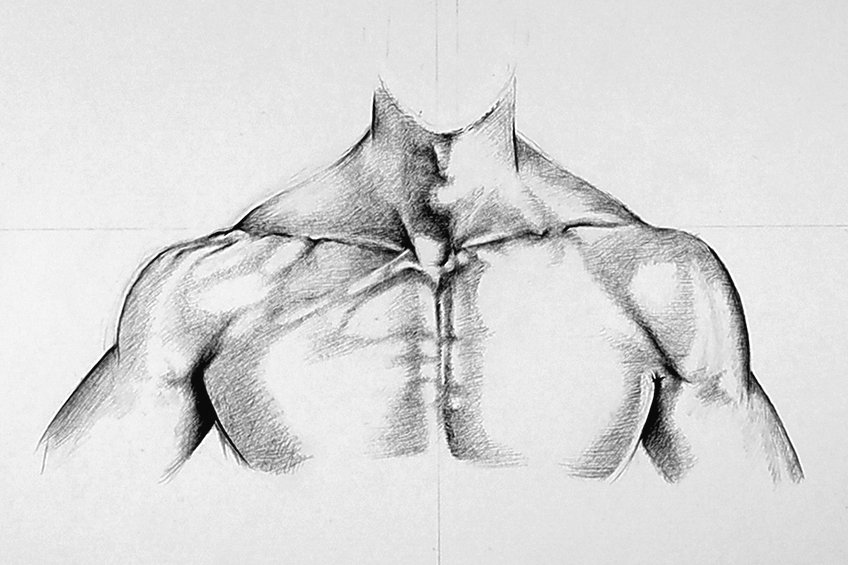
Lastly, let us go through any moments that might need to be darkened. With shading, we want to make sure that the darkest moments within the areas of lighter shading should be touched up last. We can also go over the shadows coming from the armpits moving into the outer portion of the arms.
There you have it, a five-step tutorial on how to draw the shoulders and neck!
Tips to Remember
- Keep a piece of paper nearby for a quick scribble to get the ink loose in the pen. This helps the ink to flow more fluidly out for better shading.
- Use a piece of paper under your hand as you shade to prevent any unnecessary smudging.
- Always think of shading with a pen by lightly and gently adding layer by layer. This gives us a better chance of preventing any mistakes.
- Make sure to always get the proportions and scale of the anatomical structure correct in the earlier stages of drawing with a pencil.
- Always use your eraser as you draw in case of mistakes.

Drawing a muscular figure is a great way of working on your shading. This is because the muscle protrusions and muscle fibres often develop grooves in the skin that make for an interesting shadow aesthetic. With this particular image, it is a nice example of how various bones work with different types of muscles around the neck and shoulders. The aim should always be to analyze the anatomical structure from the source image as best you can. Then we want to make sure we get the shape, proportions and general shadows perfected with our pencils. Once we feel confident about the pencil marks we can then cautiously and patiently apply the shading with our pen. From there it is simply a matter of layering pen marks over each other until we reach the tonal values necessary. That’s the overview of how we want to go about the tutorial.
Frequently Asked Questions
How Do I Draw Muscular Shoulders?
The male shoulders tend to be more circular. This is because the muscle density is greater which presses against the skin, causing a bulging effect. This bulge seems circular on the outer shoulder as they move from the trapezius muscles to the bicep. The trapezius muscles also have a slightly rounder shape if they are muscular. By this, what is meant is that they don’t curve downward or inward but rather they protrude outwardly by the muscle pushing against the skin. These are two key aspects of shaping the shoulders to seem more muscular
How Wide Should I Draw the Shoulders?
This is quite a tricky concept to grasp, however, the best way to understand scale is to compare aspects of an anatomical structure to others that surround it. For instance, if we want to understand the length of the trapezius muscles we can do so by comparing it to the width of the collarbones. This is why using a digital device is helpful, due to its ability to zoom in and out of an image which can help us grasp scale and proportion more accurately. Always compare one aspect of the body to its surrounding features, this is a great way of working through shape and proportion.
How Do I Shade in the Shoulders?
When we shade in anatomical structures we want to know how the light interacts with its surface. Shadows are an effect of light, where light struggles to penetrate a surface is where shadows are found. So firstly identify the light source and see how this develops shadows. Secondly, use a light pencil to shade and draw lines over the areas where there are shadows. Once you do this, use your darker pencil or pen to layer over these marks until you reach the tonal value necessary for each particular shadow. Shading is a process of layering, so it is always better to start light and slowly shade layer by layer.
Matthew Matthysen is an educated multidisciplinary artist and illustrator. He successfully completed his art degree at the University of Witwatersrand in South Africa, majoring in art history and contemporary drawing. The focus of his thesis was to explore the philosophical implications of the macro and micro-universe on the human experience. Matthew uses diverse media, such as written and hands-on components, to explore various approaches that are on the border between philosophy and science.
Matthew organized various exhibitions before and during his years as a student and is still passionate about doing so today. He currently works as a freelance artist and writer in various fields. He also has a permanent position at a renowned online gallery (ArtGazette) where he produces various works on commission. As a freelance artist, he creates several series and successfully sells them to galleries and collectors. He loves to use his work and skills in various fields of interest.
Matthew has been creating drawing and painting tutorials since the relaunch in 2020. Through his involvement with artincontext.org, he has been able to deepen his knowledge of various painting mediums. For example, watercolor techniques, calligraphy and lately digital drawing, which is becoming more and more popular.
Learn more about Matthew Matthysen and the Art in Context Team.
Cite this Article
Matthew, Matthysen, “How to Draw Shoulders – A Step-by-Step Guide to Drawing Shoulders.” Art in Context. June 23, 2022. URL: https://artincontext.org/how-to-draw-shoulders/
Matthysen, M. (2022, 23 June). How to Draw Shoulders – A Step-by-Step Guide to Drawing Shoulders. Art in Context. https://artincontext.org/how-to-draw-shoulders/
Matthysen, Matthew. “How to Draw Shoulders – A Step-by-Step Guide to Drawing Shoulders.” Art in Context, June 23, 2022. https://artincontext.org/how-to-draw-shoulders/.


