


How to Draw a Star – Easy Star Drawing Tutorial for All Artists
Shining away up in the sky are millions upon millions of stars, all unique and beautiful. In today’s drawing tutorial, we are going to show you how to draw a simplified five-point star. Hand-drawing a five-point star can be tricky, as each point needs to be symmetrical and perfectly placed in relation to the others. With our easy-to-follow tutorial, we make it simple for anyone to create a hand-drawn star.
How to Draw a Star in 12 Easy-to-Follow Steps
Have you tried and tried again to create a hand-drawn five-point star but you simply cannot get the proportions right? In this tutorial, we break down the process of creating a hand-drawn star into 12 easy-to-follow steps. We show you how to ensure that all of the sides are equal in length, and how to make sure that each of the points has the right perspective.
You can see an outline of the tutorial in the collage below.

When it comes to the coloring steps, you have a choice to make about the medium that you want to use. You are welcome to use whichever medium you feel most comfortable with, whether that is a digital paintbrush or coloring pencils.
Gather your drawing supplies, and let us jump right into our stars sketch.
Step 1: Begin with a Triangle
We are going to begin our stars sketch by drawing a simple isosceles triangle. Find the center of your canvas, and place the upside-down triangle there. Ensure that there is plenty of space on all sides of this triangle, particularly above and below.
Your isosceles triangle should be quite flat and quite wide, like the one in our example below.

Step 2: Draw a Second Triangle
In this step, you are going to draw a second triangle at a slightly different angle to start laying the foundations of two more points of your star drawing. The top point of this second triangle should sit directly on the top point of the first triangle.
This second triangle is not a perfect isosceles, as the top line of it should be significantly longer than the bottom one.

Step 3: Shaping the Final Triangle
You are now going to repeat the second step but as a mirror image. Draw a third triangle that lies on the opposite side of your five-point star.
By the end of this step, you should have all five points of your stars sketch.

Step 4: Adding the Center Lines to Your Star Drawing
In this step, you are simply going to add a centerline through each of the five points. Beginning at the midpoint of the star, take a straight line to the tip of each point.
At the end of this step, you should have a pentagon shape right at the center of the star.

Step 5: Finishing the Internal Pentagon
Within the internal pentagon shape, draw an additional small line from the center of the star to the top right corner of the pentagon. In later steps, we will use this line to add definition and shading to our stars sketch.

Step 6: Completing the Outline of Your Star Drawing
To begin this step, repeat the previous step on the left side of the pentagon, adding in a secondary line. You can now erase many of the overlapping lines, leaving the central point lines and the secondary pentagon lines in place.
You should now have the final outline of your hand-drawn star with a three-dimensional illusion on each point.

Step 7: Adding the First Dash of Color to Your Stars Sketch
Begin coloring your hand-drawn star with a gold color and a sharp brush. At this stage, you want to color only the right side of each star point.
The other sides of the point will be colored with a different shade of yellow to emphasize the three-dimensionality of your five-point star.

Step 8: Painting the Second Color
You can now fill in the rest of your star drawing with a lighter gold shade. Use a fine brush to fill in the blank halves of the five points.
You are now ready for the next few steps where we will be adding some shadows to emphasize the three dimensions of your star drawing.

Step 9: Begin Shading
Find a soft shading brush and use a touch of black paint to lightly add some shading to each of the points of the star. This shading should be added only to the right side of each point. You also want to make sure that this shading has a bit of a gradient, with the darkest part being on the edge and it fading inwards.
When you have added the shadow to each point, use a clean blending brush to spread and smear the shading to create a smooth finish.

Step 10: Adding Highlights
Highlights are the other side of the coin to shading, particularly when it comes to creating a three-dimensional effect. In this step, use a small blending brush and some white paint, and use this to trace the center lines of each star point.
You also want to add a small line of highlight to the left half of each star point.

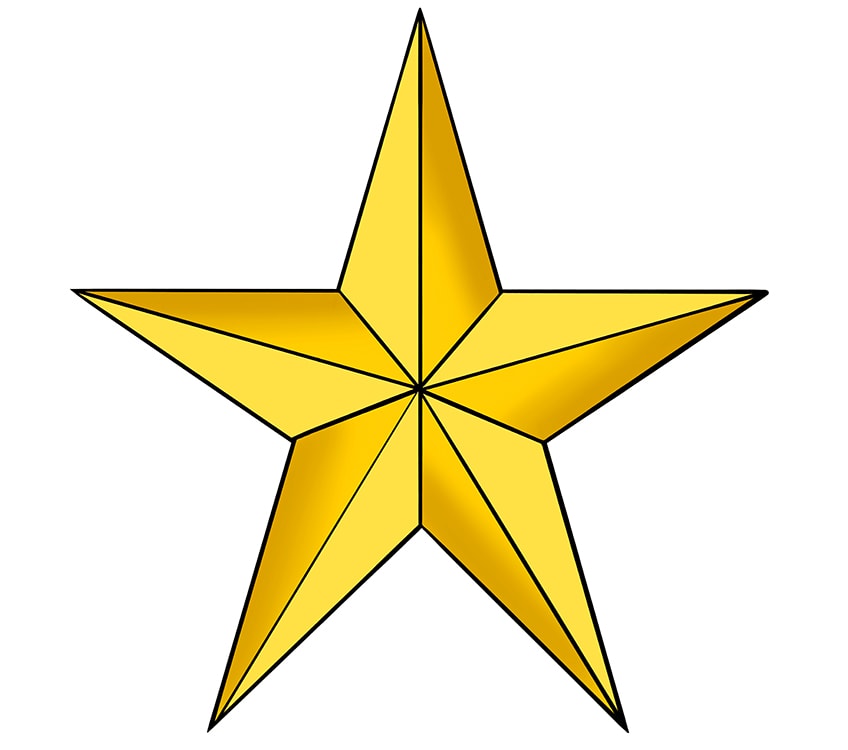
Step 11: Finishing Your Star Drawing
To finish your five-point star drawing, you can now erase the black outlines to create a seamless stars sketch. You can do this with a fine brush and the corresponding color at each point of the outline.
At the end of this step, you will have yourself a beautiful seamless drawing of a star.

Step 12: Bonus Step
If you want to add a little more three-dimensionality to your star drawing, you can use a small blending brush with some black paint to add a shadow along the edges of your star points. This final step will give the impression of your star casting a light shadow.

Hopefully, you have enjoyed this star drawing tutorial and you are happy with your final five-point star! Now you will be able to successfully draw a symmetrical five-point star drawing with ease.
Take a look at our star drawing webstory here!
Frequently Asked Questions
How Can You Draw a Five-Point Star Perfectly?
Creating a hand-drawn five-point star that is perfectly symmetrical can be a tricky task. In our star drawing tutorial, we show you how to draw a star in 12 easy steps, with the first steps being used to construct the perfect symmetrical star shape.
Can You Make a Hand-Drawn Star Three-Dimensional?
Absolutely! In our star drawing tutorial, we show you exactly how to create a realistic three-dimensional stars sketch using shadows and highlights.

Matthew Matthysen is an educated multidisciplinary artist and illustrator. He successfully completed his art degree at the University of Witwatersrand in South Africa, majoring in art history and contemporary drawing. The focus of his thesis was to explore the philosophical implications of the macro and micro-universe on the human experience. Matthew uses diverse media, such as written and hands-on components, to explore various approaches that are on the border between philosophy and science.
Matthew organized various exhibitions before and during his years as a student and is still passionate about doing so today. He currently works as a freelance artist and writer in various fields. He also has a permanent position at a renowned online gallery (ArtGazette) where he produces various works on commission. As a freelance artist, he creates several series and successfully sells them to galleries and collectors. He loves to use his work and skills in various fields of interest.
Matthew has been creating drawing and painting tutorials since the relaunch in 2020. Through his involvement with artincontext.org, he has been able to deepen his knowledge of various painting mediums. For example, watercolor techniques, calligraphy and lately digital drawing, which is becoming more and more popular.
Learn more about Matthew Matthysen and the Art in Context Team.


