


How to Draw a Spider – An Easy Tarantula Drawing Lesson
Spiders are associated with the horror genre, as their creepy-crawly nature often evokes fear and terror. Spiders are also very misunderstood creatures and are essential to the ecosystem, which makes them very valuable. Learning how to draw a spider is a great skill to have because of how versatile they are. There are many spider species to draw inspiration from, but perhaps the most visually powerful is the tarantula. In this tutorial on how to draw a spider, we will be creating a tarantula drawing. Spider drawing is a great exercise for various reasons; for one, it is good subject matter for finer detail drawing, and secondly, it is a great opportunity to explore color variations.
An Easy Guide to Drawing a Spider
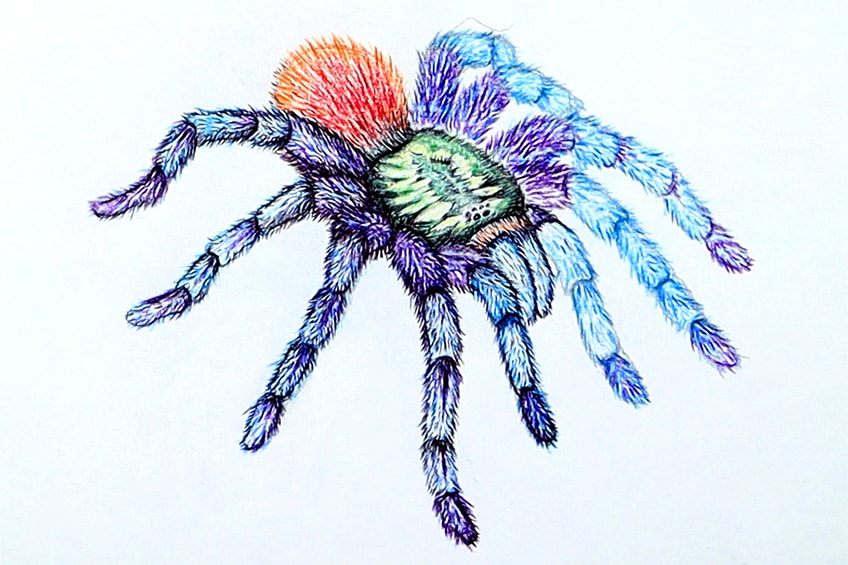
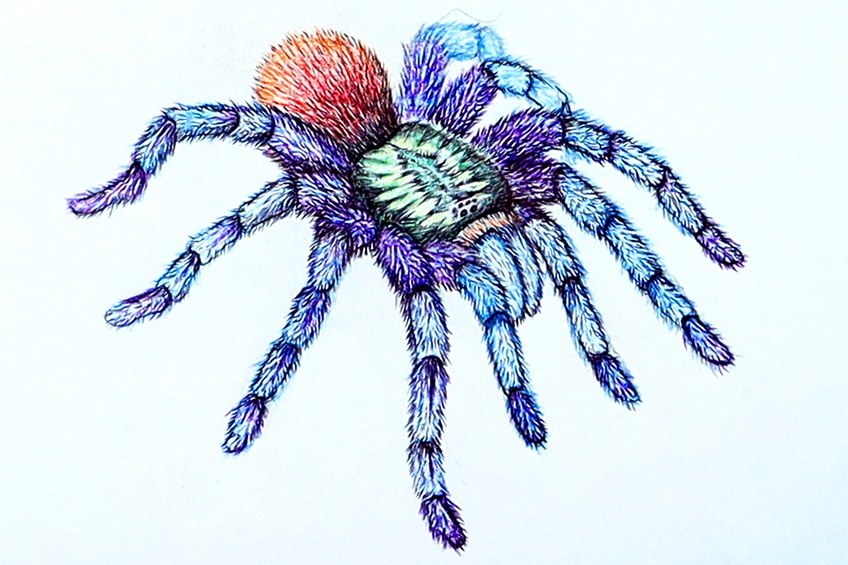
In this easy spider drawing tutorial, we will be creating a tarantula drawing. There are various species of tarantulas, however, we will be drawing inspiration from the Mexican Red Knee tarantula. We will explore color combinations once we have worked out the form and shape through a pencil sketch of a spider. In this tutorial, we will learn how to transform a basic sketch of a spider into a more refined tarantula drawing.
Learning how to draw a realistic spider is not difficult when it is broken up into steps and in digestible stages
Step-by-Step Instructions on How to Draw a Spider
In this tutorial on how to draw a spider, we will begin by creating a basic spider sketch using an HB pencil. We will want to first work out the structure and form of the spider with some basic line work. From there, we will then continue to construct the different elements of the spider around the linework. We will then continue by using our colored pencils to add in hair-like line work to give the tarantula a hairy quality and some color. Then lastly, we will use our ballpoint pens to add in some more contrasted line work to give the tarantula drawing more contrast and definition.
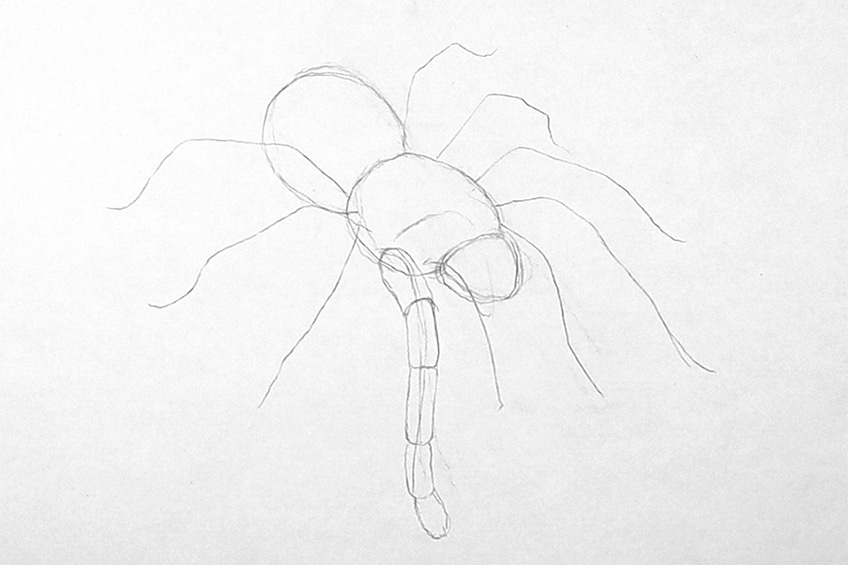
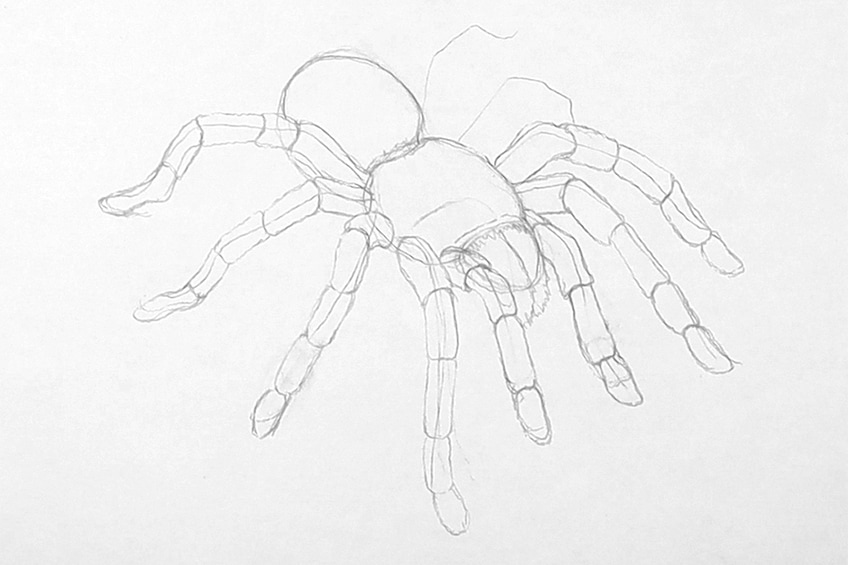
Step 1: Forming the Spider’s Shape With Linework
We want to begin by creating a simple and basic line sketch of the spider’s basic form. We start by breaking the spider up into its different components, starting with a head shape that will be for the fangs, which we want to draw as a circular bullet-head shape.
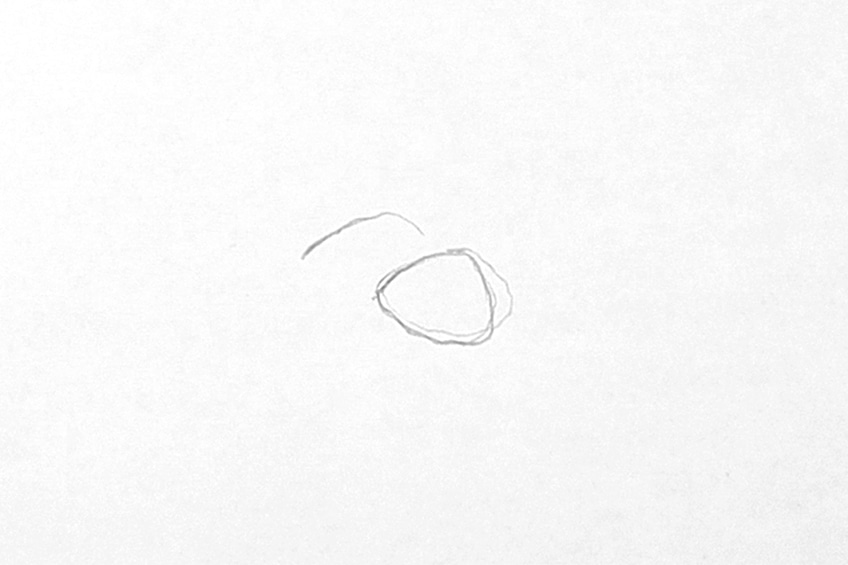
We will be drawing the spider from a side angle, which means one side will be more visible than the other. From there, we want to draw both the cephalothorax and abdomen of the spider as two domes or circular shapes that connect to the fangs area or head shape.
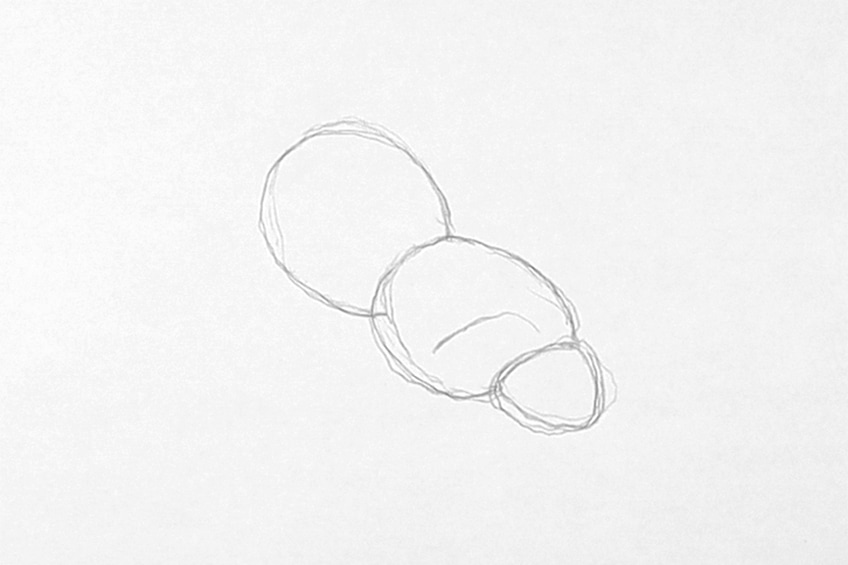
The cephalothorax should be larger than the head and the abdomen should be slightly larger than the cephalothorax. From there, we want to draw three legs on one side of the spider sprouting from the cephalothorax.

The back legs should sprout in a backward direction, almost as if they sit parallel to the abdomen, whereas the middle two legs move out in a lateral direction from the cephalothorax. Then, the front legs will move forward almost parallel with the head. Lastly, the pedipalps will move in a forward direction directly, facing directly forward.
We want to use the first set of legs on one side of the spider to guide how we place the second set on the farthest side of the spider. Remember, because we are drawing a spider from a side view, this means the other legs will be slightly less visible.
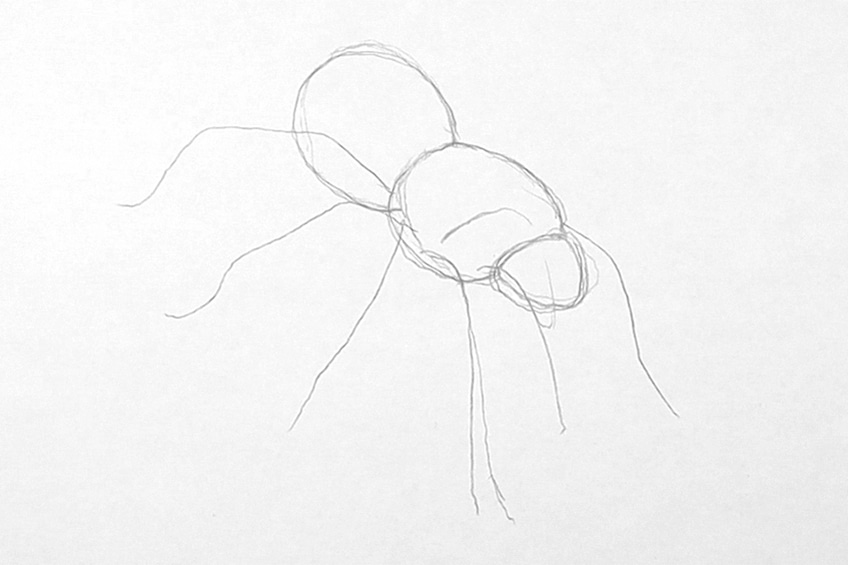
Step 2: Sketching the Spider
Using the line work we want to start drawing in the different features of the spider. We do this by starting with the features that sit in the foreground and seem the closest. Starting with the legs, you want to draw the different segments over the line work.
Moving along the side of the spider, let us go through each leg and draw in the different segments. In this case, we will want to make sure our spider’s legs all have an equal amount of five segments.
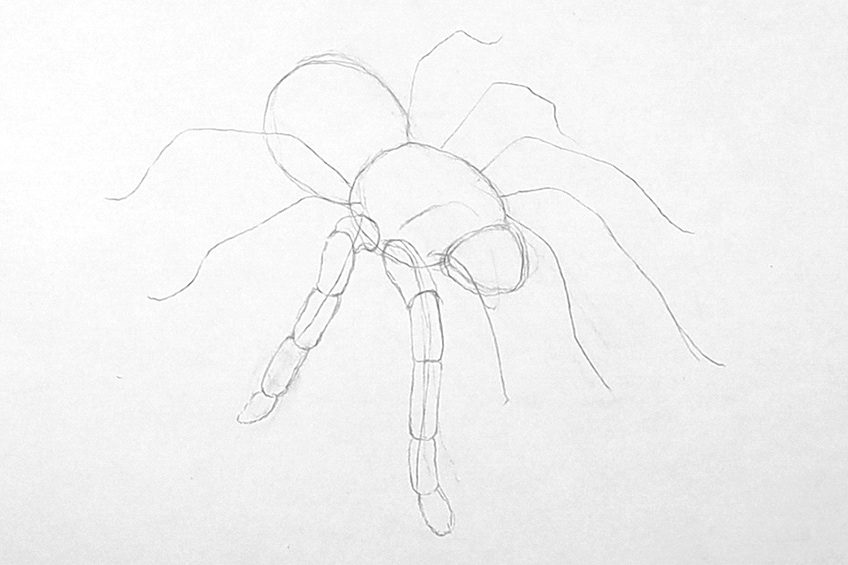
We also want to consider how the legs flow from the side of the cephalothorax. In the case of the tarantula, the legs will move in different directions for stability. The last segments of each foot are generally smaller as well, except for the hind legs, where the last segment will be slightly larger.

We want the legs to curve around the body, all connecting to the cephalothorax of the spider. As we come to the front of the spider, the pedipalps should also extend out from the cephalothorax, moving forward directly next to the head.
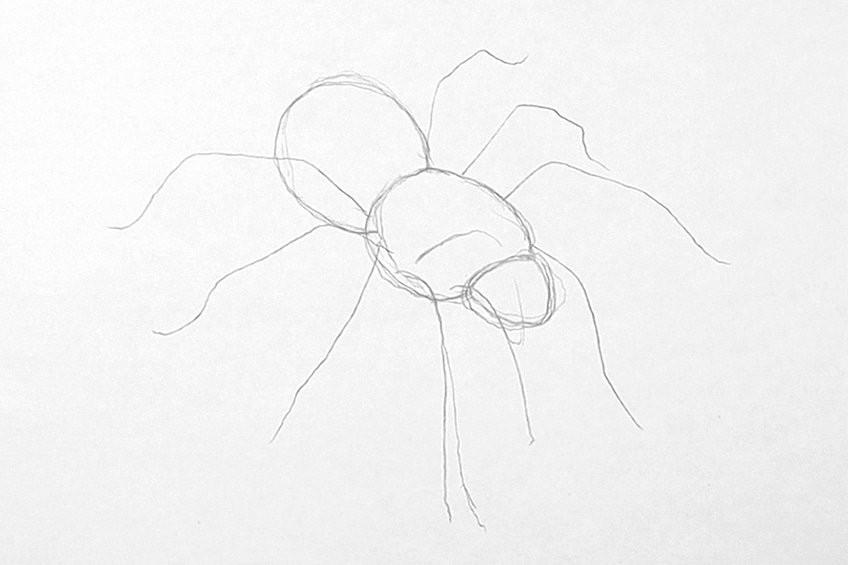
The little head shape we have drawn is not a head but the space allocated to the fangs. We want to draw the fangs in an arched shape, curving downward. The fangs should be within the middle of each pedipalp.
The pedipalps should have only four segments and should not be as long as the legs of the spider. Pedipalps extend slightly ahead of the fangs, as if they were little arms used to grab prey.
As we proceed to draw the legs that will be positioned on the less visible side of the spider, we want to make sure that the legs in the foreground guide the formation of the less visible legs.
We want to make sure that each leg has five segments and that they flow in a way that makes sense with how it would stabilize the spider on a horizontal plane.
As you proceed to draw the legs positioned on the less visible side of the spider, you want to make sure that there is a realistic form to the legs. we want to consider how they would curve behind the spider as they plant onto the ground. Make sure you take your time working out the different features of the spider during the pencil stage of the tutorial.
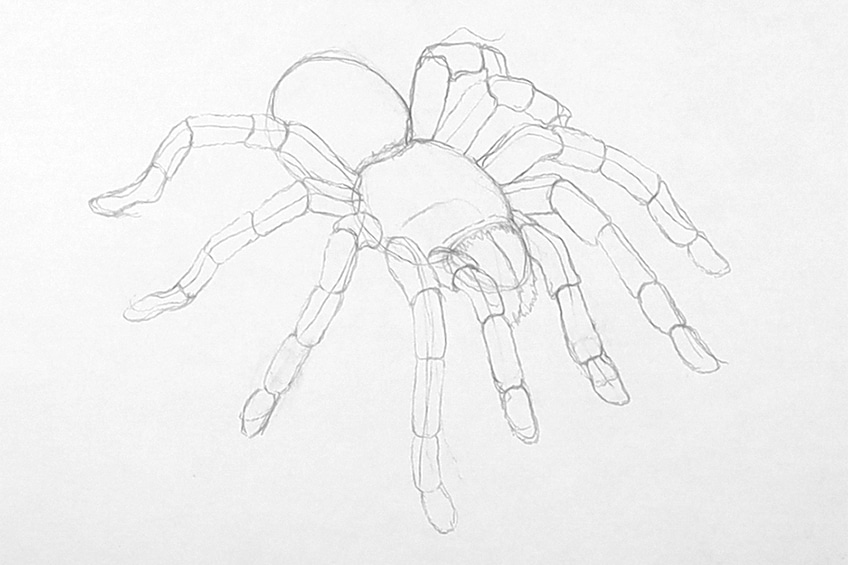
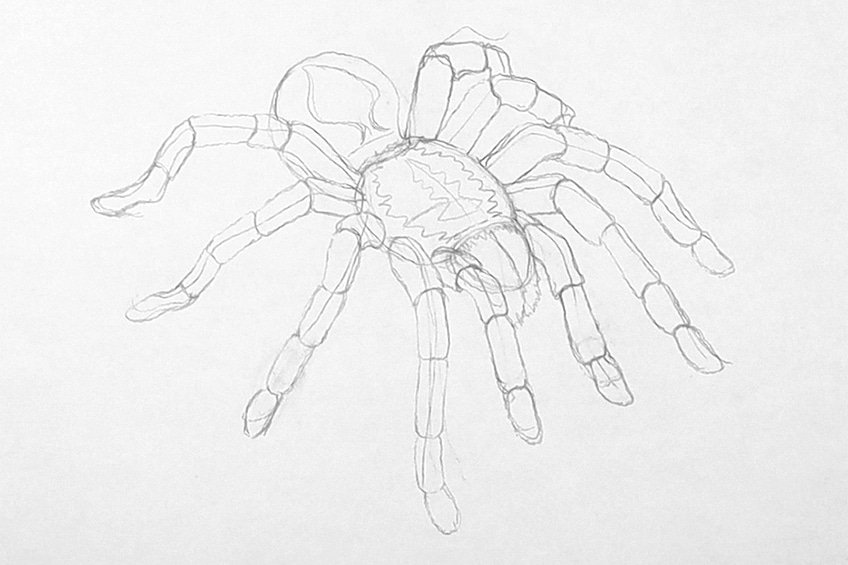
We can also add a pattern design of our choosing to the cephalothorax and the abdomen. Doing so will later assist us in how we add color to the spider.
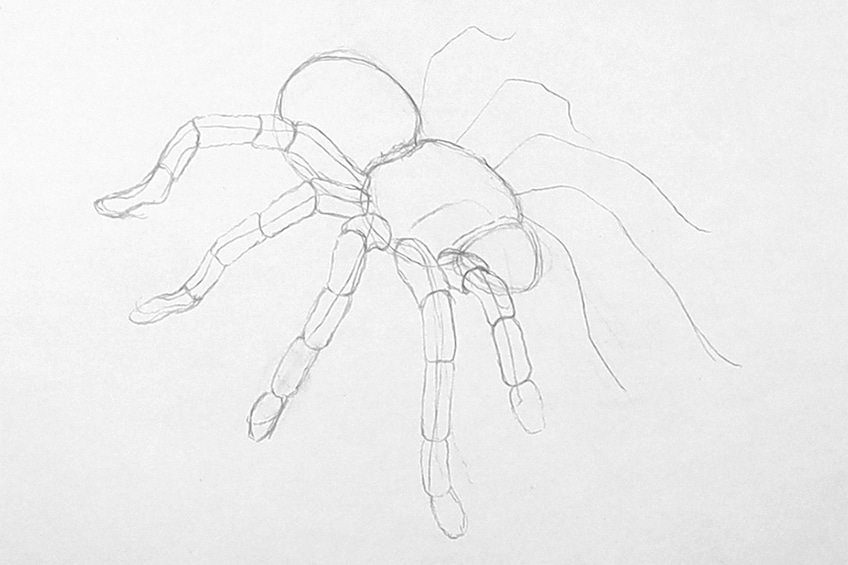
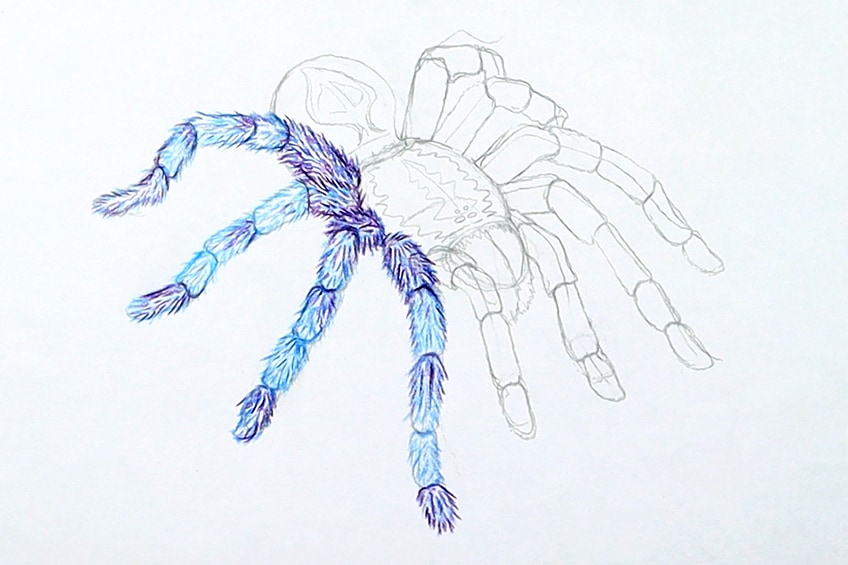
Step 3: Adding Color to One Set of Legs on the Spider
We will now continue by adding color to the spider drawing. Starting with the aspects of the spider that sit in the foreground we want to now be strategic with how we add color. With the legs, we want to make sure that there is consistency in the coloration.
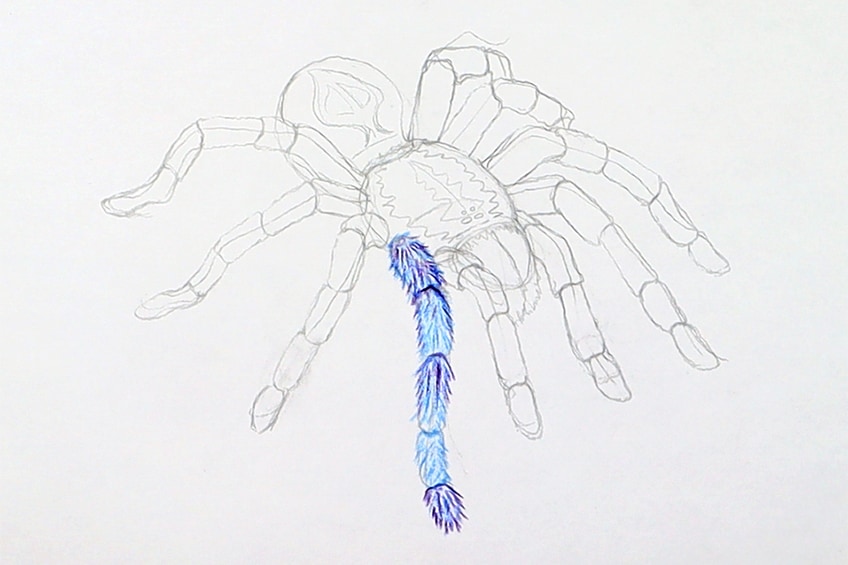
Again, we want to follow the same process as we did for the sketching of the spider. As we add color, we want to make sure the sequence of colors is the same. We also don’t want to simply fill different features of the spider with color but add color to the spider by the use of strokes or lines of color. As you color in your spider, allow yourself to be playful with your color choices. As long as you have consistency within the color placement in the spider’s features, you can choose whichever colors you would like to use.
Remember, we want to add color by the use of little strokes and lines, as this will give the tarantula a hairy quality.
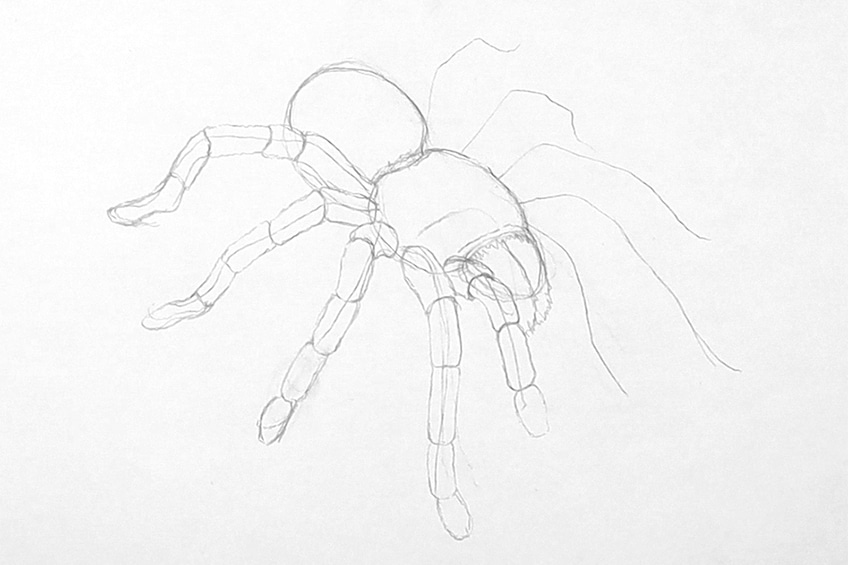
Step 4: Adding Color to the Cephalothorax and Abdomen
As we come to the completion of coloring the legs on one side of the spider, we can now start to color the cephalothorax. The cephalothorax can also be colored in any color of your choice.
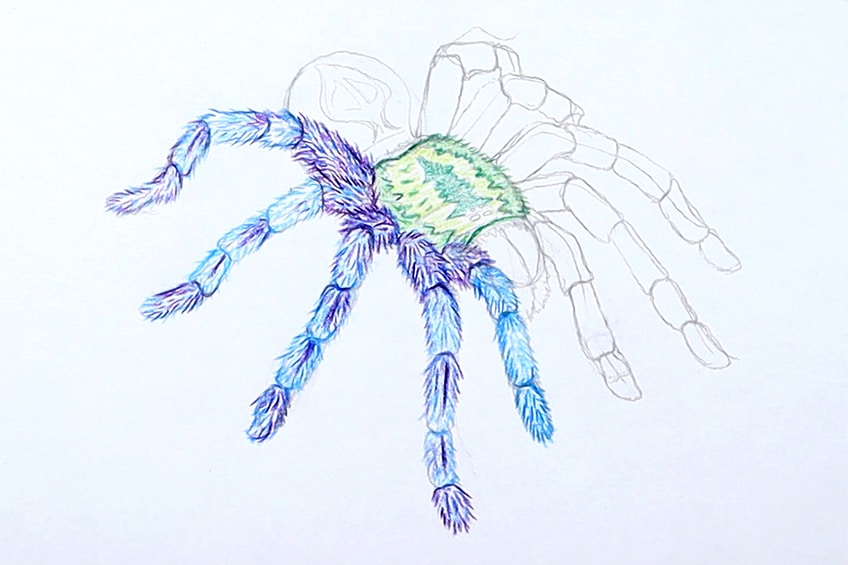
Both the Cephalothorax and abdomen exist within the midground of the drawing, which means we want to color them in at this point. The idea is to work from the foreground features to the background features.
The cephalothorax and abdomen don’t have to be the same color, in fact, a good suggestion is to make them different colors. Making the legs, abdomen, and cephalothorax of the spider different colors makes the drawing a little more interesting.

As you color in the pedipalps that exist within the midground as well, we want to make sure that they are the same color as the legs. The pedipalps of any spider normally have the same color sequence as that of the legs of the spider. When adding color to the spider, we want to make sure that we don’t just fill the spider with a solid color. We want to use a set of strokes or lines to fill the different sketched features of the spider.
These lines of various colors can also extend beyond the sketched pencil lines.
As we go through the different areas of the spider adding in color, we want to make sure we do two things. For one: we want to add color with the approach of lines and strokes. Secondly: we want to make sure that our color sequence is consistent with the different features of the spider.
When it comes to the cephalothorax, we also want to make sure that the pattern has symmetry. This is a more accurate representation of how a real spider’s cephalothorax would appear. Make sure you are careful when adding color to the pattern on the cephalothorax.
Again, we want to continue with the other set of legs by adding the same color sequence to them as we did for the row of legs in the foreground. Make sure that you take your time, slowly drawing in strokes of lines within the different features of the spider. Make sure that you also keep consistency within the sequence of colors for the various features of the spider.
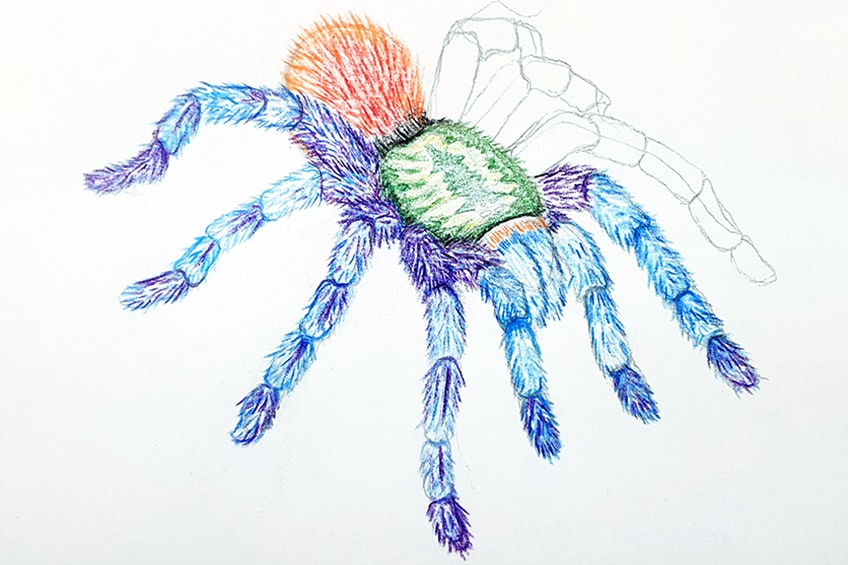
Step 5: Adding Pen for Contrast and Definition
Once we have completely colored the spider, we will now work with a ballpoint pen over the color to give the spider more definition and contrast. Starting with the legs, we want to add in some linework and strokes with our ballpoint pens. We want to make sure that we go through the spider drawing in the same way that we did for the sketching and coloring process.
Make sure that you attend to the features within the foreground, starting with the legs.

The aim here is to not overpower the spider drawing with black ballpoint pen marks. Rather, we want to add a few lines to the various features of the spider, whilst slightly outlining the different components of the spider. You want to make sure that you take your time, slowly adding little strokes to the legs as if you were drawing little hairs. These pen marks are going to help accentuate the hair-like qualities of the spider drawing.
We want to work slowly with our ballpoint pens, making sure we go through each aspect of the spider with caution. Again, we want to add little strokes to the different features of the spider whilst simultaneously outlining them.
The little strokes of a ballpoint pen will help to enhance the hairy quality of the tarantula drawing.
As we outline the different features of the spider, this will allow for the colorful marks to become more prominent.
As you come to the cephalothorax, you want to be very delicate with adding in-line work. For this section, we want to subtly add in some light line work that simply outlines the pattern. At this point, we can also draw in a set of eyes within the spider.
Again, this stage is simply about adding little lines to the different areas of the spider with light shading and outlining. We want to make sure that the colors are not overpowered, but that the different features are slightly more defined. We can do the same in the abdomen of the spider, where we add a set of lines and strokes to the form.
We want to make sure that the lines and strokes also flow with the structure of the different components within the spider.
This means that the little pen strokes would move in a downward fashion, whereas the strokes on the abdomen would move in a backward direction. Make sure you consider all the different elements, from the front to the back of the spider, and how your linework can enhance the different features.
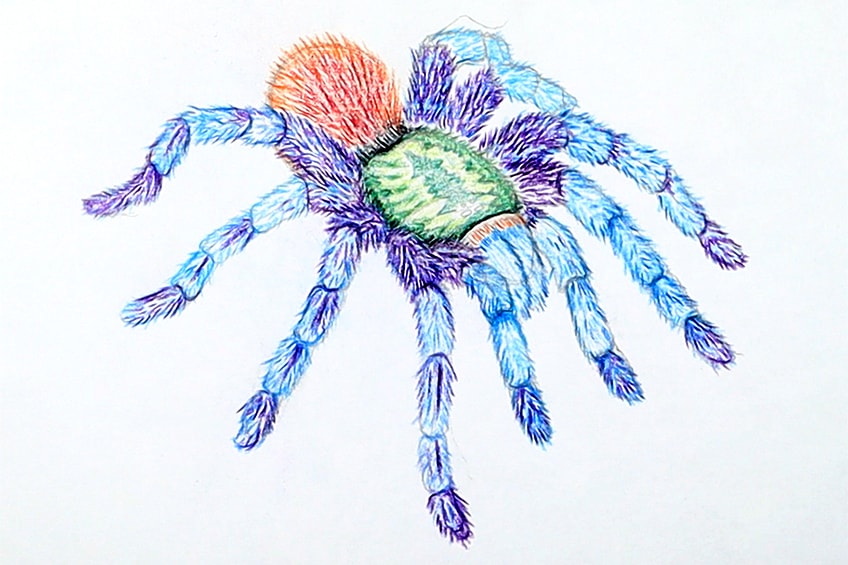
Step 6: Giving the Spider a Shadow
Once we are satisfied with our pen strokes in our spider drawing, we want to give the spider a shadow. Giving the spider a shadow gives it a more realistic interaction with the environment in which it exists. We want to begin by using our HB pencil to connect a shadow to each limb of the spider.
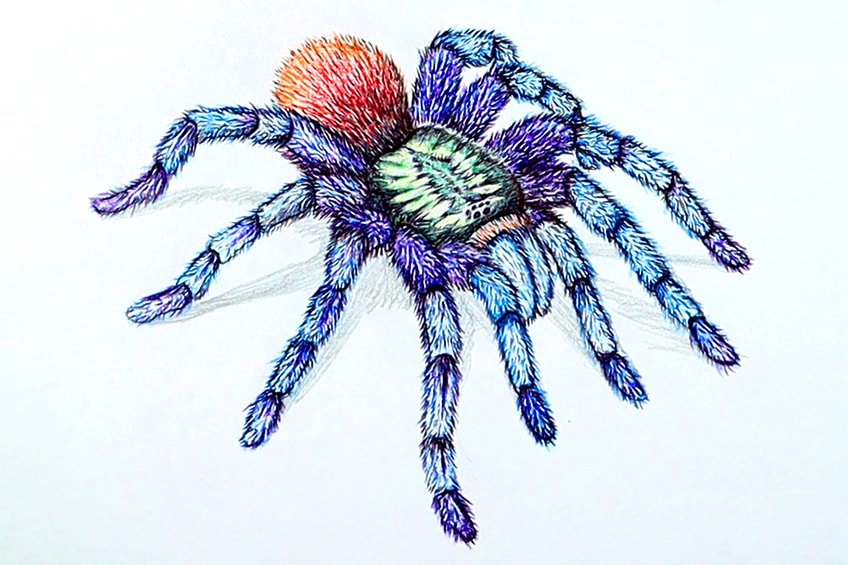
Once we have added some light pencil marks underneath the spider, we can then go over the pencil shading with our ballpoint pen. Make sure you keep the shadow as horizontal as possible and that it connects to each limb that makes contact with the surface.
Take your time shading in the shadow beneath the spider before you give your drawing one last glance before completion. And that is how you draw a spider in a few simple steps!

Tips to Remember
- Make sure the sketch of the spider is as best it can be in pencil first. You want to make sure that this is the case before adding pen marks and color.
- Consider the placement of the legs. They can easily be misplaced due to the variety of them being distracting.
- Keep consistency when you color your spider. You don’t have to use the same color but make sure there is consistency for a realistic quality.
- Consider the placement of the shadow. When adding in the shadow, make sure it makes sense with how it is placed on the plane that it is cast on.
- Have fun with the steps. We have suggested steps that can easily be tweaked to suit your tarantula drawing interests.
Learning how to draw a spider is a fun task because you can play around with color combinations to create a vivid and colorful tarantula drawing. In this easy spider drawing tutorial, we learn how to create a spider in its basic form, which we then colored over with a linework-styled approach. The most important thing to remember is to keep consistency and symmetry within the spider’s color scheme and patterns on its cephalothorax; this resembles a more realistic spider aesthetic.
Frequently Asked Questions
How Do You Draw the Hair on a Tarantula?
Drawing the hair on a tarantula is quite simple. You first want to sketch the spider, making sure that you have adequately drawn the body and legs with their various segments. Once we have the spider drawn correctly, we can then move on to adding in the line work which not only will work as hair but also gives the spider drawing color. For instance, if you work with a blue pencil to give the legs a blue color, you want to add little strokes of lines as you go through each segment of the legs. What is meant by this is that we draw with lines and not by filling the legs solidly with a color. You also want to allow the lines to flick out of the outlined sketch of legs, which will give the spider a fluffy hairy-like aesthetic. From there, you can go over the legs and colored lines with some darker lines, perhaps with a pen. By doing this, we emphasize the hairy quality of the tarantula and give it a little more contrast.
How Do You Draw a Spider’s Legs?
A spider is an eight-legged creature with four legs that grow from the side connected to the cephalothorax or prosoma. Each leg has a combination of seven segments that form the various joint structures. However, not all tarantulas have seven segments in their legs; in some cases, it can be six or even five. As you draw the legs you want to make sure that the hind legs extend more parallel with the abdomen towards the back of the spider. The middle two will extend laterally to the side of the spider and will sprout from the prosoma. Then the spider will have two more that extend from the prosoma and move laterally in a forward direction.

Matthew Matthysen is an educated multidisciplinary artist and illustrator. He successfully completed his art degree at the University of Witwatersrand in South Africa, majoring in art history and contemporary drawing. The focus of his thesis was to explore the philosophical implications of the macro and micro-universe on the human experience. Matthew uses diverse media, such as written and hands-on components, to explore various approaches that are on the border between philosophy and science.
Matthew organized various exhibitions before and during his years as a student and is still passionate about doing so today. He currently works as a freelance artist and writer in various fields. He also has a permanent position at a renowned online gallery (ArtGazette) where he produces various works on commission. As a freelance artist, he creates several series and successfully sells them to galleries and collectors. He loves to use his work and skills in various fields of interest.
Matthew has been creating drawing and painting tutorials since the relaunch in 2020. Through his involvement with artincontext.org, he has been able to deepen his knowledge of various painting mediums. For example, watercolor techniques, calligraphy and lately digital drawing, which is becoming more and more popular.
Learn more about Matthew Matthysen and the Art in Context Team.
Cite this Article
Matthew, Matthysen, “How to Draw a Spider – An Easy Tarantula Drawing Lesson.” Art in Context. September 27, 2022. URL: https://artincontext.org/how-to-draw-a-spider/
Matthysen, M. (2022, 27 September). How to Draw a Spider – An Easy Tarantula Drawing Lesson. Art in Context. https://artincontext.org/how-to-draw-a-spider/
Matthysen, Matthew. “How to Draw a Spider – An Easy Tarantula Drawing Lesson.” Art in Context, September 27, 2022. https://artincontext.org/how-to-draw-a-spider/.


