How to Draw a Clown – Create a Goofy and Colorful Clown Drawing
Ready to sketch the stars of slapstick and silliness? Learn how to draw a clown in 15 easy steps, transforming a blank page into a burst of color and laughter. Perfect for artists of all levels, this guide will help you capture the essence of clowning, ensuring your artwork is as entertaining as the subjects themselves. Grab your pencils and let’s get started!
Learn How to Draw a Clown in 15-Easy Steps
Congratulations on taking the first step toward learning how to draw a clown! Drawing a clown can be a fun and rewarding experience that allows you to unleash your creativity and imagination.
When starting, it’s important to familiarize yourself with the basic shapes and features that make up a clown’s appearance, such as oversized shoes, a round nose, and colorful attire. Once you have a solid foundation, you can start experimenting with different expressions, poses, and accessories to create your unique clown character. One tip for drawing clowns is to use bold colors and exaggerated features to make them stand out and capture the playful spirit of clowning. Whether you’re using pencils, markers, or digital tools, don’t be afraid to get creative and have fun with your drawings!
The below collage is provided as a helpful guide so you can learn how to draw a clown step-by-step.
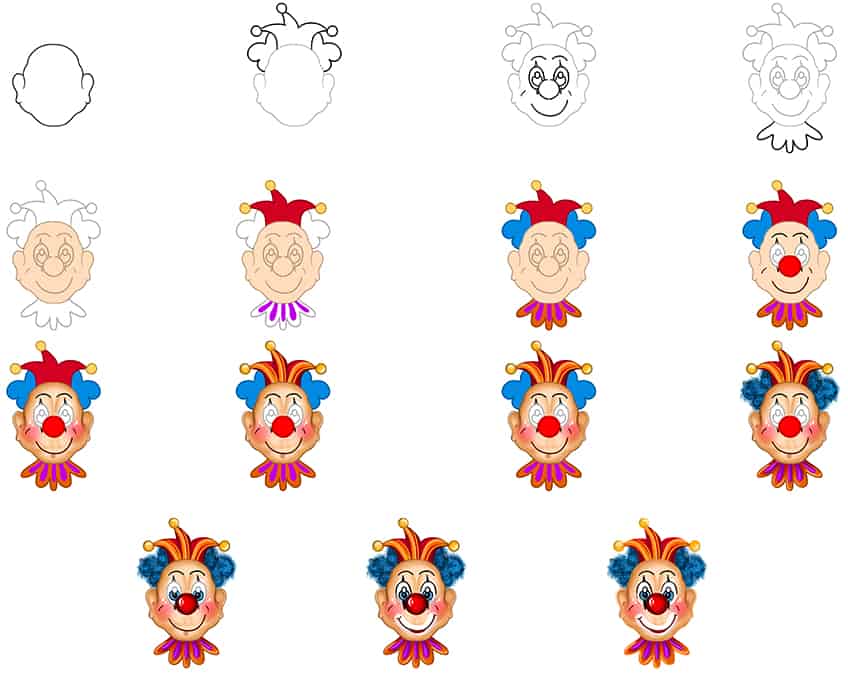
Step 1: Draw the Head of Your Easy Clown Drawing
Begin your easy clown drawing, by drawing a symmetrical head outline that includes the top of the head, the ears, the jawline, and the chin.

Step 2: Draw the Clown Hat
Above the head, draw the clown’s hat with sharp ends leading onto a small circle representing the hat bells. On either side of the hat draw a patch of hair on the head.

Step 3: Add in the Facial Features
Begin by drawing the nose as a large oval shape. Continue by drawing two large oval shapes to represent the eyes, and within the eyes draw two more, smaller oval shapes.
Finish off by drawing the face paint markings on each eye, and draw the eyebrows and mouth line on your clown drawing.

Step 4: Attach a Bow to Your Clown Sketch
Below the chin, draw the extending clown bow.

Step 5: Apply the First Color Coat
Select a fine, sharp brush and tan paint, and evenly coat the face on your clown sketch.

Step 6: Color the Hat and Bow on Your Easy Clown Drawing
Use the same brush as previously and switch to red paint, and evenly color the bow. Continue using golden yellow to paint the hat bells. Complete the step and paint the inner layer of the bow using bright purple paint.

Step 7: Add Color to the Hair
In this step, paint both patches using a thin brush and blue paint. Switch to orange paint and color in the bow on your clown drawing.

Step 8: Color the Facial Features
With a fine, sharp brush and red paint, color the nose on your easy clown drawing. Continue using white paint to fill the eyes. Finish off using black paint to trace the eyebrows, face paint markings, and the mouth line.

Step 9: Begin to Shade Your Clown Sketch
In this step, add a soft contour along the edges of the face and head, using a small, soft brush and brown paint. Repeat using a fine, sharp brush for the ears and continue by using a blending brush to soften and blend the color coats.
Make sure the first color coat is still somewhat visible. Complete the step using a small, soft brush and pink paint, and add soft dabs on the cheeks. Switch to white paint and add small shimmer dots on each cheek.

Step 10: Detail the Hat
With a thin brush and a combination of orange, yellow, and tan paint, add fine stripes leading with the curvature of the hat to each bell. Continue to add soft shading using a soft brush and black paint on each of the bells. Repeat using white paint and add highlights to your clown sketch.

Step 11: Shade the Bow
Start this step by adding soft and subtle brushstrokes along the edges of the bow, using a small, soft brush and black paint. Repeat using white paint to apply soft highlights to the edges of the bow.

Step 12: Texture the Hair on Your Clown Drawing
Select a thin brush and a combination of dark blue and light blue paint, and paint the hair texture in a circular motion. Switch to a small, soft brush and extend the hairline beyond the outline of the hair patches.

Step 13: Detail the Facial Features
Begin to add shading around the nose of your clown drawing, using a soft brush and black paint. Repeat using white paint to add a fine highlight.
Continue using blue paint to fill the eye’s iris. Switch to black paint for the pupil, and white paint to add a fine shimmer on each eye.

Step 14: Add the Face Paint to Your Clown Sketch
In this step, trace the eye’s facial paint and the eyebrows, using a fine, sharp brush and black paint. Continue using dark brown paint, trace the mouthline, and red paint for the actual mouth. Surrounding the mouthline, use white paint to add a fine-painted outline.

Step 15: Finalize Our Tutorial on How to Draw a Clown Face
To finish your drawing on how to draw a clown face, use a thin brush and the corresponding colors to trace the harsh outlines. This will result in a seamless and realistic clown drawing!

Congratulations on finishing your clown face drawing! Drawing a clown can be a challenging task, but with your hard work and perseverance, you have created a unique and delightful character. Take a moment to appreciate the details and features you’ve included, from the bright and bold makeup to the exaggerated facial expressions. Now that you’ve completed your clown face, why not try experimenting with different colors, accessories, and expressions to create even more clown characters? You can also practice drawing full-body clowns, different poses, and other elements of clowning, such as balloon animals or juggling props. Remember, the more you practice, the better you will become. Keep on clowning around and have fun with your art!
Frequently Asked Questions
How to Make a Clown’s Hair Look Realistic?
When drawing a clown’s hair, it’s important to find the right balance between realism and playfulness. You can achieve this by using a combination of colors to create a vibrant and playful effect and adding volume and texture to the hair with quick and loose strokes. Experiment with different styles of hair, such as a curly afro or spiky punk rock look, to find what best suits your clown character. Don’t forget to add in accessories like hats or headbands to enhance the overall appearance of the hair and make it look even more playful and fun. The key to creating great clown hair is to have fun and experiment with different techniques and styles until you find what works best for your character.
What Colors Can My Clown Drawing Be?
When it comes to a clown’s makeup and outfit, there are many options available! Bright and bold colors are often used to create a fun and whimsical appearance. For a clown’s makeup, white is typically used for the base, while other colors like red, blue, and yellow can be used for accents such as the lips, cheeks, and eyebrows. Outfits can be made up of different colors, but it’s common to see a lot of red, yellow, blue, and green in clown costumes. These colors can be arranged in stripes, polka dots, or other patterns to create a playful and eye-catching look. It’s important to experiment with different color combinations to find what works best for your clown character and to ensure that the colors are well-balanced and complement each other!

Matthew Matthysen is an educated multidisciplinary artist and illustrator. He successfully completed his art degree at the University of Witwatersrand in South Africa, majoring in art history and contemporary drawing. The focus of his thesis was to explore the philosophical implications of the macro and micro-universe on the human experience. Matthew uses diverse media, such as written and hands-on components, to explore various approaches that are on the border between philosophy and science.
Matthew organized various exhibitions before and during his years as a student and is still passionate about doing so today. He currently works as a freelance artist and writer in various fields. He also has a permanent position at a renowned online gallery (ArtGazette) where he produces various works on commission. As a freelance artist, he creates several series and successfully sells them to galleries and collectors. He loves to use his work and skills in various fields of interest.
Matthew has been creating drawing and painting tutorials since the relaunch in 2020. Through his involvement with artincontext.org, he has been able to deepen his knowledge of various painting mediums. For example, watercolor techniques, calligraphy and lately digital drawing, which is becoming more and more popular.
Learn more about Matthew Matthysen and the Art in Context Team.