How to Draw a Face – A Step-by-Step Guide to Face Drawing
Learning how to draw a face is an essential skill to learn for drawing. Learning about facial proportions and how the structure of a face is developed will improve your drawing skills, providing you with a better sense of drawing facial features in their correct spaces. Learning how to draw a face will also provide you with other skills such as symmetry. Knowing how to draw a symmetrical face is a great exercise that can be translated into other categories of drawing. Learning how to draw a face correctly is a great way to develop your portraiture. Knowing how to draw face proportions gives you a greater sense of accuracy, and scale and ultimately gives you more confidence in your face drawing endeavors. Understanding how to draw a face correctly also allows you to create your own face for other artworks. For whatever reason you would like to learn how to draw a face, this is an essential skill that will enhance your drawing skill. This tutorial is both for beginners and intermediates.
An Easy Guide to Drawing a Face
Face drawing can often seem really difficult, this is because we are generally only seeing the finished product. However, face drawing is not that difficult when you know how to use guidelines that help you to draw the facial features correctly. In this tutorial, we will be looking at how to draw face proportions using a few guidelines to help us accurately make a face drawing. Think of it as a face proportions guide, that will give you a better understanding of how to construct a face correctly.
Using this tutorial as a face drawing reference will help you to draw other faces with more confidence.
This method can also be used to create your own faces without using an image as a face drawing reference or source image to guide you. We don’t need much for this tutorial, so let us see what are the necessary materials.
Necessary Materials
Learning how to draw faces requires very simple materials. This tutorial is intended to demonstrate the process of forming facial features, this means we will need a ruler for drawing guidelines. We will also need a pencil to draw the guidelines, we will also use the pencil to form the different features of the face within their correct positions using the guidelines.
A good suggestion is to also keep your pencils sharp for this tutorial so that we can keep our marks as precise as possible.
We will also need an eraser as we will inevitably encounter a few mistakes along the way. Lastly, we will use an open as well to go over a few basic steps of refining features once our face is drawn to completion.
- Pencil
- Ballpoint pen
- Eraser
- Sharpener
- Good paper (200 g/m – 250 g/m recommended)
Step-by-Step Instructions on How to Draw a Face
The process of drawing a face and learning how to draw face proportions is quite simple. Firstly, we will look at the basic facial construction method using a few tools to guide us. We will look at how we can use our tools to create guidelines that direct our drawing process. To get the facial proportions correct we want to make sure that we create a set of guidelines that demarcate the areas for different features of the face. We will then proceed to draw different features of the face.
Using the guidelines, we will have a better sense of adequate placing the different facial features. You can use any image of a face to work with in tandem with this tutorial.
You can also use no face drawing reference, and simply construct features using only the guidelines, however, using a reference image is going to be much more helpful. Once we feel satisfied with our drawing, we will then move on to the last stage defining the general shading process of drawing face proportions. Now that we know what to expect, let’s get started.
Step 1: Drawing the Head Shape
Let’s begin by drawing a circle on the page. You want your circle to be as accurate as possible, so perhaps use a compass or a rounded object like a bowl. This is up to you and is really dependent on how large you want your face drawing to be.

Once we have drawn the circle, we then want to find the center of the circle. Finding the center of the circle is going to help us establish the first guideline. You can find the center of the circle by measuring the length and width, wherever the points intersect will determine the center of the circle.
From there we can draw a vertical line down the center of the circle, this will help us to create symmetry in our face drawing.

The next thing we will do is draw an arch shape that forms around the bottom of the circle. This is going to define the lower half of the face as well as the guideline for the jawline. You can draw this shape like an upside-down spearhead, that starts from the left side of the circle and finishes at the right side of the circle.

Step 2: Drawing the Guide Lines
The next thing we will do is draw the guidelines that define where each feature of the face will be drawn. Each of these lines will help us to place the different features of the face. However, these lines are simply intended to guide you.
They are not going to be perfectly representative of the fact that you might be using as a reference image.
We start by drawing the first horizontal line that describes the axis on which the eyebrows will be placed. This is the line that runs through the center of the circle. From there you can leave about 3cm and draw another horizontal line that runs parallel underneath the first horizontal line.
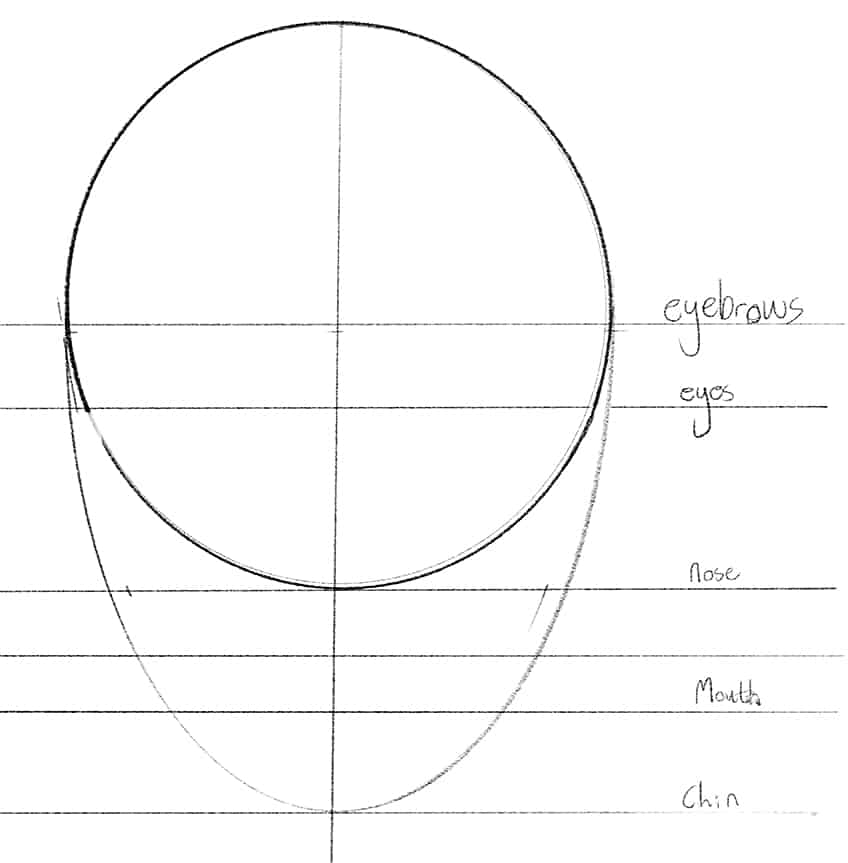
The bottom horizontal line will define where the nose ends.
We will then proceed to draw two more horizontal lines underneath the lowest one. However, this time we want to only leave about 2 cm between them. These two below the line that runs along the bottom of the circle will describe the position of the mouth.

We should be left with five horizontal lines. The top two will define where the eyebrows and eyes are placed. The middle one is placed significantly lower and describes where the nose will end. The bottom two horizontal lines describe the placement of the mouth.
The distance between the top two is 3 cm and the distance between the bottom three is 2 cm.
Step 3: Sketching the Eyes
Now that we have our grid lines in place, we can add the facial features of our face drawing. We do this by starting with the eyes. Looking at whichever image you are using as a reference, try to begin with the inner corners of the eyes. The inner corners of the eyes should connect to the second horizontal line from the top.
The distance between is dependent on the face in your reference image.

An excellent way to gauge the distance is to imagine a third eye between the two on the face. What you want to do is spend time drawing the eyes, constantly referring to your reference image for guidance. Use your eraser and a light HB pencil to tweak and change them until they seem correct in size to that of the reference image. As long as you keep them on the horizon line they should be fine.

You will find that it takes time to get the form and shape of the eyes and pupils correct. We not trying to make them super detailed at this point, rather we want to just keep the eyes as a simple outline. We just want the eyes to resemble the shape of the eyes in our reference images.
Use your reference image and analyze the shape of the eyes. The guidelines are simply there to help you place them in the face.

Step 4: Sketching the Nose
We can now move on to drawing the nose. Usually, the placement of the nose begins on the center horizontal line. The bottom of the nose should remain above the middle horizontal line. Don’t forget to add a nostril on each side.
You can use the vertical line to help place your nose centrally on the face.

Once you have drawn the nose and have used the vertical line to help you make it as symmetrical as possible, you can add some light shading marks to indicate how the nose flows towards the eyes. Again, allow the vertical line to help you shape the nose, making the curvature of the nose the same on either side of the vertical line.

Make sure you keep referring to your reference image to guide you in your drawing process. The form of the nose should flow into the inner corners of the eyes. Remember to take time tweaking and correcting it until it seems to be placed correctly on the face.
Keep your pencil marks light, to make it easier to erase any mistakes.

Step 5: Sketching the Mouth
We can then proceed to add in the mouth for our face drawing. We draw the mouth in the bottom gap between the two last horizontal lines. This upper lip might go slightly over the second last horizontal line, however, the indentation between the nose and upper lip should be placed in the second gap of horizontal lines from the bottom.

The bottom lip should fall on the bottom horizontal line, keeping the lips from going too far down the face. Again, use these guidelines to help you place features of the face. You should, however, tweak them and correct them until they resemble the unique shape in your source image.
Spend time on the mouth, making sure it is contained within the demarcated lines.

Step 6: Sketching the Eyebrows
The eyebrows are a very unique feature of the face, they are very character-defining and give the face a unique dimension. Using your reference image, proceed to draw the eyebrows, try to keep them contained to the top horizon line.
They might extend a little past the top horizon line, that is okay as some eyebrows extend high.

As the eyebrows merge towards the center of the eyes, they connect to the top of the nose, where the nose merges into the forehead. Imagine it as the eyebrows extend into the center of the face along each side of the nose.
The aim is to create a seamless symmetrical shape that moves up along the sides of the nose into the forehead and flows into the eyebrows.

Step 7: Sketching the Facial Structure
The next thing that helps to define facial proportions is to refine the facial structure. We do this by using our reference image and seeing how the lines are formed around the features of the face. We want to notice how far the bottom of the chin is from the lower lips.
How far are the sides of the face area from the eyes and so on?

Once you have a grasp of the facial structure you then can proceed to add some light shading with your pencils. We want to do this to give structure to cheekbones, the nose, and bone structures in the face. From here, it is simply a matter of refining your face drawing with shading.

As you shape your face, you will want to really consider how the face is outlined by its structure. The facial structure is another aspect that gives a face its uniqueness, as everyone’s facial structure is different. So be sure to analyze your source image.
See how the face is defined within your source image.

You can also proceed to draw indicative lines that define the hair on the top of the head. Hair forms and falls in different ways. Giving your face drawing some suggestive marks that indicate the hairline will help to form the facial form a little more.
Step 8: Shading for a More Realistic Result
Those are the basic steps on how to draw an accurate face. Using the gridlines is going to help you to place different facial features more accurately. However, to give your face a more realistic quality will be determined by your shading.
A good suggestion is to use a ballpoint pen because the ink comes out sparingly, giving you more control over dispensing the ink. Using a pen gives your work a clean and sharper quality.
As you sketch out your face you will do so as well with the shading of the face. This means you will want to start with the eyes of the face. Focusing on the eyes and how the eyelids are formed and how the little shadows form around the eyes will give your face drawing more dimension. With shading, you want to spend a lot of time on the eyes, focusing on the features on and around the eyes.

Shading helps to also give more structure to the face. As you shade the face, it will give more prominence to different features within the face. IT also helps to refine the symmetrical nature of the face. This is particularly true for the ridge of the nose and how it forms into the eyebrow ridges.
Shading helps to define the protrusions of the bone structure.

The lips are another unique aspect of the face when it comes to shading. Some lips are moist which creates a seamless shine, whereas some lips are drier, giving the lips little cracks. Focusing on how you shade the lips and how they are represented in a reference image is important. The skin of the lips is also slightly reflective.
You want to consider how light interacts with the mouth that you are drawing.

As you shade in different features of the face you will see how shadow and light are significant parts of what makes faces look the way they do. The way facial structures interact with light is character-defining as much as the features themselves.
This means you always want to consider the light source in your reference image as well.

Make sure you consider all aspects of the face only needs to come after forming the basic features of the face. Once you have guidelines that help you to place your features you then can work on adjusting the facial proportions to resemble your reference image.
From there on, working on your shading process will take some time.
Tips to Remember
- Take your time. Faces are tricky and taking your time to figure out how eyes are placed together, how wide a nose should be, or working out other details requires some tweaking.
- Work light. Keep your drawing light, drawing proportions of the face correctly comes with mistakes. You don’t want to create dark marks, making it easier for you to erase any mistakes.
- The little adjustments matter. This means with facial proportions, working on how each detail is placed in comparison to other features of the face should be adjusted slightly until it seems correct.
- Use your eraser. When drawing face proportions, you will make mistakes but you can also use your eraser to help shape and tweak each little detail in the face.
- Compare features in scale. A good idea is always to compare features. Ask yourself questions like, is the nose much larger than the mouth? Or do the eyes seem different in size?
- Use a reference image to guide you. Once you have drawn the guidelines, using a reference image to guide your drawing process can be really helpful.
- Use this resource as a face sketch reference. This is a tutorial intended to help you as a face proportions guide, giving you insight into the correct placement of different facial features.
- Have fun. Learning how to draw a face is an interesting exercise. Take your time, have a break, and enjoy the process!
A face drawing is something you will need to practice. Within a face proportions drawing, taking your time tweaking and lightly correcting little moments is what you should experience. This is because the more we look at a source image for reference, the more we will start to notice the little details more accurately. Once your grid lines are drawn, drawing face proportions should be done with a light pencil and slowly and cautiously drawn. Remember to always compare features as well, this helps to understand scale much better. Make sure you use a reference image to guide you in the scale and sizes of different features. Remember to be patient; drawing is a skill to be practiced, which means that it will take some time to get right. This is a great resource to use as a face proportions guide, learning how to develop your skill using this face sketch reference to help build up your face drawing skills.
Take a look at our face drawing webstory here!
Frequently Asked Questions
How Do You Draw a Face Accurately?
You start by drawing gridlines to help indicate where exactly you would draw each feature of the face. This can be done by drawing a circle and a spear-headed shape that goes around the bottom of the circle. The spearheaded shape should move along the bottom of the circle and should connect to the right and left sides of the circle. This will leave us with a generic head shape. From there you will draw five horizontal lines through the face. You start with the first line going through the center of the circle, and then another horizontal line running parallel underneath. These lines should have 3 cm space between them. The next line runs through the bottom of the circle, with two more lines beneath, both with 2cm of space between them. This gives us the lines that will place the eyebrows, eyes, nose, and mouth. From there you shape the face and add shading last, giving your face drawing details.
Which Features of the Face Do You Draw First?
Once you have drawn a grid to help guide you in your placement of each facial feature, it is best to start with the eyes. Starting with the eyes helps to figure out the rest of the proportions of the face. Once you have drawn the eyes, you have the correct size and placement to then understand where the nose will go and then the mouth and so on. Once you know how large the eyes are you can then understand how large the rest of the features should be. With facial proportions, you are constantly comparing features and seeing how they are scaled in comparison to one another. Thus, by drawing the eyes first you will know how large the other features will need to be. The eyes are also the most difficult part of the face, this is why it is best to spend time on the eyes first.
How Do You Correctly Draw the Sizes of Different Facial Features?
When it comes to drawing facial proportions, it’s all relative. This means you will scale the face according to how large you draw the head. However, the best thing to do is to start with the eyes. Once you understand the size of the eyes, you will have a better understanding of how to size the nose, mouth, eyebrows, and other parts of the face. Using a reference image is also really helpful, this way you can draw your eyes more accurately. From there, it becomes a process of tweaking, erasing, and redrawing as you try to shape the eyes to look as accurate as possible. Using guidelines helps with the placement of the features as well, keeping your features as symmetrical as possible. Once you have started with the eyes, you can then simply work your way through the rest of the face constantly using the previously drawn feature as a reference to size the next.

Matthew Matthysen is an educated multidisciplinary artist and illustrator. He successfully completed his art degree at the University of Witwatersrand in South Africa, majoring in art history and contemporary drawing. The focus of his thesis was to explore the philosophical implications of the macro and micro-universe on the human experience. Matthew uses diverse media, such as written and hands-on components, to explore various approaches that are on the border between philosophy and science.
Matthew organized various exhibitions before and during his years as a student and is still passionate about doing so today. He currently works as a freelance artist and writer in various fields. He also has a permanent position at a renowned online gallery (ArtGazette) where he produces various works on commission. As a freelance artist, he creates several series and successfully sells them to galleries and collectors. He loves to use his work and skills in various fields of interest.
Matthew has been creating drawing and painting tutorials since the relaunch in 2020. Through his involvement with artincontext.org, he has been able to deepen his knowledge of various painting mediums. For example, watercolor techniques, calligraphy and lately digital drawing, which is becoming more and more popular.
Learn more about Matthew Matthysen and the Art in Context Team.
Cite this Article
Matthew, Matthysen, “How to Draw a Face – A Step-by-Step Guide to Face Drawing.” Art in Context. June 20, 2022. URL: https://artincontext.org/how-to-draw-a-face/
Matthysen, M. (2022, 20 June). How to Draw a Face – A Step-by-Step Guide to Face Drawing. Art in Context. https://artincontext.org/how-to-draw-a-face/
Matthysen, Matthew. “How to Draw a Face – A Step-by-Step Guide to Face Drawing.” Art in Context, June 20, 2022. https://artincontext.org/how-to-draw-a-face/.