How to Draw Smoke – A Step-by-Step Tutorial on Smoke Drawing
Learning how to draw smoke is really easy and fun, and in this tutorial, we will look at two different ways how to draw smoke. Smoke is a strange composition as it isn’t really tangible and oftentimes has a strange shape that needs context to make sense. In this tutorial, we will be looking at how to create a smoke drawing in two different ways allowing us to see how we can use smoke for different effects. Smoke can take different forms and can be a soft subtle result of a blown-out candle, or a thick and smokey result of a massive explosion. A smoke drawing can be used in so many different ways and can be a great addition to other artworks. A smoke drawing can also have a strong visual meaning and can contextualize a scene in a very strong way. However you use a smoke drawing, understanding how to draw it softly and more strongly is a great addition to your drawing skills.
An Easy Guide to Drawing Smoke
Smoke drawing can seem intimidating because it looks complicated and it seems as if it doesn’t have clear structural qualities that can be drawn. However, as you learn how to draw smoke you will see that the strange structure that is smoke allows us to be playful with how we form smoke in two unique ways.
In this tutorial, we will look at how we can create a simple and soft smoke drawing, as well as how to create a more cloud-like and thick smoke drawing.
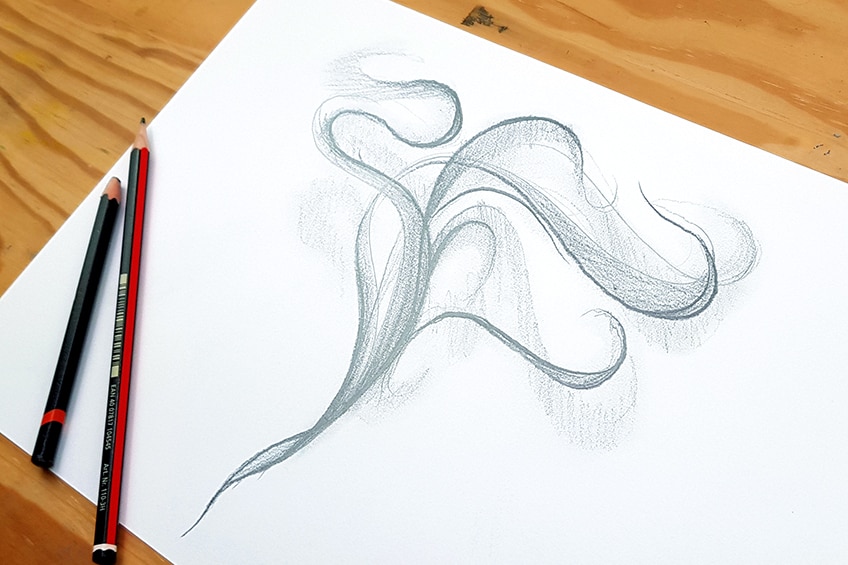
Necessary Materials
Learning how to draw smoke is quite simple and requires very simple materials. smoke drawings can be done in various ways, however, in this tutorial, we will be focusing on two specific ways how to draw smoke.
Both processes will require a simple set of pencils, which will be between an HB and a 3B pencil.
We will also want to make sure we have an eraser or sharpener just in case we need to rectify any silly mistakes along the way. Lastly, we want to make sure we have some paper, any paper will do for this tutorial. all materials for the smoke drawing tutorial can be found through the links below:
- HB pencil
- 2B pencil
- 3B pencil
- Eraser
- Sharpener
- Good paper (200 g/m – 250 g/m recommended)
Instructions on How to Draw Smoke
Learning how to draw smoke is not difficult at all and the process is simple and quick. This can be said for both ways of drawing smoke, whether it is explosion smoke or a soft wisp of smoke from a blown-out candle.
Either way, we will break down each process into a few digestible steps, helping you to advance your smoke drawing skills.
The process for both smoke drawings will start with a simple smoke sketch, where we form general shapes and then we will see how we can add shading to each smoke drawing to enhance it a little more. Now that we know what to expect, let us go through the drawing process for this smoke drawing.
How to Draw a Wisp of Smoke
drawing smoke in a subtle way can be used in all sorts of artworks. Learning how to create elegant and soft smoke is a great way to set a scene and contextualize an event within an artwork. There are many ways to use this form of smoke drawing style and can be a great skill to have available as an artist.
That being said, let us take a look at the few simple steps on how to draw a wisp of smoke.
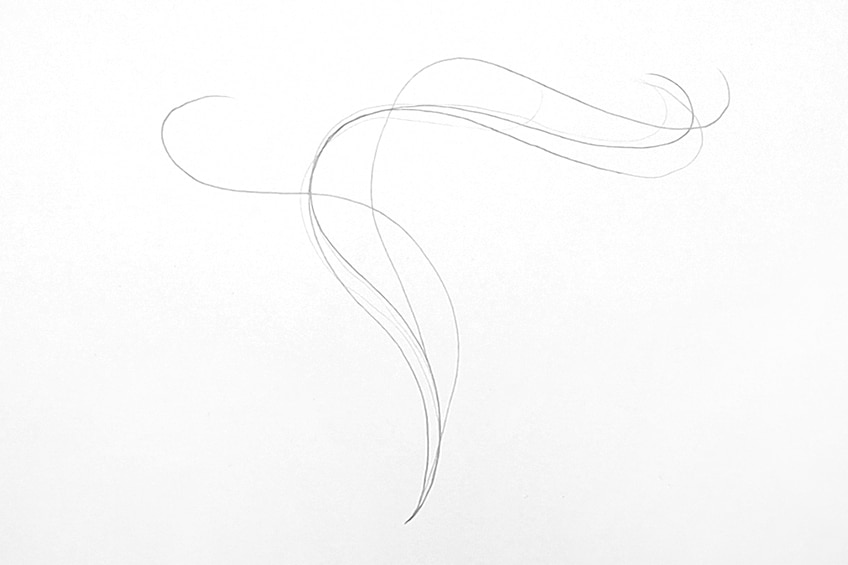
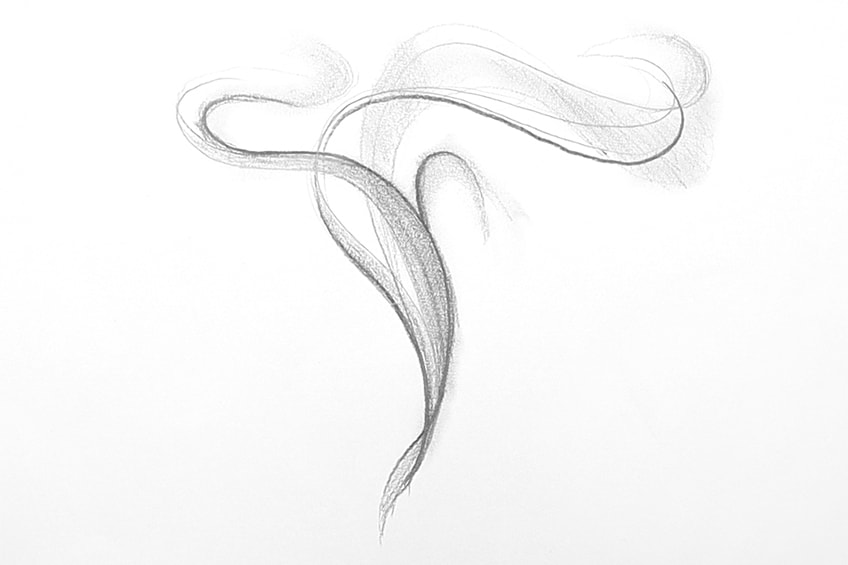
Step 1: Draw Curved Lines
We can begin by drawing a few curved lines with our HB pencils. The key thing to remember is that we want the lines to all sprout from a single point. From there they can form a mushroom shape and curve all over the show.
Try to make these lines curve in all sorts of directions.
Step 2: Add Shading Along Curved Lines
From here, we can work with both our 2B and 3B pencils, where we will start to shade along with the form of the curved lines. We want to keep the concept of a ribbon in the back of our minds and try to capture the twisting quality similar to that of the ribbon.
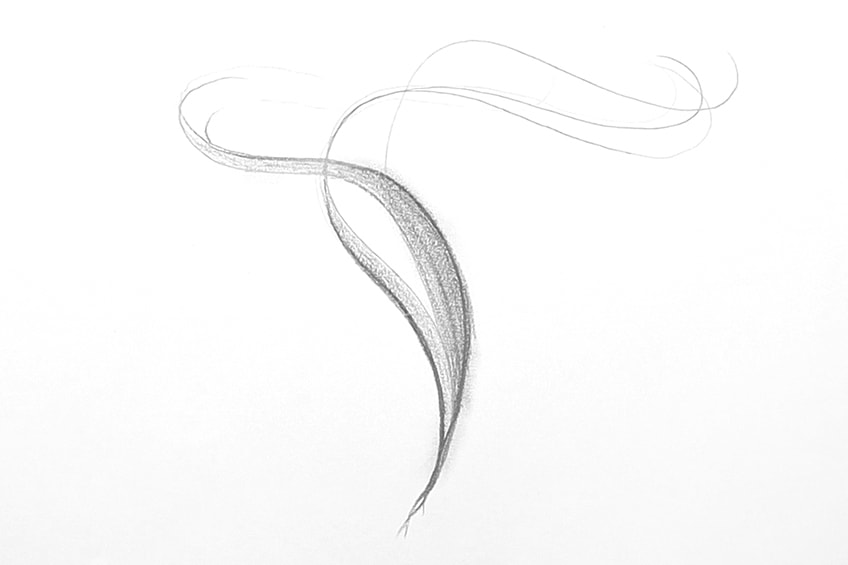
Most importantly, it is the twisting and ribbon quality that we are trying to capture in the smoke.
Step 3: Adding More Lines and Shading
That is the basic process of drawing soft wisps of smoke, and it is a really subtle art. The idea is that you want to capture the mushroom shape, where the smoke will round out and twist as it rises.
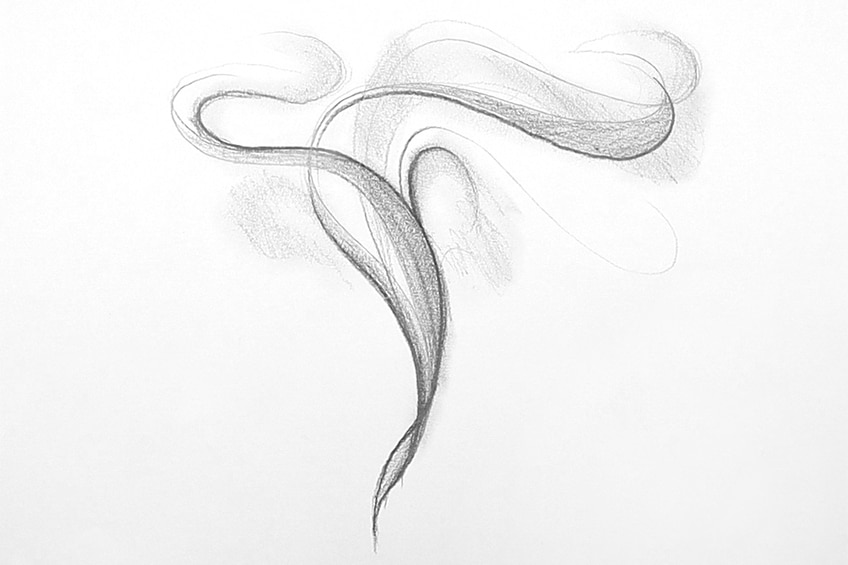
This is the basic process of creating subtle wisps of smoke.
You just want to make sure that there is a mushroom shape, that the smoke originates from a single point and that the streams twist and curl. And that is it! A basic process of creating a wispy smoke drawing.
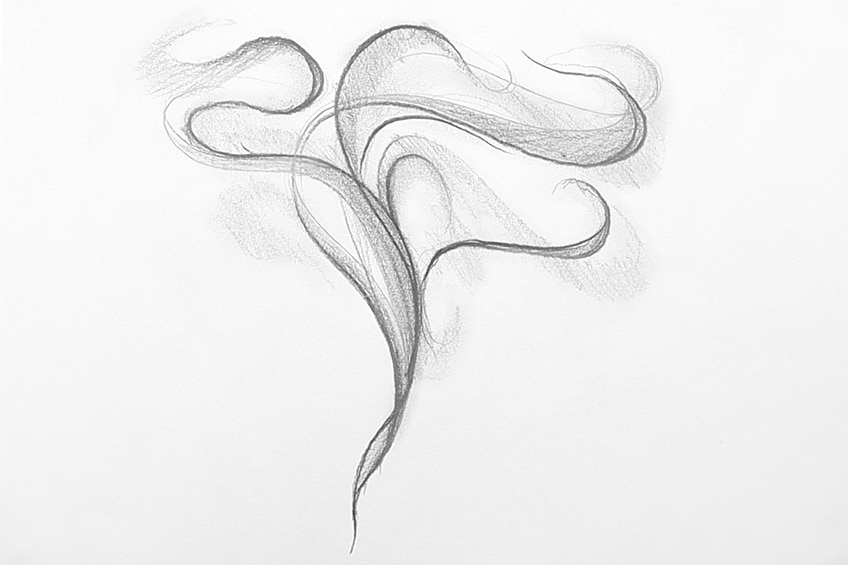
Explore the ideas you have learned and try a few things with this type of smoke drawing.
How to Draw Thick, Explosive Smoke
The process of drawing thick, explosive smoke is completely different from that of drawing soft and wispy smoke. For one, the idea is that thick smoke is seen from a distance, whereas wisps of smoke are seen close up. Secondly, thick smoke is dense and has this quality of consistent folding in on itself which gives it ripple-like qualities that look as if it has a variety of different layers.
That being said, let us take a look at the drawing process for thick, dense smoke.
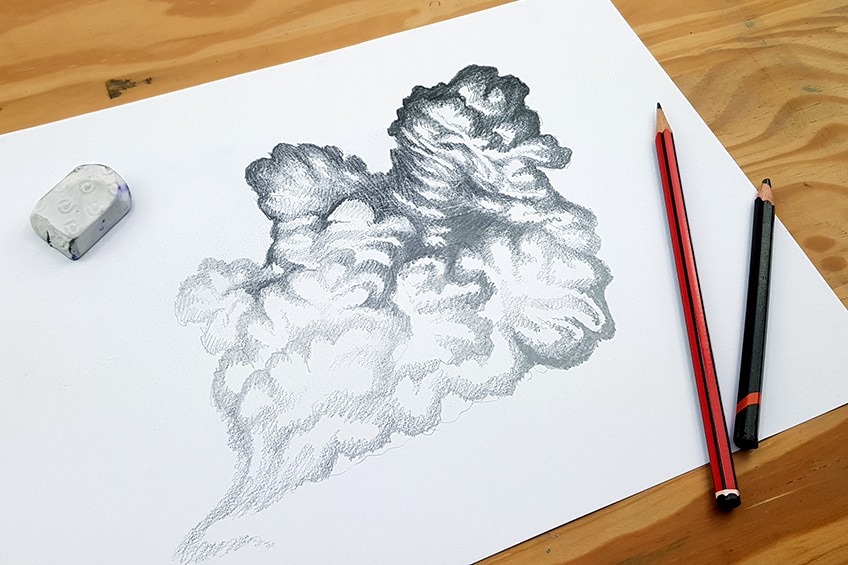
Step 1: Drawing the Outline of the Cloud of Smoke
We start by building up a cloud-like structure, we do this by using our HB pencils and drawing miniature cloud shapes stacked together. These are generally in the form of circular or oval shapes. However, you can give them more jagged lines as you draw them.
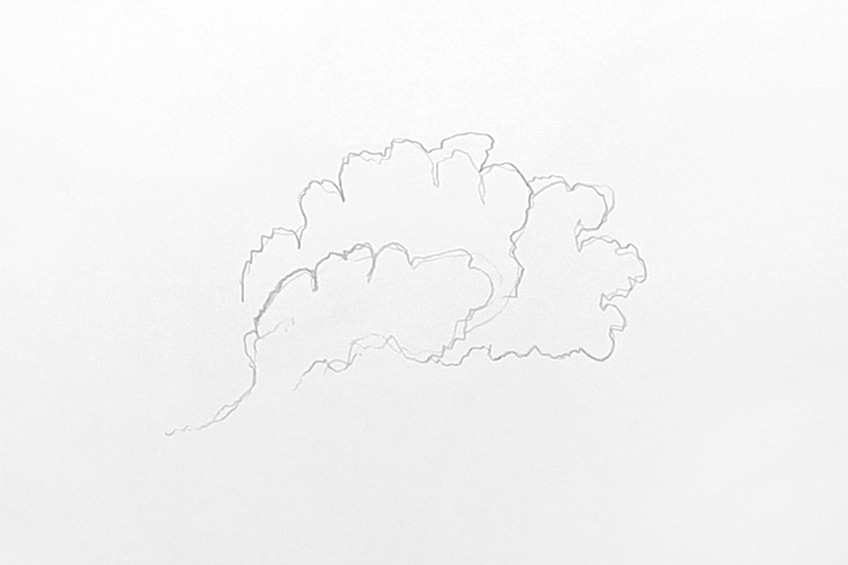
This will make it more mushroom-like as we build up the cloud of smoke.
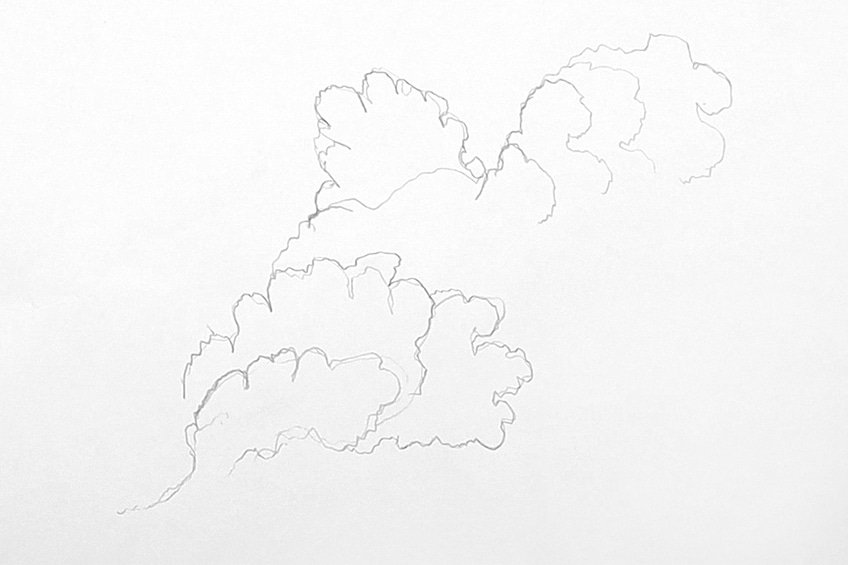
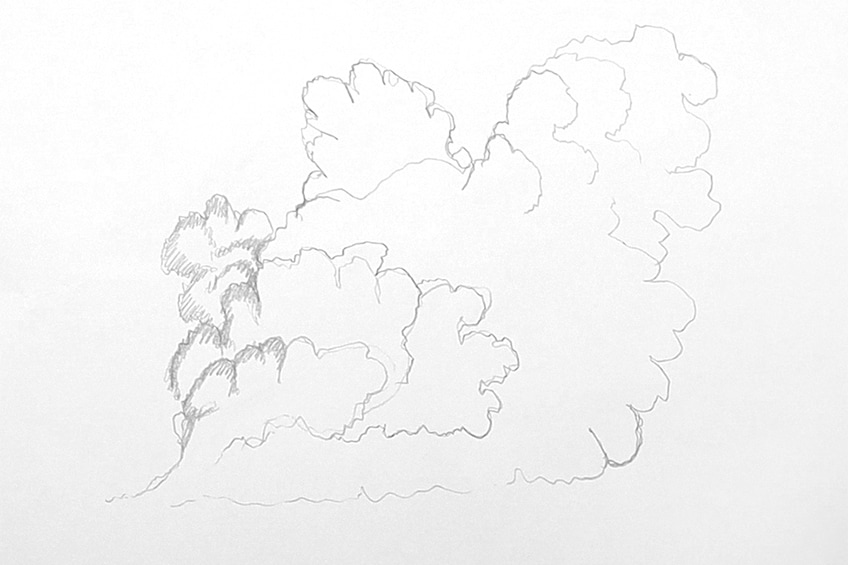
You can also decide how many little sections within your smoke cloud you would like.
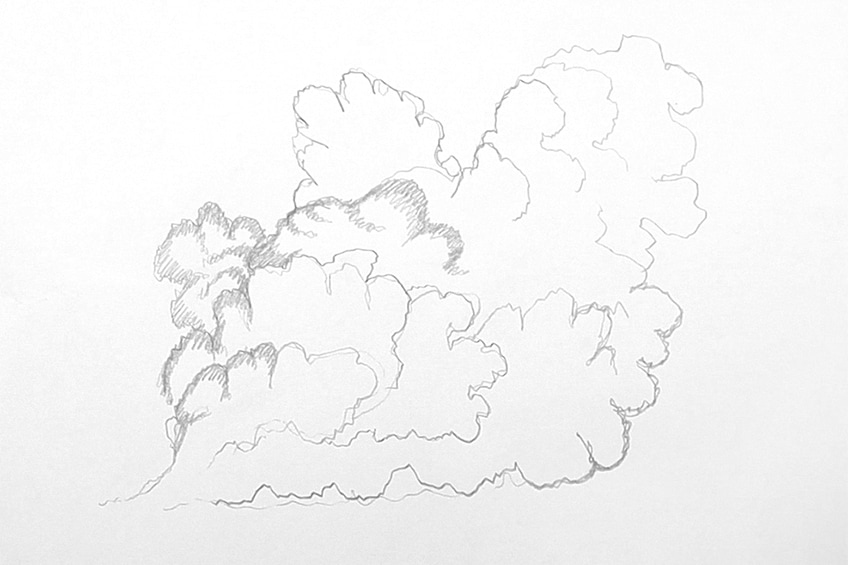
Step 2: Adding Light Shading
One important concept to consider with thicker smoke is how light interacts with the smoke. This means we want to have an idea from which direction a light source will be present. From there, we want to shade in the smoke cloud with that in mind.
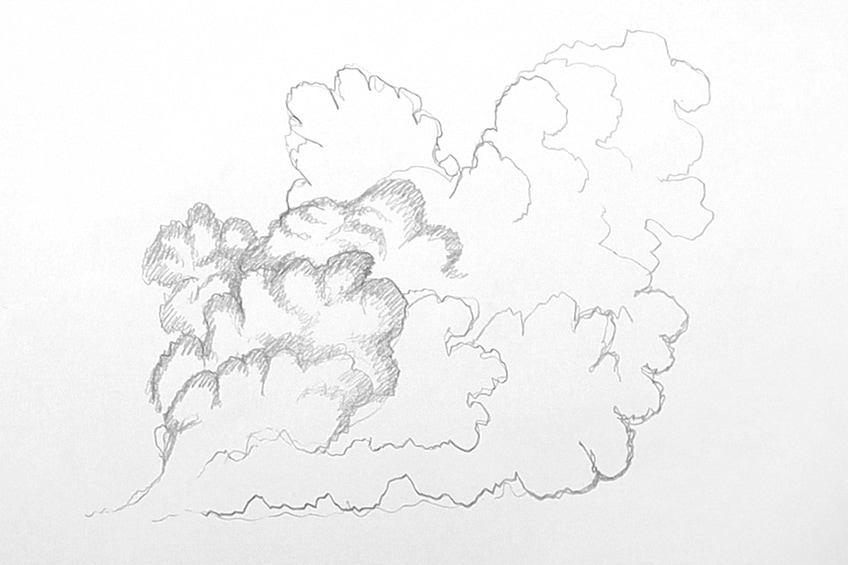
Don’t forget to also shade around the cloud.
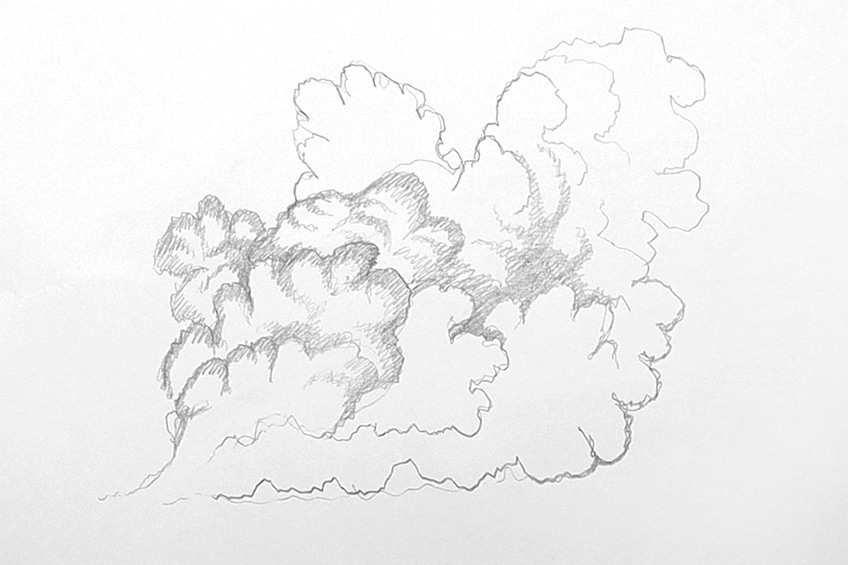
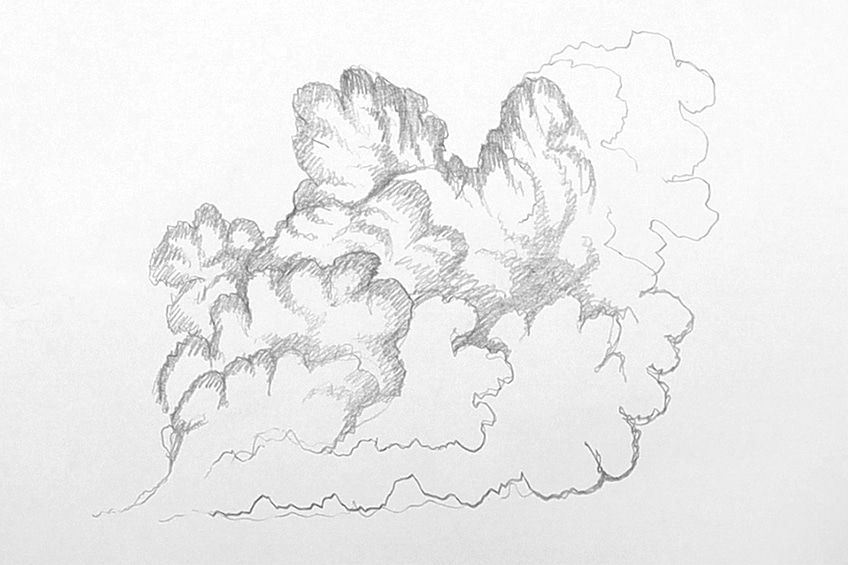
This is because it is the dark side of the smoke cloud.
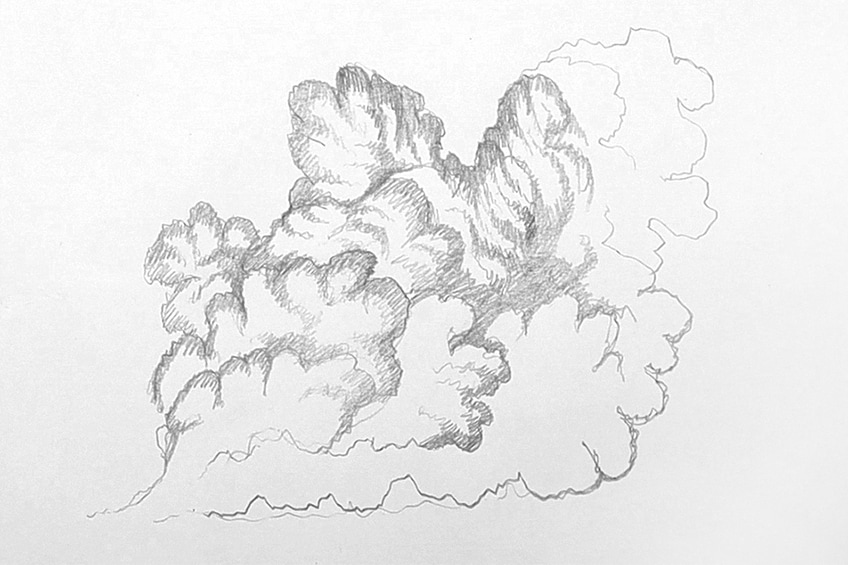
Step 3: Adding Darker Shading
We can now start using our 2B and 3B pencils to add darker shading within the clouds. This time, we want to move from the shadow side where the light source would be less present, slowly shading the cloud with darker tonal values.
This will suggest darker shadows within the cloud.
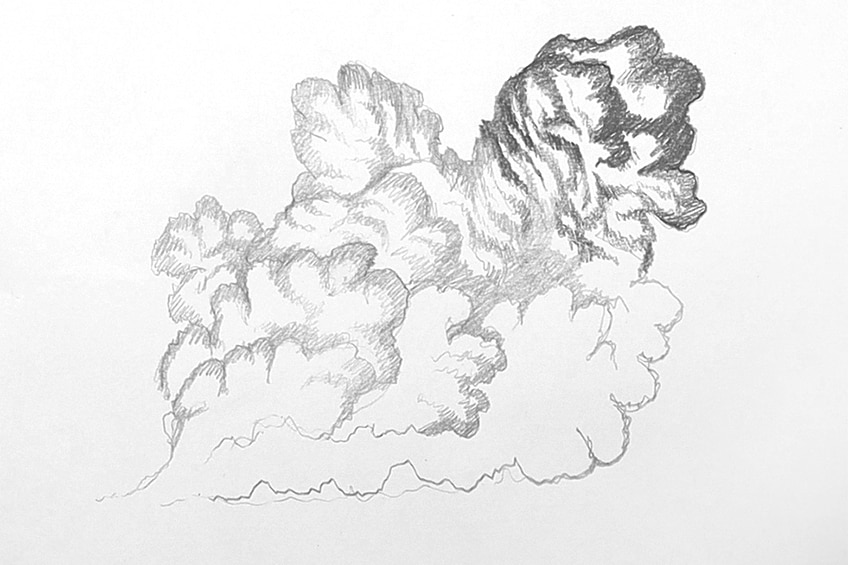
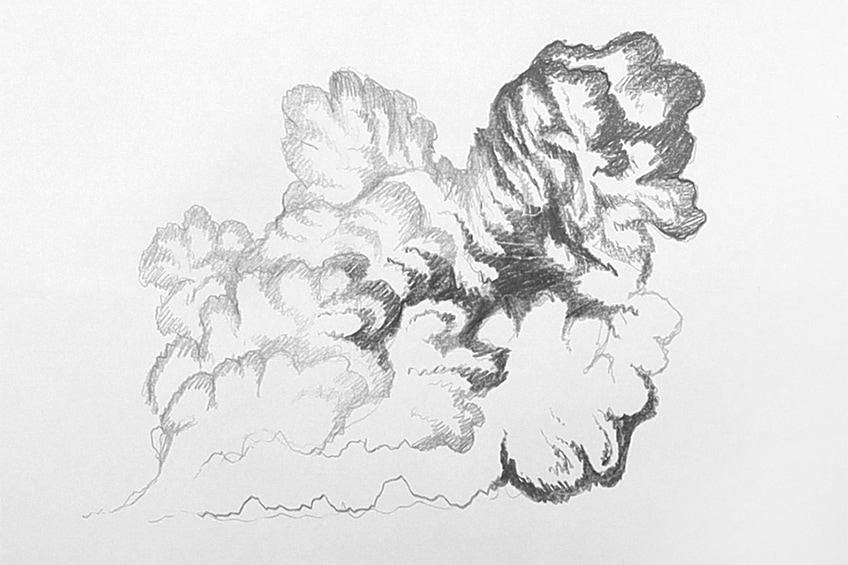
This will give the impression of dimension.
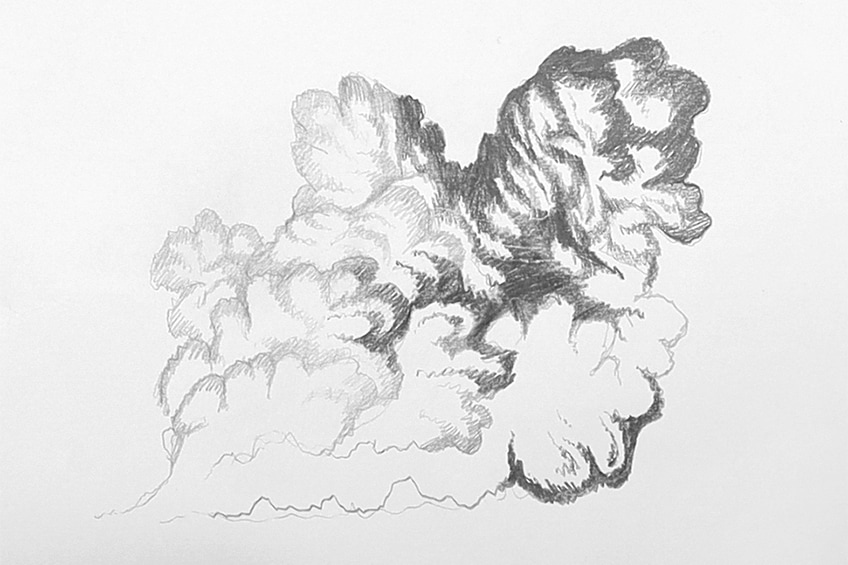
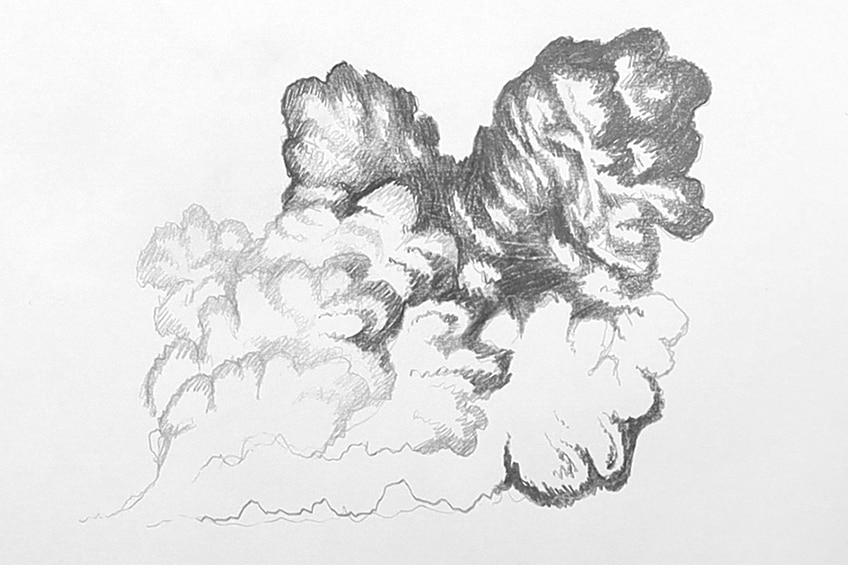
We want to have some moments in the light part of the cloud where there are darker moments of shadows.
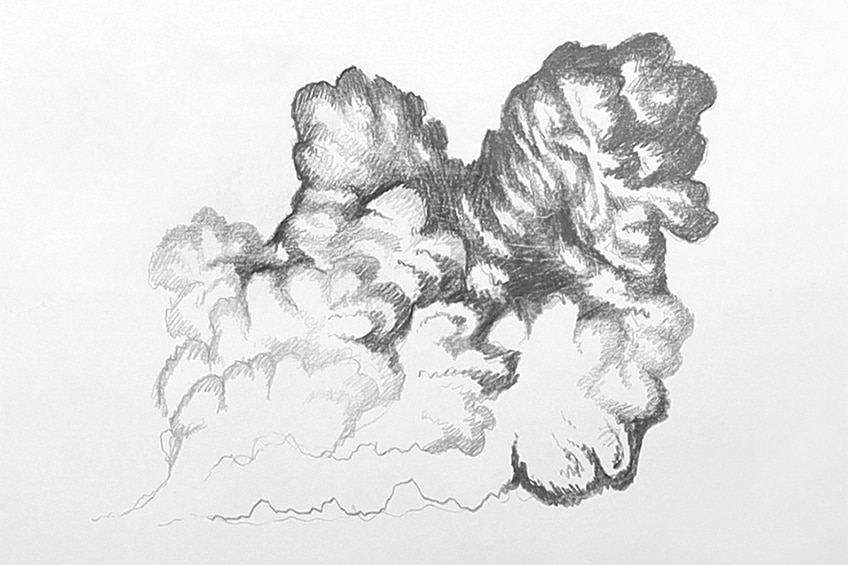
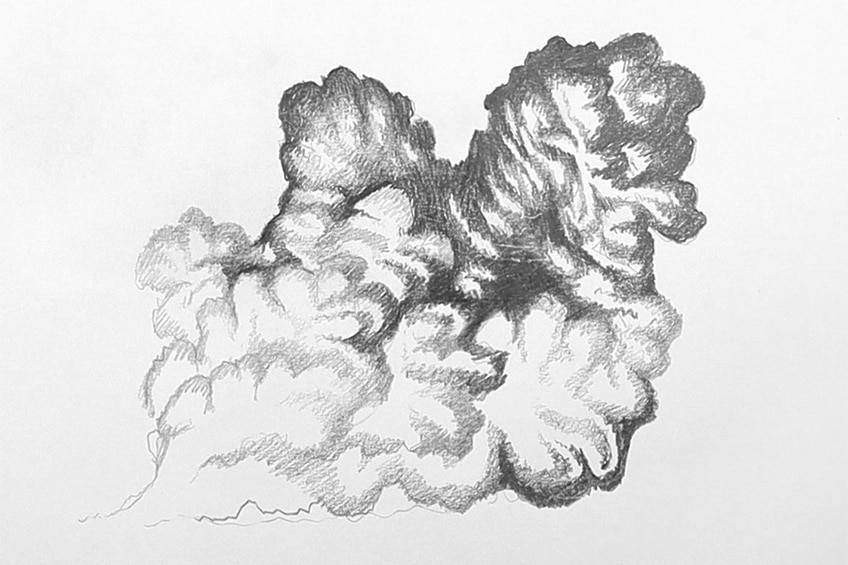
Take your time with both and play around with the process within your own smoke drawings!
Tips to Remember
- Be smooth with your lines. This applies more to the wispy style of smoke drawing, as it suggests a more natural movement within the smoke.
- Be jagged with your lines. This applies to the outline and formation of thick smoke, as it suggests a rumbling quality within the smoke that is unique to thick clouds of smoke.
- Remember the light source for thick smoke. This allows the smoke to create shadows on itself, which is essential to making smoke seem thick.
- Take your time. Work out how the shadows form in the thick smoke, and how you can create subtle shadows within the lighter wisps of smoke.
- Use references. Getting visual clues from internet resources is always a great way to help you figure out certain drawing techniques.
The process of learning how to draw smoke is not difficult, however, the form and structure of smoke are quite abstract and can take some time to get right. Smoke also is very morphable, which means its structure can change in various ways within a smoke sketch. Between the thicker dense smoke and light wisps of smoke, using some visual aids from the internet may be helpful to refer to. In this tutorial on how to draw smoke you learn the skills necessary to create smoke drawings in a simple way, so use this resource and have fun with how you apply it to other artworks.
Frequently Asked Questions
How Do You Make Smoke Look Thick?
Thick smoke often has a more jagged and harsh line structure, which means we want to make sure that the lines aren’t smooth. The way we start is by drawing a basic cloud shape, which we then will compartmentalize by drawing different sections within that shape. This means we will draw smaller cloud shapes within the larger cloud shape, and we will draw sections attached to the larger cloud shape to give the smoke an exploding effect. Two key points to remember are the light source and how this creates shadowing within the smoke. The second is how we add shading to the smoke to represent the shadows. The way we draw the shadows within thick smoke is by shading along the lines of each partition within the cloud, this way the bulk of the cloud seems light both thick enough to cast shadows on itself. This is the key part of drawing thick smoke and will create a realistic smoke drawing.
How Do You Make Smoke Look Light?
Drawing soft wisps of smoke is a completely different approach to drawing smoke. Creating a light and soft smoke sketch starts with creating a set of curved lines that flow in different directions. From there the intention is to shade around those lines, with the intention of creating a ribbon effect. We do this by creating strands within the curved lines with only shading. This means that there are moments where the lines will be distinct, such as when you draw the curved lines at first. However, you also want seamless moments of shading that flow along the curved drawn lines, giving the impression of evaporation or fading of the smoke. The aim is to create a combination of hard lines with soft shading, which results in a fade-away effect within the smoke. Something important to remember is that you also don’t want to do too much with wispy smoke as it can then start to look a little strange. Lastly, these lines and smooth shading marks should all come from a single point and disperse more widely as they move up, somewhat like a miniature mushroom cloud shape.
Matthew Matthysen is an educated multidisciplinary artist and illustrator. He successfully completed his art degree at the University of Witwatersrand in South Africa, majoring in art history and contemporary drawing. The focus of his thesis was to explore the philosophical implications of the macro and micro-universe on the human experience. Matthew uses diverse media, such as written and hands-on components, to explore various approaches that are on the border between philosophy and science.
Matthew organized various exhibitions before and during his years as a student and is still passionate about doing so today. He currently works as a freelance artist and writer in various fields. He also has a permanent position at a renowned online gallery (ArtGazette) where he produces various works on commission. As a freelance artist, he creates several series and successfully sells them to galleries and collectors. He loves to use his work and skills in various fields of interest.
Matthew has been creating drawing and painting tutorials since the relaunch in 2020. Through his involvement with artincontext.org, he has been able to deepen his knowledge of various painting mediums. For example, watercolor techniques, calligraphy and lately digital drawing, which is becoming more and more popular.
Learn more about Matthew Matthysen and the Art in Context Team.


