


How to Draw a Boy – Easy Portrait Drawing Guide
Learning how to draw a boy is a unique drawing exercise because there are subtle differences that distinguish masculine and feminine features. In many ways, drawing a boy is the same as drawing a girl but the real challenge comes in noticing the little difference that distinguishes the two. Knowing how to create a boy sketch is a great skill to have because it can be incorporated into so many different drawing ideas. It also develops your attention to detail, making it a subtle art as it develops a keen eye for finer details. However, an artist utilizes this particular subject matter in their own practice it comes with so many benefits there learning how to draw a boy is an essential task for every artist.
An Easy Guide to Drawing a Boy With Colored Pencils
In this tutorial on how to draw a boy, we will be drawing a colored portrait of a boy’s face. We will slowly construct the face starting with a diagrammatical pencil sketch, allowing us to place the different features correctly within the face. From there, we will go through each of the features, slowly refining them with a pencil. We will then proceed by adding color to the face, exploring different color combinations for different parts of the face.
Lastly, we will work with some ballpoint pens to enhance and add contrast to certain features. Now that we know what to expect, we go through the different steps in this tutorial on how to draw a boy.
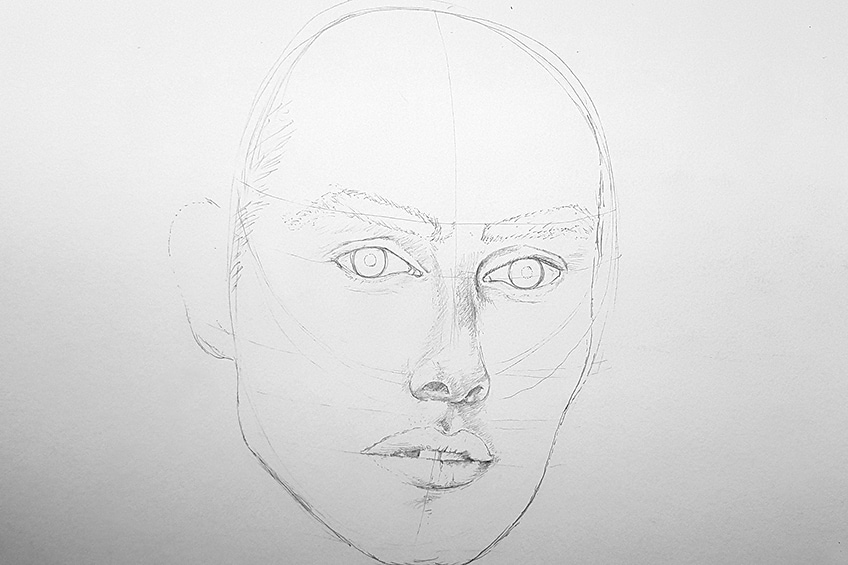
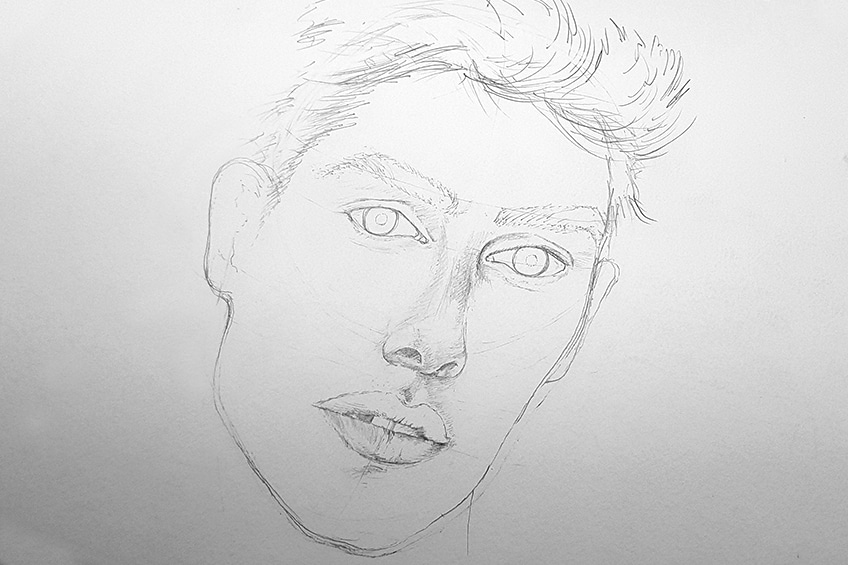
Step 1: Sketching the Face
We want to start by creating a basic boy sketch, starting with a basic head shape. We draw this as an oval shape with a smaller circle positioned at the top of the head. We then can add in five horizontal lines to indicate the position of the various features of the face.
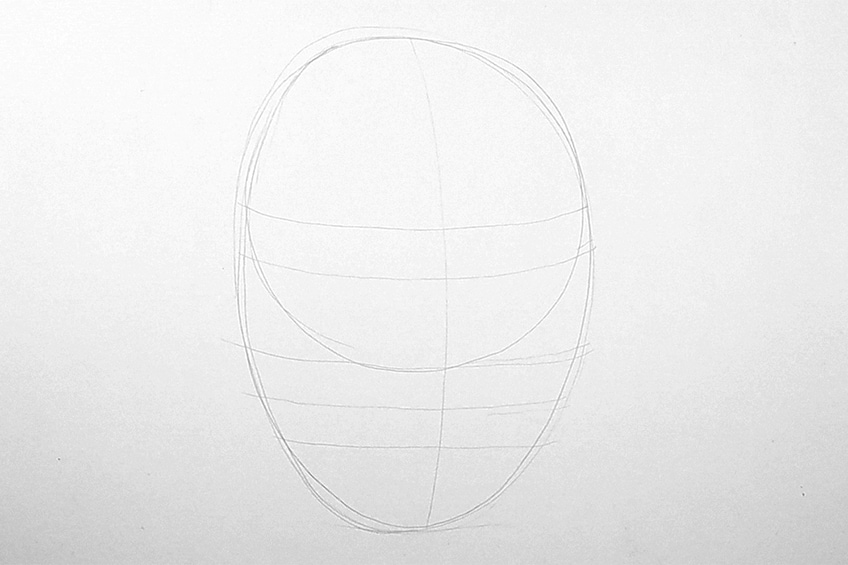
A good way to test out the size and proportions is to sketch the nose quickly, which should be positioned just above the small circle. If it seems too large or too small, you can simply erase and adjust the guidelines.
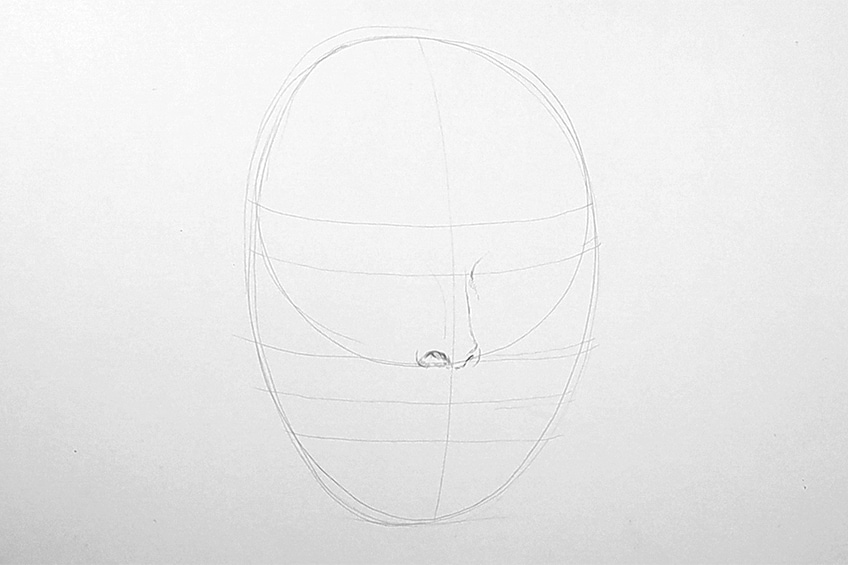
Once we feel that our head shape and guidelines seem proportional, we want to start with the eyes. We will want to draw the face from a slight angle to give it more nuanced characteristics. Make sure you think through subtle distortions in details that are furthest away.
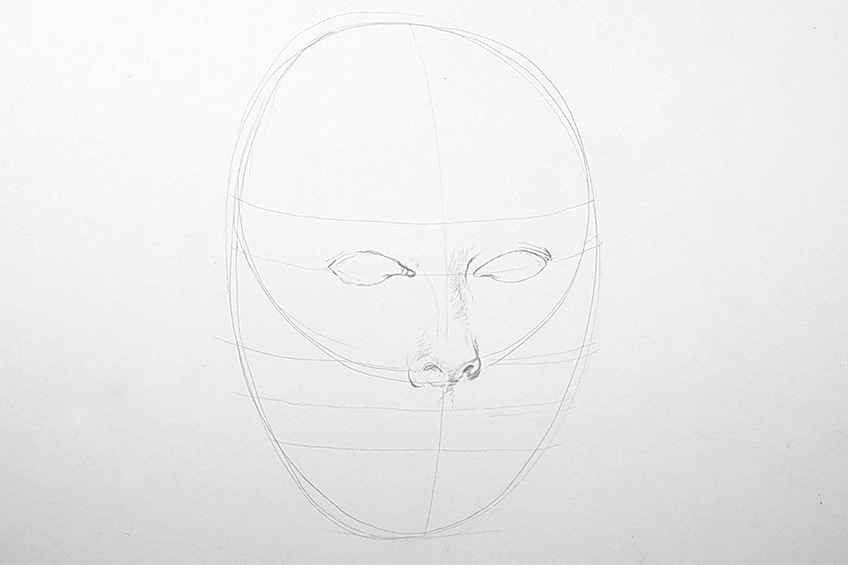
Sketching the face should take time, and we want to focus on single features for a good portion of time before moving on to the next. We want to make sure we use the guidelines to position the different features and consider the subtle distortions in size because the face is drawn from an angle.
An effective way to give the features a more masculine quality is to make the eyebrows slightly more disheveled and thicker.
For the eyes, we want to keep them more arrowhead shaped rather than rounded and the nose’s ridge can protrude slightly more.

We really want to take our time working out the different features and placing them in their correct spaces. With the nose we want to make sure the ridge protrudes slightly and that the furthest nostril is slightly smaller due to the perspective.
As we come to the mouth area, we want to make sure that there is a decent indentation between the upper lip and the bottom of the nose. We want to make sure that the upper lip is slightly smaller than the bottom lip.

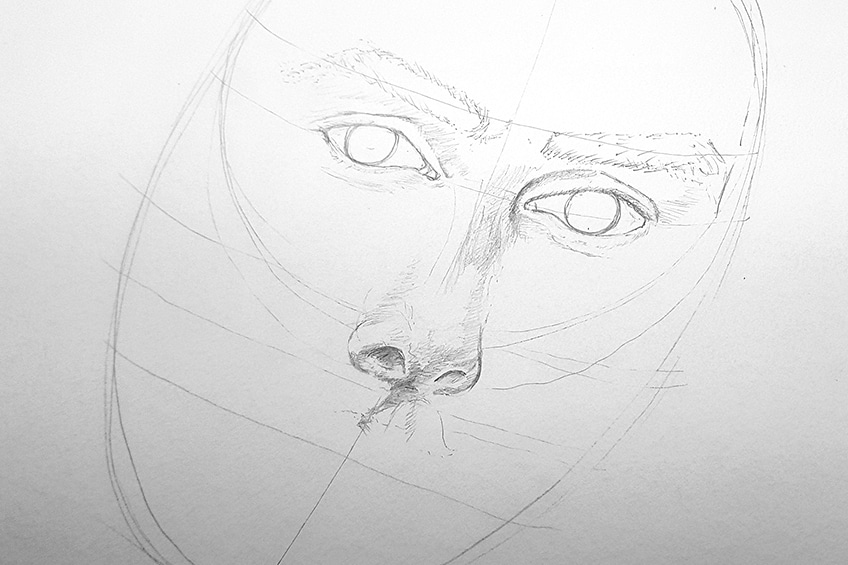
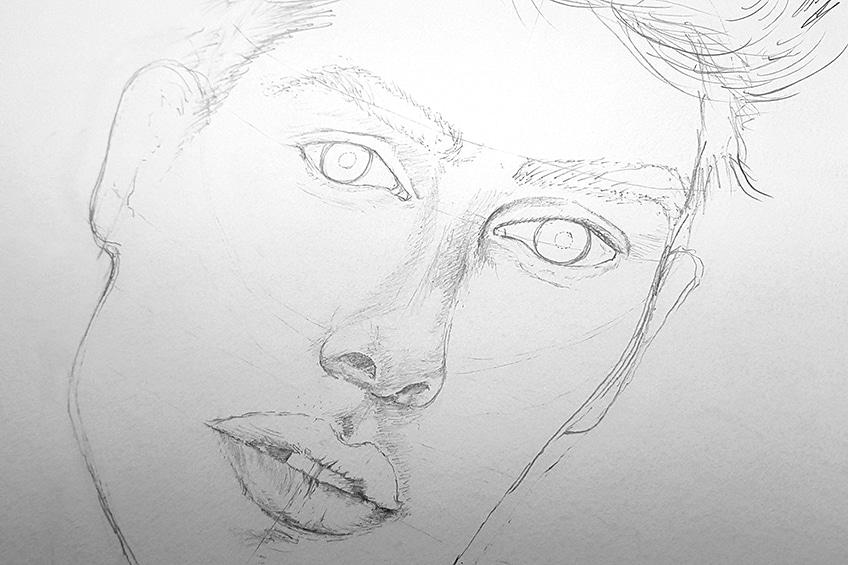
Step 2: Refining the Sketch
Once we have the general positioning of the facial features, we want to start forming the facial structure and refining the facial features. Starting with the jawline, we want to make sure that we give the boy drawing quite a strong rounded chin and a distinct jawline.

We also want to refine the lips with some light shading, making sure they are positioned correctly according to the angle the face is viewed from. We also want to spend time on creating a strong jawline, which is a really great way to create a masculine quality within a boy drawing.
At this point, we want to take time going through all the features, using both our pencils and eraser to slightly tweak and refine the details in the face. We want to consider the angle of the face and how that subtly distorts features.
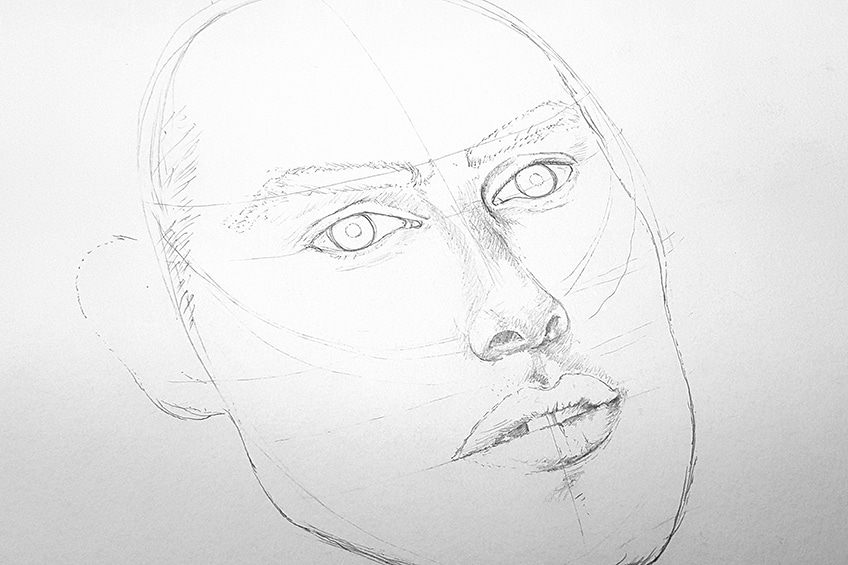
We also want to make sure that the bottom of the earlobes falls along the same horizontal plane as that of the bottom section of the nose. The top of the ear should fall along the same horizontal plane as that of the eyes.
Take your time going through the sketch making sure the eyes are positioned correctly, and how the eyelids form around the eyes, or how long the nose is and how wide the nostrils are. Try to think through all the little details at this point before we start adding in color.
Another aspect of the face that we want to create suggestive marks for is the hair and hairline. We want to remember that the hairline should come near the top of the fore had and not sit on top of the head. We can also add marks around the head to suggest how voluminous the hair is.
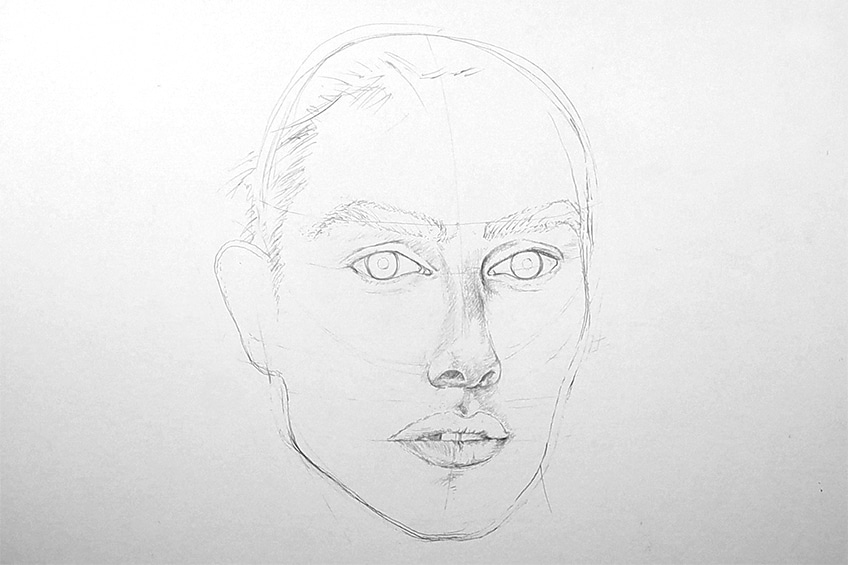
Before we move on to adding color, we want to scan over all the details of the face to make sure that we haven’t missed anything. We want to consider all the features of the face and how they might be proportionally correct or incorrect.
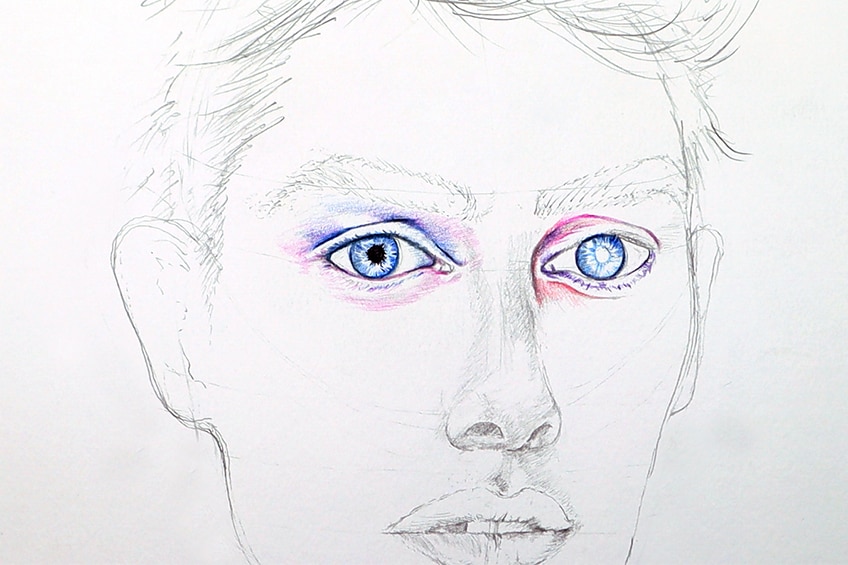
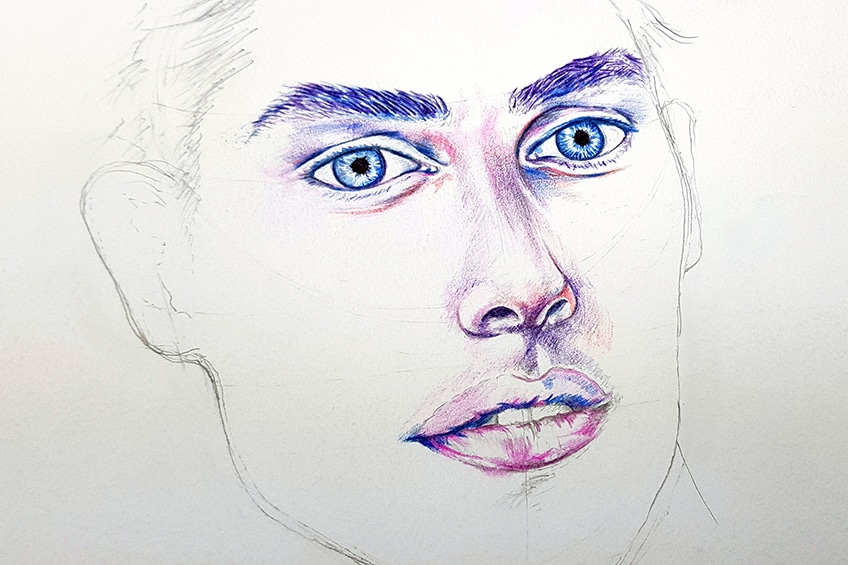
Step 3: Adding Color to the Upper Face
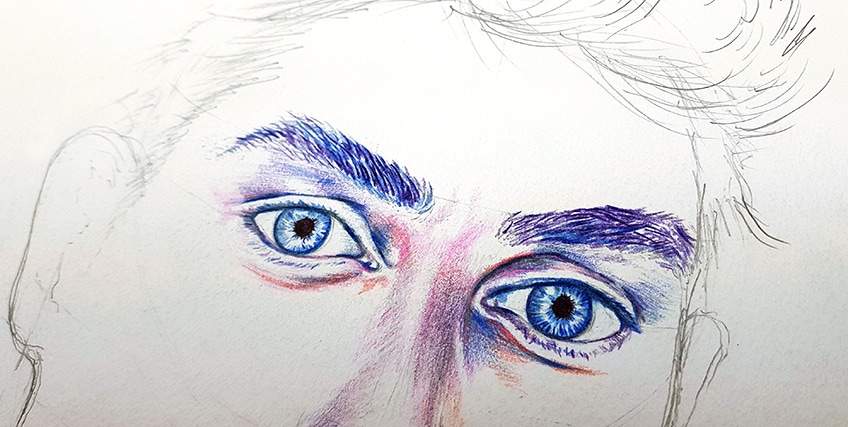
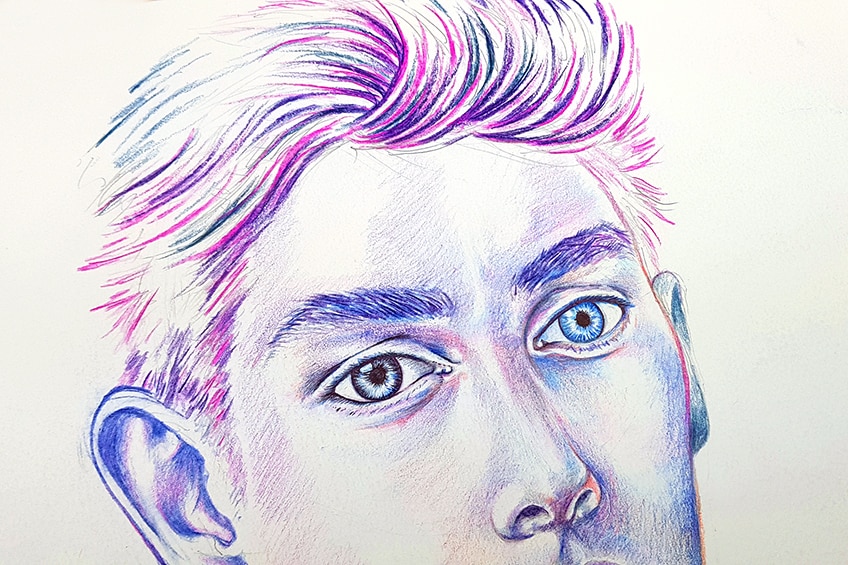
We want to start with the eyes because the eyes are the most complex aspect of the face. Use your Derwent pencils and consider what color you would like the eyes to be, and then proceed to color them lightly.
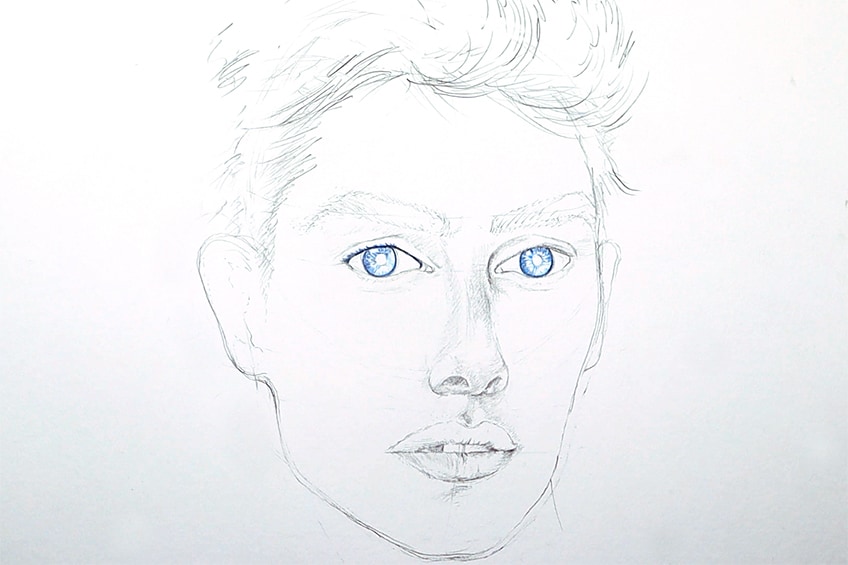
We want to use a combination of light, medium, and darker colors, which can be your choice. As we work on one eye, we want to add darker colors around the shadowed areas and lighter colors near the areas that protrude and have more light exposure.
We want to allow ourselves to explore color combinations whilst thinking about the laws of light and shadow. If details are naturally darker due to less light exposure, consider using a darker color to shade in those areas.
We can really allow ourselves to use any color combinations we want, the only thing we need to think about is how light and shadow are formed on the face. From here, we can shade as we would with normal pencil but instead, we can use darker or lighter colored pencils.
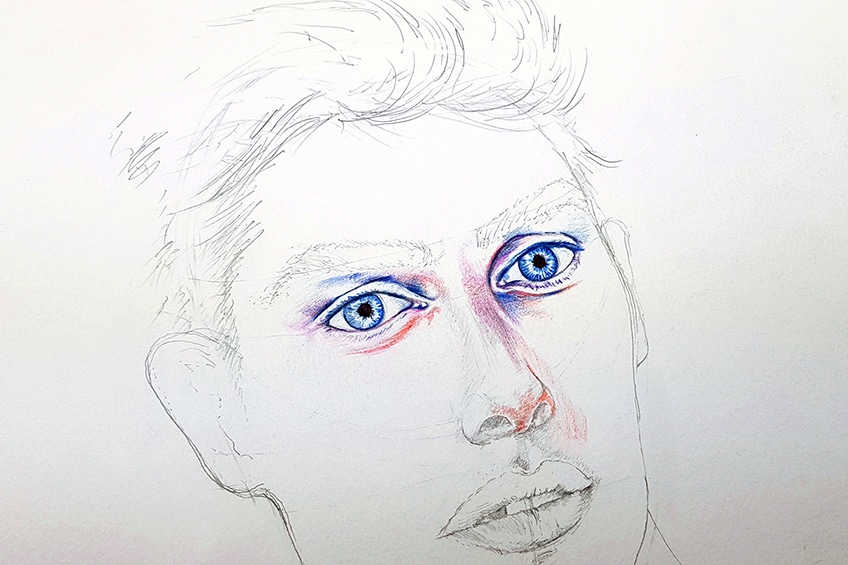
Spend time on the eyes, thinking about how the eyes are darker under the eyebrow ridges and lighter under the eye. Allow yourself to blend colors, to create seamless gradients between darker and lighter areas. As you proceed to shade the face using colored pencils, you will find that the blending of the colors can allow you to fade from one color to the next. This is great for transitioning to new features within the face, such as from the eyes to the nose.
We want to also consider using a darker color for the eyebrows; however, a good suggestion is to first use a light undertone. This is when we use a lighter colored pencil than a darker one to give a more detailed quality to the drawing.
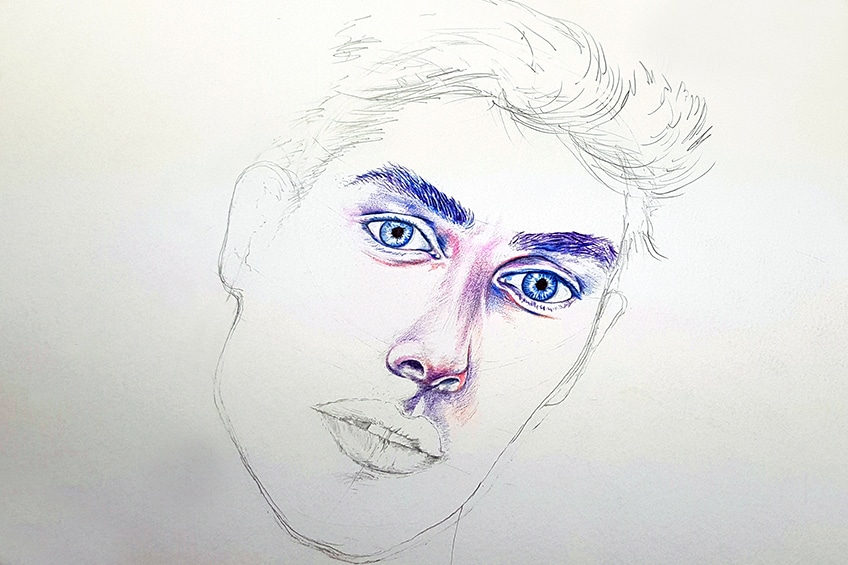
As we color on the face with our pencils, a good suggestion is to keep a consistent color tone. You can allow certain features to have other colors but keeping a general color tone will give you more confidence in creating lighter and darker moments.
As you are using predominantly three colors, you will also get used to different colors being used to achieve different effects on the face.
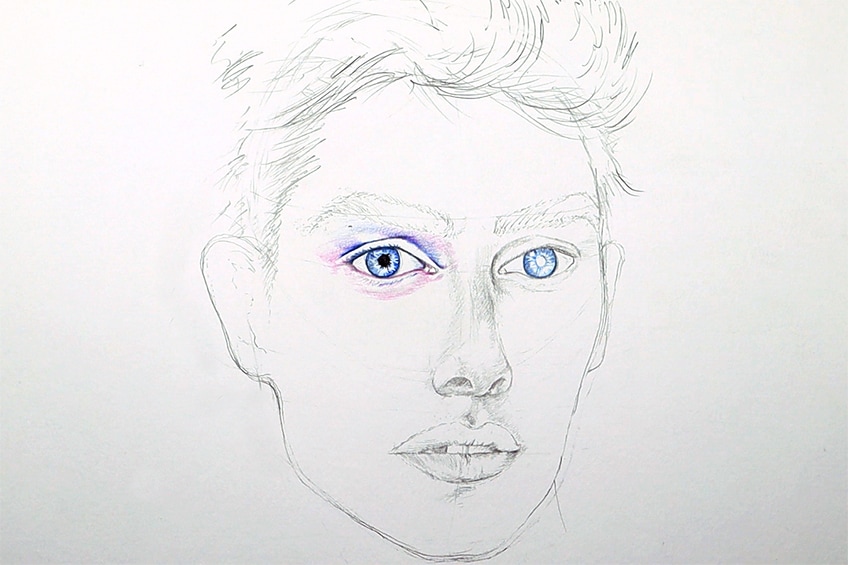
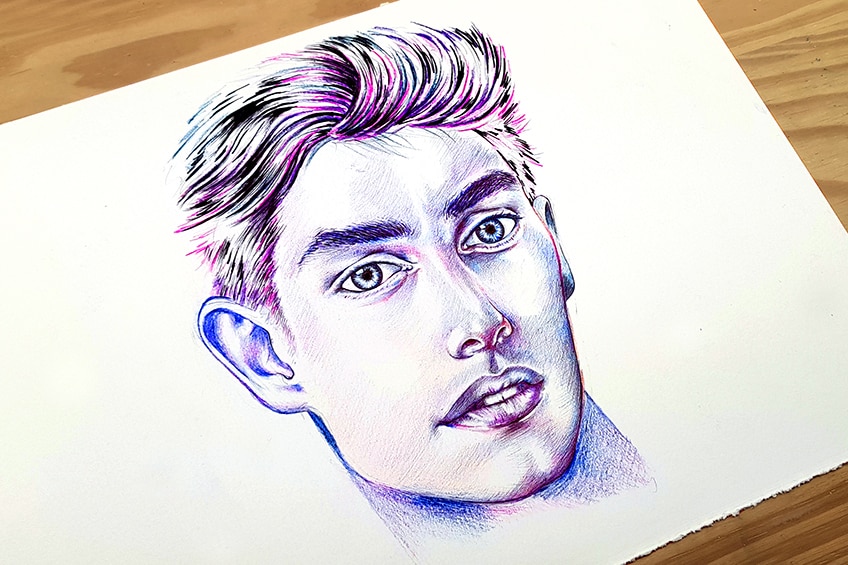
Step 4: Adding Color to the Lower Face
We now want to focus on the lips area, whereby we shade one side of the philtrum darker than the other to suggest shadowing. We also want to work with a light color to set the undertone on the lips.
Lips are generally slightly different in tonal value, which means one is slightly darker than the other. The upper lip is general darker because it’s angled downwardly, which creates a shadow on the upper lip.
Using both light and darker colors, first set the areas of shading with your light pencil, and then go over the areas where the lips would be darkest.
We also want to consider leaving negative space in the bottom lip to suggest highlights, as the bottom lip is generally more exposed to light giving it a reflective quality. Once you have set the shading areas within the lips, you can then start to work slowly with darker pencils to add more details and linework.
Also consider the areas within the mouth that would be darkest and how those shadows differ, between, the top lip, bottom lip, and inside of the mouth. We can also start to add shading around the face.
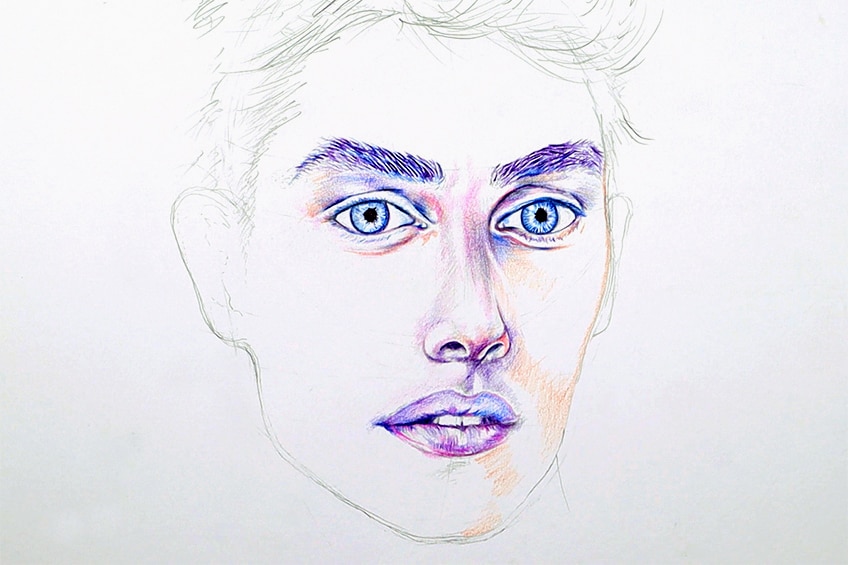
Again, we really want to consider light and shadow as our guiding forces for shading. This will allow us to set the darkest shadows on the face that would be least exposed to light. The side of the face that is furthest is generally the darker side of the face.
Try working with the light, medium, and darkest colors that you have chosen when shading the face. Again, set an undertone with a lighter color first to establish shading positions.

Consider how details of the face that protrude will cast shadows behind them, such as the nose or the subtle bulges around the lips. This is a concept to consider especially when shading around the lower nose area.
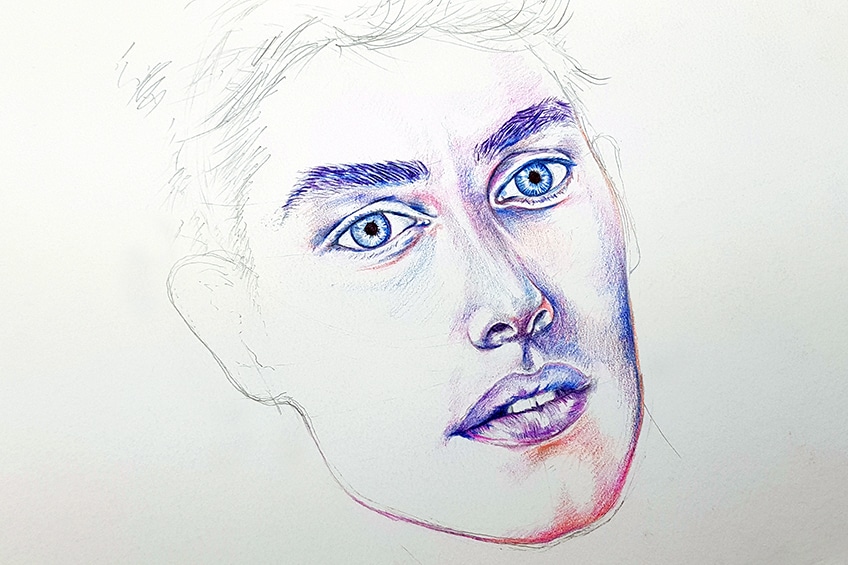
Step 5: Adding Color to the Face and Hair
Take your time working color into the face and around the face. As we continue with adding color, we want to start adding in some suggestive strokes within the hair to suggest flow and shape.
As we shade around the face, we want to consider adding darker shadowing to the neck below the jaw. Refining the jawline with darker lines is another great way to emphasize the masculine aspect of the face.
We can also consider how we shade along the forehead, giving the boy sketch some subtle wrinkles near the forehead for more expressive movement.
Step 6: Adding Pen Shading to the Facial Features
Starting with the eyes again, we want to use our ballpoint pens to go over certain details in the eyes. We want to avoid overpowering the coloring, but we do want to add in some dark pen lines to emphasize the contrast.
Again, we really want to take our time with each aspect of the face, making sure that we spend a good time on the different features within the face. Another great way to keep the eyes slightly more masculine is to not add too much line work into the eyelashes.

We really want to use our ballpoint pens strategically, whereby we try to emphasize details with subtle pen shading and line work. We can do this in the eyebrows by adding strokes into the brows to both refine their shape and darken them a little.

Take your time on the eyes area, slowly working in subtle shading around the eyelids and under the eyebrows. We can also refine the eye lines and darken any shadows if necessary. We want to slowly work our way through the face just as we did with the colored pencils. Starting with the eyes, we can move through the nose, paying close attention to the shadowed areas that form beneath and around the tip of the nose.
As you come to the mouth, we want to be subtle with our pen marks. We have already established all the light and darker areas of the lips, so we now want to simply emphasize any shadows with some light pen shading.
With the nose and lips area, we really want to take our time with how we add shading to the darkest areas. Don’t press too hard with your pen; treat it as a pencil shading process whereby you consider the pressure applied to the pen.
The lower mouth area, such as the chin is another great place to work with your shading to form a more masculine chin. Consider how your shading can create subtle indentation near the chin to suggest a strong jawline. Slowly work your way through the face as you had done so with your colored pencils, taking your time adding in shading. Again, some areas will be more exposed to light than others, so make sure you remember this when shading.
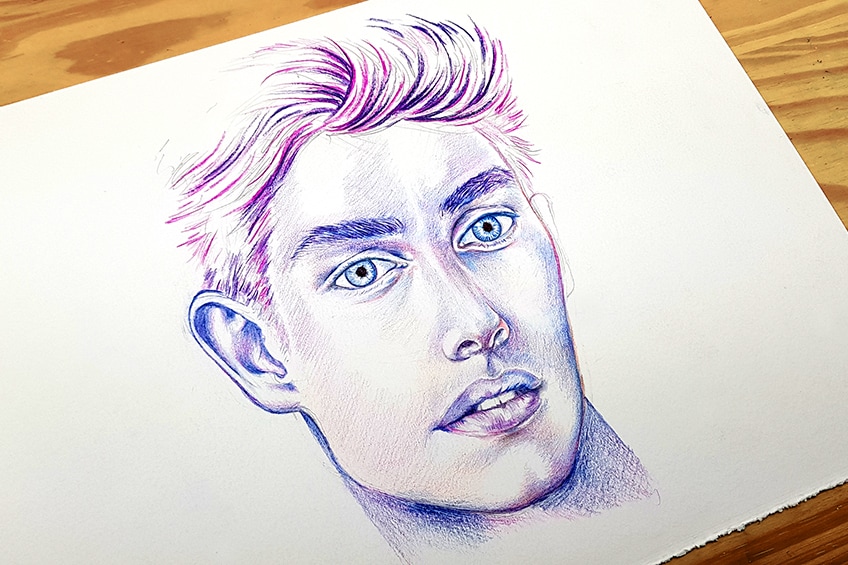
Step 7: Adding Pen Shading to the Hair
As we start to come around the face and subtly add pen shading to the face and forehead, we now want to transition to the hair. We want to use both our markers and pens to create strokes within the hair structure.
We can do this by adding in darker strokes with a marker flowing in the direction that the hair is formed. We then can use our ballpoint pens to add smaller strokes between the marker strokes to create a variety in the linework.
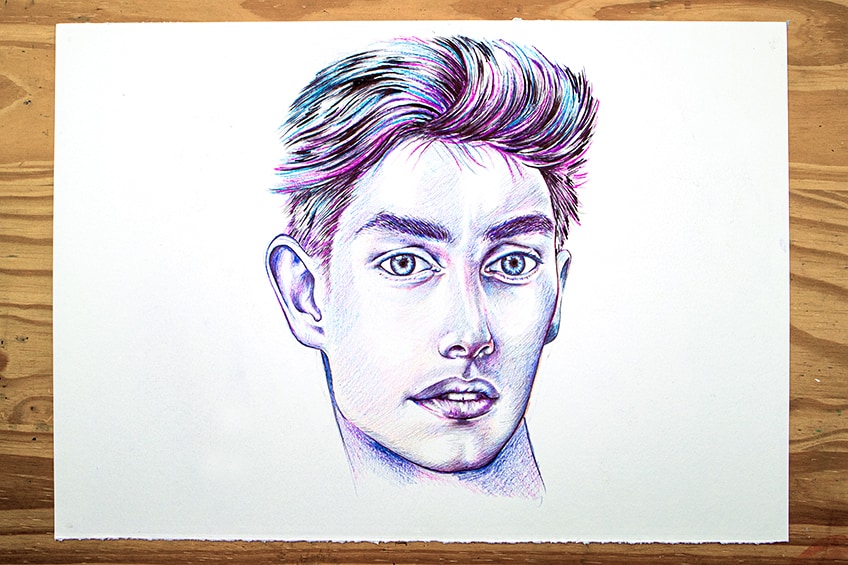
Take your time using both your marker and pen to create a variety of stroke thicknesses that flow in the direction that the hair is formed. Having both thick and thin strokes will give the hair more depth.
You want to make sure you take your time with the hair and keep your movements continuously flowing in the same way. You can have directional change within the hair flow but make sure it makes sense with how the hair sits on the head.
Step 8: Last Little Tweaks
Now that our drawing is basically done, we want to make sure we go through our drawing one last time. We want to make sure that the features have all been attended to and that we have added shading in the correct areas.
And there you have it, how to draw a boy in a few simple steps! This is quite a unique drawing process but it provides you with a unique set of drawing skills to take your drawing to the next level.
Tips to Remember
- Work through a single feature at a time. A realistic boy drawing takes time, so make sure you work through the features with attention to detail.
- Explore color variations. Try to choose the main color scheme and utilize the skill of light, medium, and darker tonal values for a realistic effect in your shadows.
- Spend some time on the eyes. Eyes are always complicated, so make sure you spend a good time on them.
- Consider the perspective of the face. Drawing a face from an angle is going to create subtle distortions within facial features- we want to be mindful of this when drawing.
- Use a reference if you need one. This tutorial doesn’t use a reference, but the process is applicable to any face when learning how to draw a boy’s face.
- Take your time. Take your time, and have a break when you need to. Drawing takes time and taking breaks is important when you feel tired.
A realistic boy drawing is a great challenge because it really requires attention to detail. The subtle differences in the jawline, chin, lips, and various other features are tricky and take time to capture correctly. The color exploration is another great part of drawing a boy because it allows you to see what color combinations complement the facial features. This tutorial gives you a lot of different tools to work with when learning how to draw a boy’s face that can be utilized in your artwork.
Frequently Asked Questions
How Do You Draw Masculine Features in the Face?
Emphasizing the masculine aspects of a youthful facial structure is tricky because in many ways, there are subtle differences between teenage boys and girls. In many cases, what makes a boy sketch more masculine is the jawline and brow ridges. The jawline is a great way to emphasize the masculine quality of the boy’s drawing. The brow ridges are also often more prominent and harsher than that of a female’s facial structure. However, it is also a matter of all these aspects and more that work in conjunction with one another to create a masculine quality within the face. We also want to think about how all these features work in tandem with one another to create a masculine effect within a boy sketch.
How Do You Color in the Different Facial Features?
There are many ways to color a face. However, working with different color combinations will result in different effects. To create a warmer blood-filled face, working with reds, pinks, and oranges as dominant tones can give the face a warmer quality. That being said, incorporating blues and purples in conjunction with red as a base color will add more variety to the face and accentuate the reds. Another aspect to imagine is how different colors work within different areas of the face; for instance, having blues around the eyes to give them a deep quality or perhaps pinks in the lips to make them plumper. Working with color is a matter of experimentation and blending colors is also a great way of creating more complex color values in the face.

Matthew Matthysen is an educated multidisciplinary artist and illustrator. He successfully completed his art degree at the University of Witwatersrand in South Africa, majoring in art history and contemporary drawing. The focus of his thesis was to explore the philosophical implications of the macro and micro-universe on the human experience. Matthew uses diverse media, such as written and hands-on components, to explore various approaches that are on the border between philosophy and science.
Matthew organized various exhibitions before and during his years as a student and is still passionate about doing so today. He currently works as a freelance artist and writer in various fields. He also has a permanent position at a renowned online gallery (ArtGazette) where he produces various works on commission. As a freelance artist, he creates several series and successfully sells them to galleries and collectors. He loves to use his work and skills in various fields of interest.
Matthew has been creating drawing and painting tutorials since the relaunch in 2020. Through his involvement with artincontext.org, he has been able to deepen his knowledge of various painting mediums. For example, watercolor techniques, calligraphy and lately digital drawing, which is becoming more and more popular.
Learn more about Matthew Matthysen and the Art in Context Team.
Cite this Article
Matthew, Matthysen, “How to Draw a Boy – Easy Portrait Drawing Guide.” Art in Context. September 28, 2022. URL: https://artincontext.org/how-to-draw-a-boy/
Matthysen, M. (2022, 28 September). How to Draw a Boy – Easy Portrait Drawing Guide. Art in Context. https://artincontext.org/how-to-draw-a-boy/
Matthysen, Matthew. “How to Draw a Boy – Easy Portrait Drawing Guide.” Art in Context, September 28, 2022. https://artincontext.org/how-to-draw-a-boy/.


