Photography Basics – Capturing the Moment
Photography is a universal language that transcends cultures and generations, and it all begins with the essential photography fundamentals. When you are just beginning photography from the ground up, it can often be a nerve-wracking experience for anyone just starting out. However, this photography guide is your gateway to mastering the craft. From understanding the basic principles of composition to navigating the intricacies of your camera settings, this photography tutorial will illuminate the path to photographic excellence. So, let us embark on this enlightening journey into photography for beginners, where creativity knows no bounds!
Photography Guide to Terminology
When embarking on the captivating journey of photography for beginners, one quickly discovers that a rich tapestry of terminology weaves through the very fabric of this art form. Understanding this photography guide to terminology to terminology is your gateway to unlocking the intricacies of beginning photography and mastering photography fundamentals. Each term unveiled in this photography tutorial is a brushstroke on the canvas of your photographic knowledge, illuminating your path toward visual excellence.
Join us as we delve into the world of photography basics, where mere terms become the building blocks of stunning imagery, and the language of light and composition finds its voice.
Shutter Speed
Shutter speed in photography is the heartbeat of your camera, a fundamental concept in the realm of photography basics. It determines how long your camera’s sensor or film is exposed to light for, enabling it to capture a moment in time. This crucial parameter plays a pivotal role in shaping the outcome of your photographs, enabling you to freeze fast-paced action or create mesmerizing motion blur. Understanding the relationship between shutter speed, aperture, and ISO forms a solid foundation upon which you can get to grips with photography fundamentals. A fast shutter speed, such as 1/1000, is ideal for shooting sports, wildlife, or any fast-moving subject with absolute clarity, while a reduced shutter speed, such as 1/30, can turn a flowing river from a static image to a silky, dreamlike cascade.
Mastering the art of choosing a shutter speed that is appropriate for your scene is one of the key elements to conveying your creative vision in all its glory.

Moreover, experimentation with shutter speed allows for the creation of stunning long-exposure shots, revealing star trails in the night sky or capturing the hustle and bustle of a city as streaks of light trailing across the frame. In the world of photography basics, shutter speed is your brushstroke on the canvas of time, offering a spectrum of possibilities to paint your photographic narrative.
Aperture
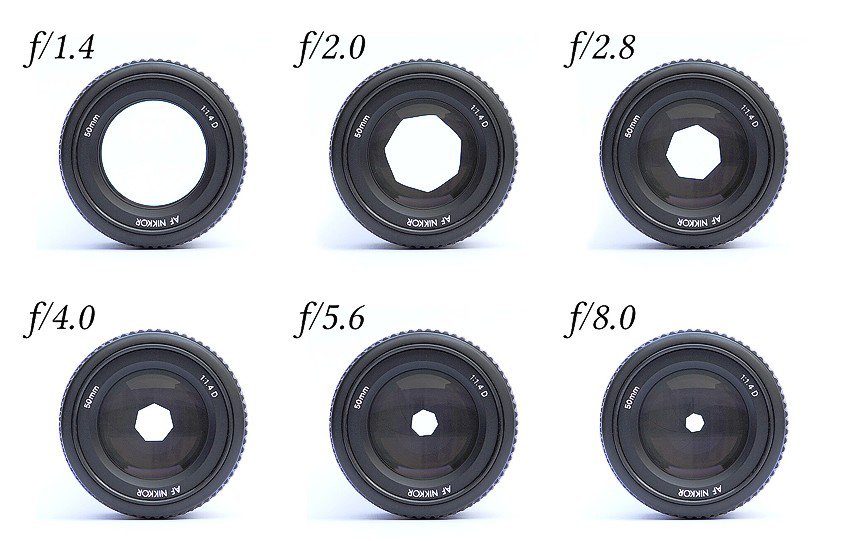
Your camera’s aperture is like the conductor of light, a fundamental element within the symphony of photography basics. It is the opening within your camera’s lens, which is adjustable in order to allow for optimal control over the amount of light that enters the camera, impacting the strength of the depth of field in your images. This fundamental aspect of photography allows you to determine what is in sharp focus and what lies in the gentle embrace of a beautiful blur.
Understanding the nuances of aperture, alongside shutter speed and ISO, forms the cornerstone of photography fundamentals.
A wide aperture, often represented by a low f-number like f/1.4, will deliver a shallow depth of field, isolating your subject from its surroundings, creating those dreamy, background-blurred portraits. On the other hand, a narrow aperture, one with a high f-number such as f/10 or higher, extends the depth of field significantly, which is the perfect choice for capturing landscapes or scenes where you want everything from the foreground to background to be in sharp focus.

Mastery of aperture transforms your lens into a storyteller, giving you the creative control to emphasize or diminish the importance of elements within your frame. It is the magic key that allows you to scallop the visual narrative, guiding the viewer’s eye exactly where you intend. In the tapestry of photography, aperture is the thread that weaves together moments, subjects, and the art of capturing light with precision and intention.
International Standards Organization (ISO)
Your camera’s ISO can often be seen as the silent poet of light sensitivity, an essential component in the symphony of photography basics. It defines the camera’s sensitivity to light, affecting the brightness and quality of your images. This fundamental aspect of photography offers a crucial lever to control exposure and adapt to varying lighting conditions, whether you are capturing a luminous sun-soaked landscape or a subdued ambiance of a dimly lit interior. Understanding the dynamics of ISO, in conjunction with aperture and shutter speed, is the cornerstone of photography fundamentals.
A low ISO setting, such as 100 or 200, delivers crisp, noise-free images in well-lit conditions, while a higher ISO setting, like 800 or above, helps you capture images in low light but may introduce some digital noise. This versatility allows you to adapt to the environment and achieve your creative vision.
ISO is your passport to exploring the nuances of light, and it offers you the creative freedom to paint with a broad spectrum of tones. Whether it is the soft glow of a candle-lit dinner or the brilliance of a sun-lit beach, ISO lets you orchestrate the play between light and shadow in your photographic compositions. In the intricate language of photography, ISO is the eloquent phrase that ensures your visual poetry is rendered with clarity and emotion, bridging the gap between imagination and reality.
Composition
The composition in each of your images should be recognized as the art of placing and arranging elements within your frame in order to capture visually harmonious and captivating images. It is the heart and soul of photography basics, as it transcends the technical aspects and delves into the realm of artistic expression. Compositional skills are the foundation upon which the entire visual narrative of a photograph is built, allowing photographers to tell stories, evoke emotions, and convey their unique perspective. Masters of photography fundamentals understand the significance of composition. They employ techniques such as leading lines, symmetry, the rule of thirds, and framing to guide the viewer’s eye seamlessly throughout the image and create a strong focal point.
These techniques transform a mere snapshot into a compelling visual story.

Composition is a language of balance, contrast, and rhythm, where every element in the frame plays a vital role. It encourages us to explore creative perspectives, experiment with viewpoints, and find beauty in the mundane. Whether it is capturing a breathtaking landscape, a candid portrait, or an abstract masterpiece, composition is the brush that strokes life into every image. The true essence of composing one’s image effectively lies in the photographer’s ability to see the beauty in the mundane, to frame the world’s chaos and disorder, turning it into a moment of quiet beauty. It is through composition that photography transcends the mundane and touches the sublime, turning a simple click into a timeless work of art.
Metering
Metering in photography is the intricate balance between your lighting and shadows, a fundamental pillar in the world of photography basics. It is the process by which your camera evaluates the light within a scene to determine the optimal exposure settings. Metering is the language that translates the luminance of the world into a harmonious visual narrative, ensuring that your images are neither overexposed nor underexposed. Understanding metering, alongside other photography fundamentals, empowers you to take full creative control of your shots.
Most modern cameras offer different metering modes, such as evaluative, spot, and center-weighted, allowing you to select the one best suited for your specific scene.

This choice influences how your camera interprets light, highlights, and shadows, giving you the power to emphasize or de-emphasize specific areas of your composition. Metering is your guiding light in capturing the essence of a moment. It enables you to tell your story with precision, revealing details in deep shadows and retaining highlights in the brightest areas of your frame. It is the conductor that orchestrates the perfect exposure, ensuring that your images are imbued with the right mood, atmosphere, and emotion.
Camera Modes
Camera modes serve a palette of options, each designed to cater to specific shooting scenarios and artistic intentions. These modes provide photographers with a dynamic range of choices to shape their visual narrative, whether it is capturing a fast-paced sporting event, creating dreamy portraits, or exploring the depths of low-light landscapes. Understanding the nuances of camera modes, alongside photography fundamentals, is essential for any aspiring photographer. They allow you to transcend the confines of automatic settings and take control of your camera, tailoring it to your vision. Some common modes include Program, Shutter Priority, Aperture Priority, and Manual, each granting your varying levels of creative input and technical control.
Camera modes are your allies in adapting to changing environments and diverse subjects. They offer a platform for experimentation, allowing you to play with exposure settings, depth of field, and motion, thereby transforming ordinary scenes into extraordinary visual stories.
In the language of photography, camera modes are the sentences that shape the narrative, dictating the mood and atmosphere of your images. They empower you to express your unique perspective and interpret the world through your lens, ensuring that your photographs are not just frozen moments but windows into your creative soul. Camera modes are the keys to unlock your photographic potential, letting you craft images that transcend mere documentation and become true works of art.
Focusing
Focusing in photography is akin to sharpening the lens of our perception, a fundamental pillar in the world of photography basics. It is the process through which a photographer meticulously determines the point of sharpness within a composition, crafting an image that resonates with precision and impact. Mastering the art of focusing is to refines one’s visual storytelling, ensuring that the viewer’s gaze is drawn exactly where it should be. Understanding focusing, in conjunction with photography fundamentals, is essential to achieving clarity and intent in your images.
Whether you opt for auto-focus or manual focus, this technique empowers you to make conscious decisions about what elements within your frame should be crisply detailed and what should gently recede into the background.
Focusing is your conduit to capturing emotion, expression, and moments in their purest form. It is the tool that enables you to create striking portraits with expressive eyes, majestic landscapes with foreground-to-background sharpness, and captivating macro shots that reveal intricate details.

In the eloquent language of photography, focusing is the punctuation that defines the essence of a visual story, it ensures that your narrative is conveyed with unwavering clarity, a testament to your mastery of this crucial skill. Focusing is the bridge between the ordinary and the extraordinary, turning a mere click into a resonant, timeless work of art.
Flash
Flash in photography is the conductor of light, an essential element in the symphony of photography basics. It is the luminescent heartbeat that allows photographers to sculpt and shape the available light, bringing life and drama to their images. Understanding the art of using flash, in conjunction with diffused lighting that bathes a portrait in a gentle glow to high-speed bursts of light that freezes a split-second moment in time. Masters of photography have long appreciated the role of flash in controlling and enhancing their images. Whether it is adding a touch of fill light to soften shadows or overpowering the sun to create a dramatic effect, flash is a versatile tool that breathes life into your vision.
Flash is your secret weapon against darkness and dullness, allowing you to illuminate the most challenging scenes and reveal intricate details.

It is the essence of controlled illumination, the key to creating images that are not merely captured but meticulously crafted. In the eloquent language of photography, flash is the brush that paints with light, the torch that guides the viewer’s eye, and the signature of a photographer’s unique style. It is the magical wand that transforms ordinary moments into extraordinary visual stories, imbued with brilliance and depth. Flash is the artistic punctuation that brings your images to life, a testament to your mastery of this captivating and illuminating tool.
Camera Settings
Your camera’s settings are the myriad of possibilities that breathe life into your creative vision, the cornerstone of photography basics. These settings encompass a multitude of technical parameters, such as aperture, shutter speed, ISO, white balance, and more, which, when skillfully orchestrated, enable photographers to capture the world in their unique light. Understanding camera settings, alongside other photography fundamentals, is akin to mastering the language of your chosen medium. Each setting influences the final image, making it brighter or darker, sharper or blurrier, cooler or warmer.
They provide the means to manipulate the exposure, depth of field, and color balance of your photographs.
Camera settings are your tools for adapting to diverse environments, subjects, and lighting conditions, ensuring your shots are the true reflection of your artistic intention. They offer creative freedom, allowing you to experiment, break boundaries, and express your vision with unparalleled precision.
In the poetic language of photography, camera settings are the verses and stanas that compose the narrative of your images. They are the words that express your unique perspective and emotions, forming the essence of your visual storytelling. Mastering these settings is akin to becoming fluent in the language of light, enabling you to converse with the world through the lens and craft images that resonate with depth, emotion, and artistry.
How to Take Sharper Photos
Within photography, the pursuit of razor-sharp images is a quest that unites both beginners and seasoned professionals. The allure of a perfectly crisp photography is irresistible, for it serves as a testament to a photographer’s skill and an invitation for viewers to immerse themselves in a world of captivating detail. For those new to the enchanting world of photography, the journey towards achieving sharper photos is a fundamental yet rewarding endeavor.
It is a journey that takes one through the foundational principles of photography basics, from understanding your camera to refining your technique and finally mastering the art of capturing clarity.
The Power of Understanding Your Camera
To embark on the path of taking sharper photos, one must first become intimately familiar with the tool of the trade – the camera. Photography, at its core, is the harmonious convergence of art and technology, and comprehending your camera’s functions is an essential step in mastering this craft. There is no shortcut; you must acquaint yourself with the three pillars of photography: aperture, shutter speed, and ISO. While already mentioned previously, we will now delve into how to attain the sharpest quality image through just these settings alone, before moving onto more practical methods that, when used together, allow you take your images from mere blurs in one’s memory, to an unforgettably vivid artwork that remains instilled in the hearts and minds of your audience.
Aperture
Understanding how your camera’s aperture works is like knowing how to paint with light. The aperture is the diaphragm within the lens that regulates the amount of light entering the camera. It is denoted by an f-number, like f/2.8 or f/16. A lower f-number, like f/2.8, implies a wider aperture, allowing your light to enter, but resulting in a shallower depth of field.
This is perfect for creating beautifully blurred backgrounds, but it requires precise focus on your subject to ensure absolute sharpness.
Shutter Speed
Your camera’s shutter speed controls how long exactly your camera’s sensor is exposed to light for. A faster shutter speed, like 1/1000th of a second, freezes motion and is crucial for capturing sharp images of fast-moving objects. However, a reduced shutter speed, such as 1/30, allows more light to reach your sensor for longer, meaning it can be used creatively when you want to capture motion blur.

International Standards Organization (ISO)
Your camera’s ISO measures the sensor’s sensitivity to light. A reduced ISO, such as 100 or 200, is perfect for well-lit environments, as it provides your photos with the least amount of noise or graininess. As light diminishes, you will have to increase the ISO to maintain faster shutter speeds, but this comes at the cost of increased noise and grain.
To consistently capture sharper images, you should aim to keep your camera’s ISO as low as possible while maintaining an appropriate exposure.
Focus and Compositions: The Heart of Sharp Photography
The pursuit of sharper photos is intricately linked to the two fundamental aspects of focus and compositions. Focusing your camera correctly and composing your shots thoughtfully can make or break the sharpness of your images.

Autofocus and Manual Focus
Modern cameras come equipped with advanced autofocus systems that make it easier for beginners to capture sharp photos. Take time to explore your camera’s autofocus modes, and experiment with both single and continuous focus. In many cases, single-point autofocus is your best ally for achieving precision. If your camera allows you to make use of manual focus, then it may become your best ally for achieving precision.
With this in mind, consider using it to gain absolute control over the focus point, especially in situations where the autofocus may struggle to find your subject, such as low-light conditions.
Depth of Field
Understanding depth of field is pivotal for sharp photography. A shallow depth of field, attained by applying a wider aperture, or reduced f-number, helps to add emphasis to your subject while creating a pleasing background blur. In contrast, a deep depth of field, achieved with a reduced aperture, or high f-number, helps you keep more of the scene in focus. By selecting the appropriate depth of field based on your subject and artistic intent, you can enhance the sharpness of your photos.

Composition
Composition is the art of arranging elements within your frame to tell a compelling visual story. While not directly related to the technical aspects of sharpness, a well-composed photo guides the viewer’s eye to the sharpest parts of the image. A few vital composition techniques you can explore may include the golden ratio, leading lines, as well as the always handy rule of thirds.
By thoughtfully composing your shots, you ensure that the viewer’s attention is drawn to the sharpest details, enhancing the overall impact of your photographs.
Mastering Stability and Eliminating Blur
Blur is the bane of sharp photography, and as a beginner, understanding how to maintain stability in various shooting scenarios is crucial. Here are several key factors to consider when it comes to stability.

Tripods
Tripods are a photographer’s best friend when it comes to achieving ultimate sharpness. They eliminate camera shake, especially in low-light situations or when working with slow shutter speeds.
Invest in a sturdy tripod and learn how to use it effectively.
Shutter Release or Timer
Even with a tripod, manually pressing the shutter button can introduce vibrations and result in blur. To prevent this, use a remote shutter release or your camera’s built-in timer. This allows the camera to settle after you initiate the shot, ensuring maximum sharpness.

Image Stabilization
Many modern lenses and camera bodies come equipped with image stabilization technology. If your equipment has this feature, make sure it is activated, as it can significantly reduce the impact of hand tremors or minor movements during exposure.
Proper Holding Technique
If you are shooting without a tripod, ensure you have a stable stance. Hold your camera firmly with both hands and tuck your elbows against your body to minimize shake. Take a deep breath and exhale slowly shut before pressing the shutter button to reduce muscle tension and steady your hands.

Faster Shutter Speeds
When shooting handheld, especially in low-light conditions, use faster shutter speeds to reduce the chance of camera shake. As a rule of thumb, aim for a shutter speed that is at least the reciprocal of your lens focal length.
For example, if you are using a 50mm lens, try to use a shutter speed of 1/50th of a second or faster.
Mastering Light: The Secret Ingredient to Sharpness
The quality of light plays a profound role in the sharpness of your photos. While this might not fall strictly under photography basics, understanding how different lighting conditions affect your images is essential.
Natural Light
Utilizing natural light is a powerful way to enhance sharpness. Soft, diffused natural light, such as that found on cloudy days or during the golden hour (the hour just after sunrise and just before sunset), can reduce harsh shadows and create a flattering, even illuminating look that lends itself to sharper images.

Artificial Light
When working with artificial light sources, such as flashes or studio lights, it is important to control and modify the light to suit your needs. Diffusors, reflectors, and light modifiers can help create soft, even lighting that enhances sharpness.
Avoiding Harsh Light
Strong, direct sunlight can cast harsh shadows and result in overexposed highlights. To avoid these pitfalls, look for shaded areas or use diffusers to soften the light. If you must shoot in harsh light, consider using a reflector or fill flash to balance the exposure.

Post-Processing: The Final Touch for Sharpness
While it is true that sharpness should be primarily achieved in-camera, post-processing is a valuable tool for refining and enhancing the sharpness of your images. When it comes to post-processing, Adobe Lightroom and Photoshop are two of the most popular and powerful tools at your disposal.
Sharpening
Lightroom and Photoshop both offer sharpening tools that can enhance the perceived sharpness of your images. Use these tools with caution, as sharpening your image excessively can bring along visual artifacting while simultaneously reducing the quality of your quality. Instead, rather sharpen your image selectively to specific areas of the image, such as the subject’s eyes.

Clarity and Detail
Adjusting the clarity and detail sliders in post-processing can also help bring out fine details in your photos. These adjustments enhance mid-tone contrast and make your images appear sharper.
Cropping
In some cases, cropping an image in post-processing can help eliminate distractions and accentuate the main subject, thereby enhancing the perceived sharpness.

The Ongoing Journey for Sharpness
In the world of photography, aspiring for sharper photos is a journey rather than a destination. Even as a beginner, you can lay the foundation for capturing sharper images by understanding your camera, honing your focus and composition skills, mastering stability, working with light effectively, and employing post-processing techniques to master sharpness. The process of refining your craft and developing your eye for sharp photography is a continuous, rewarding endeavor. Remember that, while technical knowledge and equipment are essential, the heart of sharp photography lies in your vision and the stories you choose to tell through your images. So, equip yourself with photography basics, and let your passion for sharp photography guide your way.
As you learn and grow as a photographer, your images will progressively sharpen and reveal the world in all its intricate, captivating detail.
Tips and Tricks for Beginning Photography
Photography is an exquisite blend of art and technique, where every frame tells a story. For beginners setting foot into this mesmerizing artform, there are do’s and don’ts that serve as guiding stars on the path to mastery. These principles, rooted in photography basics, help ensure that your photographic journey is filled with creativity and growth rather than frustration and setbacks. In the following exploration, we will delve into the essential do’s and don’ts that lay the foundation for budding photographers to embark on a fulfilling and fruitful voyage.
The Do’s for Beginner Photographers
Embarking on the enchanting journey of photography, beginners are poised to uncover a myriad of opportunities and possibilities. The “do’s” for novice photographers serve as guiding stars, illuminating the path toward mastery and creativity.
These essential principles, rooted in photography basics, pave the way for an inspiring and fulfilling exploration of the art and craft of photography.
Tip One: Do Learn Photography Basics Thoroughly
Begin your photographic journey with a strong understanding of the basics. Familiarize yourself with your camera’s settings, including aperture, shutter speed, ISO, and white balance. These fundamental aspects of photography are your tools for capturing images, so invest time in understanding and mastering them.

Tip Two: Do Experiment and Practice
Photography is as much about practice as it is about theory. Explore different settings, lighting conditions, and subjects. Do not be afraid to make mistakes; experimentation is the path to discovery.
Practicing regularly will help you build your skills and develop your unique style.
Tip Three: Do Pay Attention to Composition
Composition is the art of arranging elements within the frame to create a compelling image. Learn and apply composition rules like the rule of thirds, leading lines, and framing to make your photos visually engaging. Keep in mind that these rules are guidelines, not strict laws, so do not hesitate to break them for creative purposes.

Tip Four: Do Embrace Natural Light
For many beginners, the best starting point would be to turn towards the use of natural light. Learn to observe and work with natural light to capture beautiful images. For instance, golden hour, the hour after sunrise and before sunset, offers soft, warm light that can enhance your photos.
Experiment with different times of day to understand the nuances of light.
Tip Five: Do Invest in Lenses and Accessories Thoughtfully
While it is tempting to accumulate a vast collection of lenses and accessories, start with a few essential pieces and add more as you progress. A versatile lens, such as a prime lens or a kit lens, can serve you well in various situations. Consider investing in a sturdy tripod for cleaner. More stable images, as well as a quality camera bag to protect your gear.

Tip Six: Do Develop a Photographer’s Eye
Train your eyes to see the world differently. Practice observing details, patterns, and interesting subjects in everyday life. Photography is about capturing moments that others might overlook, so being observant is crucial.
Tip Seven: Do Study Other Photographers’ Work
Diving into the work of renowned photographers, and analyzing their photos can help you gain ample inspiration and insights. Take note of their compositions, the techniques they use, and the storytelling methods they implement. This will help you develop a critical eye and refine your own photographic style over time.
The Don’ts for Beginner Photographers
Within the captivating world of photography, the “don’ts” for novice photographers act as crucial signposts, guiding them away from common pitfalls and setbacks. Understanding what to avoid is as pivotal as knowing what to embrace in the realm of capturing moments in time.
These principles, steeped in photography basics, serve as cautionary tales, ensuring a smoother journey toward honing one’s photography skills.
Tip One: Don’t Overspend on Gear Initially
While high-end cameras and lenses are enticing, they are not prerequisites for taking great photos. As a beginner, focus on mastering your current equipment before contemplating upgrades. Understand your gear’s limitations and capabilities before investing in new items.

Tip Two: Don’t Overcomplicate Settings
Avoid the trap of using every setting and feature on your camera simultaneously. You can start out by turning to simple settings before gradually exploring the more advanced features of your camera as you become more comfortable as a burgeoning photographer.
A great image can be captured with basic settings if the composition and lighting are right.
Tip Three: Don’t Rely Exclusively on Auto Mode
While your camera’s auto mode is convenient, it can limit your creative control. Experiment with aperture priority (A/Av), shutter priority (S/Tv), and manual (M) modes to gain a deeper understanding of exposure settings. These modes provide more creative freedom and allow you to capture the image as you envision it.

Tip Four: Don’t Ignore Your Background
Keep a close eye on the background in your photos, as a background that is cluttered or distracting can detract from your subject to a significant degree. Before taking your photo, instead take a moment to scan your entire frame before making any necessary adjustments to ensure a clean and unobtrusive background, as this will provide you with the best results.
Tip Five: Don’t Overlook Post-Processing Etiquette
While post-processing can enhance your images, avoid taking it too far and over-editing your image. Heavy-handed editing can result in unnatural colors, excessive sharpness, and loss of detail. Aim for a balanced approach that enhances your photos without making them appear artificial.

Tip Six: Don’t Fear Critique and Feedback
Do not shy away from feedback and constructive criticism. Take it in as an opportunity to learn and grow, not only personally but as an aspiring photographer. Engaging with critique can highlight areas where you need improvement and open doors to new perspectives.
Tip Seven: Don’t Compare Yourself Unfairly
Avoid comparing your work to that of seasoned photographers. Remember that they started as beginners too. Each photographer has their unique journey, and it is crucial to focus on your own progress and growth.

In the constantly changing and evolving world of photography, getting to grips with the basics is like learning the language of a visual storyteller. Photography basics serve as the foundation upon which one’s creative journey is built. From understanding the interplay of aperture, shutter speed, and ISO to the art of composition and the magic of light, these fundamentals unlock the door to a world of boundless possibilities. As we grasp these essentials, we embark on a voyage of endless exploration, capturing moments that evoke emotions, narrate stories, and illuminate the beauty of the world. In the end, photography basics are not just a starting point; they are the enduring pillars of our photography odyssey.
Frequently Asked Questions
What Are the Three Fundamentals Elements of Exposure in Photography?
The three essential elements of exposure are aperture, shutter speed, and ISO. Aperture takes control of how much light enters the camera, shutter speed allows you to change the duration of how long your camera sensor is exposed to light, and ISO is in charge of the sensitivity of the camera’s sensor to light.
How Can I Achieve a Shallow Depth of Field in My Photos?
To achieve a shallower depth of field, consider using a wider aperture, such as a reduced f-number such as f/1.4 or even f/2.8. This allows for more light to enter and creates a blurred background, making the subject stand out from the background with ease. Ensure your subject is well-focused to achieve the desired effect.
What Is the Golden Hour in Photography, and Why Is It Significant?
The golden hour can be found twice throughout each day, as it refers to the hours just after and just before sunrise and sunset respectively, when the sun is low in the sky, casting soft, warm, and flattering light. It is significant in photography because the quality of light during this time enhances the overall aesthetic of images, creating a magical and golden glow.
Duncan completed his diploma in Film and TV production at CityVarsity in 2018. After graduation, he continued to delve into the world of filmmaking and developed a strong interest in writing. Since completing his studies, he has worked as a freelance videographer, filming a diverse range of content including music videos, fashion shoots, short films, advertisements, and weddings. Along the way, he has received several awards from film festivals, both locally and internationally. Despite his success in filmmaking, Duncan still finds peace and clarity in writing articles during his breaks between filming projects.
Duncan has worked as a content writer and video editor for artincontext.org since 2020. He writes blog posts in the fields of photography and videography and edits videos for our Art in Context YouTube channel. He has extensive knowledge of videography and photography due to his videography/film studies and extensive experience cutting and editing videos, as well as his professional work as a filmmaker.
Learn more about Duncan van der Merwe and the Art in Context Team.
Cite this Article
Duncan, van der Merwe, “Photography Basics – Capturing the Moment.” Art in Context. November 23, 2023. URL: https://artincontext.org/photography-basics/
van der Merwe, D. (2023, 23 November). Photography Basics – Capturing the Moment. Art in Context. https://artincontext.org/photography-basics/
van der Merwe, Duncan. “Photography Basics – Capturing the Moment.” Art in Context, November 23, 2023. https://artincontext.org/photography-basics/.


