

One Point Perspective Drawing – Learn to Draw Perspective Art
Perspective art is a great way to enhance your drawing skills as it develops your sense of spatial awareness. There are many one-point perspective examples to look at for inspiration when learning how to draw this style of perspective. One-point perspective is a very valuable skill for various drawing activities, especially live drawing activities. Having a fundamental knowledge of constructing spaces with the rules of one-point perspective will also give you a better sense of constructing spaces from memory, or simply creating fictional environments from your imagination. The rules of simple perspective drawing can be a great addition to your drawing repertoire as they can improve your ability to draw environments, making them a little more realistic and immersive.
An Easy Guide to Drawing One-Point Perspective
In this easy perspective drawing tutorial, we will be breaking down the process of drawing a one-point perspective in a simple and doable method. We will break up the process into digestible steps that will allow you to fully grasp each aspect of constructing a one-point perspective from start to finish. This tutorial is easy to follow and will demonstrate how you can use one-point perspective drawing rules to create various environments.
Necessary Materials
This tutorial on how to draw one point perspective requires very simple tools as it intends to help you grasp these concepts at a basic fundamental level. You will need a pencil, a ruler, an eraser, a sharpener, and a ballpoint pen. This tutorial demonstrates the one-point perspective drawing process through the means of a digital drawing device but the drawing process is completely applicable to traditional materials. If you do not have a digital device, you may find all the materials through the links below:
- Pencils
- Ballpoint Pen
- Ruler
- Sharpener
- Eraser
- Good Paper (200 g/m – 250 g/m recommended)
Step-by-Step Instructions on How to Draw One Point Perspective
In this tutorial on point perspective, we will be learning the basics of how to construct a one-point perspective drawing and how this particular perspective drawing can be used to create an environment. We will be learning how to draw an immersive room with the rules of a one-point perspective. We will learn how these particular techniques for perspective drawing create a particular point of view in space and how this can be used to create a realistic spatial scene.

Learn the Basics for One-Point Perspective
We first want to understand what exactly makes a one-point perspective drawing a one-point perspective. Understanding the basic rules that are necessary for a one-point perspective are quite simple and once understood can be used to create all sorts of environments.
Understanding the Horizon Line and Vanishing Point
We can start by drawing a simple horizontal line through the middle of the page. We do want to make sure that the horizon line is slightly closer to the top of the page.

From here we can mark a point on the horizon line to establish the vanishing point. We can do this anywhere on the page, but to make it simple, let’s draw the vanishing point in the center of the line.

Understanding Perspective Lines
With one point perspective, we will find that all objects fall along a single plane that flows directly into the single vanishing point. This means that if we draw lines, they will flow into that single vanishing point, this single vanishing point is what determines it as one point perspective.

As we set up these perspective lines, we will find that they will govern how larger or small objects will be drawn within the drawing. This will give the effect of objects getting smaller in scale as they appear to be more in the distance.

When drawing lines that are positioned along a vertical or horizontal plane, you can use these perspective lines to establish their origin points or points of contact.

We will also find that regardless of whether objects are placed above or below the horizon line, they will all flow into the vanishing point. This will keep consistency in the one-point perspective style.

Drawing a Room in One-Point Perspective
Now that we have a basic understanding of one-point perspective let us proceed by creating a room environment using the rules of a one-point perspective drawing. It’s always good to use these rules and put them into an actual drawing that helps to contextualize the concepts in an artwork.
Step 1: Drawing Walls of the Room
You can start by drawing the horizon line with a vanishing point in the center. From there you can draw diagonal lines that flow to the bottom corners of the page. From here, we can begin by drawing the walls of the room by drawing vertical and horizontal lines that connect at the diagonal lines.

From here, we can draw another square that is much smaller in the middle of the larger square. Already we can tell that this is establishing the walls and depth of the room. Try to work lightly with your pencils as we will be working layers on top of one another.

Step 2: Lightly Sketching Objects In the Room
The same concept applies when drawing objects in the room. In this case, let us start simply with a table. Because the table is sitting in the horizontal plane, its sides will flow into the vanishing point, whereas the horizontal lines will stay horizontal.

However, if we were to draw a couch against the wall, we know the wall is vertical and therefore the back of the couch will remain in a vertical direction. This is determined by the side of the couch. However, to give it depth, the top of the couch will flow along the depth of field toward the vanishing point.
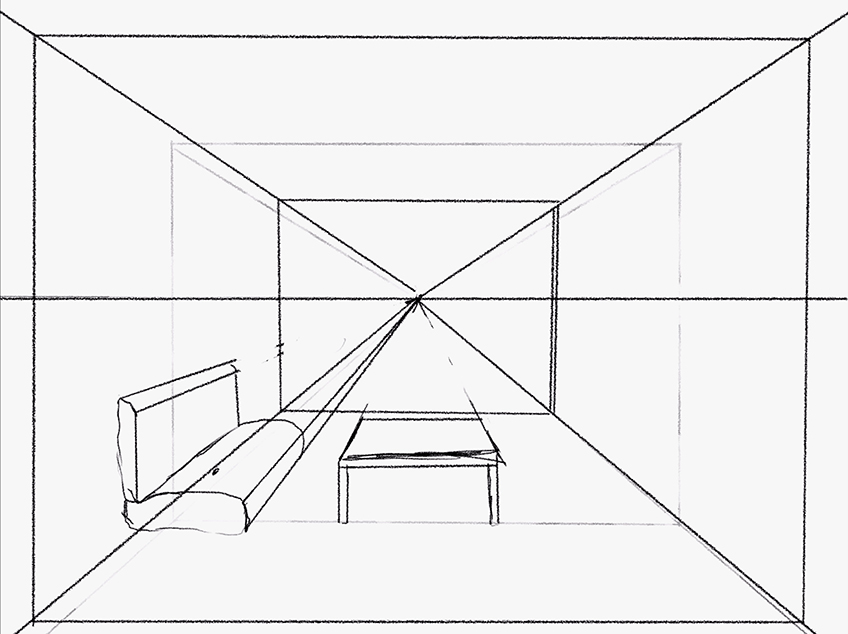
A good suggestion is to work in a set of diagonal lines, from the vanishing point, for each object. Then you can use the diagonal lines as guidelines to construct objects accurately within the space.

It’s important to note that objects that flow in the upward direction, or the vertical direction will remain so. However, as the flow into the distance, this is where we will use the vanishing point to assist us.
If we use the vanishing point for depth every time we draw an object, we will have continuity in the scale and depth of objects. This will give them an accurate and realistic structural distortion as seen from a one-point perspective.

Whether you draw a carpet, a light fitting, or a door, you want to use the walls and floor of the room to help you establish the length or height of the object. However, the vanishing point is what you will use to establish the depth of the object.
This means you can use the walls and the ceiling to establish the positioning of the object, but the vanishing point and perspective lines can help you to determine how large or small an item should be depending on where it is positioned within the room.

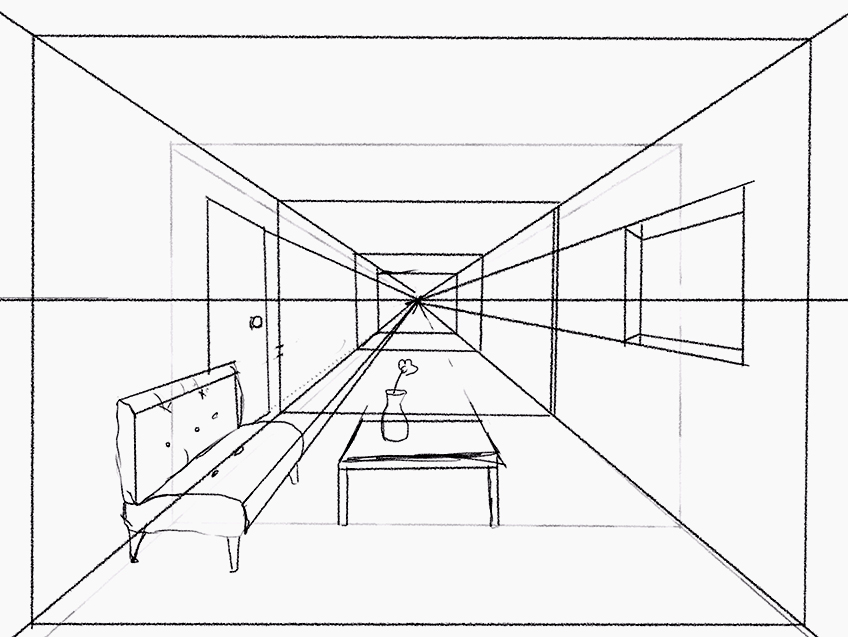
Step 3: Going Over the Sketch With Refined Marks
With one-point perspective drawings, it’s good to work with layers of light pencil shading to first establish the drawing. From there you can start to layer darker pencil shading and more refined drawing. Once you have drawn your room, first give it a light erasing before drawing over it with darker marks.

From here, you can start working on objects in the space with more detail and shading. Once we know where the objects are placed in comparison to the vanishing point, we then can start to draw them more accurately.

This is where we can start to be more artistic about our decisions and how we enhance the one-point perspective drawing with details in the objects.

You can play around with adding items to the room, such as adding items to the table or adding details to the carpet. At this stage, we can start to be a little playful with our details.

Once we have built the room up accurately by using the vanishing point, the rest is about creating the environment by understanding the scale of the already-drawn objects.

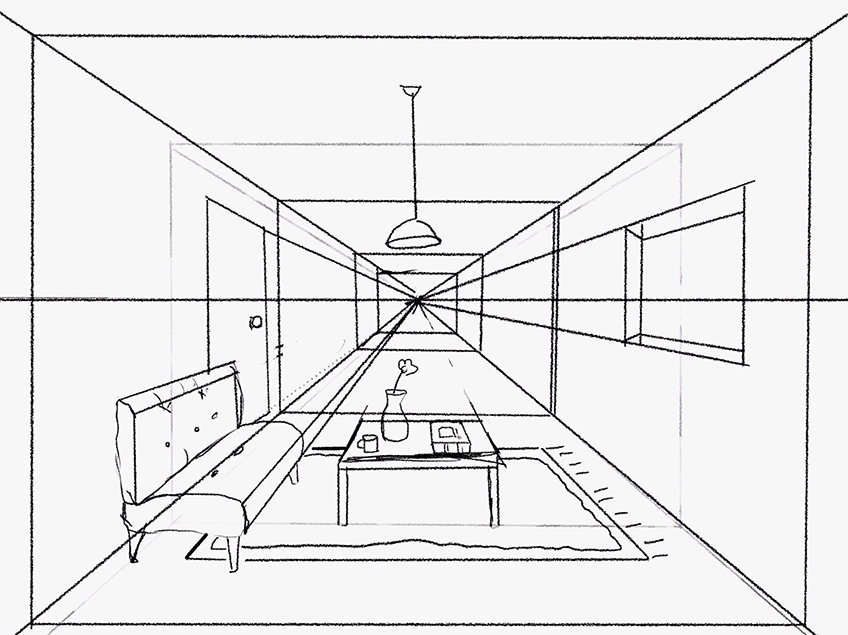
Step 4: Sketching Objects in the Space
At this point, we can see how large and deep the room is, which can now be used to guide the drawing process and the placement of objects in the space. This means that we can add objects in the foreground, midground, and background, by using the surrounding objects to determine how large or small we should draw new objects.

At this point, you can play around with adding new objects to the space. Once you know the depth of the space determined by the vanishing point, it then becomes an easy perspective drawing process and how to scale objects.

Again, as long as you use the walls and ceiling for length and height, you can then use the vanishing point to set up guidelines to determine depth. You can simply draw lines from the vanishing point to any space in the room to establish structures correctly in the space.
This goes for floors, windows, artwork on the walls, and whatever else you would like to add to the room. You then can play around with shading and detailing in the different objects of the perspective drawing.

From here on out you can explore what kind of details you would like to add to the room, as well as features outside, visible through the window. And there you have it! How to draw a space using a one-point perspective.

Tips to Remember
- Take your time. Understand the basics before creating perspective art.
- Work with light layers. You want to make sure you build your drawing up with light layers of sketching before adding refined and contrasted details
- Make sure all objects flow into the vanishing point. If you use the vanishing point for establishing objects in space, they will always look right.
- Understand that the vanishing point is used for depth. When adding objects in space, the floor and ceiling can be used for height and length but the vanishing point establishes the depth of the object.

Many simple perspectives drawing techniques can be applied to your own artwork that will enhance the sense of depth and space. In this vanishing point drawing tutorial, we learn how this tool can be used to establish depth for a more realistic interpretation of space. This one-point perspective technique can be utilized in various perspective artworks.
Frequently Asked Questions
What Is the Main Purpose of Perspective Drawing?
Perspective drawing helps you to understand the depth of the field and how to create this effect within a drawing. In various artworks, we can clearly see there is a sense of depth that establishes a foreground, midground, and background. However, to construct these spaces in a way that seems logical, perspective drawing will help you to create these effects within your own drawings. One-point perspective drawing is one of a few ways of working with concepts of depth and how to establish this quality in your own work. Try to explore various one-point perspective examples to get a sens of how depth is developed using this technique.
How Can You Use Perspective Drawing in Art?
One-point perspective art can be utilized in various ways, but perhaps the most useful way to use one-point perspective is to create backdrops and environments. Perspective art is mostly used to make more accurate-to-scale scenes that set the backdrop for a drawing. This easy perspective drawing tutorial breaks down how to use a one-point perspective to construct a setting such as a room. This can also help to establish the scale of objects as well as figures within an environment. A vanishing point drawing helps to determine the depth of the environment and how distant objects and space are from one another.
What Is Unique About One-Point Perspective?
One-point perspective is different from two and three-point perspectives by the position it establishes the onlooker in. It creates this effect of seeing a single aspect of a space and how the surrounding space fades into a single vanishing point. This is often used in spaces to create this eye-level effect of being in a space, whereas two and three-point perspectives establish space with more vanishing points. Therefore, this creates a more peripheral representation of space, such as seeing around corners of a building.

Matthew Matthysen is an educated multidisciplinary artist and illustrator. He successfully completed his art degree at the University of Witwatersrand in South Africa, majoring in art history and contemporary drawing. The focus of his thesis was to explore the philosophical implications of the macro and micro-universe on the human experience. Matthew uses diverse media, such as written and hands-on components, to explore various approaches that are on the border between philosophy and science.
Matthew organized various exhibitions before and during his years as a student and is still passionate about doing so today. He currently works as a freelance artist and writer in various fields. He also has a permanent position at a renowned online gallery (ArtGazette) where he produces various works on commission. As a freelance artist, he creates several series and successfully sells them to galleries and collectors. He loves to use his work and skills in various fields of interest.
Matthew has been creating drawing and painting tutorials since the relaunch in 2020. Through his involvement with artincontext.org, he has been able to deepen his knowledge of various painting mediums. For example, watercolor techniques, calligraphy and lately digital drawing, which is becoming more and more popular.
Learn more about Matthew Matthysen and the Art in Context Team.
Cite this Article
Matthew, Matthysen, “One Point Perspective Drawing – Learn to Draw Perspective Art.” Art in Context. February 17, 2023. URL: https://artincontext.org/one-point-perspective-drawing/
Matthysen, M. (2023, 17 February). One Point Perspective Drawing – Learn to Draw Perspective Art. Art in Context. https://artincontext.org/one-point-perspective-drawing/
Matthysen, Matthew. “One Point Perspective Drawing – Learn to Draw Perspective Art.” Art in Context, February 17, 2023. https://artincontext.org/one-point-perspective-drawing/.


Hi I haven’t been at drawing before but I did that drawing which turned out fantastic really appreciate you work .
Thanks
Thanks for your feedback John, it’s great to hear our drawing tutorial helped you!
I have a question about the recession in the window. My understanding is that the recessed panel should have a horizontal line in the back, but it appears that it is going to a separate vanishing point.