


Two-Point Perspective Drawing – An Easy Step-by-Step Guide
Two-point perspective drawing is a great way to capture an environment within a drawing from a unique vantage point. With two-point perspective drawing, we can create this unique peripheral effect where you can see around an object. The two vanishing points define space in a very beautiful way, which often can be used as a background to various drawing ideas. Understanding the two-point perspective is also another unique way of understanding depth and scale, and how to place different objects within a space that seems accurate in size. There are many benefits to come from learning 2-point perspective shapes and how to turn them into identifiable structures within a drawing.
An Easy Guide to Drawing Two-Point Perspective
In this tutorial on two-point perspective drawing, we will learn how to create 2 point perspective shapes and how to transform them into identifiable structures that can be used in our own practice. Knowing about perspective drawing and understanding the difference between one-point and two-point perspectives will provide you with more choices when constructing spaces and environments in your artwork.
This skill is especially helpful when learning how to draw landscapes that seem immersive and realistic in scale and depth.
Step-by-Step Instructions on How to Draw Two-Point Perspective
In this tutorial on two-point perspective, we will start simple with a basic demonstration of the fundamental rules that constitute a two-point perspective drawing. We will learn how to establish 2-point perspective shapes using these rules, which we will then change and shape into a more identifiable structure. In this case, we will learn how to draw a building and go through the step-by-step process of creating the structure with the rules of perspective.
Now that we know what to expect, let us go through the drawing process of the two-point perspective.
Understanding the Basics for Two-Point Perspective
We first want to break down some basic concepts used in two-point perspective drawing that will help us to understand the drawing process a little more clearly. Once we know the basic concepts we will find that we then will be able to apply these concepts to various two-point perspective drawings.
Understanding the Horizon Line and Two Vanishing Points
Similar to one point perspective, you simply want to draw a horizon line on your page and establish two vanishing points along the horizon line. Depending on how high or low the horizon line will change the way in which the two-point perspective shapes will be seen.

Once you have the horizon line and two vanishing points drawn on the horizon line, you can then draw a single vertical line between them. This will establish a meeting point where the perspective lines of each vanishing point will connect.

Understanding Perspective Lines for Depth
This vertical line can extend past the horizon line, going through it will establish an object placed on the ground beneath the horizon line. From there, lines can connect to either end of the vertical line from both vanishing points.
These perspective lines are going to establish a sense of depth for objects to be drawn within.

From here you can add vertical lines within the perspective lines, which will start to create two-point perspective shapes. These perspective lines can meet anywhere in the space on the page to establish shapes anywhere within the drawing.

You will find that as you create shapes within the confines of the perspective lines, you will start to see that it establishes a viewpoint from the corner of an object, allowing you to see around the object.

Drawing a Building in Two-Point Perspective
Now that we have a general idea of how basic two-point perspective shapes are constructed, we can start drawing our own building with the basic concepts we have learned. We will see that by using the simple tools of the two-point perspective, we can easily construct interesting structures.
Step 1: Drawing Perspective Lines in Two-Point Perspective Shape
We now know how to draw a simple shape with two vanishing points and a vertical line that runs through the horizon line. Once we have established the shape, we can draw dots along the vertical line and connect perspective lines to them from both vanishing points.

We can now add points along the top of the rectangular shape. Trying to keep them evenly separated. Try to draw these dots along the top line of the rectangular shape on either side of the shape. We should see that the rectangle resembles a building in its most basic rectangular form at this point.

Step 2: Adding Vertical Lines to the Shape
From the dots drawn along the top of the rectangular shape, we can now draw a set of vertical lines down both sides of the shape. We want to make sure that they remain vertical and parallel to one another.

Step 3: Lightly Erasing the Drawing
With perspective drawing, it is a good idea to work lightly, especially during the early sketching stages where you establish the fundamental form of the structure. From here, it is a good idea to lightly erase the basic structure before more refined sketching.

Step 4: Lightly Drawing Features of a Building
The combination of vertical and perspective lines is going to establish a grid that runs along the surface area of the shape. This is going to set up some guidelines for us to draw in features of a building. We want to make sure that we consider the angle at which the building is viewed when drawing features.

Due to the perspective, we will see all the right sides of three-dimensional structures on the left side of the building and vice versa for structures on the right side of the building. When drawing lines of features on the building we can use the vanishing points on opposite ends to establish the angles of lines.

This means that not only can we use the perspective lines from one vanishing point to establish a structure on the building, but, we can use the perspective lines from the other vanishing point to draw the visible edges of said structures.

This is especially helpful for making structures three-dimensionally accurate on the building. By using both perspective lines from vanishing points, you can create different three-dimensional structures on both sides of the building.

Try to explore adding features to the façade of the building using the grid that was drawn with the perspective lines. Remember, that the perspective lines are used for establishing depth, however, length and height are established with vertical lines.

You can also explore adding features that protrude outwardly from the façade of the building. Again, you can use the perspective lines to build up the structural lines, by making them point toward each vanishing point.

You can play around with creating levels in the building by drawing protruding features on the façade that break up the building into different levels. This is a great way to create balconies or windows with protruding columns.

You can also draw features surrounding the building such as sidewalks and street lights. Again, the perspective lines will assist you with the depth of structures and how far they need to extend toward each vanishing point.
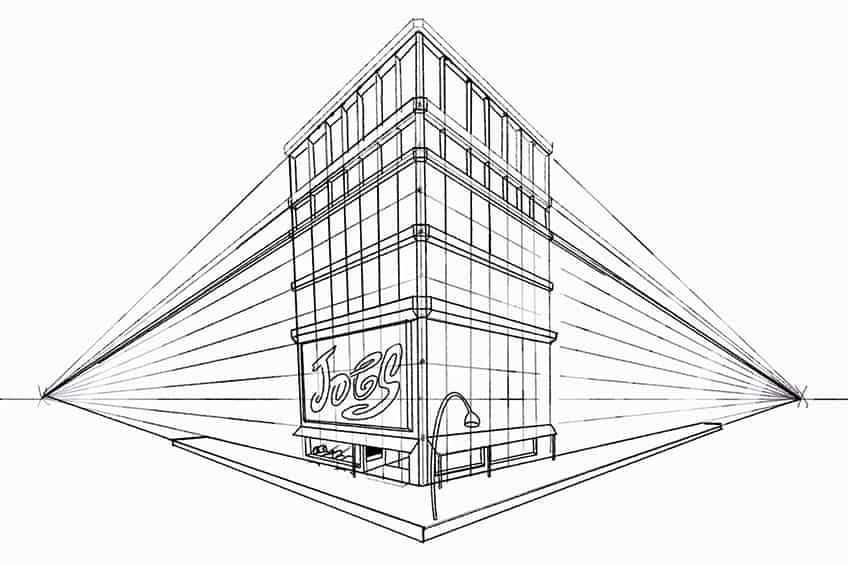
You will also find that they help to establish the scale of objects fading into the distance and the more they drift toward the vanishing points. This means that you can use these lines to determine how larger or high objects will extend from the ground, such as street lamps.

Start to play around with adding features as you use the perspective lines to assist you with establishing them in the space. Again, each vanishing point will set up guidelines for drawing various sides of a single structure and their various angles.

The perspective lines from each vanishing point will also establish the plane on which features can be drawn. This means that the cross-over of these perspective lines will help you to accurately establish features on the building, and features surrounding the building.
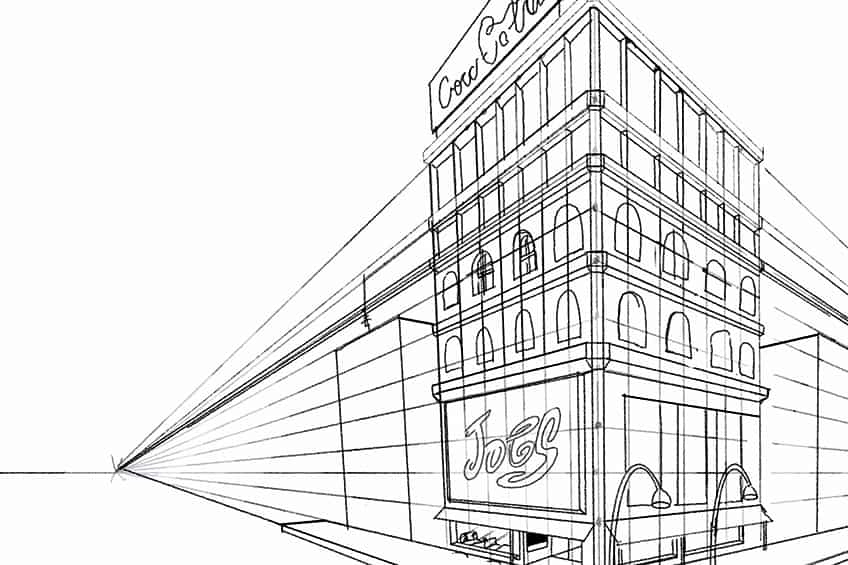
Step 5: Drawing Final Details
This is where we can start to work over the light sketch one last time, finalizing the details of the building. We should at this point feel free to be expressive with adding details to the building.

At the end of the day, we want to use the rules of two-point perspective to establish simple two-point perspective shapes that can then be tweaked and changed by more free-hand drawing and details.

We now can also explore adding color and unique elements to the drawing. Once we have lightly sketched the basic features of the building with the perspective lines, we can use those features as a reference for adding more as we go.

This means we can still accurately add new features, simply by using the placement of previously drawn features as a reference. The previously drawn features should be used as a reference for the form and shape of new features on the building.

The valuable part of a two-point perspective is that you can build up basic two-point perspective shapes with the rules, and then tweak and change them to create unique and interesting structures. This is where you can play around with how you would like a building to look.

It is important to know that the vanishing points establish the depth of a structure. The perspective lines can be used to gauge how high or low structures will be but mostly how far back they will appear.

Try to take your time as well, you don’t want to rush a perspective drawing. You want to make sure you keep using the vanishing points to establish new features.

When trying to add unique features, consider exploring architectural images from Pinterest or any other art-based platform for inspiration.

Step 6: Adding Contextualizing Features
This is where we can draw a road on either side of the building in the center of the page to establish that roadside effect near the building. We can do this by simply drawing a line from both vanishing points that flow down towards either side of the page.

You can also explore adding things like billboards on top of the building or buildings on either side of the building. These are secondary features we can add to the drawing to give the scene a more contextualized setting.

You can also add in road lines, again flowing into the vanishing points on either side of the building. The road starts to give a more realistic placement to the building and how corners of buildings are often perceived from this angle.

From here on out you can choose how you would like to detail surrounding features and structures near the building. This is where you should play around with the world-building aspect of a space and how you would like the surrounding features to appear.

By the use of these perspective lines, you could construct an entire city, keeping the height and depth of the space realistic by sticking to the parameters of the perspective lines.

And there you have it! How to draw two-point perspective shapes and how to transform them into something interesting. Allow yourself to explore the potential of this drawing technique by creating spaces with the use of perspective lines.
Tips to Remember
- Build up the drawing with light sketches. It’s better to build up a drawing with light sketches, as this way you are less likely to make a mistake.
- Understand the difference between length, width, and height. Perspective lines can help you to navigate the positioning of elements and determine how close or far they should be.
- Play around with features and perspective lines. Use the lines from the vanishing points to build features on the building.
- Experiment with creating spaces. Don’t get hung up on perfect placement; use the perspective lines to establish various features and structures in different spaces in the scene.
Two-point perspective drawing is a great skill to know when you want to create immersive environments that give a point-of-view-like effect. The utility of the two-point perspective is quite versatile as it can be added to the different subject matter as well as different drawing exercises. This is particularly useful for breaking down spaces when drawing them in real life.
Frequently Asked Questions
What Can You Draw With a Two-Point Perspective?
Two-point perspective is often used for architectural and landscape artworks as a unique way to observe objects. This point of view can also be used to draw anything as the principle of two-point perspective can be applied to various subject matter and not just simple two-point perspective shapes. Two-point perspective principles can be a unique way of drawing characters that have a real shift in scale as body parts are positioned between backgrounds and foregrounds. This is a great way to draw characters moving in space and in unique positions of movement.
What Is the Difference Between a One-Point and Two-Point Perspective?
One-point perspective utilizes the unique composition established by one vanishing point, whereas two-point perspective utilizes the composition of two vanishing points. For a one-point perspective, this is a great way to create a landscape or a scene that flows in a singular direction. From a two-point perspective, the landscape is capable of flowing in two directions, creating a scene where objects are present on the crossover between two vanishing points. This gives a unique peripheral-like effect to the scene, where you can observe the object directly, but also the scene around the object.

Matthew Matthysen is an educated multidisciplinary artist and illustrator. He successfully completed his art degree at the University of Witwatersrand in South Africa, majoring in art history and contemporary drawing. The focus of his thesis was to explore the philosophical implications of the macro and micro-universe on the human experience. Matthew uses diverse media, such as written and hands-on components, to explore various approaches that are on the border between philosophy and science.
Matthew organized various exhibitions before and during his years as a student and is still passionate about doing so today. He currently works as a freelance artist and writer in various fields. He also has a permanent position at a renowned online gallery (ArtGazette) where he produces various works on commission. As a freelance artist, he creates several series and successfully sells them to galleries and collectors. He loves to use his work and skills in various fields of interest.
Matthew has been creating drawing and painting tutorials since the relaunch in 2020. Through his involvement with artincontext.org, he has been able to deepen his knowledge of various painting mediums. For example, watercolor techniques, calligraphy and lately digital drawing, which is becoming more and more popular.
Learn more about Matthew Matthysen and the Art in Context Team.
Cite this Article
Matthew, Matthysen, “Two-Point Perspective Drawing – An Easy Step-by-Step Guide.” Art in Context. May 8, 2023. URL: https://artincontext.org/two-point-perspective-drawing/
Matthysen, M. (2023, 8 May). Two-Point Perspective Drawing – An Easy Step-by-Step Guide. Art in Context. https://artincontext.org/two-point-perspective-drawing/
Matthysen, Matthew. “Two-Point Perspective Drawing – An Easy Step-by-Step Guide.” Art in Context, May 8, 2023. https://artincontext.org/two-point-perspective-drawing/.


