


How to Paint Wine Glasses – Your Guide to Wine Glass Painting
Painting wine glasses is a wonderful way to express your creativity and is a fun and affordable craft that everyone from first-time painters to seasoned artists can enjoy doing in an afternoon or over a weekend. The designs and decorations for wine glass painting are endless, and with the right tips and tricks, you can turn your ordinary wine glasses into something extraordinary!
Painting Wine Glasses: Where to Begin
Just as there are different blends and varieties of wine, from crisp chardonnays to warm merlots, there is an endless selection of patterns and motifs you can use to decorate wine glasses. In this easy-to-follow tutorial, we will show you the easiest way to paint wine glasses using the best products on the market.

Our Recommendations for the Best Paints for Wine Glasses
While there is a variety of different paints to use, the best paint to use for DIY painted wine glasses is acrylic enamel paint. That may sound like a contradiction since enamel paint is oil-based and acrylic is water-based, but acrylic enamel paint has been specially formulated for glass painting.

There are a number of different brands of acrylic enamel paints available, but we recommend using FolkArt Acrylic Enamel for the best results. They come in a range of 12 satin-finish colors, and 16 gloss finish colors.
Regardless of the finish you choose, when the paint has dried and hardened the colors will not fade or chip no matter how often you use your decorated wine glasses.
The Best Paint for Wine Glasses: FOLKART Gloss Finish Acrylic Enamel
FolkArt paints are produced by Plaid Enterprises who have been market leaders in the arts and crafts industry for 45 years. The acrylic enamel paints have been uniquely formulated for use on glass and ceramics. Although the cost of the paints is quite high, it is good value for money because the paints come in a set of 16 different colors, thus giving you a versatile palette to work with. FolkArt paints are available in 2 oz and 16 oz bottles.
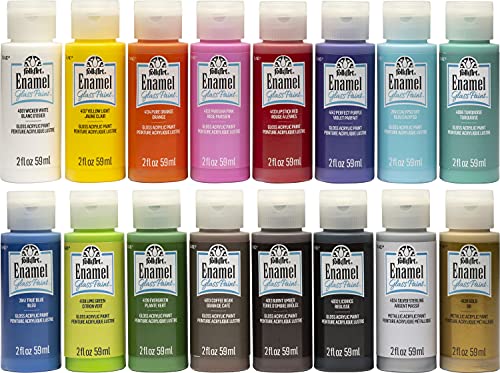
- The set includes 16 2 oz bottles of colored enamel craft paints
- Acrylic enamel paint dries with a durable, scratch-resistant gloss
- After drying and curing, the paint is dishwasher safe
Once the paint has cured (hardened), it dries to a brilliant glossy finish that is durable and scratch-resistant. It is also dishwasher safe. When you have finished painting your wine glasses, cleaning up is quick and easy. Just wipe the areas where paint has spilled with soap and water. The downside to using this acrylic enamel paint is that it dries extremely quickly, so you have to work fast. You will also need to apply several layers of paint to ensure that you get the best coverage. Some of the colors, such as the Lipstick Red, are less transparent than others.
If, however, you already have a stock of regular acrylic paints, you do not need to go out and specially buy acrylic enamel paints. All you will need to do is add FolkArt 869 Medium, a water-based, non-toxic liquid, to your acrylic paints to make them suitable for painting on glass.
[su_shadow style=”simple”][su_panel]PROS
- Good value for money
- Dries to a brilliant shine
- Durable and scratch-resistant
- Dishwasher safe
- A wide range of colors available
CONS
- Some colors are more opaque than others
- Dries very quickly
- Requires several layers to ensure good coverage
The Best Paint Marker Pens for Wine Glasses: ARTISTRO Paint Pens
If you prefer a method of decorating wine glasses that is a bit more straightforward than using paints and paintbrushes, you could use Artistro Paint Pens They are an excellent choice if this is the first time you are going to paint wine glasses and want an easy medium to use, or if you are working on a painting project with small children. Artistro Paint Pens use fast-drying, water-based ink that dries to a glossy and opaque finish. They are also non-toxic and odor-free and come in all the colors of the rainbow, as well as black and white, gold and silver, pink and brown.

- Premium quality paint pens with vivid water-based inks
- Dries to produce a durable and opaque glossy finish
- Suitable for glass, fabric, wood, paper, pottery, and more
Using paint marker pens to paint wine glasses also means that there is no need for you to buy paintbrushes – and you will not have to clean them afterward, either! However, while paint marker pens are an excellent choice for fine, detailed work, they are not the best choice when it comes to covering a large surface of solid color. You will definitely need a fairly thick paintbrush for that.
Remember that, unlike acrylic enamel paint, applications using paint marker pens will need to be sealed with a protective varnish spray. You can pick either a gloss or a matte finish, the choice is up to you. We recommend that you open windows and remove your pets and children from the room before applying the varnish. Stand between six and nine inches away from the wine glasses when spraying them.
[su_shadow style=”simple”][su_panel]PROS
- Fast drying
- Easy to use
- Non-toxic and odor-free
- Dishwasher safe
- Durable and long-lasting
CONS
- Not suitable for covering large areas
- Limited choice of colors
Paints Suitable for Painting Glass
The following table shows you all the paints that can and cannot be used on glass.
| Paint Type | Suitable for Painting on Glass |
| Acrylic enamel | ✔ |
| Acrylic marked as suitable for glass | ✔ |
| Regular acrylic mixed with glass medium | ✔ |
| Specially formulated solvent-based paints | ✔ |
| Paint marker pens | ✔ |
| Alkyd paint (oil-based) | ✘ |
| Oil paint | ✘ |
| PVC paint | ✘ |
| Watercolor paint | ✘ |
Decide on Your Picture or Design
Before you start painting your wine glasses, you should decide on the designs or pictures you want. Popular designs at the moment are flowers and peacock feathers, butterflies, ladybugs, and bees. Or you could paint single words onto your wine glasses such as chill, relax, enjoy.
If you are decorating wine glasses for a special gift for a friend’s or family member’s birthday or wedding anniversary, how about painting their names and the relevant dates on the glasses? If you’re holding a bridal shower, choose silver and gold colors and write the bride’s and groom’s names on the wine glasses, as well as the date of their wedding.

If the occasion is to celebrate the birth of a baby, paint the wine glasses pink or blue, depending on the gender of the baby, together with the baby’s name and the date on which he or she was born. If the baby’s gender is not known yet, you could go with a soft yellow or green theme. You could paint baby animals or teddy bears on the glasses, too, or even Disney characters if you like.
If you plan on using your decorated wine glasses at home to enjoy with family and friends, you could go with polka dots or stripes or swirls if you prefer. Remember, not all your glasses have to be decorated with the same pattern. You could have some with polka dots and others with stripes or stars or swirls. The choice is yours.
You can paint the design onto the wine glasses freehand, or print pictures from Pinterest to copy. You could also download the free PicMonkey app for an endless selection of graphics, fonts, templates, and embellishments. There is no end to the pictures and patterns you can choose for painting your wine glasses.
Choosing Your Wine Glasses
You can use whatever wine glasses you like, although smooth glass as opposed to fluted or cut crystal – which is uneven – is the most suitable choice. If you are new to glass painting, you may want to do a practice run first using cheap wine glasses.

That way you can be sure of perfecting your designs and painting methods before moving on to better quality glasses. The current trend is for stemless wine glasses, but if you prefer traditional stemmed glasses, that is entirely your choice. As we mentioned earlier, you could also paint wine bottles, highball and lowball glasses, condiment bottles, and pitchers.
Picking Paint Brushes
If you decide to use acrylic enamel paint, pick a selection of paintbrushes to use to paint your wine glasses. If you are doing a fine, detailed picture or lettering, a liner brush is best. Round brushes have shorter, rounder bristles than liner brushes and are ideal for laying down paint of different thicknesses.
Flat brushes are thick and square and put down a lot of paint, for example, a solid background over which other designs can be painted once the paint has dried.
For the best results, use a soft-bristle paintbrush such as watercolor or acrylic brushes. Natural hair paint brushes such as sable hair are the best, although they are more expensive than synthetic brushes, for example, brushes made of nylon bristles. We recommend Artbrushes Superior Sable Hair brushes.
Choosing Other Craft Tools
In addition to your paintbrushes, you could also use applicator sponges to decorate your wine glasses. Again, there are a number of different ones available on the market. Most come in a pack of five to seven sponges and are a mix of natural and synthetic. If you want to cover a large area with color, using an applicator sponge makes painting wine glasses quick and easy.

Because the sponges come in different sizes and textures, you can achieve a variety of interesting facades on your wine glasses. If you are going to print a picture to trace onto your glasses, you will also need painters’ tape and a waterproof marker.
Cleaning Supplies
Before you start decorating wine glasses, you will need to clean them. You can either wash them in hot soapy water and rinse them in very hot water or clean them with a good glass cleaner. Alternatively, you can rub them down with white vinegar or denatured rubbing alcohol.
You don’t need to rinse the wine glasses in water after using vinegar or alcohol because it will evaporate naturally.
How to Paint Wine Glasses
Now that you’ve got all the supplies you need, it’s time to start painting. However, there are a few steps to follow before you can apply the first coat of paint, and we recommend you follow each step in order to get the best results.

Step 1: Preparing the Glasses for Painting
If you are going to wash the wine glasses in hot, soapy water, make sure you rinse and dry them thoroughly as you do not want any soapy residue on the glass. Alternatively, spray them inside and out with a glass cleaner and wipe them down with a soft cotton cloth. Otherwise, you can clean them with white vinegar or denatured rubbing alcohol (they have similar cleaning properties) using a soft, clean cloth. Alcohol will also enable the acrylic paint to adhere better to the glass.
If you use alcohol to clean your wine glasses, let them stand for about 10 minutes before you start painting.
Follow the same process to clean your wine or condiment bottles, and pitchers, and glasses. You will have to remove the label from the wine bottle first. You can do that by soaking the bottle in warm water or rubbing it off with cotton wool soaked in a liquid adhesive remover. Alternatively, you could use acetone, but if you do make sure that the room you are in is well ventilated because acetone releases strong-smelling fumes.

Put down old newspaper or brown kraft paper on the surface you will be working on to protect it from paint spills. Wear old clothes or an apron to prevent paint from getting onto your clothes. Lastly, make sure the windows are open to allow maximum ventilation in the room and the paint fumes to escape.
Step 2: Painting the Glasses
There are two ways to paint your glasses. You can either copy a printed picture onto the glass, or you can paint a picture by hand. For drawing your picture or design onto your wine glasses, we recommend using Sharpie markers for the best results.
They come in a multitude of different colors, so you can match the pen and paint colors easily.
Painting Freehand
Give free rein to your creative muse! As we have said, there are no limits to the designs and embellishments you can use to decorate wine glasses. In addition to your other tools (ie, paint brushes, sponge applicators, and paint pens) you can use a pencil eraser or a foam brush for smaller applications such as the centers and petals of flowers or the polka dots on ladybugs. If you are not using paint marker pens to decorate your wine glasses, the most versatile tool to use for doing fine, detailed work is long-bristle paintbrushes. Remember, you are not limited to painting only the bowl of the glass, so don’t forget the stem and base!

If you are decorating wine glasses with stems, incorporate the stem and base into your design by painting them as well. You could even paint a design or picture on the underside of the base as well as the top of it. Bear in mind that the less paint you use on the glass, the more transparent your picture or design will be. The thicker the paint, the more opaque or unclear it will be.
Each and every layer of paint must be completely dry before a new color is added, otherwise, the colors could run into each other and mix into a different color completely, and you do not want that! And if you make a mistake, all you have to do to correct it is to wipe the paint off with a piece of cotton wool, or a Q-Tip, or a piece of paper towel.
Using a Printed Picture
If you have chosen to use a printed picture or design, the easiest way to transfer it to the glass is by first tracing it onto tissue paper. If you use tissue paper, you will be able to bend it easily into the glass so that the picture lies flush against the glass on the inside. Use the painters’ tape to secure the picture to the glass.
Then, trace the design onto the glass using the waterproof marker.
Remember to leave about ¾ to 1 inch of space from the rim of the glass to where the paint will start. That way you can scrub the rim without risking taking off any paint. (Also, although acrylic enamel paint is non-toxic, it would be preferable to not allow the painted area to come into contact with the person’s mouth, particularly women who wear lipstick.)
Step 3: Drying the Wine Glasses
Remember that the areas on which you have put down a lot of layers of paint will take longer to dry than the areas that have less paint. A trick to speeding up the drying process is to use your hairdryer to dry them off. We suggest that you use the warmest setting, but hold the hairdryer about 30 centimeters from the wine glass so that the force of the hot hair does not spread the wet paint or make it bubble. If you want to ensure that your painted wine glass lasts even longer, you can use a spray-on sealant.

Step 4: Curing the Paint
There is one more step to follow after the paint has dried, and that is to harden or cure it. There are two ways of doing this. If you don’t mind waiting a while for your glasses to cure, then you can leave them to air dry.
However, if you want to use your glasses as soon as possible, you will have to put them in the oven.
Air Drying
It will take up to three weeks to cure your decorated wine glasses if you air dry them (even if you have used a hairdryer to dry them off). For the best results, we recommend you follow the instructions on the paint label. Store the wine glasses upside down on a soft cloth and away from drafts while drying. This will prevent dust particles and other small pieces of debris from attaching to the paint while it cures.

Oven Drying
This method takes a little more preparation than air drying, but it does not take as much time. First, you will need to set your oven to 350˚F (or 180˚C). There is no need to pre-heat the oven because you are going to put the wine glasses into the oven right away. If you put them directly into a hot oven there is a danger that they might crack as they have come from the ambient room temperature to the oven that is over one hundred times hotter! Cover a cookie sheet with aluminum foil then place the wine glasses face down on the foil. Make sure you leave an equal amount of space between each glass.
For the best results, place the sheet in the center of the oven.
Put the timer on for half an hour. Leave the wine glasses in the oven for 20 minutes, then turn off the heat and leave them in the oven for another ten minutes. Be careful not to burn yourself when you take them out of the oven because they will be extremely hot. Leave them to cool down completely before you handle them.

Whether you air dry or oven dry your painted wine glasses, they will be dishwasher safe provided you place them on the top shelf of the dishwasher. However, a number of people prefer to wash their painted wine glasses by hand. We do not recommend putting them in the microwave oven. The same applies to glass bottles and pitchers.
As you can see, there is no end to the pictures and designs you can use to pretty up your wine glasses. And, as we mentioned, you need not limit yourself to just wine glasses. Why not give your glass bottles the special treatment, or your iced tea or soft drink pitcher set, too? Glass painting is something anyone can do, as we have shown, and is a project you can enjoy doing on your own or with your friends or children.
Frequently Asked Questions
What Is the Best Paint to Use On Wine Glasses?
The best paint for painting wine glasses is acrylic enamel paint. It has been formulated specifically for glass painting so that when the paint has been cured – or hardened – on the glass, it won’t chip or fade through use.
What Are the Best Paint Brushes to Use?
Soft-bristle paint brushes are ideal, for example, acrylic or watercolor brushes. Paintbrushes made from natural hair, for example, sable, are the best.
What if I Make a Mistake When Painting?
You can easily correct mistakes by simply wiping the paint away with a paper towel or a piece of cotton wool or a Q-Tip. Make sure that you remove all the paint before applying fresh paint.
How Soon Can I Use My Painted Wine Glasses?
As soon as your wine glasses have cooled down to room temperature after being cured in the oven, or at least three weeks after you have set them to air dry − you can use them.

In 2005, Charlene completed her Wellness Diplomas in Therapeutic Aromatherapy and Reflexology from the International School of Reflexology and Meridian Therapy. She worked for a company offering corporate wellness programs for a couple of years, before opening up her own therapy practice. It was in 2015 that a friend, who was a digital marketer, asked her to join her company as a content creator, and this is where she found her excitement for writing.
Since joining the content writing world, she has gained a lot of experience over the years writing on a diverse selection of topics, from beauty, health, wellness, travel, and more. Due to various circumstances, she had to close her therapy practice and is now a full-time freelance writer. Being a creative person, she could not pass up the opportunity to contribute to the Art in Context team, where is was in her element, writing about a variety of art and craft topics. Contributing articles for over three years now, her knowledge in this area has grown, and she has gotten to explore her creativity and improve her research and writing skills.
Charlene Lewis has been working for artincontext.org since the relaunch in 2020. She is an experienced writer and mainly focuses on the topics of color theory, painting and drawing.
Learn more about Charlene Lewis and the Art in Context Team.


If using the paint pens on the glass, what kind of spray varnish should I use and will it still need to be cured in the oven? also, will the spray varnish allow the glass to go in the top rack of the dishwasher?
Hi Barbara, thank you for the question.
When using paint pens on glass, it is important to choose a spray varnish that is compatible with the type of ink or paint used by the pens, and that is formulated for use on glass. A good option is a clear acrylic sealer, which can provide a durable finish. Products like Mod Podge Spray Acrylic Sealer are specifically formulated to seal craft projects and can be a suitable choice.
As for curing, it generally depends on the type of paint pen and varnish used. Some paint pens require oven curing to set the paint before applying the varnish, while others may simply need air drying. Always follow the manufacturer’s instructions for the best results.
Regarding dishwasher safety, some spray varnishes, like Mod Podge Dishwasher Safe Waterbase Sealer, Glue and Finish, are designed to withstand washing and can make the glass item top-rack dishwasher-safe once fully cured. However, it’s essential to let the varnish cure completely according to the product instructions, which typically involves air drying for a certain period, and may or may not include additional steps like oven curing.
I used the paint pens and folk art paint for my wine glasses. So, is oven curing good enough? I cant find a sealer to spray on. Do I still need to oven cure after I find and spray on the sealer?
Thank you
Absolutely, oven curing your painted wine glasses is a great method to set the paint, especially if you’re using paint pens and Folk Art paint designed for glass. This process helps make the design more durable. If you do find a suitable sealer and decide to apply it, it’s still recommended to oven cure the glasses afterward. This will ensure that both the paint and the sealer are properly set, providing the best protection for your artwork. Remember to follow the specific instructions for both the paint and the sealer regarding curing times and temperatures. Enjoy your creative project!