

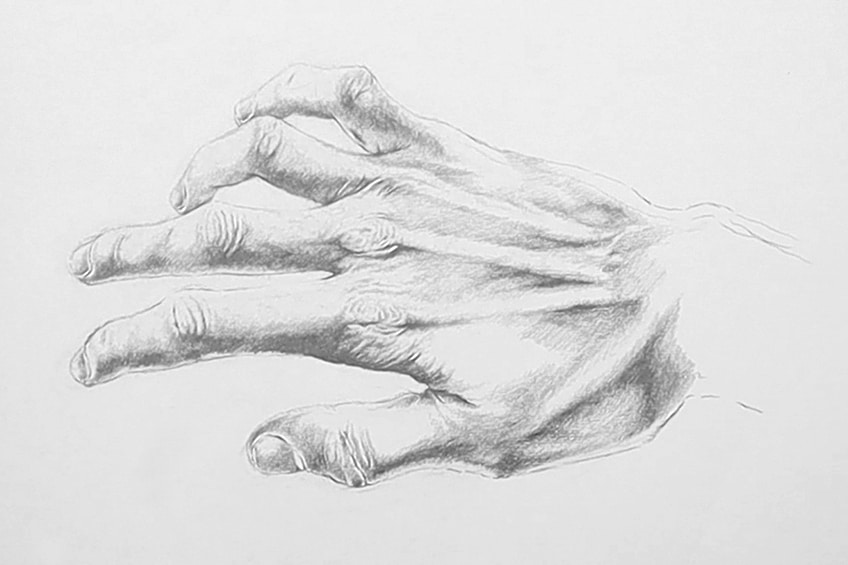
How to Draw Hands – 8 Steps for Realistic Hand Drawing
There is nothing better than learning a new skill in your free time. In this tutorial, we will be teaching you how to draw hands. Drawing hands can be a real challenge. However, anything is doable when broken down into a few steps. In this tutorial, we will be showing you how to draw realistic hands from start to finish. If you are willing to commit some time and patience to the art of drawing you will find that it can be quite a rewarding activity.
Some Things to Know About Drawing Hands
This exercise comes with some commitment, hence the words free time. Drawing hands is a complicated task. It is accompanied by various little challenges but none of which are impossible to complete. It becomes quite simple when we start breaking it down into various steps. We first construct and then we refine, these are the essential principles to remember. These are the two guiding principles when drawing something realistic and complicated. So let’s get started.
Necessary Materials for Hand Drawing
When drawing something complicated like hands, we need to have the right tools. For this drawing, we will be using graphite pencils. The right pencils are essential for helping us achieve various tones. For this tutorial, we will be using a series of Derwent Graphic Pencils. These pencils are easily accessible online and can be bought at your local stationery shop.
The drawing exercise will come with a few mistakes here and there. Therefore, it is useful to have an eraser and a sharpener. You will want to correct your mistakes in the early part of the tutorial. By doing so, it will make the later and more complex stages easier for you.
These supplies you will need:
- A good Set of Pencils, e.g. Derwent Graphic Pencils
- An Eraser, e.g. Derwent Dual Eraser
- A Sharpener, e.g. Derwent Pastel Pencil Sharpener
- High-quality Drawing Paper, 200 g/m – 250 g/m recommended
- Source material, could be a photograph, print, etc.
Preparation and Marking the Centre of the Page
When we start our drawing, you must have a good reference image. A good image can help guide us through the process more effectively. In this tutorial, I suggest using an iPad or printing a photograph of your hand on printer paper. A good suggestion is to try and print an image that is the same scale as your drawing paper, this will make it easier to use it as a reference. Make sure your drawing paper is the same size as your reference image. Once we have this image, we can set up our drawing and reference image in front of us.
Find the Centre of the Page
Find the center of both the reference and drawing page by measuring the page horizontally and vertically. Where the lines cross over is where the center is. Once you have found it make a small dot for reference. Finding the center is a more simple way of preparing you to scale your image. Remembering the center of the page can help you keep your image centrally placed on your drawing paper.
Time Learning How to Draw a Hand
With all of our preparation out of the way, we can now begin our drawing process. remember that this will take time and patience. This is the nature of drawing, that we approach each step with attention and consideration.
Step 1: Sketch Shapes
Now that we have made note of the center of our page we can begin to draw. At this stage, we should use the reference image as a guide that helps us scale general shapes and lines on our drawing paper. Try to draw the general shapes of the hand by using the reference image as a guide for position and scale. Allow the point to be an indication of where you would draw your shapes.
Try to identify the common shapes of the hand, for instance, the side profile of the hand could resemble a triangular shape and the fingers could resemble an ellipse or circle.
By drawing these basic shapes, we are learning about scale and form. These shapes are helping us understand how the hand bends and curves. This step is about learning the fundamental forms of the hand.
We should start to see how the hand has a combination of shapes that are placed together. All these shapes gathered will start to form the basic structures of what will become a hand. Once the shapes are drawn, we can lightly erase them, this way they are still present but don’t interfere once we start drawing the lines. This is just a way to make it easier for us when we draw the lines.
Use a light pencil at this stage and work with your eraser until the scale and general shapes start to resemble a vague structure of the hand.
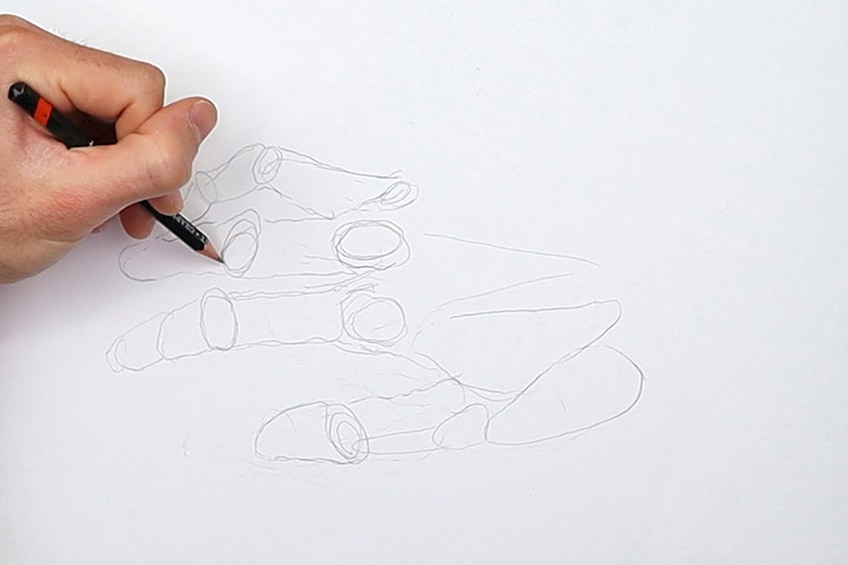
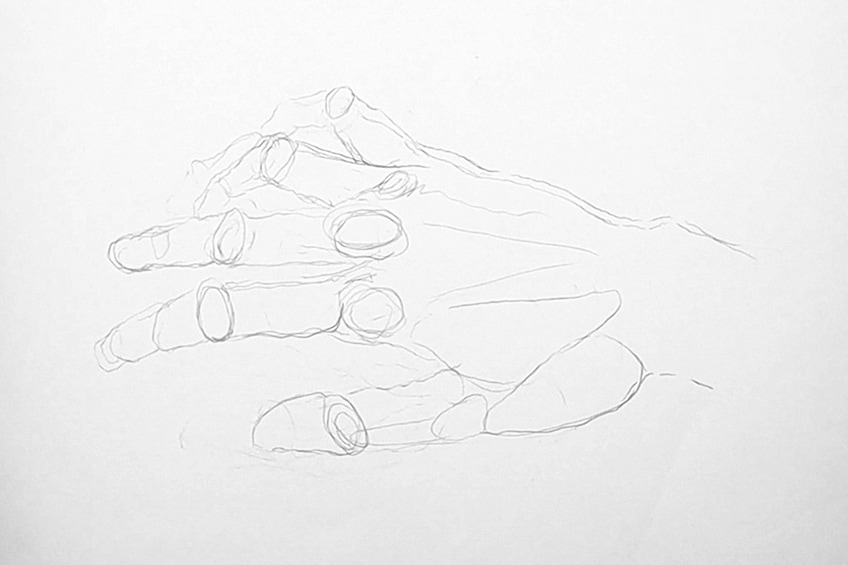
Step 2: Sketch Lines
Using line-work for drawing hands is an essential step when turning the vague shape into an identifiable structure of a hand. We can now work lines into the drawing to connect and outline the shapes.
Try to see where the lines connect between each shape. Keep your line marks faint, that way it is easy to erase any mistakes. Let your reference image show you exactly where you would place lines. Allow the shapes to guide you as you refer to your reference image.

Be creative with your lines, whether they are jagged, straight, or disconnected. Try to make faint marks that start to bring the structure of the hand together. At this stage, we should have turned our vague shapes into an identifiable structure of a hand.
Use either a ruler or a pencil to measure where different lines are about each other. Drawing hands require attentiveness to composition. If we take our time during this step we will gain a better understanding of placement. Be patient and use your eraser during this step to make marks and correct them if need be. Do this until you feel that the general shape of your hand seems accurate in relation to your source image.
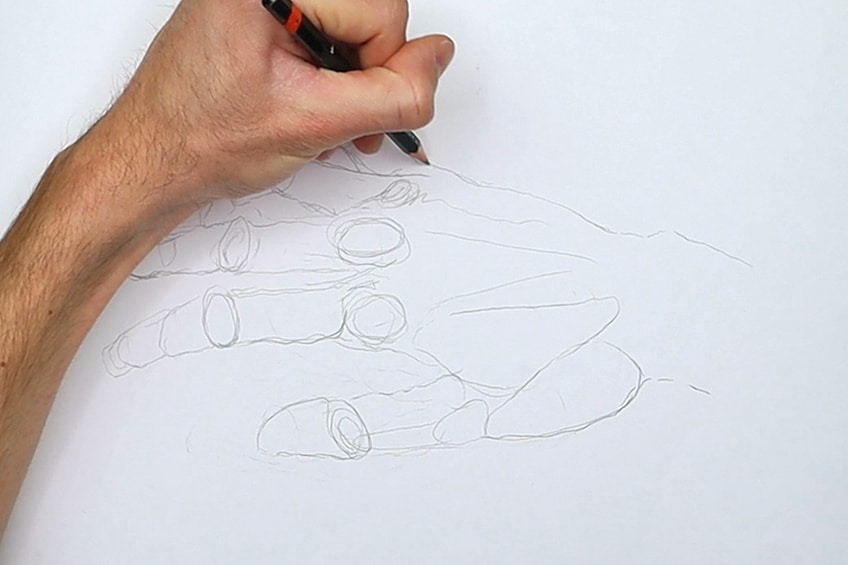
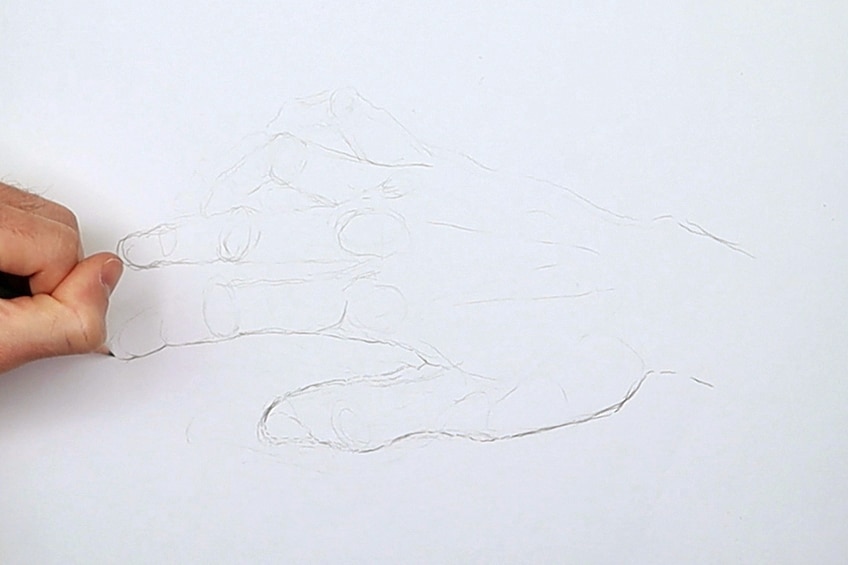
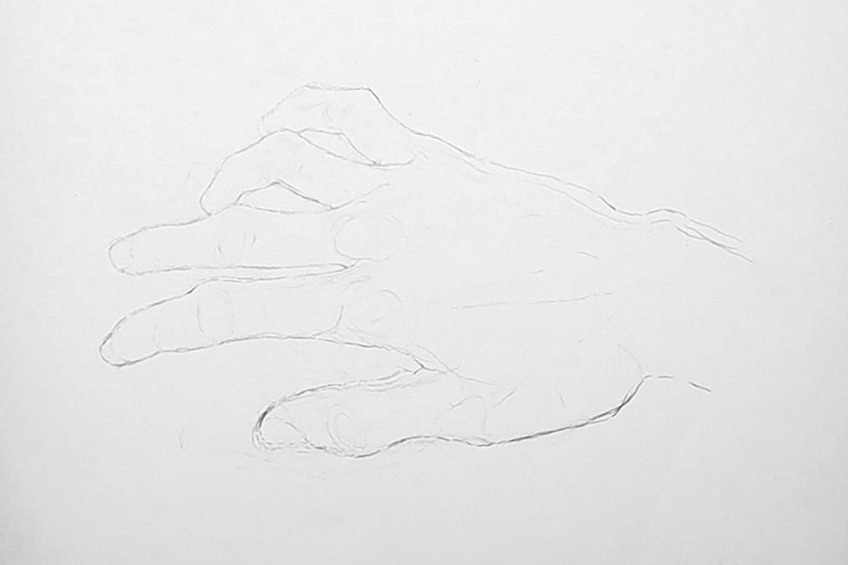
Step 3: General Details
At this stage, try to keep your drawing marks faint, at this point, we are building up general structures.
By now, the hand sketch should resemble a real hand structure. From here on we can become more playful with our mark-making. When looking at your reference image, take a moment to identify the different wrinkles and kinks of the hand. Try to notice the lines and various shades in each part of the hand. By doing so, start to put down simple details that you can see.
Your reference image should guide you with the various details in the different parts of the hand. Start to make general marks that resemble different aspects of the hand. Ask yourself questions before doing so, for instance, is the nail curved or straight? Are the wrinkles long or short lines?
Ask yourself similar questions and try your best to see how they are formed on the hand. By doing this you begin to draw more accurate details. This is how your lines and marks start to make the hand look more realistic.
Step 4: Refining the Details
This is where we start to pay close attention to the little parts of the hand. In the previous step, we added details but, in this step, we will go over them again. Use your reference image to mimic each detail as best you can from each aspect of the hand.
This is where we should correct any faults in the details. Work with your eraser if you feel that you need to redraw any marks. A really good way to do this is to start from one point of the drawing and work your way slowly through the rest of the drawing.
When going through each aspect of your reference image, take a moment to analyze it. Once you feel that you understand each little structure in each aspect of the hand, make your marks, then move on to the next.
Do this until you have attended to all aspects of the hand. Here we can start to work with more of a variety of pencils. However, we still want to keep our drawing relatively light. Work with light to mid-tone pencils, such as (H to 2B).
It is important to remember that we are not shading at this point. We are still trying to lightly draw the details as best we can. Think of it as adding on the lighter layers of the drawing. Later we will put down the darkest layers, which will bring the drawing to life.
Keep your pencil sharp for thinner marks and blunter for larger marks. This is helpful for the different groves and kinks of the hand.
Step 5: Identifying the Light Source
This step is not about drawing it is about analyzing our reference image. When drawing hands, it is important to know how the various types of shadows appear on the hand. This is an effect of light, specifically the direction from which the light comes. For example, if the light comes from the right, it will form shadows on the left of an object. Analyze the light in your reference image.
Each wrinkle, crease, or indentation of the hand will be affected by the light source. This is important to remember when drawing smaller details. This tip may help you to draw difficult parts of the hand, such as the nails and creases. This principle is essential for making a hand drawing look as realistic as possible. A good idea is to go from one section of the hand and work your way through the whole hand.
To understand the light source, take a moment to study your reference image. Your drawing should still be relatively light at this point.
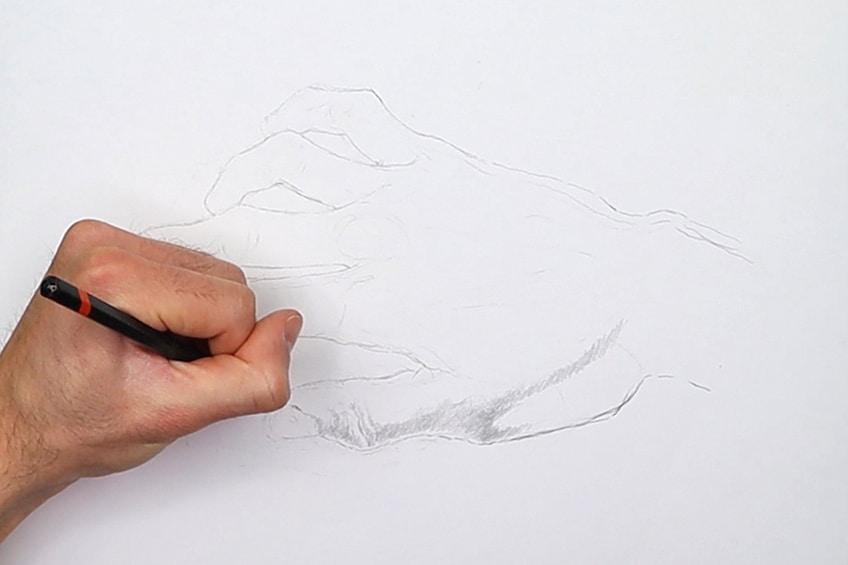
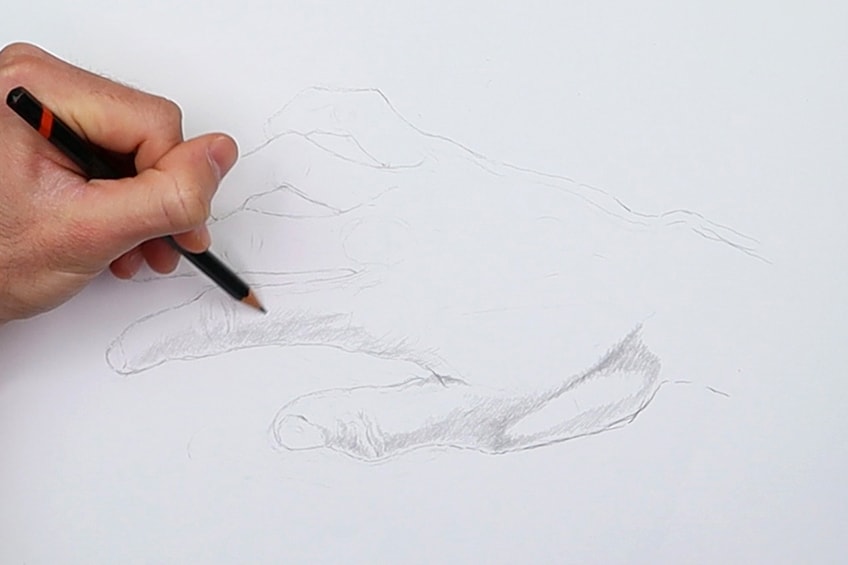
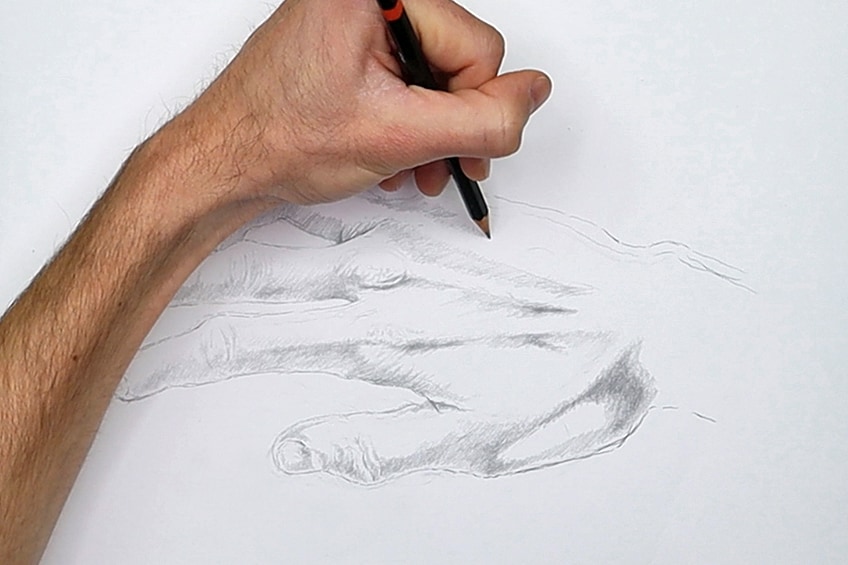
Step 6: Light Shading
We are now at our most complex stages. When shading, it is important to remember the correct technique. Certain techniques work best with certain mediums. When drawing hands in graphite pencil, one of the best techniques is smooth shading. This is where we blend the different graphite pencil tones.
Smooth shading is a great technique to learn when trying to do realistic drawings. It works well with graphite pencils and makes seamless gradients. This can resemble the skin quality very well. Try to work with your light to mid-tone pencils at this stage (HB – 3B).
Keeping a piece of paper under your hand is an effective way to not smudge your drawing whilst shading. Start to analyze your reference image and see the different parts of the hand that would cast a shadow. Take note of all the details that we have drawn and try to work in the different gradients.
These gradients will be achieved with the different pencils. Working with your lightest pencils to your mid-tone pencils (from HB to 3B). Keep your shading light to mid-tone, this will allow us to make the gradients more seamless when doing darker shading.
Make note of the pressure you place on your pencil. Something else to note is the different degrees at which you hold your pencil. If you slant your hand down it is a good way to shade the larger surface areas of the drawing. This is because you will use the side of the pencil as opposed to the tip. Using the tip of the pencil could be achieved by straightening your hand.
You can also blend using your fingers. I prefer to use my fingers, however, a blending stick can be used as well. When shading I suggest using your eraser to correct or clean up any unnecessary marks. Preferably, use your eraser consistently through the shading process. It is not just for mistakes but can be used to make various lines within your shading.
The harder you push the darker the mark. Try to keep a light hand at this stage, by doing so you are less likely to make mistakes that are hard to fix.
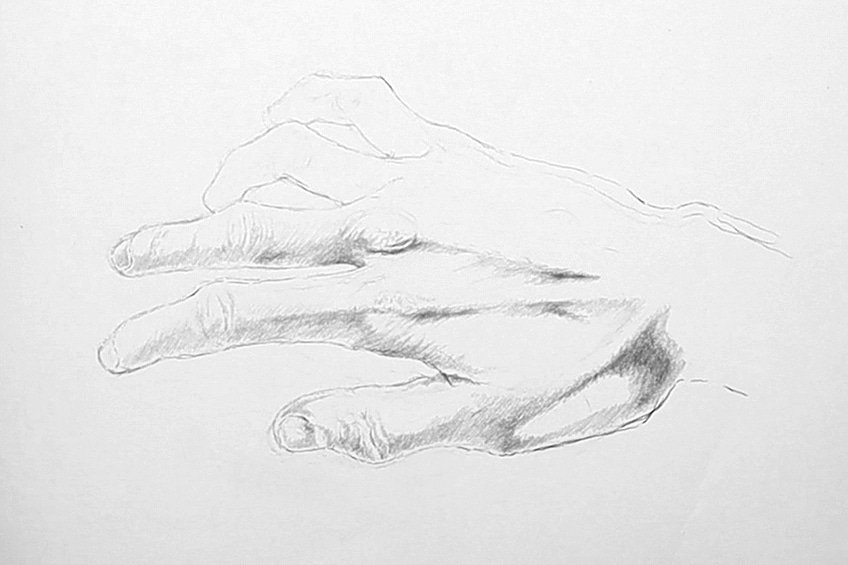
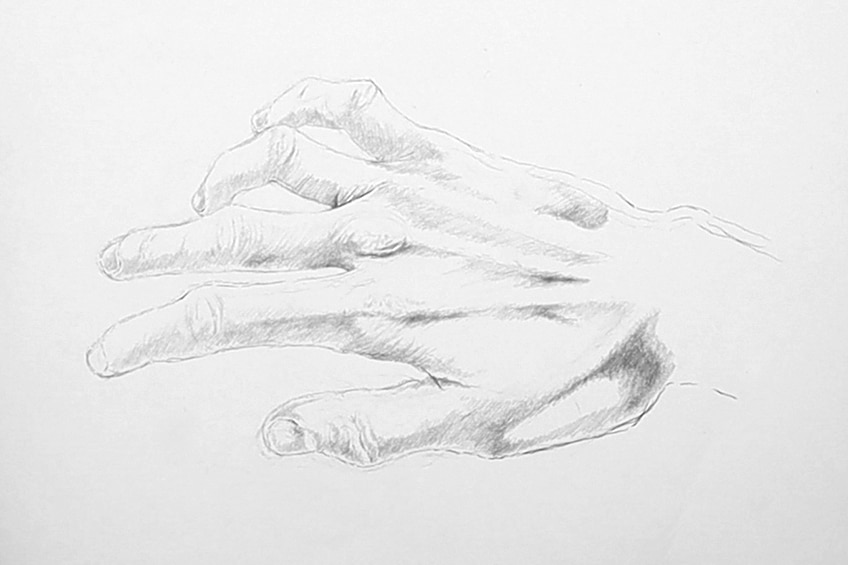
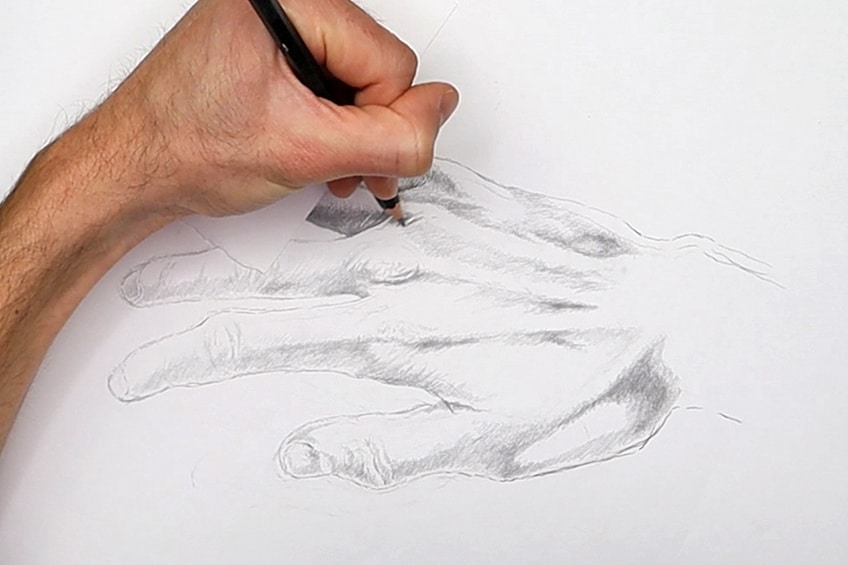
Step 7: Darker Shading for Contrast
This is where we start to maximize the contrast of our drawing. Again, think about shading as putting down layers.

We started with the lighter layers and now we are at the stage where we put down the darkest layers.
When we use layers as a guiding principle it helps us to understand the process of light to dark. This can help us make sense of where to draw the darkest in the drawing. It also helps us understand how to fade the darkest marks into lighter marks. Understanding the layering process is very helpful when drawing something realistic. This is because you should focus on working various shades in the details.
Having done the details lightly we should work different gradients of shade within them. Once you have done that, you can slowly start filling in the darkest shadows within those details. The aim of this stage is to shade darker tones over lighter tones. We do this by slowly and carefully adding in the darker tones where the shadows would be.
Be patient with this stage, allow yourself to take time when adding in darker tones. Refer to stage 7, try to understand how the light falls on the hand in your source image. Once we start gently adding in these darker tones, the image will start morphing into a more realistic image.
Try to see how the shadows of the hand define its darkest moments. The shadow will help to maximize the contrast. This use of maximum contrast allows the drawing to resemble a real-life figure. The shadow makes an object seem realistic because real-life objects cast shadows.
Make note of the areas of the hand where shading is a small distance between light and dark. Such as the edges of the fingers. It is helpful to keep your pencils sharper for these areas.
Analyzing shadow gradients is essential at this stage. This is how we achieve realistic interactions with light in a drawing. At this stage feel free to use the darkest pencils in the set for greater effects of contrast.
At this point, you should feel free to experiment with all your pencils. Try to achieve greater contrast by using darker pencils for the darkest shadows. Remember that your image serves as a reference, it is not about a perfect replication of your source image. So if you feel there are subtle differences that are okay.
Remember: Try your best to be patient with this stage. Apply these darker tones gently by paying close attention to the pressures you apply on the pencil.
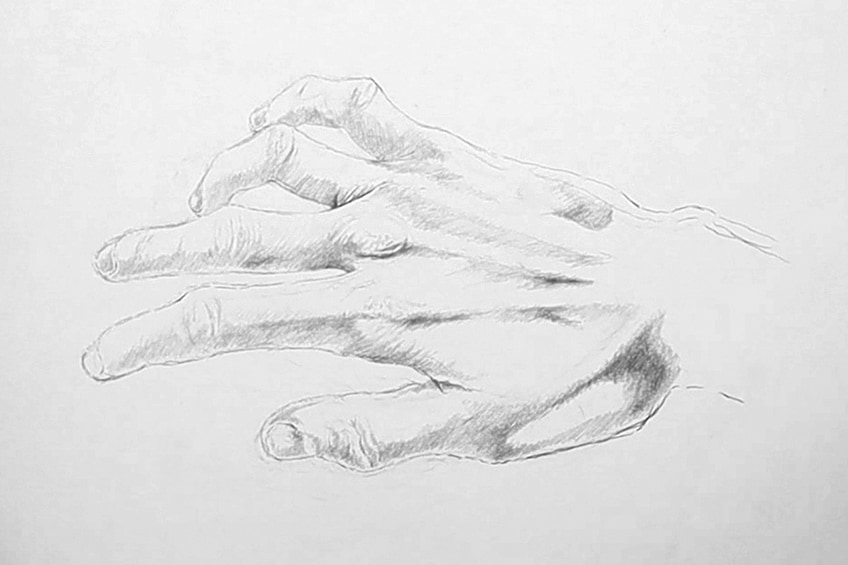
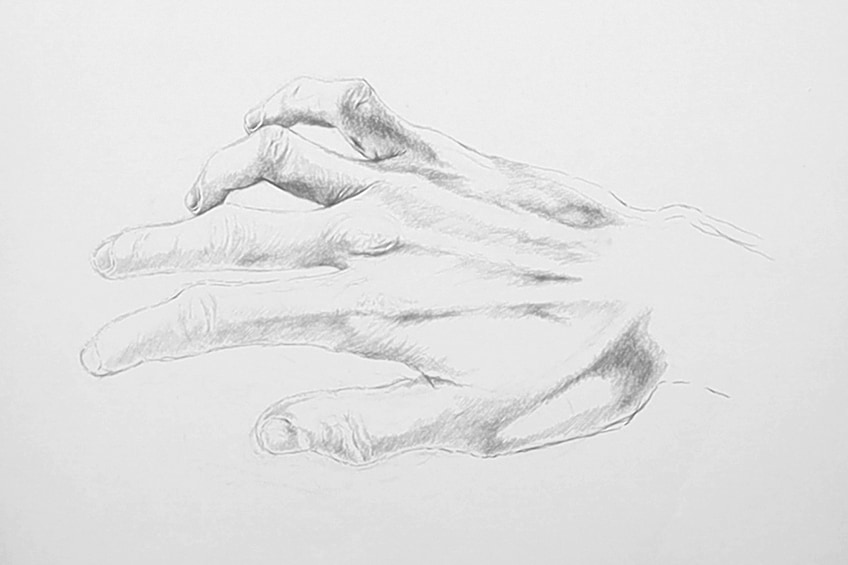
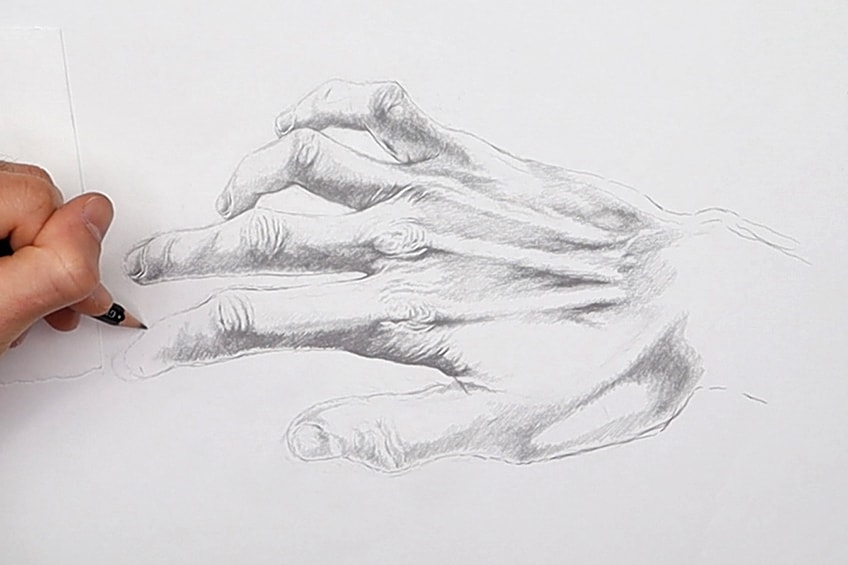
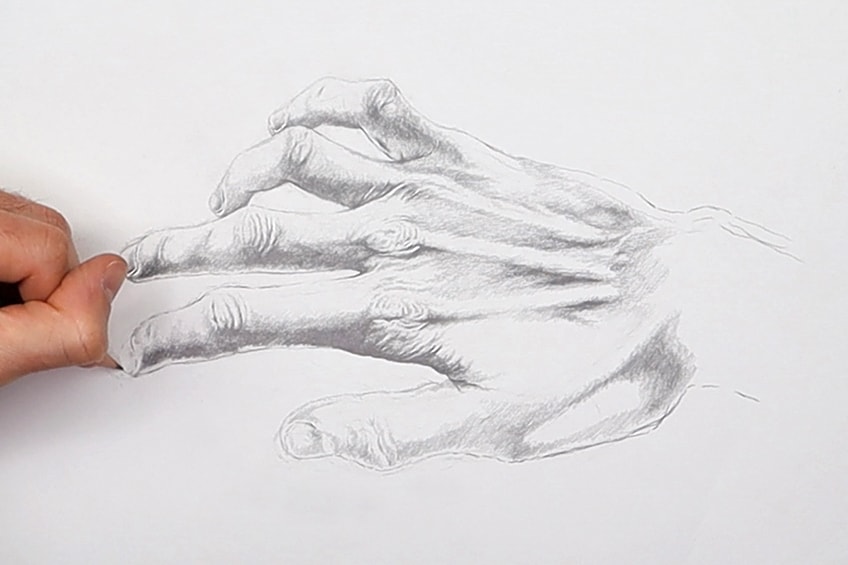
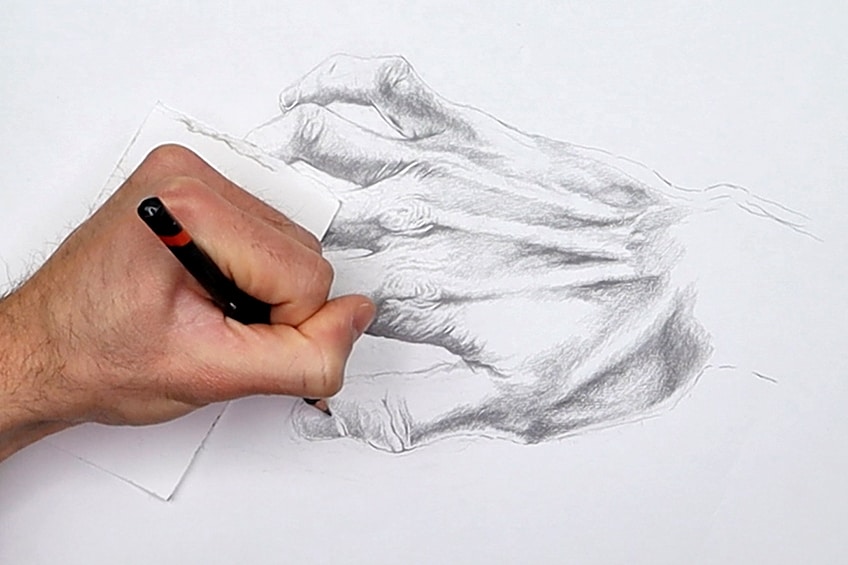
Step 8: Touch Ups for your Hand Drawing
We have come to the final stage of our drawing. By now we should have a drawing of the hand that resembles our source image. Not completely perfect but similar. Start to work with your eraser and mid-tone pencils (1B-3B) to try to merge any distinct lines in your gradients. Attend to areas of the hand you feel that you have not attended to yet if need be.
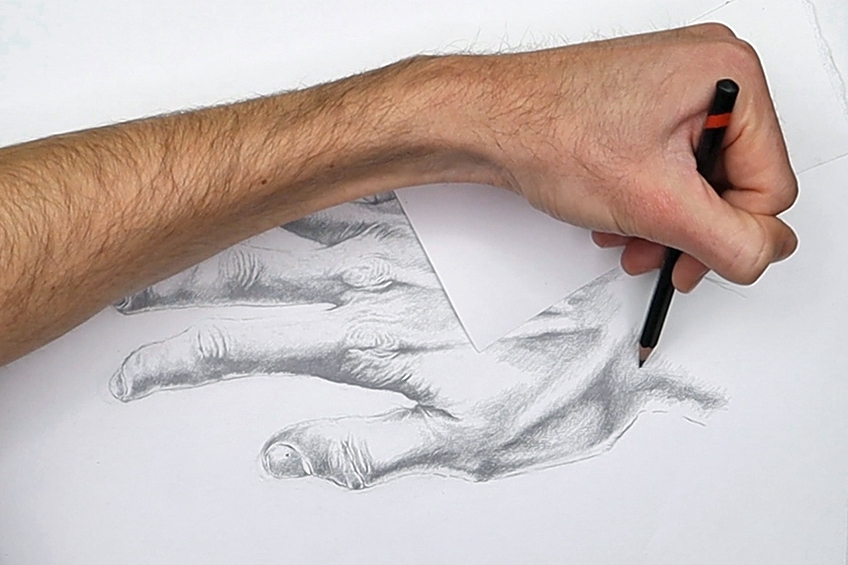
You can either use a blending stick or your finger to do this, I prefer to use my finger. Erase any unnecessary marks around the hand. Once that is done, we can fill in any shadows or lines that we might feel would add value. Always check the creases, kinks, nails, and any other smaller details that might be easy to miss.

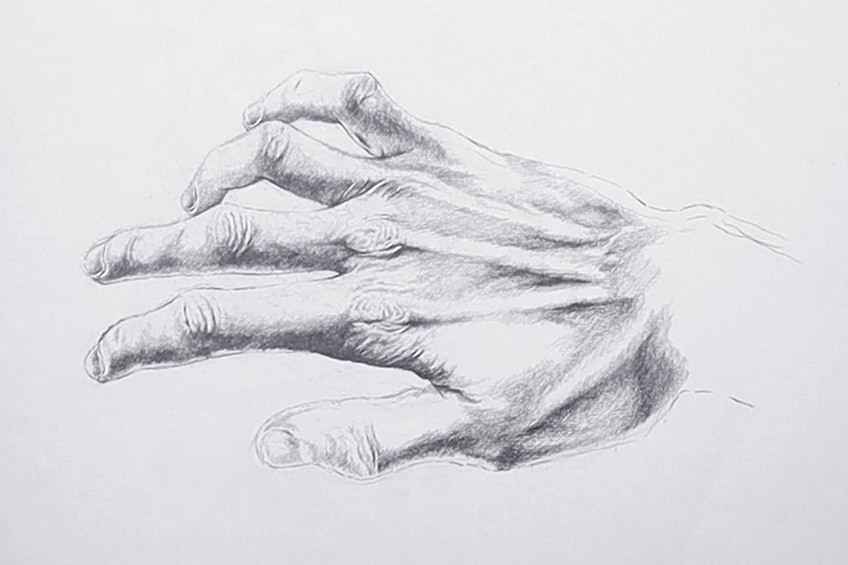
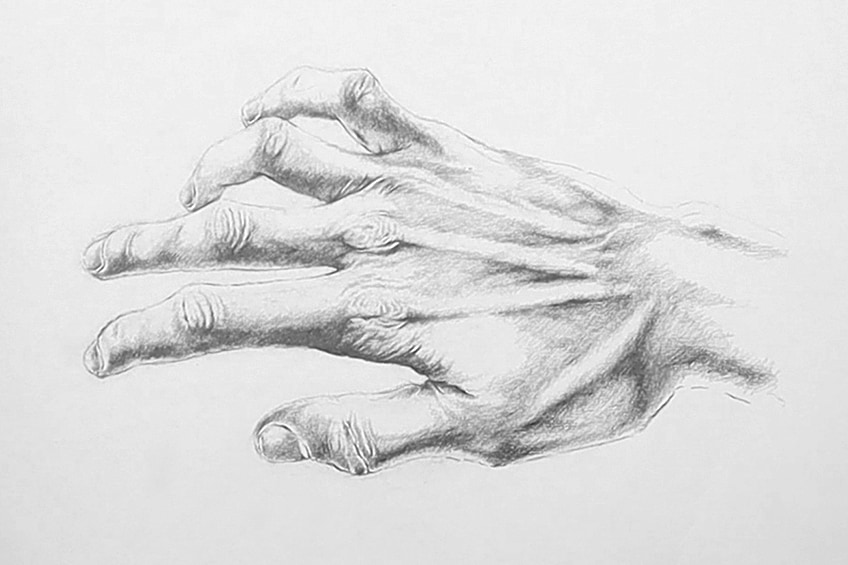
We can also begin to insert the hairs of the hand. It is essential to put in these details last as hair resembles a stroke of the pen. Thus, it is easier to do as a last step. Once your hand is completed the hair marks should fall on top of the hand like an actual hair on a hand. Lastly, work with your eraser one last time to remove any unnecessary marks. And there you have it, a detailed 8 step guide to help you draw a realistic hand.
Tips to Remember for Drawing Hands
- Drawing takes time, allow yourself the time to work on your drawing.
- Practice makes perfect. This tutorial does not guarantee that you will perfect your drawing on the first try. You will have to practice.
- Do not be afraid to use your eraser, this is an essential tool for my own process of drawing.
- Try your best to draw what you see and not what you think you see. Take time with your details.
- When making your gradients smooth, you can either use a blending stick or your finger. I prefer to use my fingers.
- This should be challenging. So, do not be frightened away when you find yourself challenged.
- Finally, have fun with it.
In Conclusion
Drawing takes time. This is why we must focus on each step as much as possible. The beginning stages are about spending time figuring out shape and scale. when we spend time here our drawing becomes more indicative of an accurate hand. If we get the shapes and scale right in the beginning stages we make it easier for ourselves to accurately draw details that are correct in proportion.
Once we have an accurate outline of the hand and have placed the general details accurately within these lines we can begin to shade. this is where we turn our two-dimensional line drawing into a seemingly realistic three-dimensional drawing. Remember that the beginning stages should work as a guide for your shading. lastly, it is then about making sense of light and where to shade from dark to light tones.
That is the just of shading. always try your best to make your early marks demarcate as best they can where you will shade in the later steps.
Frequently Asked Questions
How do you Get Better at Drawing Hands?
There is no secret, it really just takes practice. However, this tutorial gives some insight into certain techniques and processes that one can practice.
How do I Get Better at Shading?
Start by practising with charcoal, it’s easier to blend. Use your fingers or a blending stick. Most importantly, utilize the full range of a pencil kit. By doing so, you will understand the shift from dark to light.
How do I Make my Hand Drawings Realistic?
It is all about light. Understanding light takes some time, just like learning a language. Once you grasp the nature of light and how it interacts with an object, you will start to pick up where and where not to shade on your drawing.

Matthew Matthysen is an educated multidisciplinary artist and illustrator. He successfully completed his art degree at the University of Witwatersrand in South Africa, majoring in art history and contemporary drawing. The focus of his thesis was to explore the philosophical implications of the macro and micro-universe on the human experience. Matthew uses diverse media, such as written and hands-on components, to explore various approaches that are on the border between philosophy and science.
Matthew organized various exhibitions before and during his years as a student and is still passionate about doing so today. He currently works as a freelance artist and writer in various fields. He also has a permanent position at a renowned online gallery (ArtGazette) where he produces various works on commission. As a freelance artist, he creates several series and successfully sells them to galleries and collectors. He loves to use his work and skills in various fields of interest.
Matthew has been creating drawing and painting tutorials since the relaunch in 2020. Through his involvement with artincontext.org, he has been able to deepen his knowledge of various painting mediums. For example, watercolor techniques, calligraphy and lately digital drawing, which is becoming more and more popular.
Learn more about Matthew Matthysen and the Art in Context Team.
Cite this Article
Matthew, Matthysen, “How to Draw Hands – 8 Steps for Realistic Hand Drawing.” Art in Context. June 22, 2021. URL: https://artincontext.org/how-to-draw-hands/
Matthysen, M. (2021, 22 June). How to Draw Hands – 8 Steps for Realistic Hand Drawing. Art in Context. https://artincontext.org/how-to-draw-hands/
Matthysen, Matthew. “How to Draw Hands – 8 Steps for Realistic Hand Drawing.” Art in Context, June 22, 2021. https://artincontext.org/how-to-draw-hands/.


