


How to Draw Shoes – Step-by-Step Sneaker Drawing Guide
Everyone loves to sport a new pair of sneakers with their squeaky soles and bright clean colors. In today’s drawing tutorial, we guide you through the process of creating a realistic shoe drawing. We begin by using construction lines and shapes to create the base shape of your sneaker drawing, and then we use this to create the final outline before adding realistic coloring. We will show you how to create a natural three-dimensional appearance in your hand-drawn shoes, and we give you our best drawing tips and tricks.
How to Draw Sneakers: A Detailed Step-by-Step Tutorial
If we were to dive right into a shoe drawing without taking the necessary planning steps, we would either end up with a skew shoe or a shoe that does not have the correct proportions. The importance of construction steps cannot be overstated. To avoid having to erase and redraw a fully colored shoe drawing, we start our tutorial by using a range of different lines and shapes to create the skeleton of our sneaker drawing. You can see an outline of the shoe drawing tutorial in the image below, and you will see that the first nine steps focus on creating the base shape.

For the last five steps of the shoe drawing tutorial, you are going to need a coloring medium. Our tutorial is written for an acrylic paint medium, but you are welcome to explore and use whichever medium you feel most comfortable with. Whichever medium you do choose, whether it is physical or digital, you will need to draw the construction steps in a way that is easy to remove. For more physical mediums, use a pencil that is light and easy to erase.
If you are using a digital drawing tablet, then we suggest drawing the construction lines on a separate layer to the outline and colors, so that you can simply remove that layer later.
Step 1: Begin by Drawing the Back Line of the Shoe
We start our sneaker drawing by drawing a single construction line. This single construction line will represent the backline of the heel of the shoe drawing. On the left side of your drawing area, draw a vertical line that is tilted to the right.

Step 2: Draw the Top Line of the Sneaker
We are now going to construct the top line of the shoe drawing, right where the foot would slide in. Draw a line from the top of the first construction line out and upwards. At this point, your drawing is not going to look much like a shoe.
If you trust in the process, you will begin to see how things start to fit together.

Step 3: Constructing Your Shoe Tongue
We are now going to draw a long sloping line from the right tip of the line you drew in the previous step. The end of this line should be in line with the bottom of your very first construction line. In future steps, we will use this line to help us draw the top of the shoe and the tongue.

Step 4: Shaping the Toe Cap
We are now ready to give shape to the front of the sneaker drawing. At the right end of the tongue line from the last step, draw a small curved line that goes down. This curved shape will help us to finish the front shape of the sneaker drawing.

Step 5: Finishing the Shape of Your Sneaker Drawing
To finish the construction outline of your shoe drawing, you can now join the front and back ends of your shoe. Create a curving line that dips down and then back up to meet the heel line. You want the bottom line to dip down a little just behind the toe cap.
This will help us to make our shoe drawing appear more three-dimensional.

Step 6: Outlining the Top of the Sole
The sneaker that we are drawing has a very thick sole base, and we are going to outline it in this step. From the top of the front toe cap, draw a curved line that follows the base all the way to the heel line.

Step 7: Shaping the Side Wall
This step is a little more complex than the previous six. We are going to draw the side panel of the shoe. Begin at the top of the rear heel line and curve a line down sharply, before taking it back up until it is in line with where you began. You can then curve the line down and forwards, slightly following the upper line of the sneaker drawing. You can then curve it down to meet the upper sole line.
You can then go back to the heel line, and curve a small line within the top of the shoe.

Step 8: Outlining the Top of the Tongue
We are now going to create the outline of the top of the tongue in your shoe drawing. From the top line, draw a curving line that extends down to meet the sidewall.

Step 9: Give a Hint of the Other Side Wall
A few steps ago, we drew the side panel on the side closest to us. In this step, we are going to give a slight hint of the other side panel.
On the tongue line, draw a short spanned secondary curving line to create a three-dimensional effect of the obstructed but partially visible second sidewall.

Step 10: Shaping the Toe Cap
We are now going to shape the white front cap of your shoe drawing. Simply draw a gently curving line from one side wall line to the other.

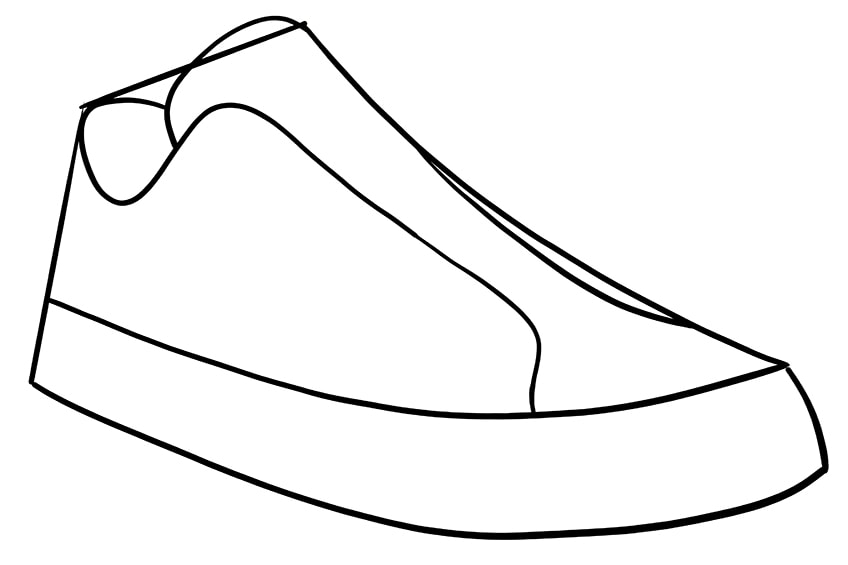
Step 11: The Final Outline of Your Sneaker Drawing
Now that we have constructed the general shape of our shoe drawing, it is time to use them to create our final outline. We are going to follow the construction lines quite closely, but you want to make the corners more rounded. You want to make your drawn shoes a little more realistic by smoothing out the edges.
Once you are happy with your outline, you can erase the visible construction lines.

Step 12: The Eyelets of Your Drawn Shoes
In this step, we are going to begin the process of adding details to our sneaker drawing. On the top part of the sidewall, you are going to draw five oval shapes with smaller ovals inside of them. These shapes are going to represent the eyelets of your drawn shoes.
Tip: These may also be drawn in such a way that makes them look wrapped with the sidewall meaning narrower or wider oval shapes.

Step 13: Drawing the Shoe Laces
Now that we have our eyes in place, we can draw the shoelaces. The pattern is quite intricate, so this process may take some time to figure out. Begin with the bottom shoelace first, wrapping the lace from one eyelet to the opposite side. When you get to the next eyelet, take the lace down under the first one in a criss-cross pattern.
Tip: To create a more realistic shoelace effect, end the hidden laces behind the sidewall of the shoe as shown below.

Step 14: Draw the Sole Marking
This step is quick and simple. All you need to do is draw a stripe along the back of the outsole.

Step 15: Adding Texture to Your Sneaker Drawing
In this step, you are going to add some texture to the sole and inside of the show drawing. On the inside of the heel cap, use some short curving lines and dots to create a rough texture. On the front area of the outsole, draw some crisscrossed lines to create a mesh effect.
You can finish the step by drawing a fine line along the midsole and some fine curved lines between the top laces.


Step 16: Painting the Base Color Coat
You are going to need some black paint and a regular brush to add the first layer of colors to your drawn shoes. Begin by adding black to the stripe on the sole. Next, you can fill the sidewall and tongue of the shoe with an even coat of black. Leave a fine white line along the edges of the sidewalls. You can now use a sharp brush and fill the insides of the eyelet holes with black.
To finish this base coloring step, use some light gray paint and fill all of the white areas with an even shade.

Step 17: Paint the Stitching on Your Shoe
In this step, you are going to use some white paint and a very fine brush to create the stitching details on your shoe. This process is one of the most intricate parts of learning how to draw sneakers. Along the rim of the sidewall and the eyelets, create two layers of stitch marks. Complete the step by creating some fine hairlines along the top of the tongue.

Step 18: Shading Your Shoe Drawing
To add realistic dimension to your sneaker drawing, we are now going to undertake a little shading. Use a blending brush and a shade of dark gray paint to add some structural shading along the sole, toe, cap, and laces. Repeat this step on the mesh texture on the front part of the sole. Finish your step by adding some fine shading around the eyelets using a fine brush.
When shading, remember to leave part of the first light coat visible.

Step 19: Creating Additional Details
In this step, you are going to add some more realistic coloring to your sneaker drawing. Find a shade of olive green and lightly brush this paint within the heel cap with a blending brush. You can then use a clean blending brush to smooth the colors and create a natural blend. To finish the step, use a fine brush and a shade of dark gray to create crease strokes on each of the shoelaces.

Step 20: Finishing Your Sneaker Drawing
In this step, we create some magic. Use a fine sharp brush and white paint to trace the dark outline surrounding the lighter areas of the shoe, this includes the laces. Repeat the step using a fine sharp brush and the corresponding color to trace the detail or textures within the shoe to create a final seamless artwork with no visible outlines.
To complete the tutorial, make use of a small soft brush and black paint to add a realistic shadow beneath the shoe going from a smaller shadow line (rear of the shoe) to a larger shadow area (front of the shoe).

In this tutorial, we have shown you how to draw sneakers in only 20 easy steps. We hope that you have enjoyed the process of drawing a realistic shoe drawing and that you are happy with your final sneaker drawing. With construction steps and shading techniques, you can easily create your very own shoe drawing.
Frequently Asked Questions
How to Draw Sneakers That Are Realistic?
Learning how to draw shoes that are realistic may seem like a tricky task, but it is actually quite easy when you break it down into steps. In this sneaker drawing tutorial, we show you how to construct your shoe drawing to get the correct shape, and how to add realistic coloring and shading.
What Is the Hardest Part of Creating a Shoe Drawing Step by Step?
The hardest part of creating any drawing is getting the correct shape and proportions before you start adding colors and details. We make this part easier in our shoe drawing tutorial with our construction steps. In these steps, we use a range of shapes and lines to create the base shape of our drawn shoes, so that we can get the correct shape.

Matthew Matthysen is an educated multidisciplinary artist and illustrator. He successfully completed his art degree at the University of Witwatersrand in South Africa, majoring in art history and contemporary drawing. The focus of his thesis was to explore the philosophical implications of the macro and micro-universe on the human experience. Matthew uses diverse media, such as written and hands-on components, to explore various approaches that are on the border between philosophy and science.
Matthew organized various exhibitions before and during his years as a student and is still passionate about doing so today. He currently works as a freelance artist and writer in various fields. He also has a permanent position at a renowned online gallery (ArtGazette) where he produces various works on commission. As a freelance artist, he creates several series and successfully sells them to galleries and collectors. He loves to use his work and skills in various fields of interest.
Matthew has been creating drawing and painting tutorials since the relaunch in 2020. Through his involvement with artincontext.org, he has been able to deepen his knowledge of various painting mediums. For example, watercolor techniques, calligraphy and lately digital drawing, which is becoming more and more popular.
Learn more about Matthew Matthysen and the Art in Context Team.


I learned how to draw all thanks to you