How to Draw a Snowman – Create a Magical Snowman Sketch
There’s something about a snowman that captures the whimsy and wonder of winter. It’s a beloved symbol of the season, with its carrot nose, coal eyes, and stick arms reaching out for a warm embrace. As kids, we would spend hours rolling snowballs, stacking them high, and decorating our frosty friends with scarves and hats. But the magic of a snowman isn’t just for children. Even as adults, there’s something heartwarming about seeing a snowman in a neighbor’s yard, reminding us to slow down and enjoy the simple things in life. So, prepare yourself for an exhilarating tutorial where we will teach you how to sketch and color a stunning snowman!
Learn How to Draw a Snowman Step-by-Step
Congratulations on embarking on the fun and festive journey of learning how to draw a snowman! To get started, grab a pencil and some paper, and imagine a cold winter day with snowflakes falling softly from the sky. To create your snowman, you’ll need to draw three circles, one on top of the other, getting smaller in size as you move up. Don’t forget to add twig arms, a carrot nose, and a cozy scarf to keep your snowman warm. And remember, the beauty of drawing is that it doesn’t have to be perfect – embrace your unique style and have fun bringing your snowman to life on the page!
The below collage displays every step you will take to accomplish the final outcome of your snowman drawing!

Step 1: Draw the Head of Your Snowman Drawing
Begin your snowman drawing by drawing an oval shape to represent the head of the snowman.

Step 2: Draw the Main Body
Overlapping the previously drawn oval, draw a second, larger oval shape to represent the main body.

Step 3: Add a Lower Body to Your Snowman Sketch
Overlapping the previously drawn main body oval, draw a third large oval to represent the lower body of your simple snowman drawing.

Step 4: Draw Guidelines for Your Snowman Sketch
Above the head, draw the cone-like shape to represent the general shape of the hat. Within the face and body, draw a curving centerline. On the face, continue to draw horizontal cross guidelines.

Step 5: Draw the Arms, Nose, and Eyes
On each end of the main body, draw a line to represent each arm. Continue by drawing the lengthy nose just above the bottom guideline. Complete the step by drawing the two small eyes on the top horizontal guideline.

Step 6: Outline Your Simple Snowman Drawing
Make use of the previously drawn construction lines to aid you in outlining a more realistic shape for your snowman drawing. Complete this step by adding a scarf outline wrapped around your snowman’s neck.

Step 7: Continue to Outline Your Snowman
Continue to outline a more realistic-looking hat above the head of your simple snowman drawing.

Step 8: Outline the Details
Begin to outline a sharper and wider nose attached to the face of the snowman. Alongside the nose, draw a small circle on each side of the face.
Continue by drawing the buttons represented by circles along the centerline of the snowman’s body.

Step 9: Add the Arms Guidelines
In this step, you will draw a more realistic branch-like shape for each arm, using the previously drawn guidelines to aid you. Complete the step by drawing small circles in a half-moon shape to represent the smile of the snowman. Once completed, erase any still visible construction and guidelines.

Step 10: Detail the Hat and Scarf of Your Snowman Sketch
Draw fine vertical lines within the scarf and hat to represent the seam lines. Continue by drawing fine hairline brushstrokes leading outwards from the top of the hat.

Step 11: Draw the Snow
Draw the snow pile where the snowman is standing. This should slightly obstruct the lower body of the snowman.

Step 12: Apply the First Color Coat
Select a fine, sharp brush and a shade of blueberry-gray paint, and evenly coat the snowman sketch.

Step 13: Color the Hat and Scarf
Use the same brush as previously and blue paint, and evenly coat the hat. Continue using mustard yellow paint, and evenly coat the scarf of your snowman drawing.

Step 14: Color the Details
Begin to fill the eyes, mouth, and buttons on the snowman’s body using a thin brush and dark gray paint. Continue using orange paint to evenly coat the nose. Switch to brown paint and evenly color both arms. Complete the step using yellow paint to color the two cheek circles on each end of the face.

Step 15: Shade the Snowman Drawing
With a small, soft brush and black paint, apply soft brushstrokes along the curving edges of the snowman. Repeat using light blue paint. Complete this step using a blending brush to spread and soften the shading inwards.

Step 16: Highlight and Shade Your Snowman
Use the same brush as previously and white paint, and apply a lighter color coat to the left half of the snowman, this includes the head, mid, and lower body. Continue using a combination of yellow and orange paint, and add highlights and shading in the main body. With a blending brush, begin to soften and spread the color coats.
Complete the step using a soft brush and black paint, and enhance the shading around the facial features, between the scarf, and the separation lines between the oval shapes of the body.

Step 17: Soften the Color Coats
Make use once more of a small, blending brush to soften and blend the color coats in a curving motion within the lower, mid, and top body of the snowman.

Step 18: Shade and Highlight the Scarf
Switch to a fine, sharp brush and black paint, and trace the vertical seam lines of the scarf. Follow this by using a small, soft brush and white paint, and add soft highlights within each seam. Repeat using black paint to add soft shading to the scarf.

Step 19: Continue to Shade and Highlight Your Snowman
Add fine lines within the vertical seam lines of the hat, using a thin brush and turquoise paint. Switch to a small, soft brush and black paint, and add soft shading along the seam lines on the top of the hat.

Step 20: Complete the Snowman’s Hat
Select a thin brush and a combination of blue, black, and turquoise paint, and add fine hairline brushstrokes leading outwards from the center of the oval. Complete the step using white paint to add fine highlight streaks within the oval.

Step 21: Enhance the Details on Your Snowman Sketch
Begin by using a soft brush and black paint to add soft shading to the eyes and buttons. The first color coat should still be visible. Continue by using yellow paint to add light highlights to the nose. Switch to a thin brush and orange paint, and add soft shading within the cheek spots on each side of the face.
Complete the step using a thin brush and black paint, and add shading along the edges of each arm. Repeat using white paint for fine subtle highlight spots.

Step 22: Add a Ground Shadow
With a small, soft brush and gray paint, softly color the snow heap underneath the snowman. Repeat using black paint to add a soft ground shadow to your snowman drawing.

Step 23: Add Falling Snow
To add a magical touch to your snowman, begin to add falling snow surrounding the snowman! To do this, select a thin brush and a combination of white and gray paint, and add fine spots representing the falling snow.

Step 24: Finalize Your Simple Snowman Drawing
You are one step closer to completing our tutorial on how to draw a snowman! Finalize your drawing by erasing any harsh outlines that are still visible. If this is not possible, select a fine, sharp brush and the corresponding colors to trace those harsh outlines achieving a realistic snowman sketch!
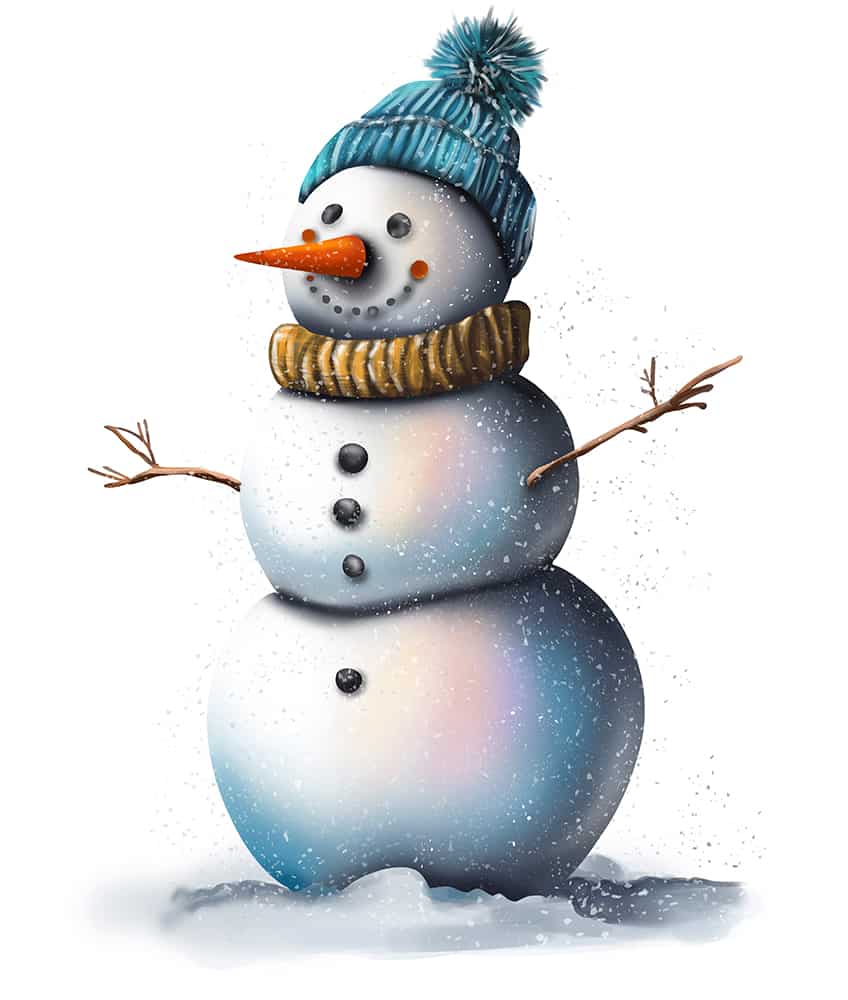
Congratulations on completing your snowman drawing! You did a fantastic job bringing your frosty friend to life on the page. Now that you’ve mastered the basics, don’t be afraid to experiment and put your own spin on things. Try creating a snowman family, giving your snowman a unique accessory, or even adding some background scenery to your drawing. Remember, practice makes perfect, so keep honing your skills and challenging yourself with new drawing projects. Who knows, you might just become a snowman drawing expert!
Frequently Asked Questions
What Are Some Different Ways to Decorate a Snowman?
There are many creative ways to decorate a snowman drawing! Some common accessories include a scarf, hat, mittens, and buttons made out of coal. You can also draw your snowman holding objects like a broom or a carrot nose. To add some color, you can use colored pencils or markers to draw a pattern on your snowman’s scarf or hat. This drawing tutorial allows you to be creative as possible, so unleash your creative side and get drawing!
What Are Some Tips for Drawing a Realistic-Looking Snowman?
To make your snowman drawing look more realistic, pay attention to shading and texture. Use a light touch when shading the snowman’s body to create a soft, fluffy appearance. You can also add texture to the snowman’s body by drawing small, irregular shapes to represent the snow crystals. Another tip is to add shadows to the snowman’s body and the ground around it to make it look like the snowman is there. Additionally, pay attention to the proportions of the snowman’s body, making sure that the head, middle section, and bottom section are in proper proportion.

Matthew Matthysen is an educated multidisciplinary artist and illustrator. He successfully completed his art degree at the University of Witwatersrand in South Africa, majoring in art history and contemporary drawing. The focus of his thesis was to explore the philosophical implications of the macro and micro-universe on the human experience. Matthew uses diverse media, such as written and hands-on components, to explore various approaches that are on the border between philosophy and science.
Matthew organized various exhibitions before and during his years as a student and is still passionate about doing so today. He currently works as a freelance artist and writer in various fields. He also has a permanent position at a renowned online gallery (ArtGazette) where he produces various works on commission. As a freelance artist, he creates several series and successfully sells them to galleries and collectors. He loves to use his work and skills in various fields of interest.
Matthew has been creating drawing and painting tutorials since the relaunch in 2020. Through his involvement with artincontext.org, he has been able to deepen his knowledge of various painting mediums. For example, watercolor techniques, calligraphy and lately digital drawing, which is becoming more and more popular.
Learn more about Matthew Matthysen and the Art in Context Team.