How to Draw a Skirt – Create a Realistic Skirt Drawing
Learning how to draw a skirt is an easy exercise that helps to develop your drawing skills. Learning how to draw a skirt helps to better understand material and fabric and how these kinds of structures can be represented within a drawing. As you learn how to draw a skirt you will essentially be learning how to draw flowing fabric. This can be useful within various contexts of the art genre, whether it be for fine artwork or fashion design. Either way, learning how to draw skirt folds, as well as developing a skirt sketch into a refined drawing is going to enhance your drawing skills as a whole.
An Easy Guide to Drawing a Skirt
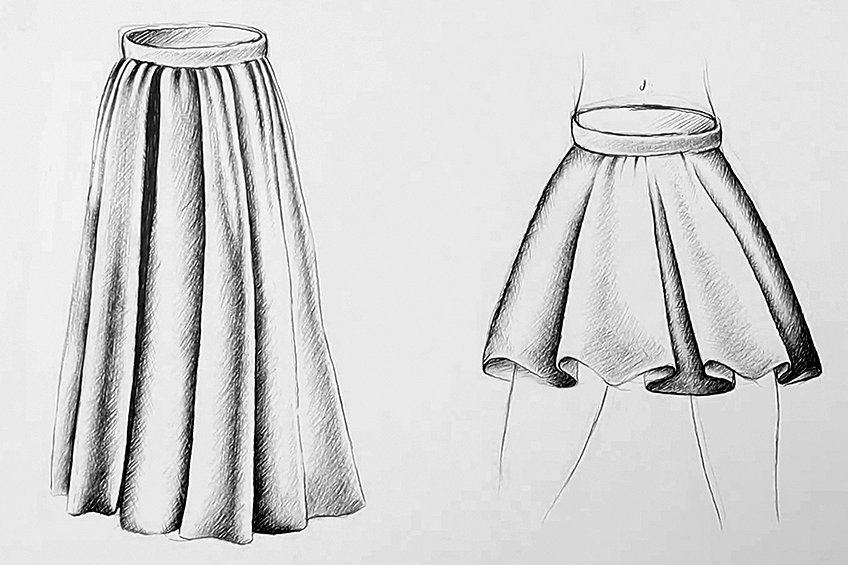
This tutorial breaks down the drawing process of two classical skirts, a pleated A-line skirt, and an accordion-pleated skirt. We’ll be drawing a long skirt and a shorter skirt, helping you understand the fundamentals of how to draw a skirt. These two skirt drawings will help to define the basic structures of two popular skirt styles, giving us an understanding of how to draw skirt folds, shadows and create three-dimensional shapes within a skirt drawing. As we slowly go through the process of developing our skirt sketch into a three-dimensional skirt drawing, we will need the right materials to help us along the way.
Step-by-Step Instructions on How to Draw a Skirt
As we learn how to draw a skirt, we will find that it is really easy to do. Essentially, we figure out the basic shape of the skirt, which is quite a triangular shape. We then slowly make a skirt sketch with our pencils, transforming the triangular shape into a skirt sketch. We will then focus on how to draw skirt folds which then will be slowly refined by our shading. Once the pencil aspect of the tutorial is done, we will slowly refine the skirt drawing with our pens. We will follow the same process for both skirts, the pleated A-line skirt, and the accordion skirt. Now that we understand what we are to expect, let us go through the different steps on how to draw a skirt.
Drawing an A-Line Pleated Skirt
We will begin this tutorial by learning how to draw an A-line pleated skirt. A-line skirts are simple to draw. Since the skirt is pleated, this means that the material folds in on itself, creating a series of folds within the skirt. In this skirt drawing, we will develop the shape, then refine that into a skirt sketch and lastly develop that into a refined skirt drawing. Let’s go through the few simple steps
Step 1: Developing the Shape
The first step is really simple, we begin by drawing an oval. We then want to draw a triangular shape or A-shape, connecting to the oval shape to form the whole skirt shape. This means that the oval part of the skirt should represent where the body would fit in the skirt. Whereas the bottom, wider section, represents the pleated part of the skirt.

Step 2: Refining the Shape into a Sketch
Once we have the general A-line shape or triangular shape, we can then start refining the shape into an identifiable skirt sketch. Using your pencils, we can make a series of waves at the bottom of the skirt. This will define the folds within the skirt. These folds at the bottom of the skirt have an M-shape, as they flow outwardly and inwardly, back and forth, creating a series of folds.

Knowing how to draw skirt folds can be tricky, another way to think about them is by thinking of them as little cursive C-shapes at the bottom of the skirt. They curve inwardly toward the body and outwardly away from the body. If you need to, spend some time trying to get these shapes right. We can also add a gestural mark of a leg to indicate how large the dress is.

Once we have the curves at the bottom of the skirt drawn, we can then add a line from the top of each curved part of the skirt. These lines run to the top of the skirt. These lines will begin to contextualize the curves at the bottom of the skirt, making them look like flowing fabric.
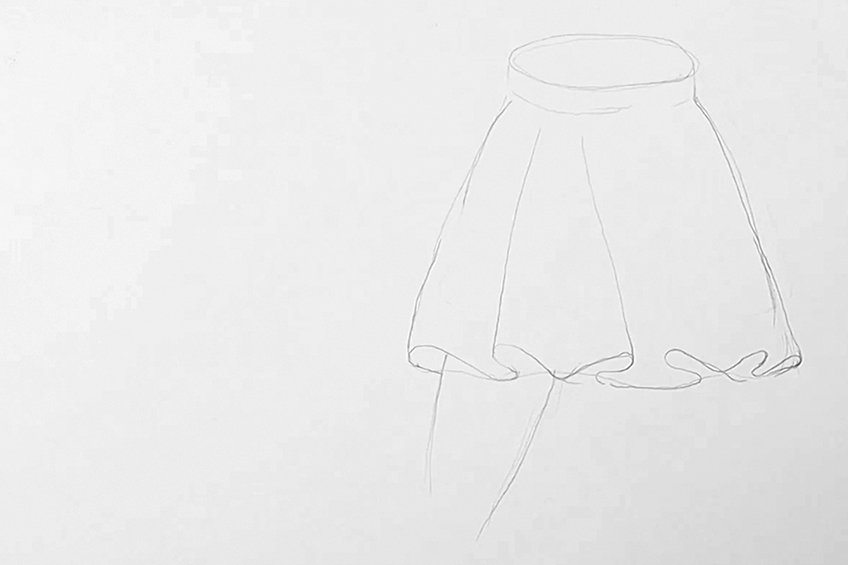
Lastly, we want to add three-dimensionality to the folds, we do this by adding line work where the folds would fold in on themselves near the bottom of the skirt. Try to visualize how the fabric flows outward and inwardly, creating the flowing effect of the pleated skirt. We need to add little vertical lines at the tip of all the inward folds, similar to how we added lines moving up the dress at the tip of all the outward curves of the folds.
Step 3: Shading with Pencil
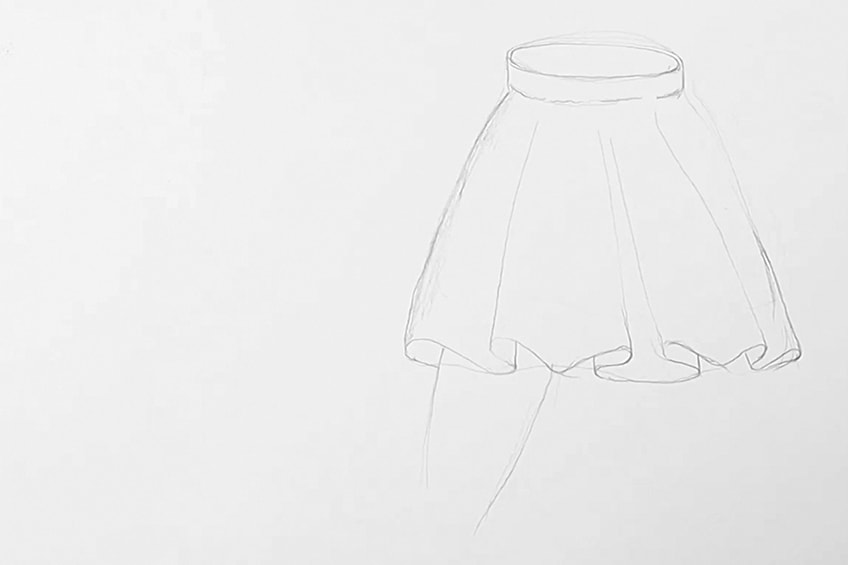
We will now proceed to shade in the skirt with our pencils. We do this by paying attention to the shape of the folds. If there are folds that move outwardly, this means that there are going to be shadows within the skirt in between the folds. Consider the shape of the skirt as your shade, as the parts of the folds that are protruding will be more exposed to light.
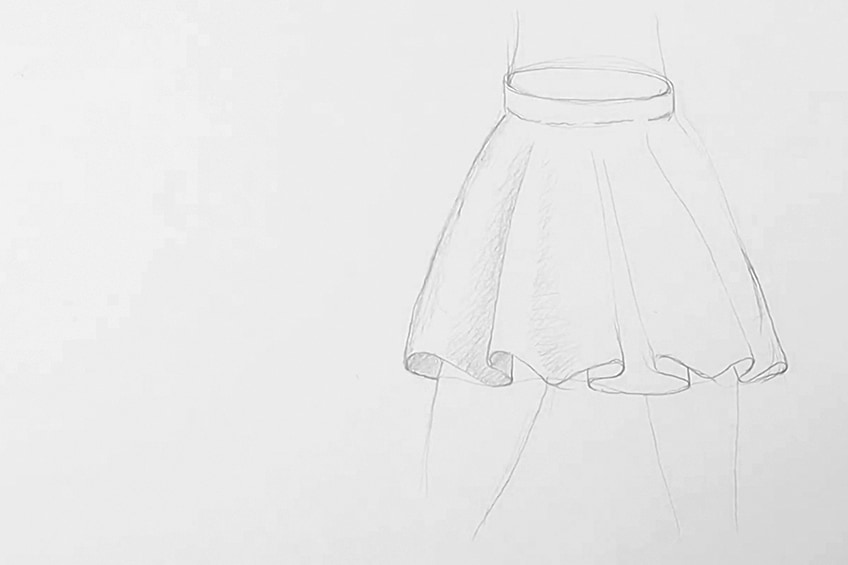
The shadows will be most stark within the folds that fall under the folds that protrude outwardly. This means that these areas will have the darkest shadows. We can also add light shading on the outward folds, running up the center of them in a vertical line.
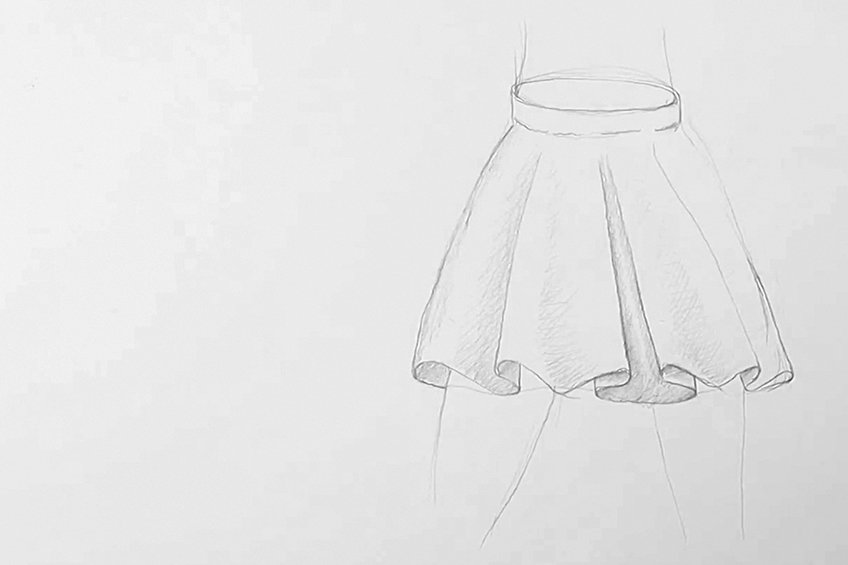
The aim here is to consider each fold and how to better define their three-dimensionality by adding shading in between them. Adding light shadowing on the folds that protrude outward and adding darker shadowing on the folds that fall inwardly. Spend some time here with your pencil, until you are satisfied with your pencil shading marks.

Step 4: Shading with Pen
We can now move on to shading with our pens. We will be using the pencil shading marks to guide our pen shading marks. Once we have established the shading in the skirt with our pencils, we can use these marks to guide our pen shading. Proceed to go over the pencil shading with your ballpoint pens.
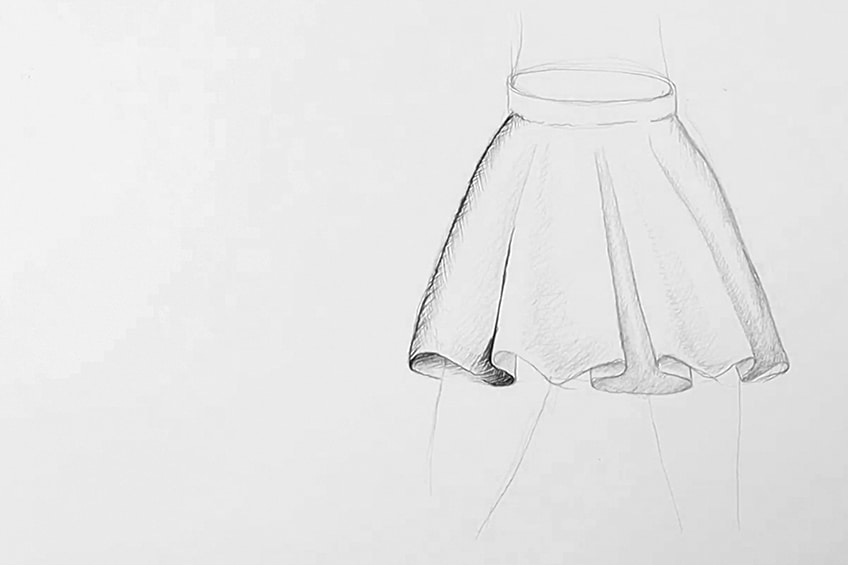
We want to slowly add a layer over layer with our ballpoint pens, adding more layers for the areas where the shadows will be darkest. Try to understand how the fabric curls and folds in on itself, this creates shadowing as some areas of the fabric of the skirt will overlap other areas.

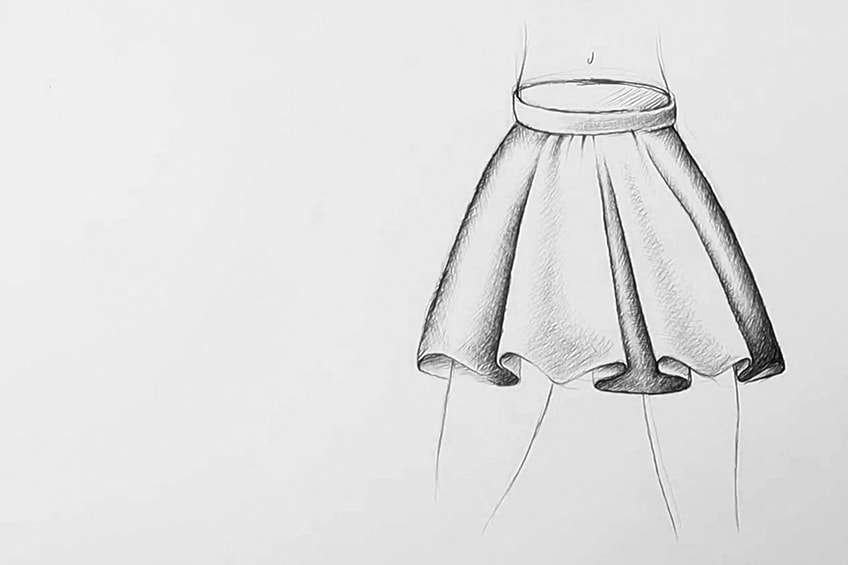
We can add darker shading to areas where we feel will help bring out the shape of the skirt more effectively. A good tip is to keep the folds that protrude as light as possible as they are the areas of the skirt that are most exposed to light. The folds that are inside the folds near the bottom of the skirt can be dark as they are less exposed to light.

To draw skirt folds takes some time to understand how fabric works. The fabric curves in and out, which means that the fold’s exposure changes to light in various areas of the skirt. Perhaps look at some other images and examples of skirts to gain a better understanding of this concept.

Once we have shaded in the shadows of the skirt, we can add some shading around the waistline of the skirt. We can also add gestural marks of the waist with a belly button. We want to keep these lines and marks very simple to give the impression of how the skirt fits on the hips. These are the basic steps on how to draw an A-line pleated skirt.
Drawing an Accordion Pleated Skirt
An Accordion pleated skirt is exactly the same as the A-line pleated skirt, except it is much longer and generally falls to the ankles. This skirt is a beautiful shape that, very similar to the A-line skirt, also folds in on itself. This gives it its pleated quality, which is another great way to practice your drawing and shading skills. We will follow the same process of developing a skirt sketch into a refined skirt drawing. Let’s get started.
Step 1: Developing the Shape
On the same page next to the A-line skirt, we will start by drawing the basic shape of the skirt. The shape of the Accordion skirt, very similar to the A-line, has the ‘A’ shape. However, it is more elongated and narrower as it falls toward the ground. We can start by making a series of pleated lines from the bottom to the top of the skirt.
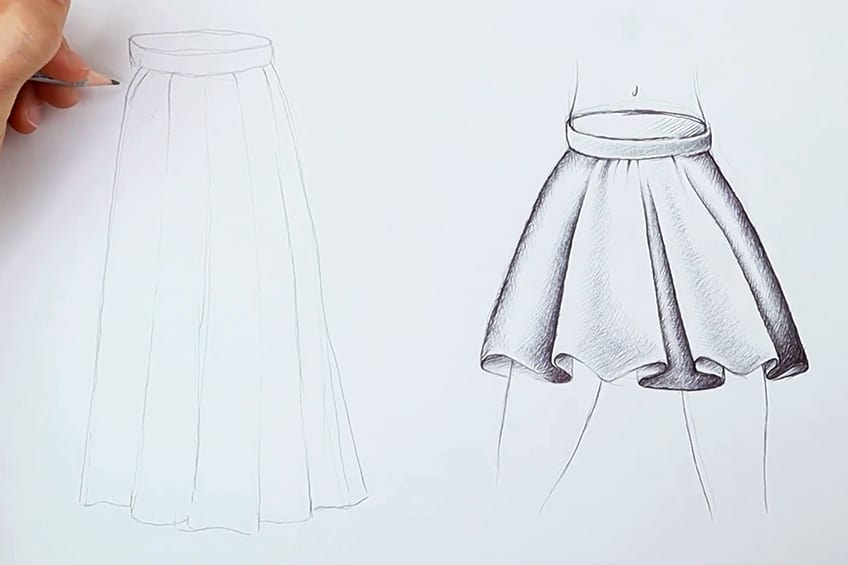
As we draw these vertical lines to indicate the pleated quality of the skirt, we can leave some space between the lines. We can also connect the vertical lines at the bottom of the skirt, like a series of elongated triangles that all connect at the top of the skirt.
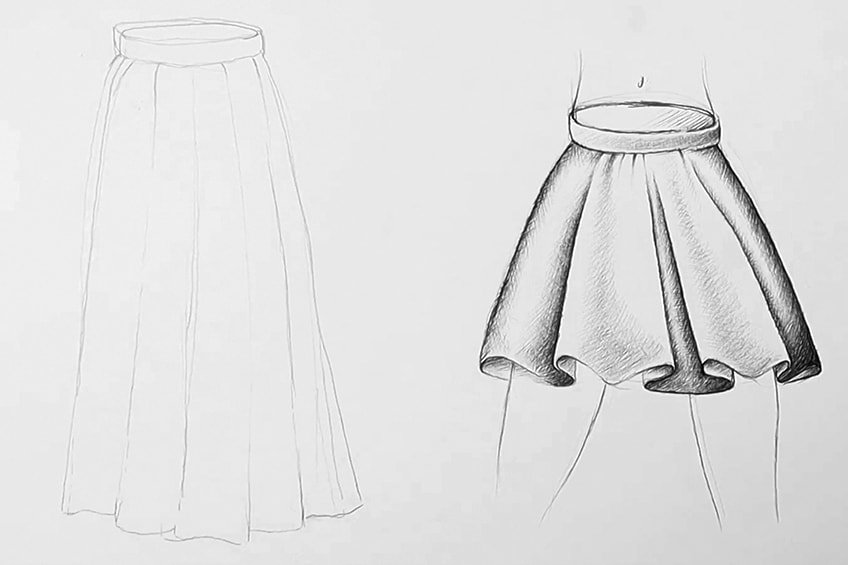
try to draw the side pleats of the skirt more narrowly, as this gives the quality of the skirt wrapping around as opposed to a blockier two-dimensional look. Spend some time playing around with the shape of the skirt, making sense of how the pleats would fall. Remember, some pleats will overlap others, which will change the length of them at the bottom of the skirt. This will give the bottom of the skirt a slight curve.

Step 2: Shading the Skirt
Since we already developed the sketch with our pencils, we can now start filling in some light shading with our pencils as well. Again, we want to pay attention to how the shape of the skirt and how the different pleats of the skirt fall. A good way to indicate these different lengths and moments of overlapping fabric is by the length at the bottom.

The skirt slightly curves at the bottom, giving the impression of a wrapping three-dimensional quality to the skirt. This is important for shading, as we want to lightly shade near the lines to indicate that those are the areas where shadows are present. The shadows will lighten as they move to the pleated areas with more surface area exposed to light.

In some areas of the dress, we can also play around with how deep we want certain parts of the skirt to be overlapped. This can create a variety of motion and texture in the skirt, giving it a more realistic quality as fabric often folds in unpredictable ways.
So play around with how you draw the skirt folds, and how they overlap with one another.
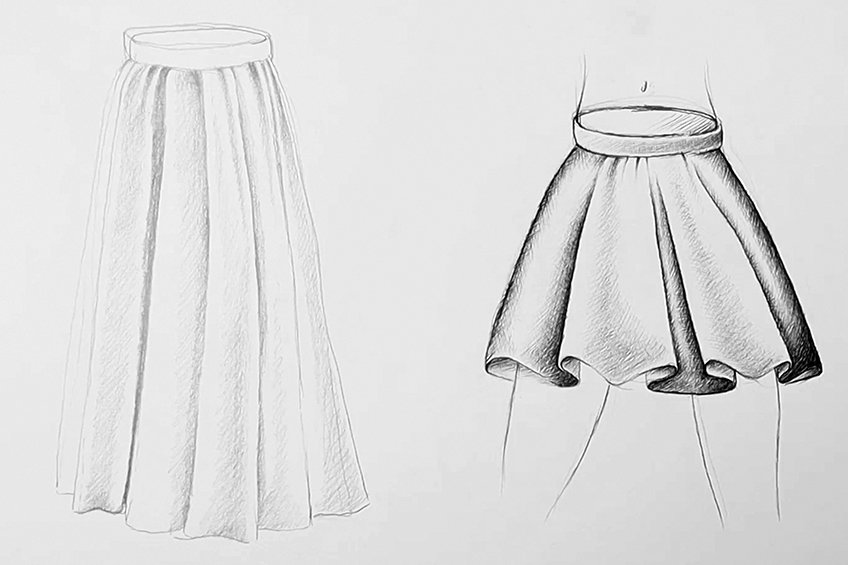
Step 3: Shading with Pen
Once we are satisfied with our skirt sketch and feel that our drawing of a skirt is refined in the pencil as much as possible, we can then begin to shade in pen. We are basically using our ballpoint pen to shade over the pencil marks that already indicate the shadows of the skirt. We now are just going over those marks with a pen to make them more pronounced.
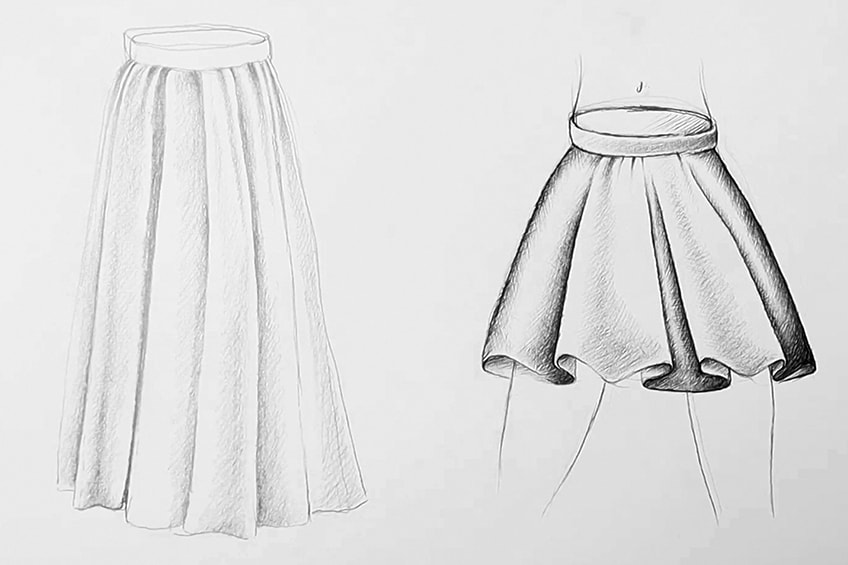
A good suggestion is to slowly start working in these shadows from one side, slowly moving to the other side as you shade in and around each pleat of the skirt. We want to pay attention to the pressure that we apply to our pen, considering the darkness to lightness ratio of how we want our shadows to appear on the skirt.

Again, pleated material means that fabric is folding in on itself, this means there will be an overlapping quality in the skirt. We can shade in the darkest marks near these pleated lines, lightening them as they move out of the overlapping moments onto the areas of the fabric with more surface area.

We also want to consider the waist area, where the fabric is squeezed into single threading to create the pleated quality. This creates little squished areas of fabric that slowly open up as they move down the skirt. This affects how the shading in the skirt will appear, as there will be darker moments in the skirt where there is bunched-up material.

As you shade, you really want to think about the structure of the fabric and how it falls. There is a lot of curvature within the fabric, this means that the folds that are protruding will have slight curvature in them as well. We can demonstrate this quality by our shading, so try to consider the flow of the skirt and where there would be shadows.
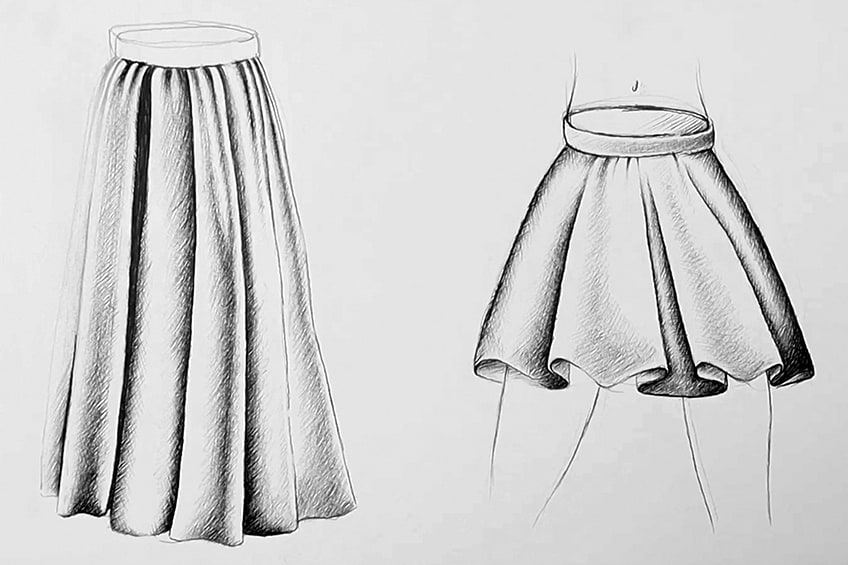
We can also darken any areas of the skirt that are overlapped in the fabric. Again, be playful with this aspect of how you shade, for instance, you can have a dark strip to indicate a more prominent overlapping quality in the skirt. We can also use our shading to indicate how prominent the folds in the fabric are.
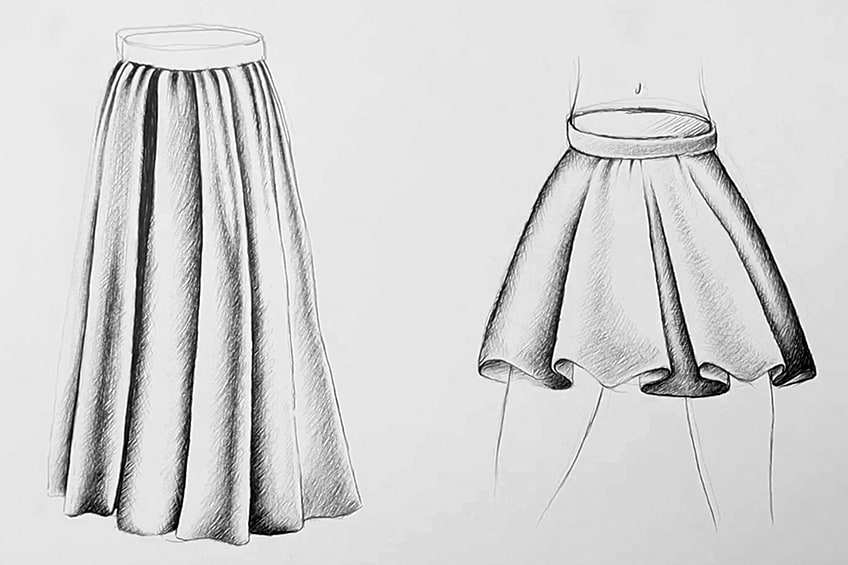
The darker we shade around the folds of the skirt, the more prominent the folds are going to seem in the skirt. Use your shading as a tool to represent the folds in the skirt, the more time we spend on this part of our skirt drawing, the more refined and realistic the skirt is going to seem.
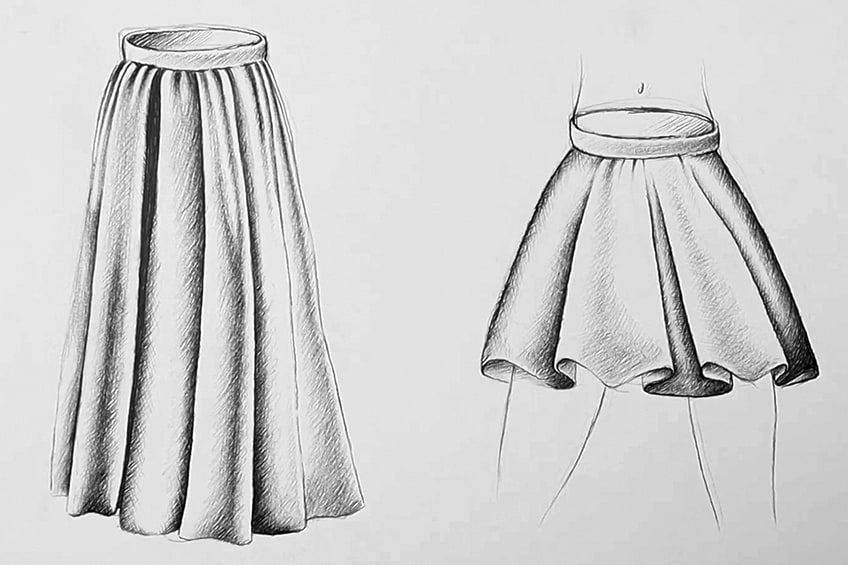
Between the top of the skirt where the fabric bunches together near the waist, compared to where the fabric opens up a bit as it falls, is where we really want to consider our shadows. Spend some time on this step, trying to grasp the quality of the shadows.

This is a full, comprehensive, step-by-step tutorial on how to draw a skirt. Learning how to draw a skirt is about understanding how light interacts with fabric. To draw skirt folds, we need to understand the structure of the fabric and its ability to flow. As we develop the skirt drawing, we must pay attention to the different moments of fabric and how it is exposed to light.
Tips to Remember
- Take your time with learning a new skill. Learning how to draw a skirt and learning how to draw skirt folds can be tricky.
- Always try your best to get the pencil part of the tutorial as accurate as possible, to make it easier for yourself when you use a pen
- Keep an eraser nearby as you will inevitably make mistakes whilst learning how to draw a skirt
- A Drawing of a skirt can be modified in various ways once you understand the fundamental principles of how they are shaped
- Most importantly, have fun with this tutorial. It is a great skill to learn
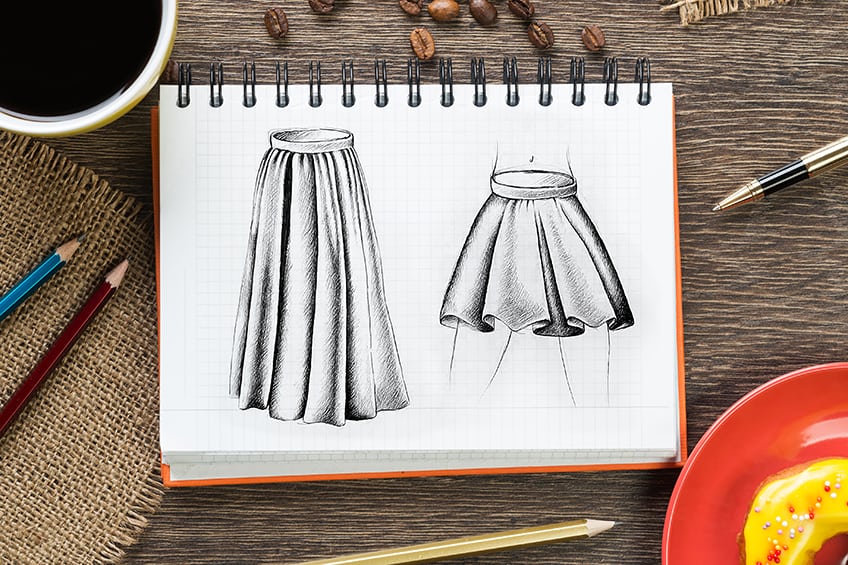
Learning how to draw a skirt is a great exercise mostly for two reasons. For one, you learn how to draw an item of clothing that can be utilized in many ways, whether it be for other artworks or fashion design-related reasons. Secondly, we are essentially learning How to draw fabric, as we develop the skirt sketch into a refined drawing of a skirt. Learning how to draw skirts gives you the skill of representing fabric and how shadows are formed within fabric through the medium of drawing. This can be utilized in various artworks as a feature, such as curtains, cloth, and various other fabric-related structures.
Frequently Asked Questions
How Do You Draw Shadows in a Skirt?
The shadows in a skirt are simple to draw if you understand light and structure. Because the material is a soft structure and can flow, it creates folds in the material. Once you draw the skirt folds, they will run through the skirt creating a series of ridges. The light then interacts with these folds which creates a series of shadows in the dress. However, we can only represent these shadows in the dress if we understand how the dress is formed in the first place. In this tutorial, we learn how to draw skirts that are the classical pleated shapes, which produces a series of ridges that run down the dress. These ridges are then represented through shading in the middle. The protruding parts will be lighter since they are exposed to light, whereas the indented parts of the dress will be shaded in as they are less exposed to the light. This is the basic concept of drawing shadows in a skirt drawing.
How Do You Draw Skirt Folds?
We draw skirt folds in various ways, however in this tutorial, since we are drawing two classical pleated skirts, the folds will form quite specifically. Learning how to draw skirt folds is simple, once we know the shape of the dress. Pleated skirts are skirts where the fabric is sowed in a way that the fabric folds in on itself, creating a series of folds or lines that run from the top to the bottom of the skirt. At the bottom of each of these folds, you are creating a series of waves or another good way to think about it is a series of cursive c’s. Each c at the bottom of the skirt is connected to the protruding parts. This is because as the skirt folds outwardly the top of the ‘c’ shape represents the protruding ridge that runs down the skirt. This is how we draw skirt folds at the bottom of the dress and how they are connected to the lines that run from the bottom of the skirt to the top of the skirt.
How Do You Draw a Skirt in Pen?
As you learn how to draw a skirt, you want to first develop the basic shape in pencil. You then start to slowly form that basic shape into a skirt sketch. Once we have our skirt sketch, we slowly start adding more pencil line work to form it into a skirt drawing. We then start to add shading into the skirt drawing with our pencils, paying attention to how we draw the skirt folds in particular. Once we have established the skirt folds and the shadows by our pencil shading, we can then use the pencil marks to guide our pen shading process. We are trying to utilize the pencil marks as a guide for our shading process. Once we have established the skirt drawing in pencil, we are then going over the lines and pencil shading with our pens. To draw a skirt in a pen is to first draw the skirt in pencil, then allow the pencil marks to guide your pen marks.
Matthew Matthysen is an educated multidisciplinary artist and illustrator. He successfully completed his art degree at the University of Witwatersrand in South Africa, majoring in art history and contemporary drawing. The focus of his thesis was to explore the philosophical implications of the macro and micro-universe on the human experience. Matthew uses diverse media, such as written and hands-on components, to explore various approaches that are on the border between philosophy and science.
Matthew organized various exhibitions before and during his years as a student and is still passionate about doing so today. He currently works as a freelance artist and writer in various fields. He also has a permanent position at a renowned online gallery (ArtGazette) where he produces various works on commission. As a freelance artist, he creates several series and successfully sells them to galleries and collectors. He loves to use his work and skills in various fields of interest.
Matthew has been creating drawing and painting tutorials since the relaunch in 2020. Through his involvement with artincontext.org, he has been able to deepen his knowledge of various painting mediums. For example, watercolor techniques, calligraphy and lately digital drawing, which is becoming more and more popular.
Learn more about Matthew Matthysen and the Art in Context Team.


