

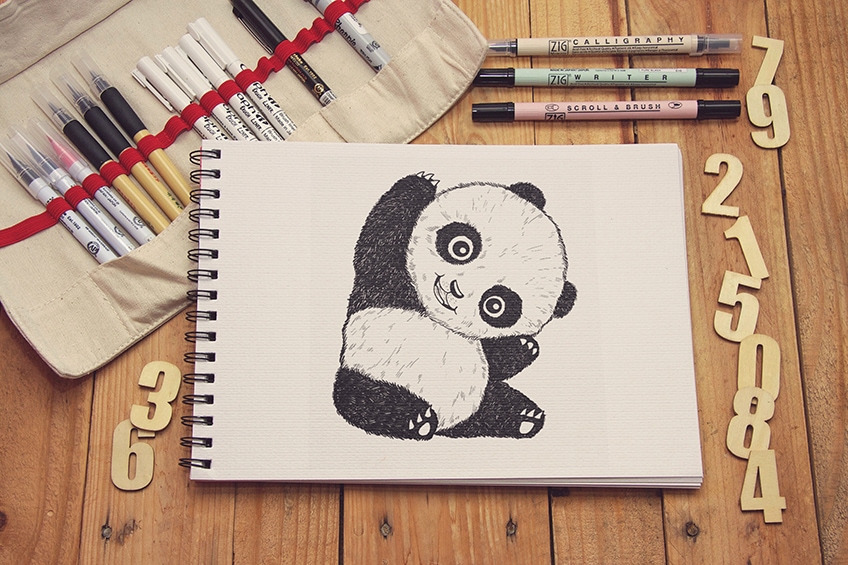
How to Draw a Panda – A Cute Panda Drawing Tutorial
If you have been struggling to draw a panda or are just looking for something different to learn to draw, our cute panda drawing tutorial might just be what the doctor ordered! Drawing can be therapeutic to the stressed-out mind, putting you into a state of relaxation, and this is especially the case when you are drawing a smiling, cartoon-like panda! Whatever your artistic background, from beginner to seasoned professional, our comprehensive step-by-step comic panda drawing tutorial will take you through the process of how to draw a panda, showing you how to construct it proportionately so that it looks both realistic and adorable.
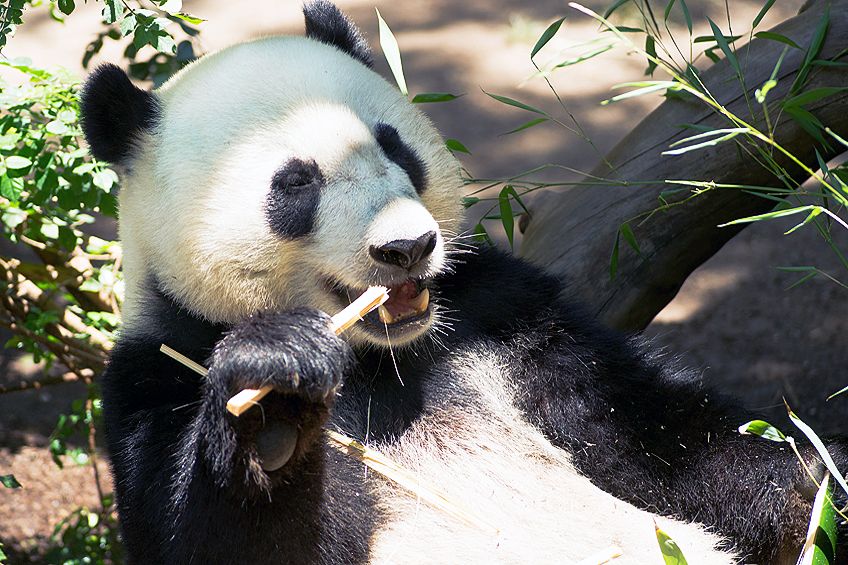
Introducing the Giant Panda
Panda bears are omnivorous creatures who enjoy catching the occasional fish and chomping all day on the juicy bamboo shoots found in their forest home – approximately 26 to 84 pounds each day! Their native home is right in the middle of Southern China, where they are thought to be a national treasure. You might never expect it from the way their bodies are built, but these bears are amazing tree climbers!
Baby panda bears are only 1/900th the size of their mother, born about 6 inches long. They grow exponentially from there and end up being about four or five feet tall! Their mothers can weigh up to 196 pounds and their male counterparts can be up to 308 pounds. They also have a lifespan of about 30 years or so.
Instructions on How to Draw a Panda
This comic panda drawing tutorial is not only suitable for kids, but also for adults. We made sure that each step is as detailed and easy as possible to guarantee a perfect drawing result at the end. So let’s start.
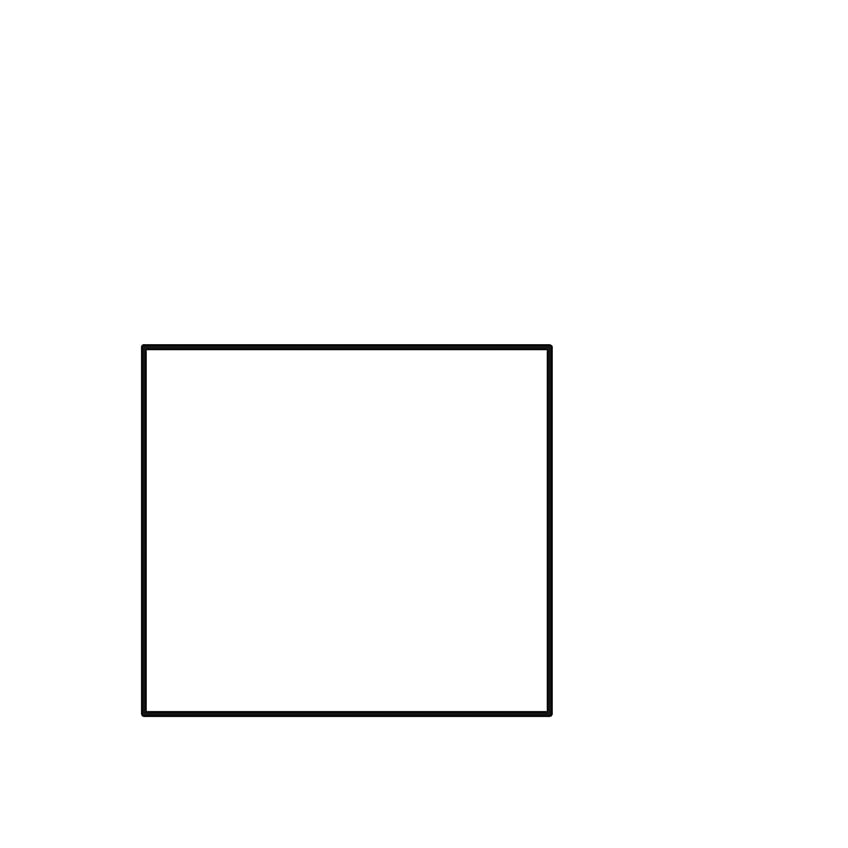
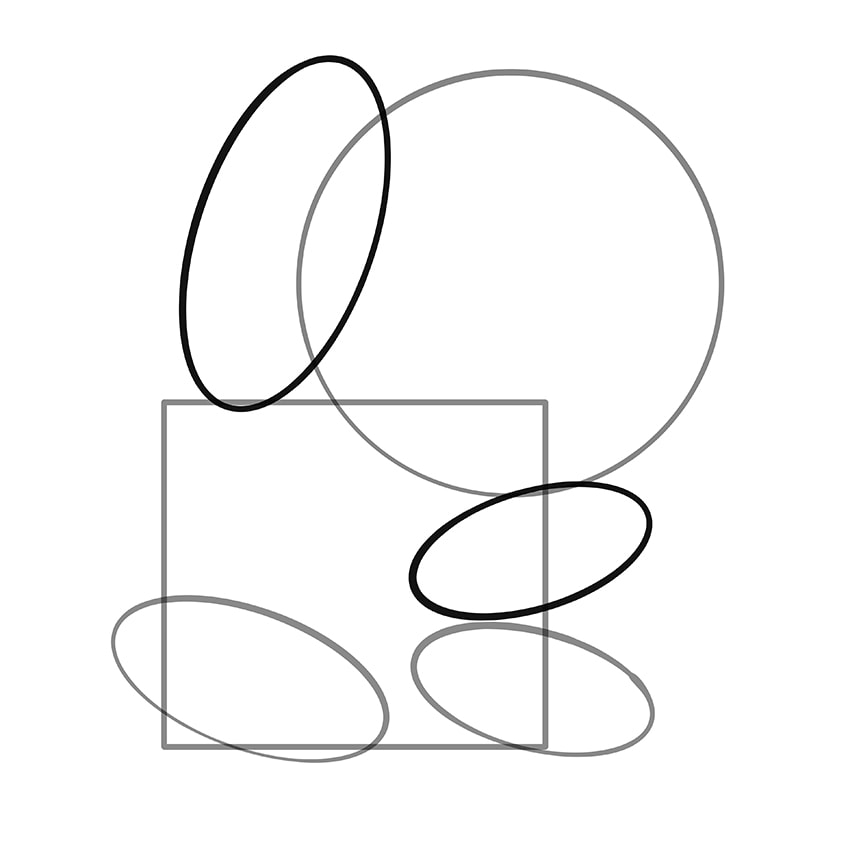
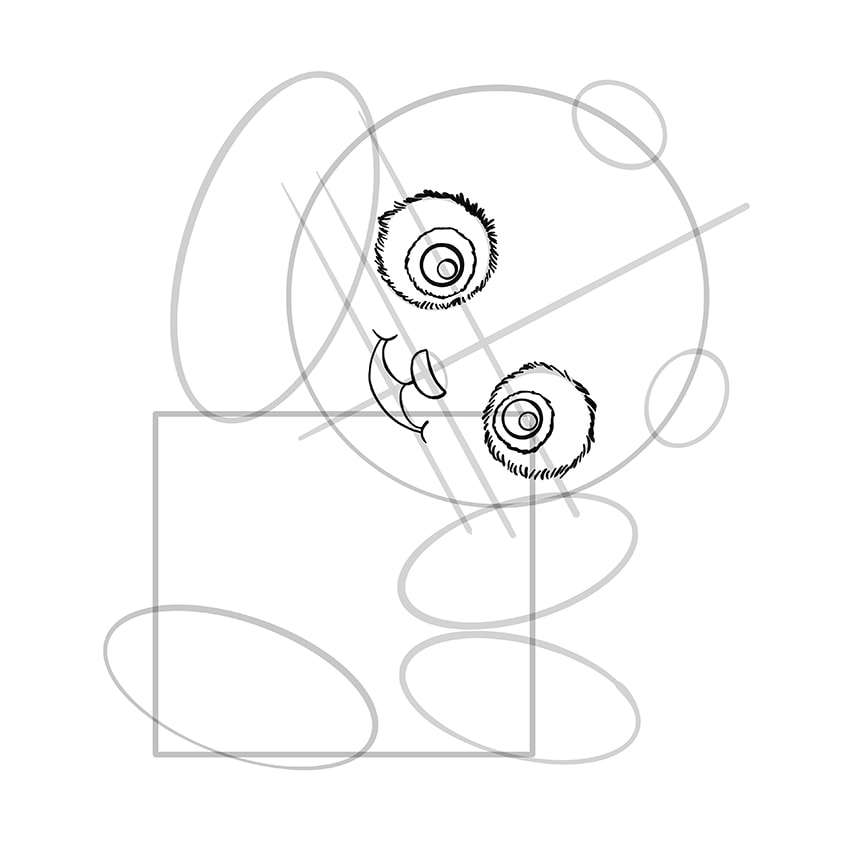
Step 1: Constructing the Body
If you have been following our other tutorials, you might be aware that most of them start with an oval shape as the body’s construction line. This time, however, for a panda bear, we will begin with a square. Do not turn up your nose at the square – all will be revealed in the end! If you want to get a better picture of it in your mind, the bottom half of the torso will fit into the square, thus defining the size of your panda in the end.
Make sure that your square is near the bottom of the page so that there is space to add in the panda’s limbs.
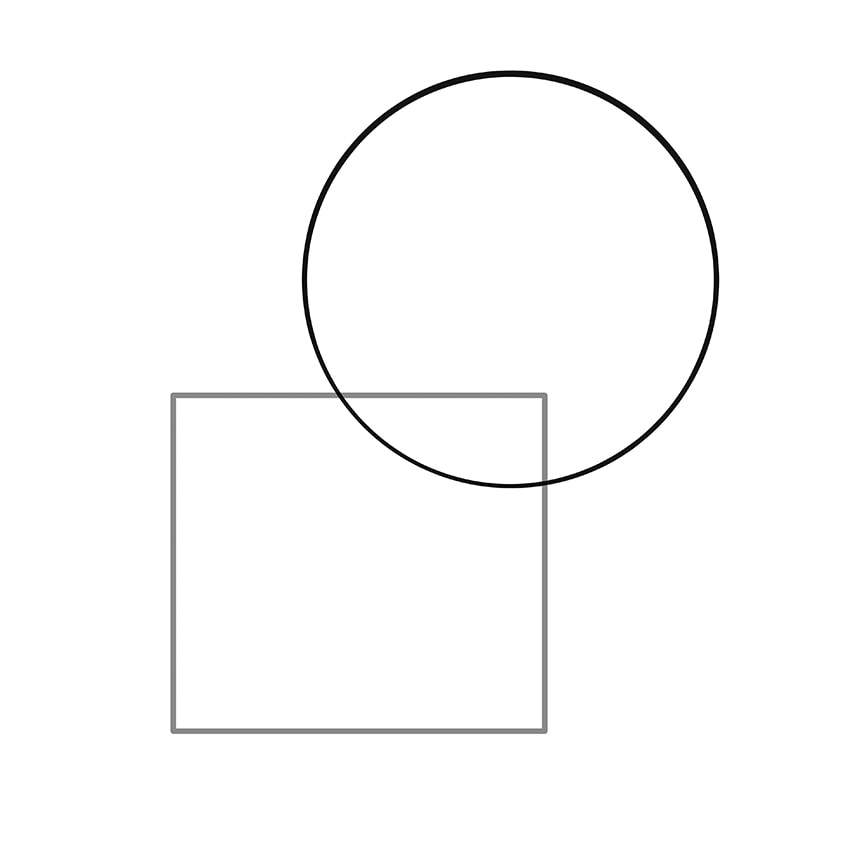
Step 2: Constructing the Face
Your next construction shape will be a circle for the outline of the panda’s face. The circle must be slightly bigger than the square and it should cross over the top-right corner of it. This is because the panda you are drawing has its head hanging on its side. Of course, you also have the artistic freedom to switch it around and make the circle cross over the top-left corner of the square. Whatever your preference, your picture should look like our example below once the first and second steps are done.
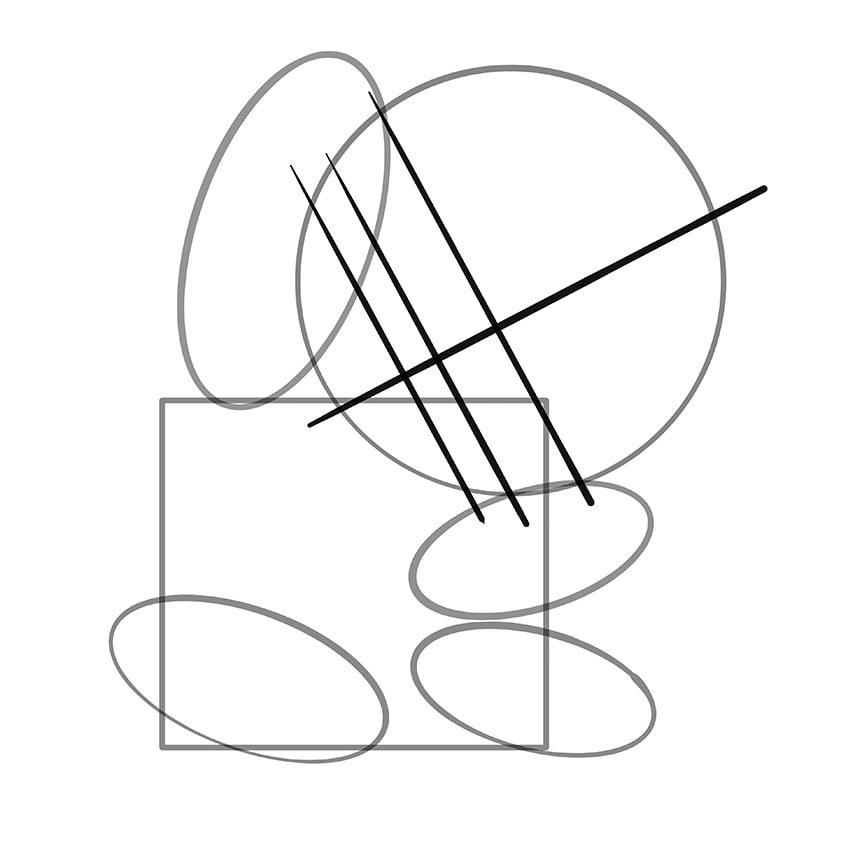
Step 3: Construction of the Legs
With the construction shapes of the head and the body of the panda complete, we can begin to add in the limbs. This step will focus on the construction lines for the bottom legs. This panda drawing is more cartoon-like than lifelike, and since it is leaning to the right, this will affect how the legs appear proportionately and dimensionally. The leg on the right is further back than the one on the left, which means that it must be drawn slightly smaller to show the depth.
The construction shapes for the legs are ovals that are slightly longer than usual, both of which must lean to the left.

Step 4: Construction of the Arms
This next step is very similar to the previous one. The difference here, however, is that you will now be able to see our little friend come to life. The ovals we use for the arms are exactly the same shape as those we used for the legs. The right arm is going to be exactly the same size as the right leg, and you can place it just above it, between the leg and the head. The right arm and leg should look as if they are reflecting themselves exactly.
The left arm is going to be slightly bigger than the left leg, but the same shape. In terms of the placement for the left arm, you want it to be at a slight angle, with the very bottom sitting on the top of the square. You also want to position the left arm so that it slightly overlaps with the head. This position will create a perspective with the arm just in front of part of the face. At the end of this step, your drawing should look something like this.
This step will start to reveal what our cute little panda will look like when you are done.
You will be adding two more ovals for the arm’s construction shapes. The first arm must add is an elongated oval, about the same length as the diameter of the head’s circle. The oval must start from the top-left corner of the square and then overlap with the circle for the head. The second arm’s construction oval will be much smaller in size – similar to the second leg’s oval size.
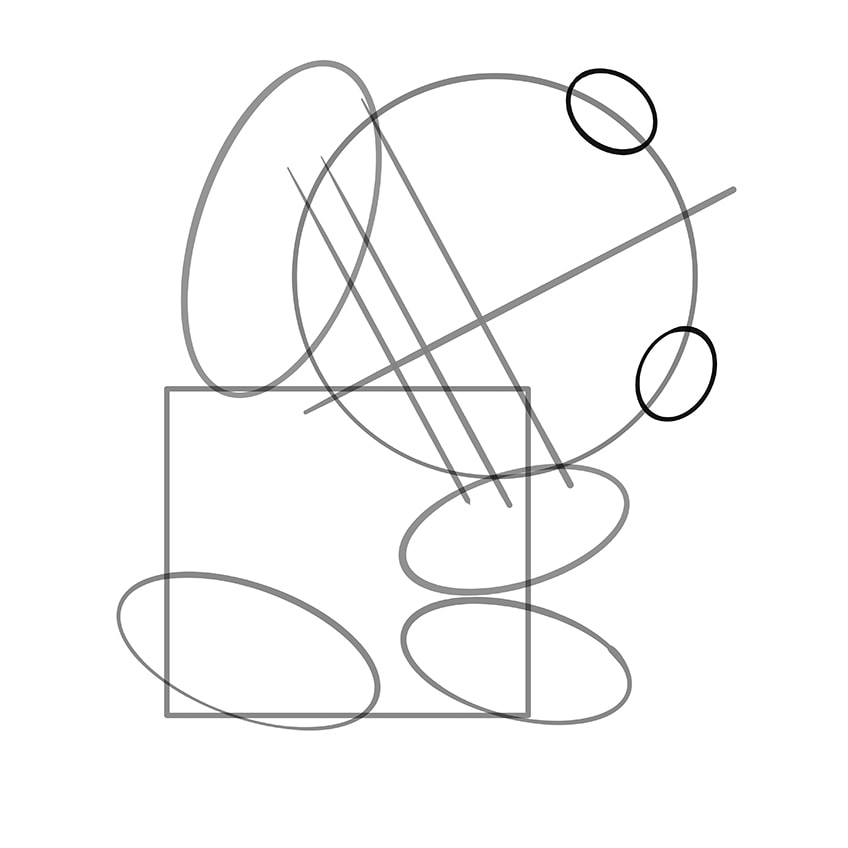
Step 5: Construction of the Face
With the limbs reaching out and the body situated, we can begin to add the construction shapes and lines into the head’s circle for the detailing of the face. Your first step is to draw one solid line right through the center of the circle, starting from the point where the circle crosses over the top of the square and pointing up through where you would imagine two o’clock might be. This is the halfway divider for the face.
The second set of construction lines for the face are a set of three lines running parallel to each other, making up the proportion lines for the nose and the mouth. The first of the three lines is for the nose, and it should start from where the top part of the upper arm and the head’s circle cross over, running down to the top right corner of the square. Leave a space and draw another parallel line, and then one more line parallel to that – the gap between the third and second line should be slightly smaller than the gap between the second and third line.
Step 6: Constructing the Ears
This is a fairly simple step. All that is required is to add two short, little ovals. Using the halfway line for the face as a guide, place each construction oval for the ears on either side. Make use of our example below as a reference for how big the ear’s ovals should be – take heed not to make them too large or your panda will look odd.
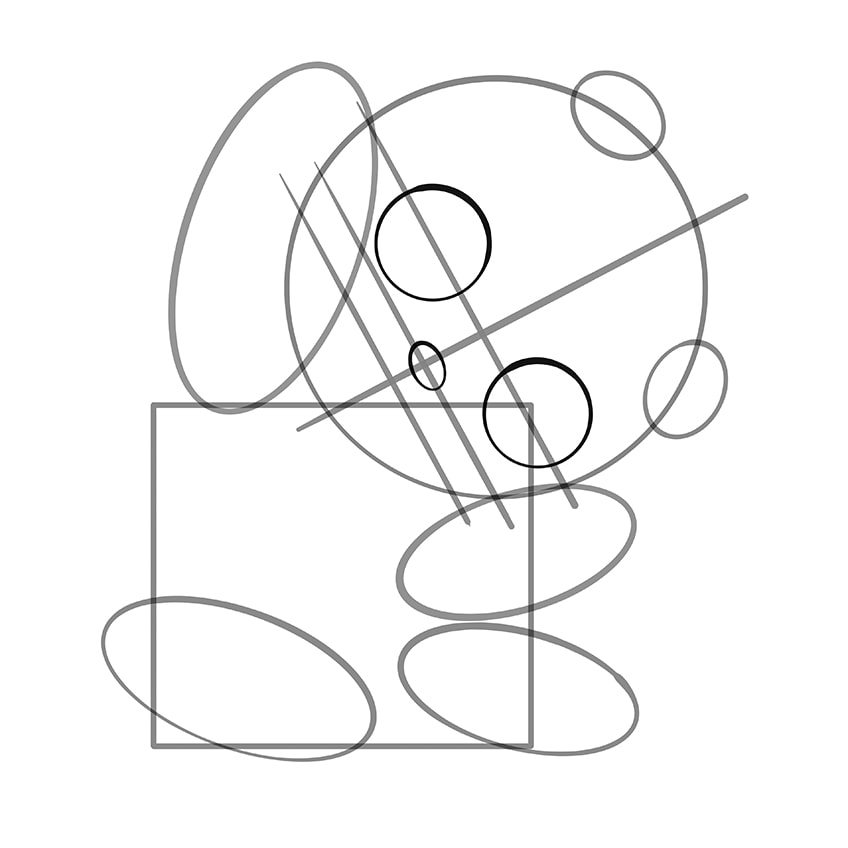
Step 7: Construction of the Eyes and the Nose
When you want to start with the construction of the details of the face, it is a good idea to start with the nose. The nose is easy to place – simply find the intersection where the middle of the three parallel lines crosses over with the halfway line of the face. Add a tiny oval there, facing the same direction as the parallel lines. For the eyes, you must add circles.
Because you are busy with a cute cartoon-like panda drawing, the circles for the eyes should be a bit larger than you might initially think.
Each eye must sit on either side of the halfway line for the face. The eye on the left-hand side of the halfway line should stop just before the middle of the three parallel lines, and the eye on the right should stop just slightly before the top eye.
Step 8: Fleshing Out Our Panda’s Face
Your cute panda drawing is now ready for some substance. This is one of the more fun parts of your drawing expedition. As you can see from our example below, we have outlined the eyes using short, sketch-like pencil strokes. This is done to achieve a look of furriness.
A tip to make the fur seem legit is to make sure that you draw the strokes for the fur going outwards like the sun’s rays.
You can then move on to the eye’s details by adding a circle (to represent the iris) inside the main circle for the eye. Inside the iris you just drew, you can add the pupil, and inside the pupil, you can add another circle – this will be the white speck in the eye that shows how the eye glistens.
For the nose, you will use the left-hand side of the nose’s construction oval as the base and turn the oval into a crescent moon, but slightly thicker. Where the halfway line meets the bottom of the crescent moon, draw a line coming down and looping back up on each side of the halfway line. This is similar to drawing a very basic cat cartoon face. You can connect these two lines with another curved line, which forms the panda’s smile.
Do not forget to accentuate the cuteness of the panda by bringing out its cheeks. You can start by adding a small, slightly curved line resting against each point of the panda bear’s smile.
Step 9: Adding Fluff to Your Panda
From the bottom of the midline of the face, trace a curved line that crosses the top of the square and dips down just before the corner. You can then fill in the line between the bottom of the arm and this point, and continue down to the top of the oval. Use your intuition to create the body of your panda using the construction lines as a basis. The aim of this is to draw the outline of the panda’s body by drawing short, sketch-like strokes to represent the fur that the panda is covered with, much like what you did for the eyes in the previous step.
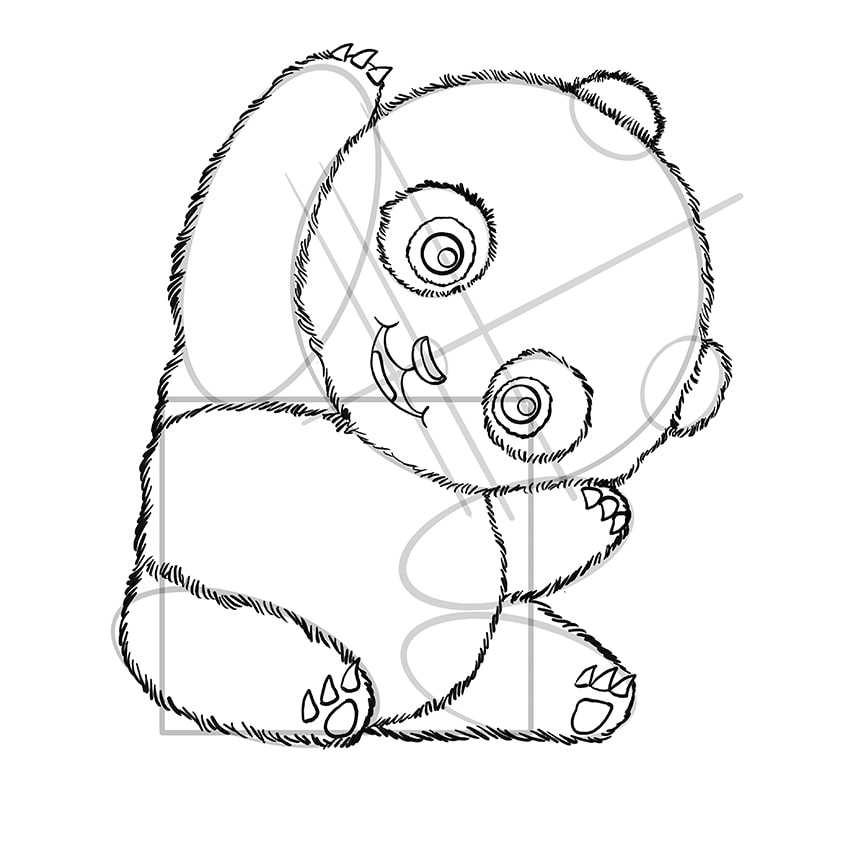
Starting with the head, draw out the sketch-like pencil strokes for the fur, following the circumference of the circle. When you add the ears, the same pencil strokes must be used, as the ears are also furry. These should be curved lines, cupping the top of the panda’s head and leaving out the bottom of the ear’s construction oval. To make the nose seem more detailed, you can add another skinnier crescent moon inside the one that is already there.
You can use our example to understand how the tongue should look inside the mouth.
Now that there is a little bit of life within the panda bear’s face, you can start to do the same with the rest of the body, moving on to the rest of the outline. For the arm on the left of the face, you must leave out the right-hand side of the arm’s construction oval. This will give the appearance that the arm is slightly behind the panda’s head.
Step 10: Detailing
Now that your panda’s outline is perfectly proportioned, you can use your eraser to remove the construction lines and shapes. You can then add in some detailing lines to show the ruffles in the panda’s furry coat and the contrasting black and white colors that this animal is so well known for.
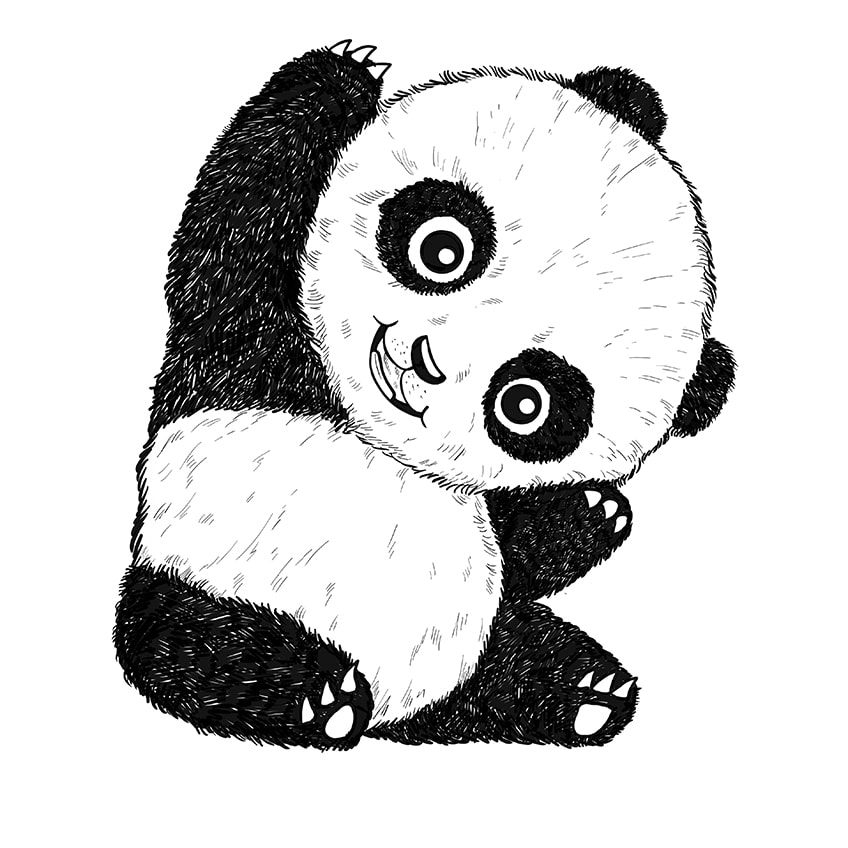
Start by using the same short, sketch-like strokes on the face, but going outwards this time, as we suggested for the eye’s fur lines. These lines will represent the furry detail of the panda’s face. Your next step is to add the black patches of fur that surround the eyes. The furry ring you drew in earlier is waiting for you to color it in black, where the sketch-like lines already signal the fur, making this step much easier for you.
For the body, you must add the same detailing, using sketch-like lines to represent the fur on the panda’s body.
Make sure that these lines run in a downwards direction to show that the fur does the same. The belly of the panda should be left white, including the fur’s detailing. The arms and the legs of the panda, however, must be colored in black. In order to achieve the fur effect, you can use a white pencil to etch in the sketch-like strokes.
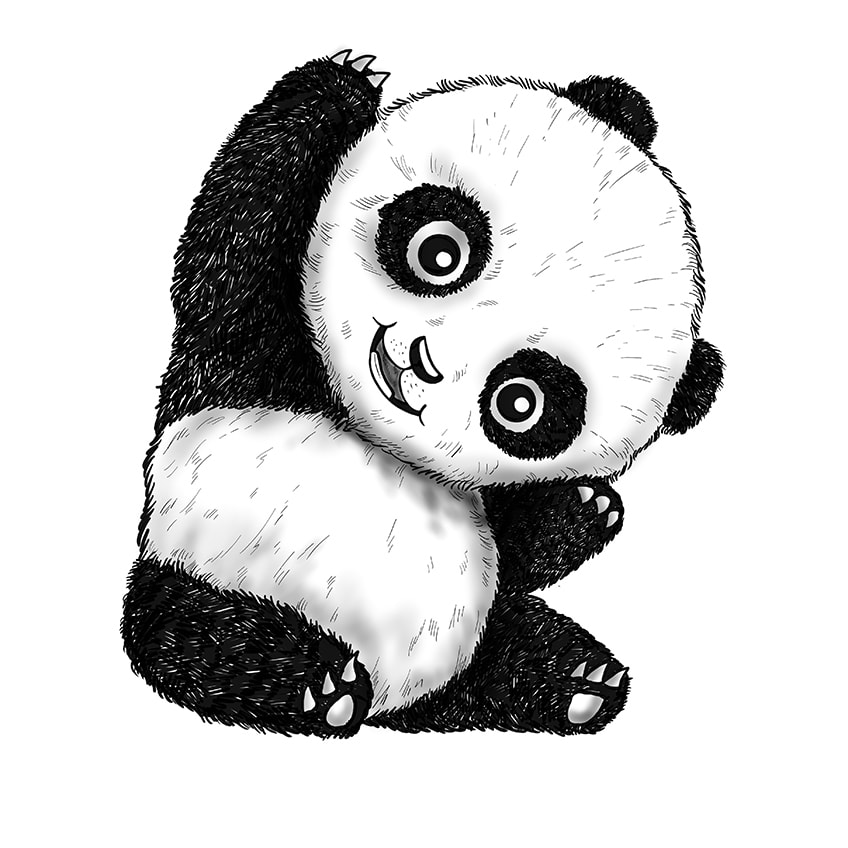
Step 11: Highlights and Shadows
This eleventh stage is not entirely necessary, but it will add a different element to the final drawing. If you use our example below as a reference, you will see that we have added some shadows to the sides of each eye – you can do this too! Additionally, there is some shading to the bottom of the head – presumably the chin. We also followed this pattern and shaded around the edges of the belly to give it a bit more dimension.
This is probably one of the cutest drawing tutorials we have offered yet. We hope that you are feeling more rested and in a better mood after experiencing the satisfaction of completing such a lighthearted drawing. This is perfect to draw for any of your children or nieces and nephews when they start demanding your art skills at the next family barbeque.
Frequently Asked Questions
Will It Take Long to Draw a Panda?
Not at all, especially once you get skilled and practiced at drawing pandas. By using the construction lines, you can actually get this drawing done within 30 minutes! Keep practicing!
Is This Tutorial Tablet Friendly?
Of course! Whatever your preferred method for drawing is, be it pen and paper or graphic tablet, this tutorial will work for them all. Make sure that your tablet’s battery is sufficiently charged, however, as you would not want it to die halfway while drawing your adorable panda bear!
Can a Beginner Follow This Tutorial?
Yes, this tutorial on how to draw a panda is perfect for beginners as well as seasoned artistic pros. While it is intended for adults, it can also work perfectly in entertaining your children for a while! This tutorial is a perfect guide to drawing a cute panda, regardless of your level of skill.

Matthew Matthysen is an educated multidisciplinary artist and illustrator. He successfully completed his art degree at the University of Witwatersrand in South Africa, majoring in art history and contemporary drawing. The focus of his thesis was to explore the philosophical implications of the macro and micro-universe on the human experience. Matthew uses diverse media, such as written and hands-on components, to explore various approaches that are on the border between philosophy and science.
Matthew organized various exhibitions before and during his years as a student and is still passionate about doing so today. He currently works as a freelance artist and writer in various fields. He also has a permanent position at a renowned online gallery (ArtGazette) where he produces various works on commission. As a freelance artist, he creates several series and successfully sells them to galleries and collectors. He loves to use his work and skills in various fields of interest.
Matthew has been creating drawing and painting tutorials since the relaunch in 2020. Through his involvement with artincontext.org, he has been able to deepen his knowledge of various painting mediums. For example, watercolor techniques, calligraphy and lately digital drawing, which is becoming more and more popular.
Learn more about Matthew Matthysen and the Art in Context Team.


