


How to Draw a Motorcycle – Motorcycle Drawing Tutorial
Ride along and learn how to draw a motorcycle today! Motorcycles can seem complicated to draw as they have a lot of intricate detail, however, our easy motorcycle drawing tutorial will take you step-by-step through creating a rad motorcycle! So hop on to your Harley Davidson and let’s get this show on the road!
A Step-by-Step Guide on Drawing a Motorcycle
Follow along and learn how to draw a motorcycle today! We will take a closer look at drawing a beautiful and intricate motorcycle step-by-step. Our motorcycle sketch tutorial breaks down the process into 23 easy-to-follow steps so anyone can learn how to draw a motorcycle! You can see all the following steps in our motorcycle sketch collage below.
A bonus is our drawing tutorial is comaptible for both digital and physical mediums!

Step 1: Draw the Wheels of the Motorcycle Illustration
Begin by splitting your drawing area into half. On each half of the page, draw a large circle to represent each wheel of the motorcycle.
The left wheel should be drawn slightly larger than the right, to represent the rear end of the motorcycle sketch.

Step 2: Draw the Rims on the Motorcycle Illustration
Within each wheel, draw a second smaller circle to represent the rims.

Step 3: Add in the Suspension on the Motorcycle Sketch
On the front wheel, draw a suspension arm positioned diagonally. Draw several separation lines leading to the front shock.
Within the front wheel’s rim, draw the central lock nut and the brake caliper “mounting bracket” attached to the suspension arm.
Within the rear wheel, draw an additional circle to represent the chain sprocket gears. Complete this step by drawing the center wheel bushing.

Step 4: Draw the Body of Your Motorcycle Drawing
Draw the motorcycle body frame, attached to the front suspension arm, and the curving fuel tank. Add small hinges to the frame of the body. Continue to draw the front of the motorcycle body, including the side outline of the headlights.
Draw an upward “c-shaped” seat attached to the body of the motorcycle.
Complete the step by drawing small shock-absorbing hinges from the rear body frame and a partially visible exhaust pipe.

Step 5: Add in the Exhaust
Draw a sloping tip exhaust head at the rear end of the motorcycle and just below the seat, before drawing the remainder of the exhaust pipe. Underneath the motorcycle, draw a second exhaust pipe, that should curve from the fuel tank to the front of the motorcycle.
Draw a partially visible motor head block that is attached to the exhaust. Besides this, draw the radiator.
Complete the step by drawing a “seat shock absorber” spring attached to the bottom of the seat and the rear frame of the motorcycle.

Step 6: Adding the Details
Begin by the front of the motorcycle, and add in the visible handlebars and front brake lever. Between the handlebars and front wheel, draw a connecting cable leading to where the brake caliper will be.
Within the body of the motorcycle drawing, draw multiple horizontal lines close together, to outline the connectors.
Draw the individual chain links within the rear wheel, and loop through the frame onto a smaller chain link attached to the side of the engine. Below the smaller chain link, draw the brake pedal and a footrest pedal. Complete the step by adding additional pins, bolts, and nuts.

Step 7: Add Detail to the Rims of the Motorcycle Sketch
Draw a rim frame within the rear wheel. In the center of the wheel, draw five oval shapes to represent holding screws.
Draw an air valve within the wheel of your motorcycle illustration.
On your front wheel, draw a brake disc. Attached to this, draw brake calipers. Complete the step by drawing a rim frame within the front wheel.

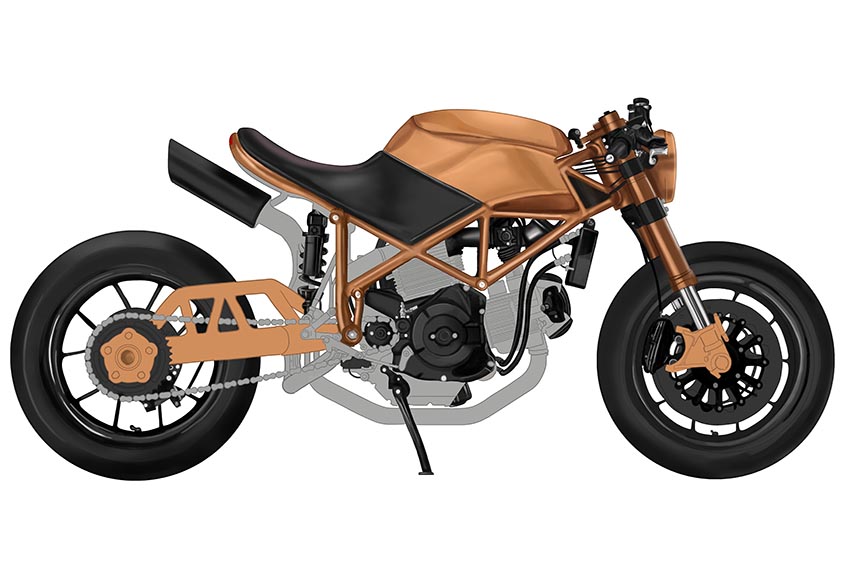
Step 8: Apply the First Coat of Color
Make use of a regular brush and gray paint, and paint the wheels and their rims, the leg stand, clutch cover, footrest, radiator and pipes, rear shock absorber, exhaust head, seat, and handlebars.

Step 9: Apply the Second Coat of Color
Use a regular brush and a light shade of orange paint, and evenly paint the rear frame, the body frame including the fuel tank, and the suspension arms.

Step 10: Color in the Engine and the Exhaust
Select a fine, sharp brush and light gray paint, and evenly coat the exhaust pipes, chain, motor-head blocks, and brake pedal.
Tip! The gray paint you have selected should be lighter than the first color coat you applied to your motorcycle drawing.

Step 11: Add Shading to the Rear Wheel
To add shading to your drawing of a motorcycle, select a soft brush and black paint, and add soft brush strokes within the rear wheel and the rim. Complete the wheel by selecting a fine brush and white paint, and adding highlights along the edge of the rim and center of the wheel.
This adds a realistic effect to your motorcycle illustration! Finish off by using a blending brush and smooth out the area.
Repeat the shading and highlighting steps to the exhaust head, seat, and rear shock absorber.
Tip! To add more realistic details to the seat, use a fine, sharp brush and black paint, and enhance the border of the seat. To complete this step, use a soft brush and light orange paint, and add a soft color reflection onto the seat.

Step 12: Shade the Front Wheel of Your Motorcycle Sketch
This step will follow the same procedure as step 11, except we will be focusing on the front wheel. Make use of a small brush and black paint, and softly add shading to the front wheel and the rim. Complete the wheel using a sharp brush and white paint, and add gentle highlights along the edge of the rim.
Note! The first color coat should still be lightly visible on your front wheel and rim.

Step 13: Add Shading to the Engine
Make use of a soft brush and black paint, and apply soft brush strokes around the outline of the engine. Enhance this area using the same brush and switching to white paint, and begin adding in highlights. Repeat this step on the leg stand and radiator pipes.

Step 14: Shade the Handlebars of Your Motorcycle Sketch
Using the same brush as previously and black paint, softly shade along the handlebars. Repeat once more now with white paint and add soft highlights to the handlebars. Repeat the shading and highlighting steps on the suspension areas, radiator, and rear brake calipers.

Step 15: Add Shading to the Main Body
Make use of a small, soft brush and black paint, and add shading to the fuel tank, seat frame, and body frame of the motorcycle. Continue this step and create more intensity by adding a layer of black paint to the suspension arms and headlight.
Complete this step by selecting a fine, sharp brush and white paint, and apply soft highlights to the mentioned areas.
Step 16: Shade the Rear Frame
Repeating the shading and highlight process done in step 15, except you will now focus on the rear frame, center lock, and front brake.
Step 17: Add Detail to the Bottom Exhaust Pipe
Apply soft brush strokes along the exhaust pipe using a soft brush and black, and gray paint. Use a blending brush and smooth out the area. Add more structure to the leg stand with a soft brush and gray paint.
On the rear end of your motorcycle drawing, apply a soft tone of orange paint to add a reflection.

Step 18: Add Detail to the Top Exhaust Pipe
Make use of a small soft brush and a combination of white, black, and dark gray paint, and softly paint the exhaust pipe.
The combination of these colors should create a chrome-like tone on the features of your drawing of a motorcycle.
Use the same brush and switch to light orange paint, and add a final reflection to the exhaust pipe.

Step 19: Detail the Motor Head Blocks
Add shading between the stripes of each motor head block using a soft brush and black paint. Complete the step with white paint and add soft highlights to the area.

Step 20: Detail the Chain of Your Motorcycle Illustration
Use a fine, sharp brush and dark gray paint, and begin filling in the chain links. To finish adding detail to the chain, shade the frame hinges with the use of a fine sharp brush and black paint.

Step 21: Color in the Brake Discs
With a soft brush and white paint, apply a soft coat of color on the front and rear brake discs. Switching to a fine, sharp brush, add fine dots on both brake discs.
Using a blending brush, smooth out the areas.

Step 22: Add a Ground Shadow
Directly underneath your motorcycle sketch, paint a dark spot with a soft brush and black paint. Use a blending brush to smooth out the edges of the shadow.

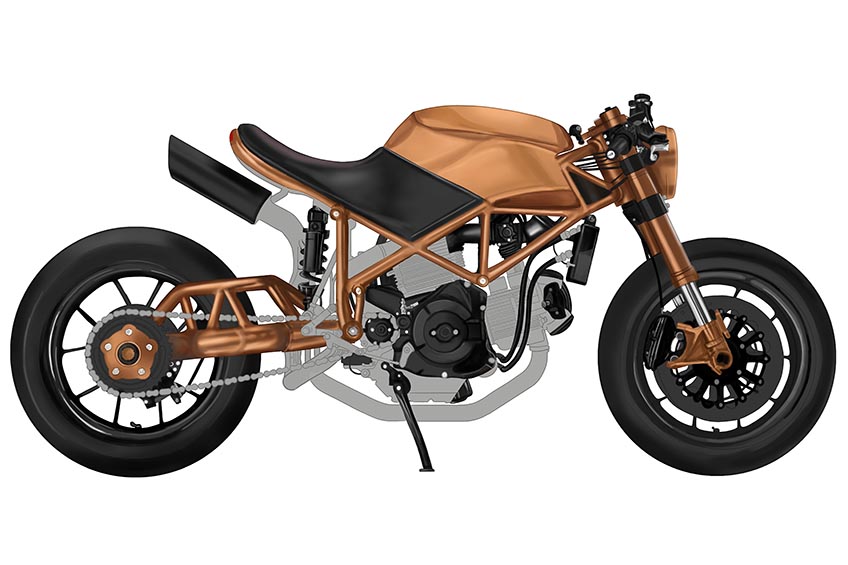
Step 23: Finalize Your Drawing of a Motorcycle
We have reached the end of our “how to draw a motorcycle” drawing tutorial! To complete your realistic motorcycle drawing, make use of a fine, sharp brush and the corresponding colors, and trace any visible outlines or texture lines.

Shew! We have finally reached the end of our motorcycle drawing. Although this drawing tutorial was longer than others, we hope you have learned how to properly add details, such as shading, highlighting, and contouring to your drawing of a motorcycle. After completing our 23 step-by-step guide, you have just created a realistic and seamless motorcycle drawing!
Frequently Asked Questions
How to Draw a Motorcycle Step-by-Step?
Our easy “how to draw a motorcycle” drawing tutorial will take you through the entire process, from creating the outline, drawing construction lines, and adding in shading, contouring, and coloring details. By the end of our tutorial, you would have created a magnificent and realistic motorcycle drawing!
What Colors Should My Motorcycle Sketch Be?
For our drawing tutorial, we only used five main colors: black, white, gray, dark gray, and orange. However, this does not limit you in any way, and you can be as creative as possible and paint your motorcycle illustration in any color you see fit!

Matthew Matthysen is an educated multidisciplinary artist and illustrator. He successfully completed his art degree at the University of Witwatersrand in South Africa, majoring in art history and contemporary drawing. The focus of his thesis was to explore the philosophical implications of the macro and micro-universe on the human experience. Matthew uses diverse media, such as written and hands-on components, to explore various approaches that are on the border between philosophy and science.
Matthew organized various exhibitions before and during his years as a student and is still passionate about doing so today. He currently works as a freelance artist and writer in various fields. He also has a permanent position at a renowned online gallery (ArtGazette) where he produces various works on commission. As a freelance artist, he creates several series and successfully sells them to galleries and collectors. He loves to use his work and skills in various fields of interest.
Matthew has been creating drawing and painting tutorials since the relaunch in 2020. Through his involvement with artincontext.org, he has been able to deepen his knowledge of various painting mediums. For example, watercolor techniques, calligraphy and lately digital drawing, which is becoming more and more popular.
Learn more about Matthew Matthysen and the Art in Context Team.


