


How to Draw a Candle – Easy Wax Light Drawing Lesson
Candles hold a special place in many of our lives, as objects of peace, sometimes worship, and home. Lighting a candle gives us a moment to take a breath and admire the beauty of the small flickering flame. In today’s drawing tutorial, we are going to learn the art of drawing candles step-by-step. Not only will we show you how to create the dripping wax of your candle drawing, but also how to create a realistic candle flame drawing.
Easy Step-by-Step Guide to Drawing Candles
For many beginners and even more experienced artists, starting a new drawing project can be a little intimidating. To help you nail your first candle drawing the first time, we are going to use a series of construction steps and shapes. These first steps will help us set up the final shape of the candle sketch, allowing us to add color and detail later, without needing to erase any of our work. Construction shapes will also help us to ensure that our easy candle drawing fits the canvas perfectly.
You can see an outline of the steps in our candle drawing below.

In the last eight steps of our candle drawing tutorial, we are going to begin adding color. For these coloring steps, we are using a painting medium, but you are welcome to choose your own medium. If you are a digital artist, then you can easily use a drawing tablet, with the construction, outline, and coloring elements on different layers.
If you are working with a more physical medium, like coloring pencils or paint, we suggest using an easily erasable pencil for the construction steps.
Step 1: Draw a Basic Cylinder
To begin your candle sketch, you need to find the center of your canvas. When you have located this point, draw a long cylinder. This shape will represent the base of your candle drawing, and we will build on to it in the following steps by adding the flame and the candle base.
As such, make sure that you leave plenty of space above and below the cylinder.

Step 2: Drawing the Bottom Plate of Your Candle Sketch
At the base of your cylinder, draw a narrow oval shape. This oval shape should be wider than the base of the candle and should not extend down below it too far.
In the following steps, we will use this base shape to create the stand for the candle.

Step 3: Shaping the Base of Your Candle Drawing
In this step, we are going to now continue shaping the outline of the base of your candle sketch. On each side of the bottom plate that you drew in the previous step, you can draw an arching line. These lines should sweep in and down, ending up parallel.
The width of this base should be the same as the candle.

Step 4: The Candle Flame Drawing
We now move on to the candle flame drawing. Find the central point of the top of your cylinder, and draw a short line to represent the wick of your candle sketch. From the top of this wick line, you can now draw the flame of your candle sketch.
The flame should be wider at the bottom and come to a curved point at the top.

Step 5: Creating the Final Outline of Your Candle Drawing
In this step, we are going to outline the shape of our candle sketch in a more realistic way, adding melted wax texture to the construction shape. Use the construction shape to help you with the final shape, rounding off the corners, and adding some long drips of wax to the top and bottom of the candle. Outline the wick, making it a little thicker. After you have finished this detailing, you can erase the construction lines, except for the flame.
We will use the flame construction shape in later steps to help us with the coloring.

Step 6: Adding Some Color
To begin our coloring process, we are going to add color to the base and to the wick of our candle sketch. Use a regular paintbrush and some dark gray paint to fill in the base of the candle holder. Make sure that the coat of color is even and does not have any blotches.
Next, for the wick, use some dark brown paint and a very fine paintbrush to fill the shape.

Step 7: Begin Coloring the Candle Drawing
You are now going to add a base color to the column of your candle. Find a tan or light peach-colored paint and a regular brush to fill the entire shape of the wax candle. Once again, make sure that this coat of color is even and does not have any spots of darker color.
In the next few steps, we will use a few different shade variations to add depth and dimension to our candle drawings.

Step 8: Adding Shadows to the Candle Holder
To create more dimension in the base of your candle holder, you can now use a blending brush and some dark gray paint. Around the bottom of the plate and along the edges of the base, gently blend in some shadows to create dimension and depth.
To finish the shaping of the base, use a small blending brush and some white paint to add several strokes going down the base.

Step 9: Adding the Final Colors to Your Candle Sketch
Now, use a soft brush and some dark gray paint to add some shadows to the melting wax lines. This will help create some structure within the shape of the candle. Then, find some yellow paint and a small blending brush, and use this to add a slight glow around the base of the wick. You can then repeat this process with a light orange hue. To smooth out this blend, use a clean soft brush to blend the shades together.
To finish the step, use a small blending brush and a touch of white paint to very lightly add some highlight lines between the first color coat and the shaded lines.

Step 10: Finishing the Outline of Your Candle Sketch
Before we move on to coloring the candle flame drawing, we are going to erase the harsh outlines around the candle and the base. Use a fine brush and some gray paint, and carefully trace the outline of the bottom plate and base. For the candle column, use the same shade of peach or tan that you did for the coloring and carefully trace the outlines of the candle, wick, and wax lines.
You will now have a seamless candle drawing without any visible dark outlines.

Step 11: Begin Coloring the Candle Flame Drawing
Now that we have the colors down for the majority of the candle, we can move on to color the flame. Use a soft blending brush and some light orange paint to color over the construction lines of the flame.
Leave some of the inner flame blank, as we will be adding a different color to this part of the flame.

Step 12: Strengthening the Flame Color
This step is very quick and simple. All that you need to do here is repeat the previous step, darkening the exterior of the flame. Use a slightly brighter shade of orange for this step.
The use of different shades of orange will help to create a seamless and natural blend within the candle flame drawing.

Step 13: Deeping the Flame Color
We are now going to add a third orange color variation to the center of our candle flame drawing. Use a small blending brush and a very light shade of orange for this step. Within the outer blend of orange, add this lighter shade of orange to the inner area of the flame.
You still want to leave a very small blank space at the very center of your flame.

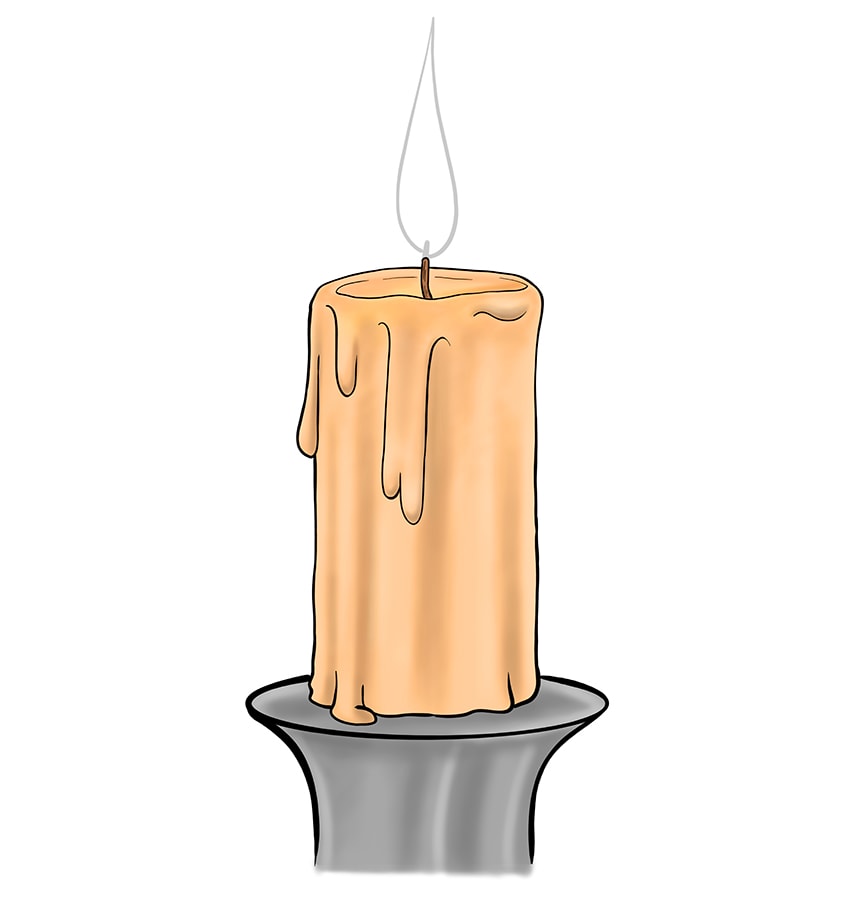
Step 14: Finishing Your Candle Flame Drawing
To finish your easy candle drawing, find a bright yellow shade of color and a soft brush to add a brighter spot to the center of your flame. To finish your candle sketch, use a clean blending brush to smear and blend the flame colors together.
This will create a more realistic and seamless glow.

How easy was it to create a beautiful and seamless candle drawing? With construction lines and a few seamlessly blending colors, you can create a realistic and easy candle drawing in only 14 steps! We hope that you have enjoyed the process of drawing candles, and now that you know the basics, you can draw a wide range of different candles!
Frequently Asked Questions
What Colors Can You Use for Drawing Candles?
The colors that you can use for an easy candle drawing really are endless. We have used tan shades to create a neutral candle, but as you know, candles come in a wide range of different and exciting shades! For the flame, a blend of different shades of orange and yellow can create a realistic flickering effect.
How Can You Make a Realistic Candle Flame Drawing?
The trick to making a realistic flame drawing lies in the colors you use and the way that you blend them together. You should use three different shades of orange and yellow, with the darkest shades around the edge and the brightest yellow in the center.

Matthew Matthysen is an educated multidisciplinary artist and illustrator. He successfully completed his art degree at the University of Witwatersrand in South Africa, majoring in art history and contemporary drawing. The focus of his thesis was to explore the philosophical implications of the macro and micro-universe on the human experience. Matthew uses diverse media, such as written and hands-on components, to explore various approaches that are on the border between philosophy and science.
Matthew organized various exhibitions before and during his years as a student and is still passionate about doing so today. He currently works as a freelance artist and writer in various fields. He also has a permanent position at a renowned online gallery (ArtGazette) where he produces various works on commission. As a freelance artist, he creates several series and successfully sells them to galleries and collectors. He loves to use his work and skills in various fields of interest.
Matthew has been creating drawing and painting tutorials since the relaunch in 2020. Through his involvement with artincontext.org, he has been able to deepen his knowledge of various painting mediums. For example, watercolor techniques, calligraphy and lately digital drawing, which is becoming more and more popular.
Learn more about Matthew Matthysen and the Art in Context Team.


