


How to Draw a Bear – An Easy Bear Drawing Tutorial
When you think of a bear, you might be immediately reminded of the fantastic movie, “Brother Bear”. Similar to the movie teaching us important skills, today’s drawing tutorial will also teach you valuable drawing skills. In the paraphrased words of Phil Collins, we will be “on our way” with this fun and exciting drawing tutorial!
A Guide to Creating a Realistic Bear Drawing
In today’s drawing tutorial, we will take you on an effortless step-by-step guide on how to draw a bear. A bear drawing can seem intimidating with all the intricate details, however, our drawing tutorial will show you the basic steps to creating your easy bear drawing! This tutorial is great for both experienced and beginner artists, so follow along today and you will be able to draw a beautiful tribute to “Brother Bear”!

For a more detailed guide on the steps we will be taking, please view our bear drawing collage above.
Step 1: Draw the Main Body of Your Bear Drawing
Begin by drawing a large rectangle in the middle of your drawing area.

Step 2: Draw the Head of Your Bear Sketch
To draw the head of the bear, draw an oval shape on top of the rectangle. Make sure the oval is positioned slightly to the right.
Drawing tip! Proportions are very important when creating a realistic bear drawing. Make sure that the head is about half the size of the body.

Step 3: Draw the Rear End of the Body
Attached to the right-hand side of the main body, draw a narrow oval shape. This will represent the rear end of the bear’s body and the rear paw.

Step 4: Outline the Pose of the Bear Sketch
In this step, draw a slightly tilted line that connects the head to the rear paw. This will create a gently sloping back outline.
Continue the step by drawing two front arms. The arms do not have to be the same length.

Step 5: Add in the Paws of the Bear Drawing
To begin this step, draw two small oval shapes in front of each arm. Draw a larger oval shape in between the two smaller ovals, which will be used for the front paw. In front of the rear paw, draw the last small oval shape.

Step 6: Draw the Ears on Your Bear Sketch
Attached to the top of the bear’s head, draw two half-complete oval shapes. These shapes will represent the ears of the bear and should have some space between them.
Remember to draw the ears of the bear the same size!

Step 7: Add in the Facial Features
Within the head of the bear, draw two small oval shapes that will represent the eyes of the bear. Continue the step by drawing a large oval shape, directly underneath the eyes, that will represent the nose and mouth of the bear.

Step 8: Outline the Body of the Bear Drawing
In this step, you will trace around the outline of the bear, which will aid you in creating a more realistic fur coat. Begin at the head and make use of free-hand drawing to create a furry edge to the outline of the bear. Do this step around the head and ears, the front arm lines, the rear end of the bear, and around the paws.
On each front paw, draw five visible claws, and on the front paw, draw two visible claws. Leave the rear paw as the claws will be hidden by the bear’s pose.
Complete the step by erasing any construction lines around the paws. Leave the other construction lines.

Step 9: Add Details to the Bear Sketch
In this step, we will begin to add more details to create a realistic bear drawing. Make use of the construction lines to aid you in the placement of the eyes, nose, and mouth of the bear.
For the eyes, draw two small ovals, with a smaller circle inside the oval, to represent the iris. Following this, draw a free-hand jagged line between the eyes, to create a furry look.
Continue the line downwards where you will draw the nose and mouth of the bear. Fill in details, such as teeth for the mouth and nostrils for the nose. Complete the step by drawing paw prints on the front and rear paws. Add final fur lines along the neck and head of the bear.

Step 10: Add Texture to Your Realistic Bear Drawing
Begin this step by drawing individual flowing curved lines that will represent the fur on the bear. Repeat this step over the entirety of the bear.
Make sure that the lines are gently flowing downwards, and are flowing with the curvature of the bear’s features.
Step 11: Add the First Coat of Color to Your Easy Bear Drawing
Select a regular paintbrush and brown paint, and evenly apply the first coat of color to the entire bear drawing.

Step 12: Add Highlights to Your Bear Sketch
Make use of a soft brush and white paint, and apply gentle brush strokes to the frame of the bear. Do this mainly around the edges that stick out, such as the ears, the forehead, the surrounding neck area, the back, and the shoulders.
In doing this, you are adding lighter areas to highlight the frame of the bear.
Use a fine, sharp brush and the same paint color, and add small dots to the eyes. This will create a shimmer within the eyes.

Step 13: Add Contour to the Bear Drawing
Select a small brush and white paint, and paint the mouth area. Complete this step by adding a light patch inside both front arms. Using the same brush but switching to tan paint, lightly add a secondary paint layer to the bottom of the neck area.
Complete this step using black paint, and gently apply a shadow surrounding the bottom half of the face, the inner ears, and the general structure of the arms and back area.

Step 14: Enhance the Highlighted Areas
Use a small, soft brush and white paint, and apply a second layer of highlights to the previously highlighted areas. However, this time, focus more on the arms, back area, and face excluding the bottom shaded part.
Tip! When adding highlights to the bear drawing, make sure the brush strokes are going in the same direction as the fur.
Make use of gray paint, and paint the nostrils and the bottom part of the mouth. Repeat this step on the paws and claws. To add final details, apply light textures on the mouth area using brown paint.

Step 15: Add Shading and Detailing to Your Bear Sketch
In this step, we will enhance the contoured areas of the bear. Use a soft brush and black paint, and begin darkening the contoured areas to create a shadow look throughout the body of the bear.
Complete the step by shading in the inner ears, surrounding the eyes, nostril, and bottom mouth area.
To complete the mouth area, make use of pink paint, and color in the tongue and the inner corners of the mouth. Use black paint to add shading around these areas to tone down the brightness of the pink paint. Make use of a sharp brush and white paint, and color the two front teeth in the mouth.

Step 16: Detail the Paws of Your Bear Drawing
Make use of a soft brush and black paint, and enhance the shading of the paws. Add texture lines within each paw to make them look more realistic. Complete this step by using white paint, and adding highlights to each paw and claw.

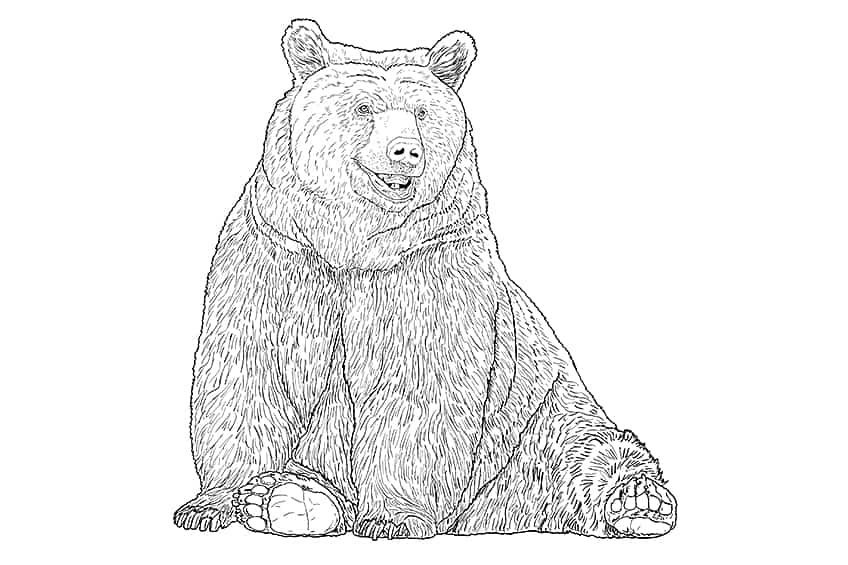
Step 17: Finalize Your Realistic Bear Drawing
We have now reached the end of our how to draw a bear tutorial. To finalize your drawing, make use of a fine, sharp brush and the corresponding colors, and trace the entire outline of your bear drawing. Erase any visible dark outlines, and you should be left with a perfect bear drawing!

Step 18: Add a Shadow to Your Bear Drawing
You can also add a shadow underneath your bear drawing to make it look more realistic!

Well done on completing our how to draw a bear tutorial! We hope you have gained some valuable drawing skills, right from the construction process all the way to the detailing and coloring. Hopefully, you have enjoyed our tutorial inspired by “Brother Bear”, and have been able to create your own realistic bear drawing!
Frequently Asked Questions
How to Draw a Bear Realistically?
For animal drawings, proportions are really important to consider. Being able to draw proper proportions will help you to create a realistic bear drawing. By using our drawing tutorial, we take you step-by-step through this process, and in no time, you will be able to create a realistic and easy bear drawing of your own!
What Colors Can a Bear Sketch Be?
Traditionally, bears come in very neutral colors such as brown, black, and white. Our drawing tutorial has followed this traditional approach by drawing a brown bear, however, this does not limit you to only using these colors. These drawing tutorials help you to become as creative as possible, so you can color your bear in any way you see fit!

Matthew Matthysen is an educated multidisciplinary artist and illustrator. He successfully completed his art degree at the University of Witwatersrand in South Africa, majoring in art history and contemporary drawing. The focus of his thesis was to explore the philosophical implications of the macro and micro-universe on the human experience. Matthew uses diverse media, such as written and hands-on components, to explore various approaches that are on the border between philosophy and science.
Matthew organized various exhibitions before and during his years as a student and is still passionate about doing so today. He currently works as a freelance artist and writer in various fields. He also has a permanent position at a renowned online gallery (ArtGazette) where he produces various works on commission. As a freelance artist, he creates several series and successfully sells them to galleries and collectors. He loves to use his work and skills in various fields of interest.
Matthew has been creating drawing and painting tutorials since the relaunch in 2020. Through his involvement with artincontext.org, he has been able to deepen his knowledge of various painting mediums. For example, watercolor techniques, calligraphy and lately digital drawing, which is becoming more and more popular.
Learn more about Matthew Matthysen and the Art in Context Team.


