How to Paint Watercolor Trees – An Easy Guide to Watercolor Trees
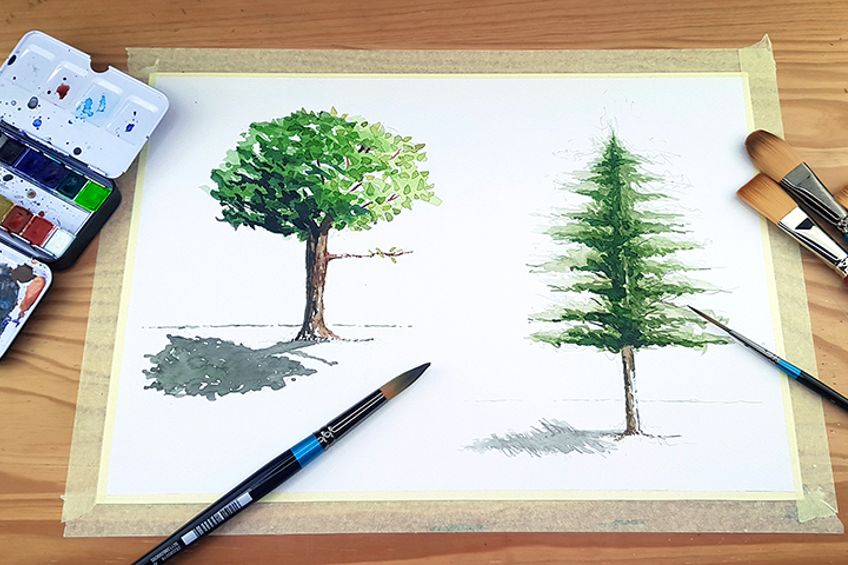
One of the best things to paint with watercolor is trees. Trees, very much like most things, are quite abstract in the way they are formed with watercolor. When you learn how to paint trees, essentially you are learning how to group painting marks into generalized shapes that could be defined as certain types of trees. Watercolor tree painting is a great way to explore your watercolor mark-making skills. Tree painting is a great exercise to help you understand color tones as well. When we learn how to paint trees we want to know how the color palettes work within the context of what kinds of tree paintings we would like to do. However, we will keep it simple for this tutorial.
Preparation
As we learn how to paint trees in watercolor let us consider the space in which we will be doing this tutorial. Try to place yourself where there is a good table to set your paper on, as well as a space that is relatively quiet. Alternatively, you could always plug in your earphones and listen to a podcast or some music as you learn how to paint trees in watercolor. Make sure all the necessary materials are nearby and ready for use.

Once you have everything in place, let us get started on this tutorial on how to paint trees in watercolor.
How to Paint an Oak Tree
Let us begin with painting an oak tree. If you consider the shape of an oak tree it resembles the form of a puffy cloud in its most generalized form. This is a great concept to keep in mind as there is a similarity in the shape of both a cloud and oak tree. This tree painting starts with understanding the basic form and then there is more freedom when it comes to how we apply the paint in this general form. Let us get started and explore this painting through a few simple steps.
Step 1: Sketching Out the Tree
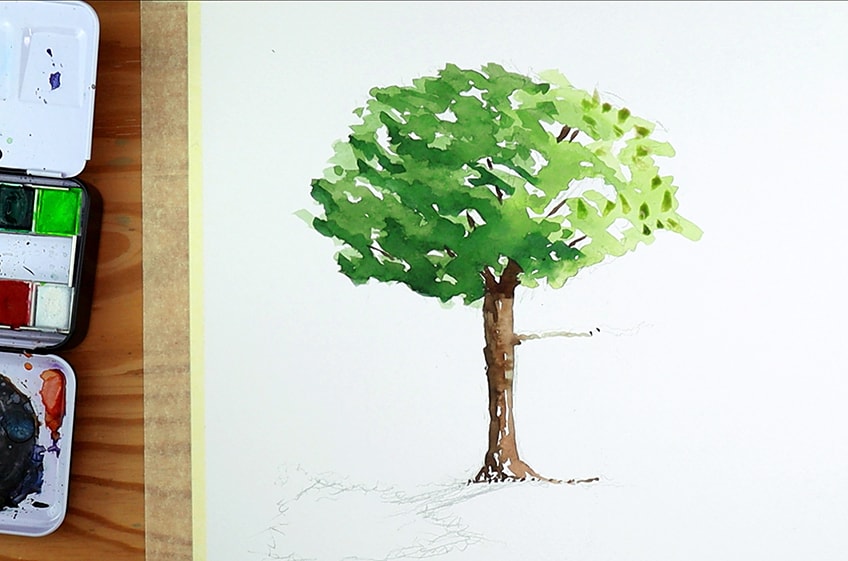
We can use a reference image for this, however, it is not necessary because the shape is quite simple. However, let us begin with a very light and basic sketch of an oak tree. You are more than welcome to use a reference image if you want. Planting trees is quite simple and we can get away with abstract mark-making. We want to paint a rough cloud-like shape with a stem out the bottom. We want to keep the drawing very light and faint as we don’t want the marks to push through our paint once we have applied the paint.
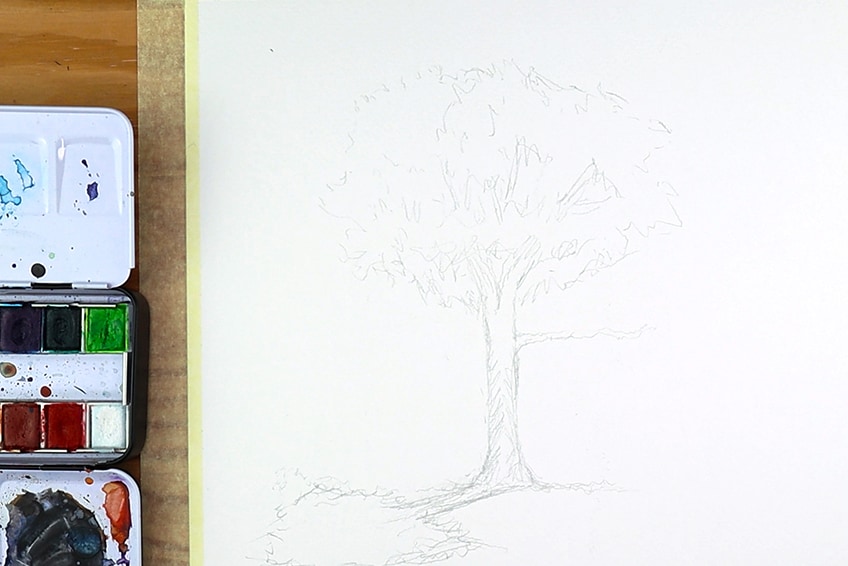
We can add a little shadow on the ground for a more realistic f of light and object relationship. Remember that we can add little lines in our trunk and perhaps another little stroke horizontally on the trunk to describe a branch coming out of the tree. We want our sketch to look a little something like a rough sketch of a cloud with a trunk steaming out of the bottom. We also want a little shadow to fall on the ground to give a sense of where the light is coming from. Spend some time on the shadow, try to make it fall on a horizontal axis.
This means that it has linear distortion so try your best to get that right.
Step 2: Painting the Light Tones
When painting a tree we want to create variation within the tones of the tree. We do this by exploring the various light and dark color combinations that are possible within watercolor paints. With your lights green available, begin to apply scattered blobs within the lines of your sketch. Try to focus on one side and slowly move over to the other side of the tree.
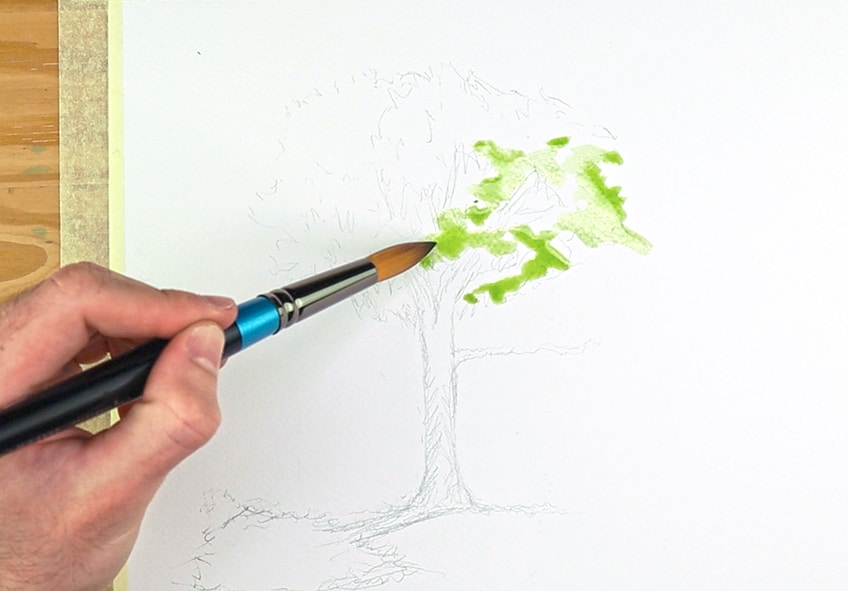
As we paint the tree we want to leave little spaces in between to create the hollow quality of the tree. As we paint the tree we also want to slowly darken our green as we move over from the light side of the tree to the darker side of the tree. We can do this by adding a tiny amount of brown, or black to our green.
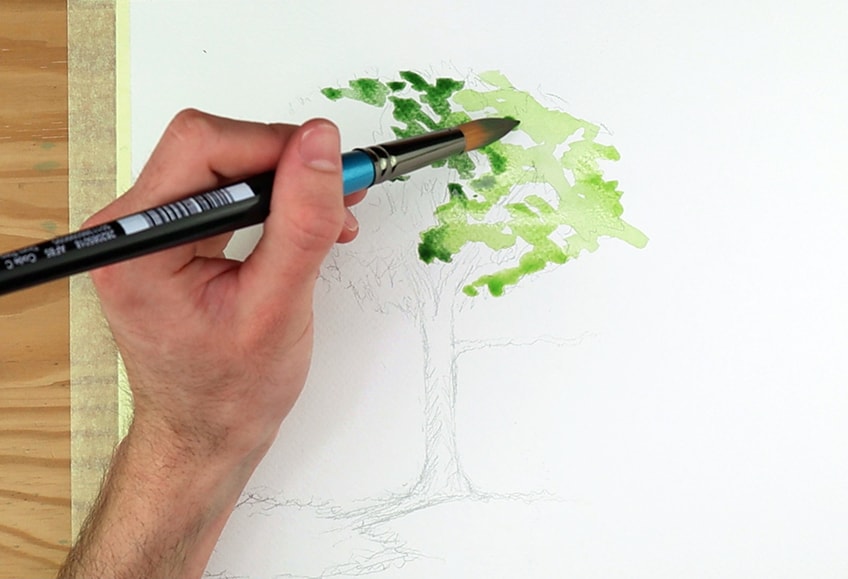
The aim here is to apply the light green paint on one side. Then, whilst the paint is still wet, quickly darken your green and then apply darker tones of green as you move over the side of the tree where the darker area would be. This would be the side of the tree where the shadow of your tree is placed.
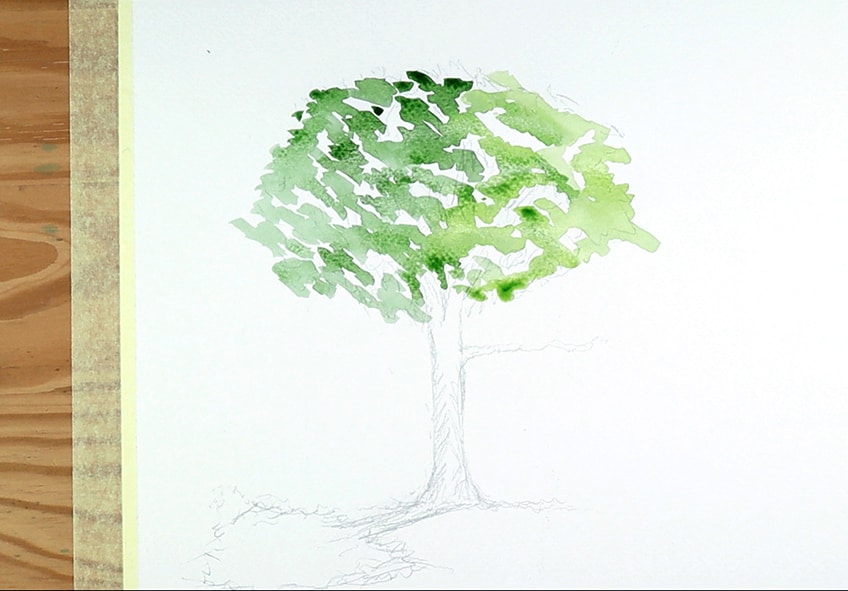
Step 3: Applying the Mid-Tones
Once the first application of paint dries, we can begin to darken our green a little more by adding a little more brown or black to the current mix of green. We keep adding little bits of darker paint as we progress. A good suggestion is to add browns as the browns create a more organic and natural color palette when darkening your green. We want to start applying darker marks on the shadow side of the tree.
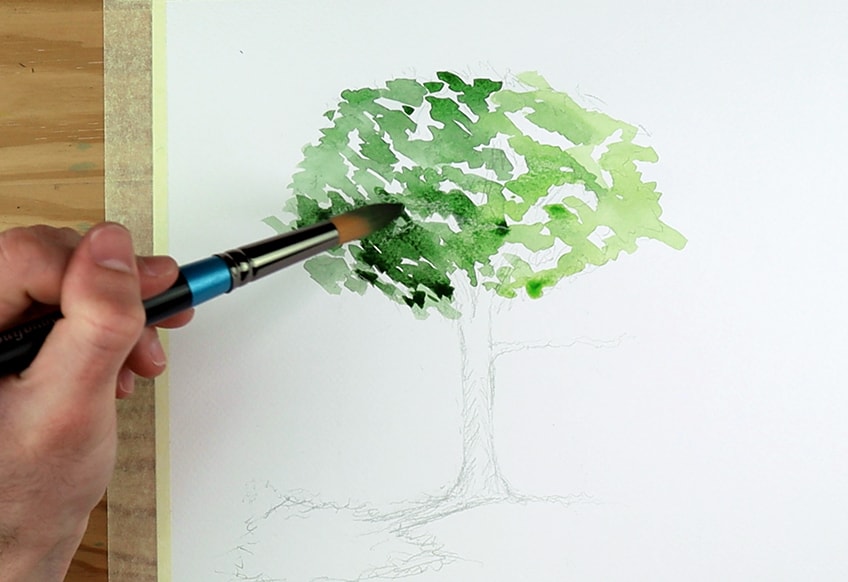
We want to add these darker marks coming from the shadow side of the tree. As we apply from the shadow side the paint will slowly lighten as it fades with each application. This way the paint fades and becomes lighter as we move toward the light side of the tree.
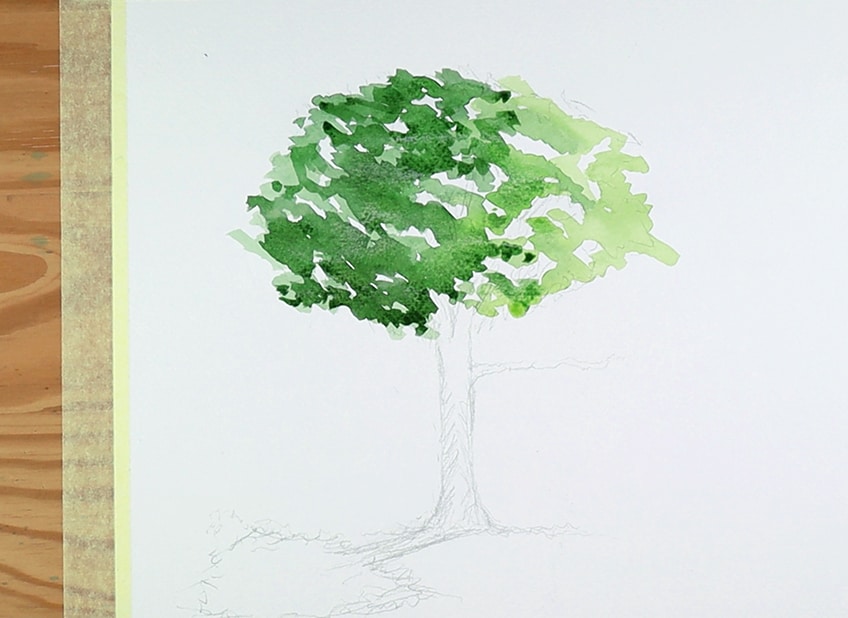
As we have finished applying this mid-tone we want to allow it to dry completely. As it dries completely it should have a nice gradient that defines the natural mix between the light and dark sides of the tree.
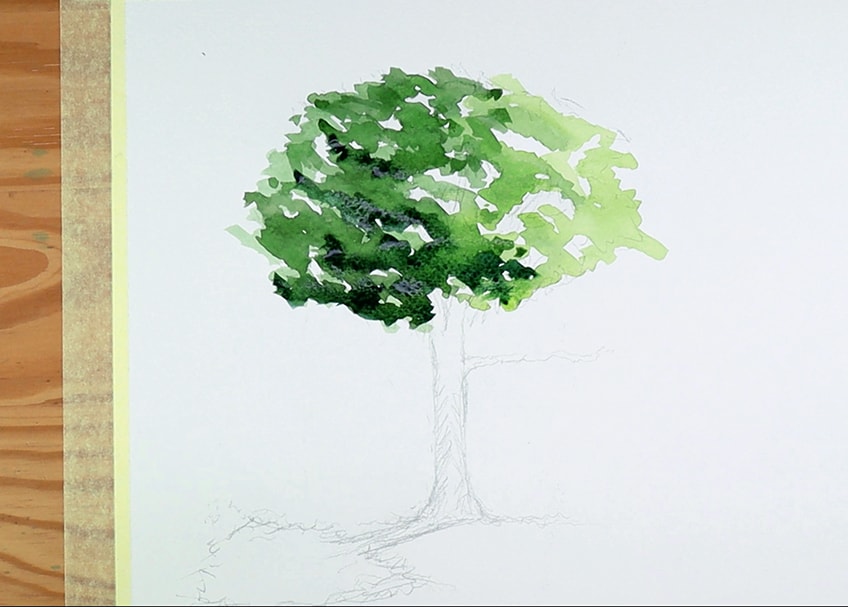
We can now slightly darken our green once again and begin to apply some darker tones on the very end parts of the shadowed side of the tree. Every time we make our tree slightly darker in its shadowed areas we begin by darkening our green mix slightly more each time with either some brown or black. We want to allow that to completely dry and what we should be left with is a tree with variations of different green tones. When painting watercolor trees we want to always have a variety of colors within the tree. This gives it more depth and density variation.
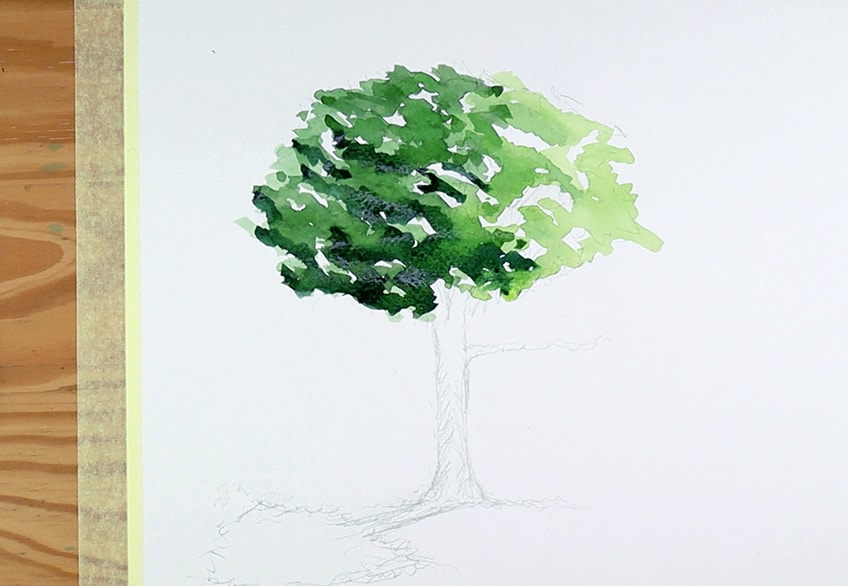
Step 4: Painting the Tree Trunk
Let us now move on to painting the tree trunk. We begin this process by making a mix of light brown. If you don’t have light brown, add some white to your current brown. We dilute the brown you have with a lot of water. We can begin by painting the lightest parts of the tree with our light brown.
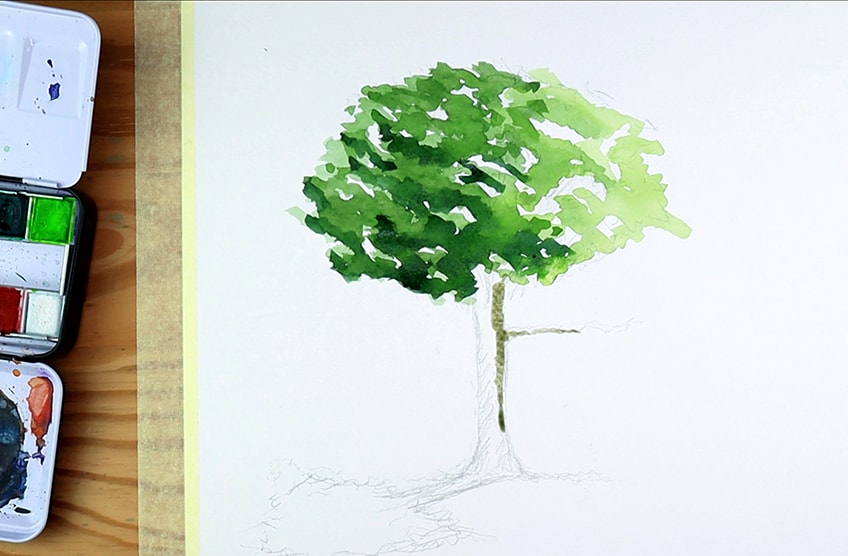
Whilst the paint is still wet, again we will begin to darken our current brown with some more brown or a bit of black. We then proceed to apply some darker tones in the trunk. Try to leave little spots of white to give the tree a little more texture.
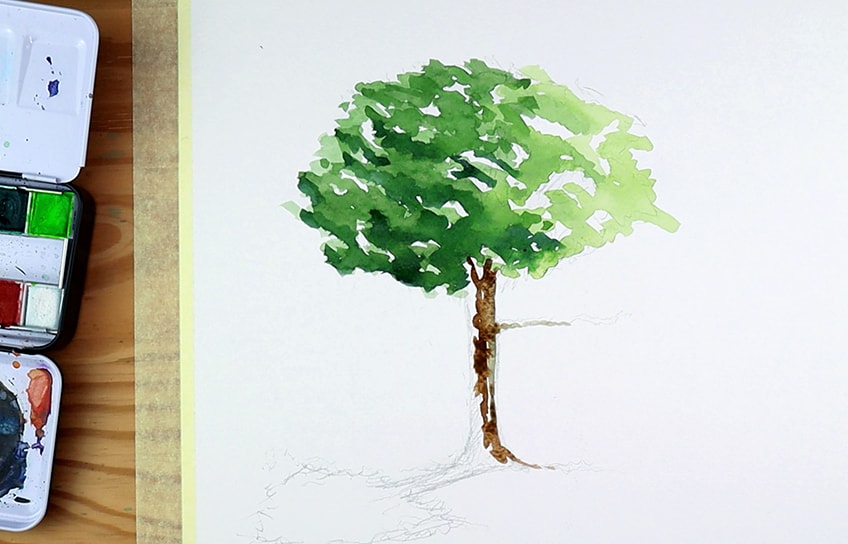
Once again, darken your brown again with some black and brown. Whilst the paint on the trunk is still wet, begin to apply some darker tones in the trunk towards the side where there would be more shadow. Apply these darker tones onto the paint whilst it is still wet for seamless gradients.
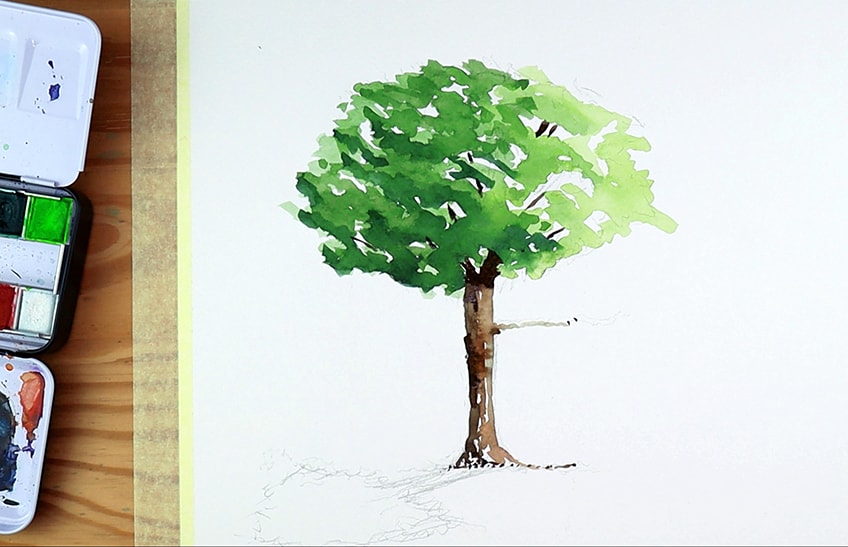
Once you have done that, allow for the tree painting to dry completely. Painting the trunk is a great way to practice your color mixing with the wet-on-wet technique. This is when we apply wet paint to the already existing wet surface for better color integration.
We can now begin to add little lines and strokes in the negative spaces of the foliage within the tree. These can be slight little lines that gesture to the idea of branches within the tree.
Step 5: Painting the Leaves
Leaves are easy and fun to paint. It is all about adding dots of paint within the tree foliage to create a more scruffy and bush-like quality in the tree. We do this by making a light yellowy-green color by mixing yellow, brown, and green for the lightest leaves. We then proceed to add little dots and spots within the lightest areas of the tree.
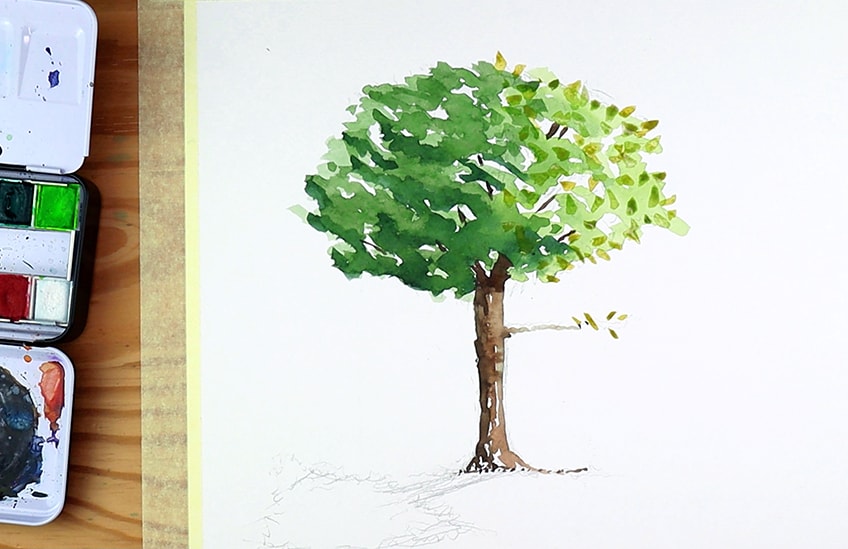
We can carry this on by slowly darkening the mix with more green and brown. Once we have darkened the mix we can begin to paint the mid-tone areas of the tree with mid-tone colored leaves. Keep darkening your mix of paint and keep on painting your tree with these little spots and dots of green. We want to slowly keep on darkening the mix as we move toward the shadow areas of the tree.
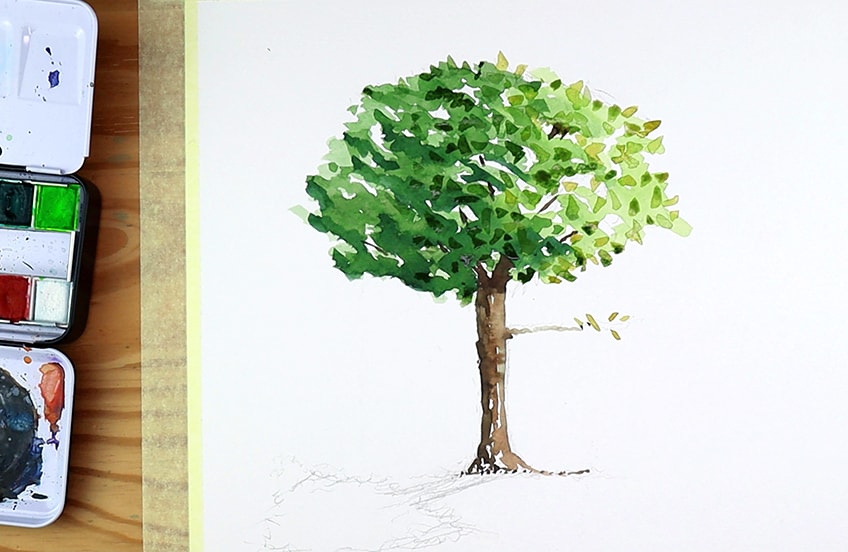
We want to carry this process on until we feel that we have attended to all the various color segments of the tree. We want to describe a color shift in the tree with an addition of the leaves to the already existing color gradient of the tree. Keep darkening the mix of green with some browns and hints of black as you slowly move over to the area of the tree with the greatest shadows. This is a great way to add leaves to a tree when painting watercolor trees.
The colors will always dry lighter than what the color was when applied wet.
Step 6: Painting the Darkest Shadows of the Tree
We can now make a dark mix of green by applying about 40% black into a dark green color. We can now begin to apply the marks that describe the darkest parts of the tree. We do this by making little blobs in the area of the tree where the shadows would be greatest.
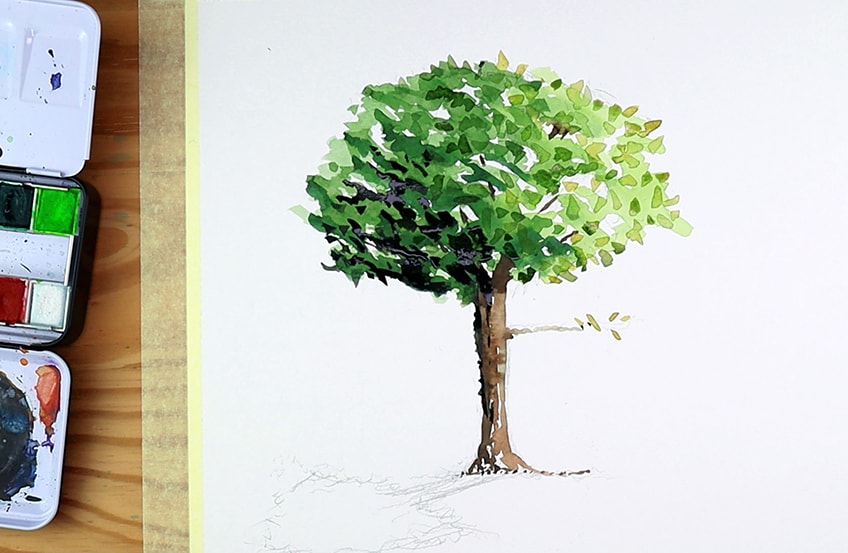
We can also take this mix and dilute it with water to create a shadow on the ground. Remember, the shadow will fall on the side of the tree that is darkest. If your darkest part of the tree is on the left then the shadow must fall on the ground that is on the left side of the tree. Keep the shadow quite washed out and not too dark, it will look much better.
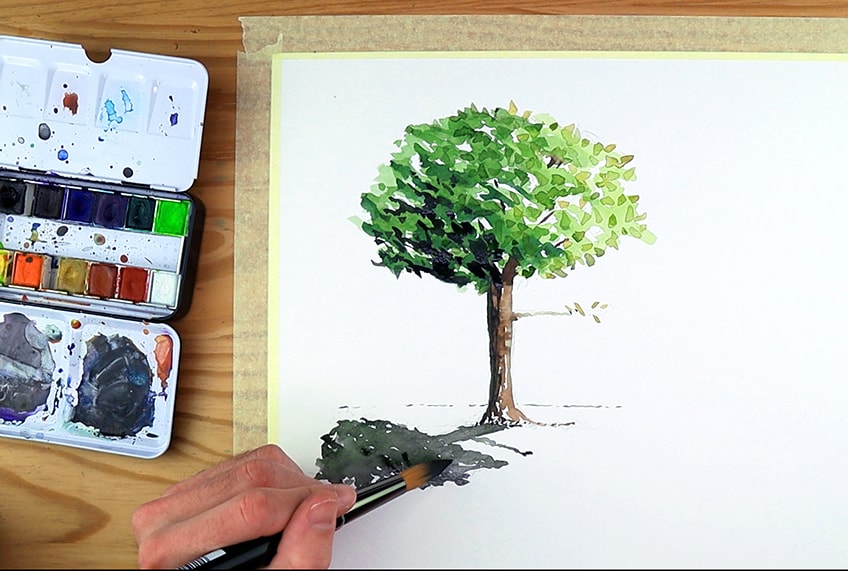
Remember, when painting a shadow it is distorted by the perspective and ground. So try to keep it as horizontal as you can. This will describe it accurately as it falls on a horizontal axis.
Step 7: Final Details
Once the tree and shadows have completely dried we can begin to add in little details with a smaller brush. One of these details could be a slight horizon line behind the tree. Just to indicate how the tree is standing on a horizontal axis.
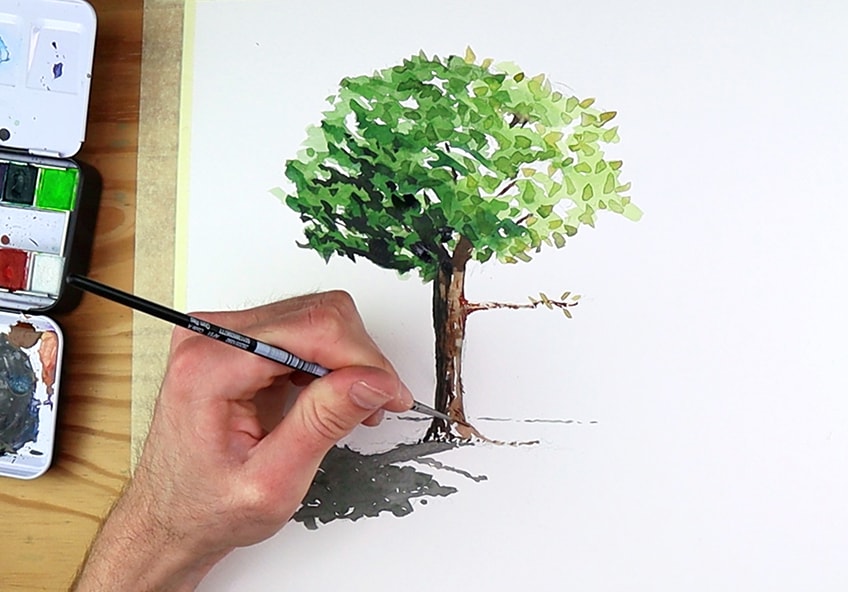
Another good suggestion is to take a lighter tone of brown and proceed to make little strokes on the trunk and in the branches. This just adds some variation in the trunk for a more interesting look and feel. And there you have it. A simple way to paint an oak tree.
Try to explore various mark-making techniques and different application styles with various brushes and colors. Otherwise, use this tutorial to guide you in painting oak trees for future landscape paintings.
How to Paint a Pine Tree
Painting trees can be explored through various types of trees one might want to add to a landscape. Pine trees are a common type of tree that can be used for more mountainous landscapes and can be used as a beautiful feature in those types of landscapes. With that said, let us go through a few steps that guide us in the process of painting pine trees.
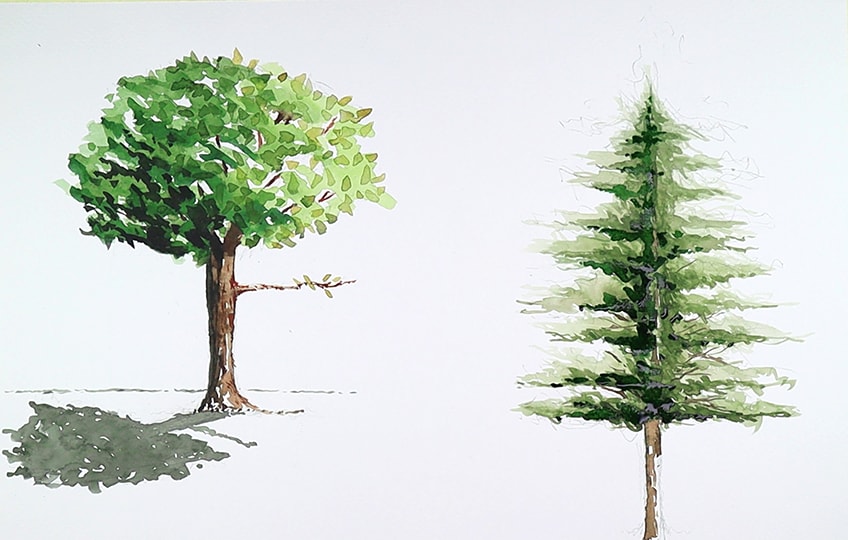
Step 1: Sketching Out the Tree
Let’s begin with a basic sketch of the pine tree. A pine tree has a more triangular shape, we want to keep this in mind when we draw our tree. It’s always good to start from the bottom up. Another good suggestion is to draw a vertical line to help guide your foliage placement of the tree.
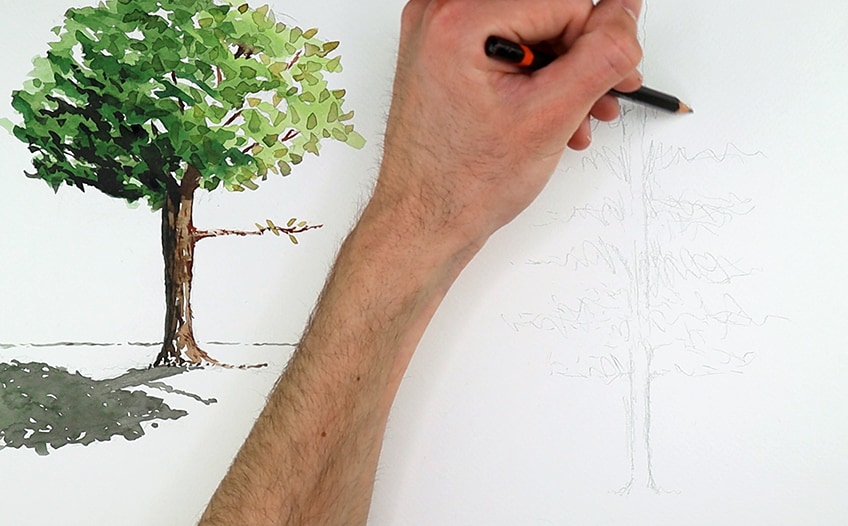
Try to shorten the length of your foliage as you draw the upper portions of the tree. We want the shape to follow an arrowhead-type shape. This is the general shape of a pine tree. Lastly, keep your sketch very light and faint so that the drawing marks don’t push through the painting marks.
Step 2: Applying the Light Tones
We will begin to apply the first layer of the foliage. What we want to do is make a mix of green with a little bit of brown to give it an organic palette. We can then proceed to paint thin scribble-like strokes horizontally with a medium-sized brush. We want to paint the main bottom portion of the tree before we continue with one side. What we want to do is work on one side of the tree first. We can continue to paint horizontal scribble motions that describe different branches of the tree. What we’re doing here is building the light tones of the tree. Let us carry on working on one side of the tree as we continue to paint the branches lightly on one side of the tree.
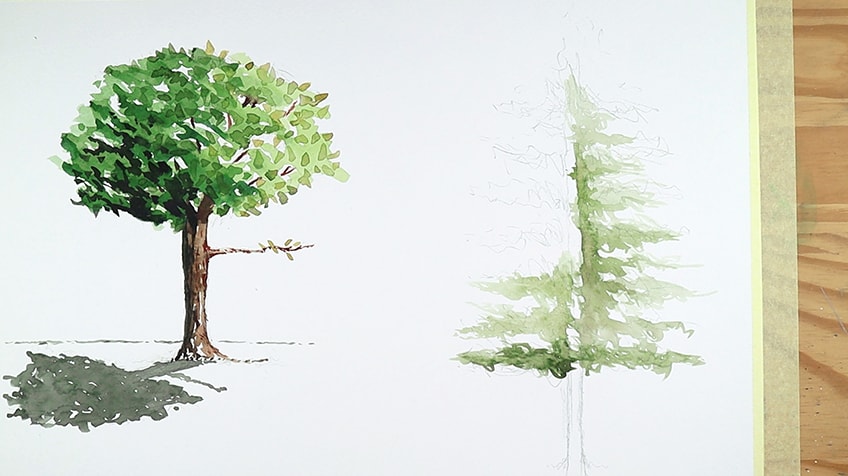
We want to allow our sketch to guide our painting process. Remember, the watercolor paint will be slightly lighter once it has dried. We can now continue with this process on the other side of the tree. Try to use the width of one side of the tree to guide the width of the foliage that you paint on the other side of the tree. As you paint the tree in the light tones of green, try to keep some negative space in the middle of the tree. This will help to create a branch that runs through the foliage of the tree. These little negative spaces also help to create a bush-like quality of a tree.
Remember, as we paint these lighter tones of the tree we are keeping the concept of the arrowhead in the back of our minds to help guide the shape that we want our tree to display. Pine trees have this arrowhead shape so keep that in mind when painting.
Step 3: Applying the Mid-Tones
Now that we have the governing shape painted with our light-toned green, we can proceed to add some darker qualities to the tree. We will do the same with the darker green, except we now want to make painterly marks at the bottom parts of each branch. We can make our green slightly darker by adding hints of brown and black into a mix with green. Remember, as you paint these mid-tones of the tree you want to make sure that you don’t go over the light tones completely. Try to paint the bottom parts of each branch with darker tones.
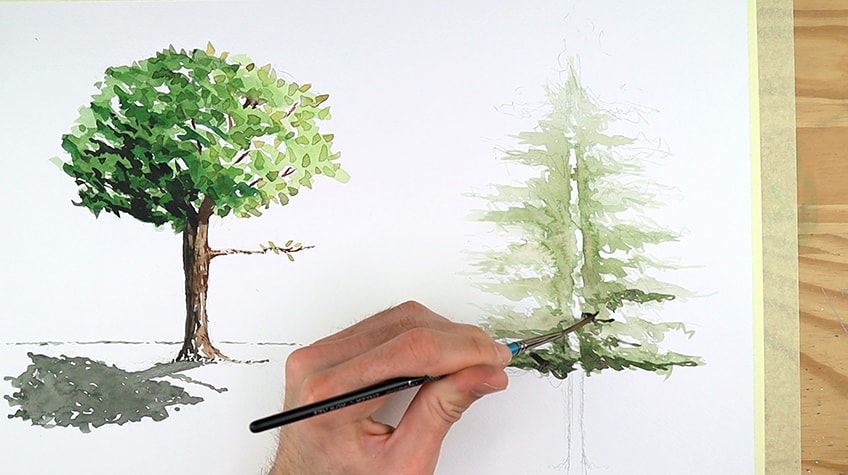
Let us carry on with this process slowly moving up along the tree toward the top. When painting trees with watercolor we want to add layer upon; layer. We do this by adding the light layers and slowly working darker layers on top of them. Watercolor trees look nice when there is color variation. Try to slowly see how the green changes its tonal value as you slowly place the darker green tones on top of the lighter green tones.
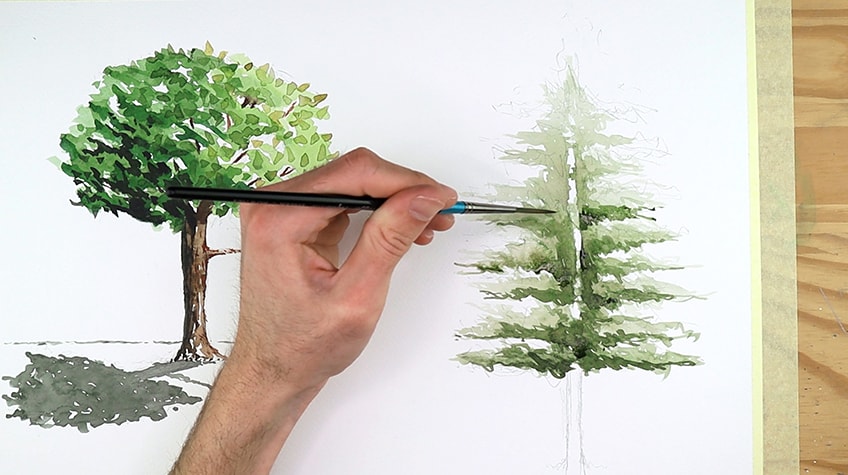
What we should see is that our darker green tones are running along with the bottom parts of the branches of the tree. By doing so, the darker tones will create both a shadow effect on the tree as well as give the tree a greater sense of depth. Remember to leave some negative space in the middle of the tree along the line of the trunk. By doing so we will have room to paint in some brown moments to represent the bark.
Once the mid-tone application is dried we should see a variety of green colors within our tree which runs along these horizontal branches.
Step 4: Painting the Tree Trunk
We can now begin to make a mix of brown that we will use to paint the trunk of the tree. When painting watercolor trees we want to make sure that the color palette suits that of real trees. Often this is achieved through the use of browns in color mixes. For the tree trunks, we want to use both light and dark tones of brown.
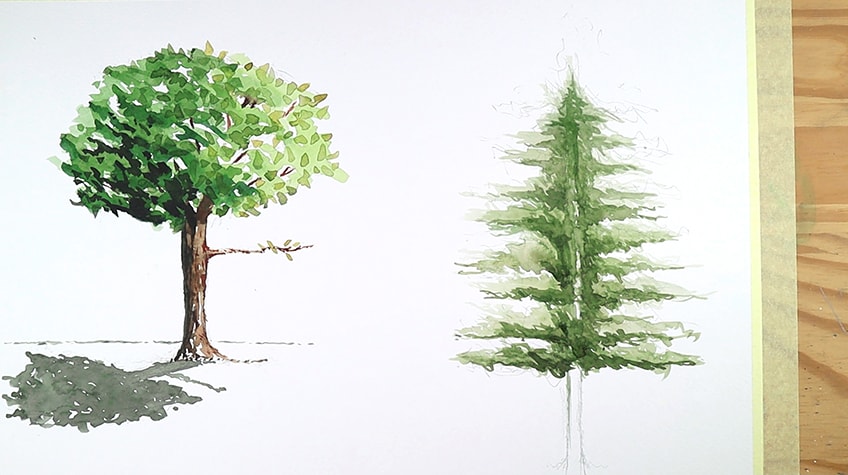
We can proceed to use this mix of brown to add little hints of brown within the negative spaces running through the center of the tree. We want to add brown in the areas where the trunk would run through the tree, describing how the trunk runs to the top of the tree.
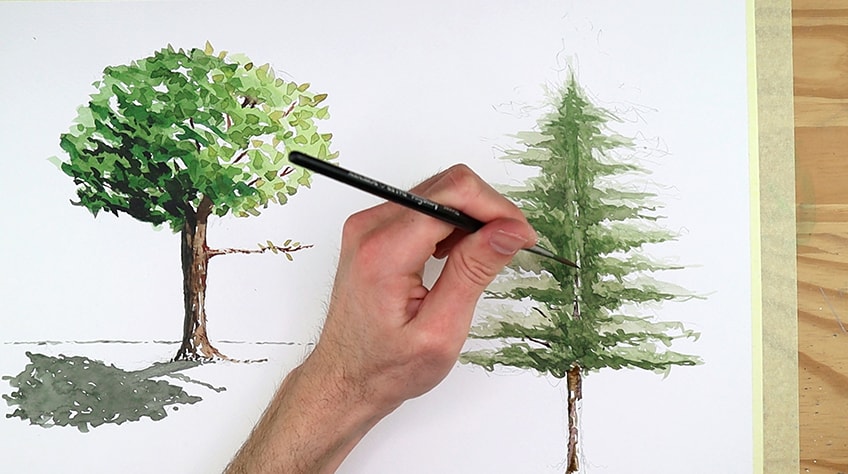
Another good suggestion is to add little lines through the tree within the negative spaces. This gives the effect of linear branches that run outwardly from the tree through the foliage. This is a great way to mimic the quality of an actual pine tree.
Step 5: Painting the Darkest Shadows
We can now begin to make a dark mix of green which we will use for the darkest tones in the tree. We do this by mixing green with a little bit of black and brown. What we want to do is apply these darkest tones predominantly on one side of the tree. This will be applied on the side of the tree where the shadows would be the greatest.
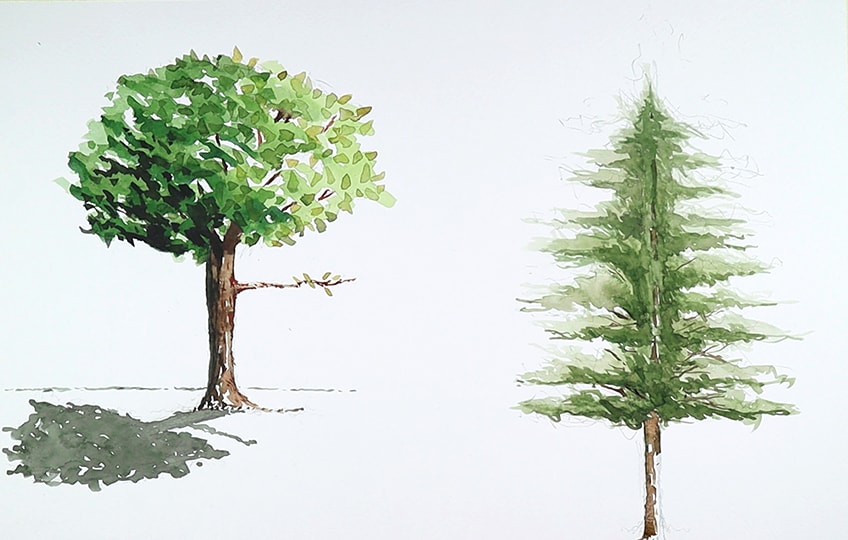
Try to be more gestural and sparing with the application of these darker tones. This is because the darkest tones shouldn’t overpower the rest of the variations of green applied before. Allow yourself to paint these marks throughout the whole tree from top to bottom. But not painting too much is the key. Keep these darker tones predominantly near the base of the tree but a little less toward the top of the tree.
Step 6: Painting the Tree’s Shadow
Here is where we can now paint the tree’s shadow. We can do this by taking a very light wash of black or highly diluted black and then begin to paint the shadow of the tree moving on a horizontal axis.
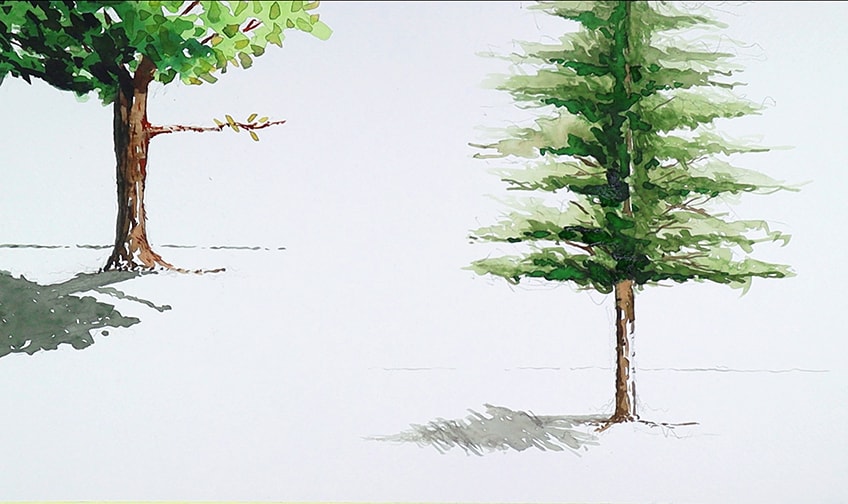
You can either make your shadow long or short. As long as it moves along a horizontal axis, it will have the effect of a real shadow.
Tips to Remember
These are two types of trees that are common to paint and often work well with both summer and winter landscapes. Painting trees is a great skill to develop for painting landscapes. Use this tutorial as a guideline for other tree paintings that you would like to do in the future or for trees that you might like to incorporate into other landscape paintings.
- Always tape your paper down when painting with watercolor. This way we have our paper firmly placed on our surface for better control.
- Always have two jars of water when doing watercolor. One for an initial rinse after using the paint and the other for a second cleaning of the brush for assurance that it is clean.

- Painting trees allows for very loose styles of application. You could try various types of scribbles and mark-making styles, no single way is the correct way.
- Painting trees is about layering different colors and marks. You always want to work from light to dark.
Again, watercolor tree painting is really simple when you think about the shape you want to achieve. The marks don’t matter as much as the holistic shape. If you get the shape of the tree correct you can apply various marks within that shape and it will look like a tree. The real exploration of tree painting is the colors that you would like to achieve, so spend some time exploring color mixing when painting trees.
Frequently Asked Questions
How Do You Paint Watercolor Leaves on a Tree?
When painting a watercolor tree in general, you will find that it is quite abstract in its structure. Essentially, it is an assembly of blobs and scribbles which are applied with paint. What makes it a tree is the shape that we paint those marks in. The same goes for leaves, there are many ways to paint leaves. However, it is more about the placement of the leaves and it is contextualized as a leaf by being painted on a tree. One good way is to make little dabbing actions on your tree, another way is to paint multiple small little strokes on the tree.
How Do You Paint Watercolor Trees?
There are many ways to go about painting watercolor trees. What we want to do first though is identify the general shape of the tree and the general color palette of the tree. We do this by using a reference image. How we represent these characteristics of a tree is through various processes. Firstly, explore the variety of brushes that could be accessed for various marks, this helps with large scale and small. scale details. One of the best ways to go about this is to understand that trees are abstract, which means that we are placing blobs and arbitrary marks. We can allow these marks to be applied in any way as long as you follow the general overall shape of whichever tree you are trying to paint. Lastly, leave some negative space or unpainted moments in your tree to create a hollow effect that trees often have.
How Do You Paint a TreeTrunk in Watercolor?
Tree trunks and tree branches are easy to paint. If you think about various trees what you’ll realize is each tree has a uniquely shaped tree trunk. Some are thin and long and are often found in pine trees. Some are thick and wide and can often be found in oak trees. Essentially, we want to identify the shape and sketch it out very faintly. Then lastly, we can create a variety of browns, which we can apply with various brushes. As long as you understand where exactly the shadow is placed on the tree then you can use that to guide where you would paint your darkest and lightest tones on the tree trunk. Lastly, explore your various brushes and what kinds of marks they can produce. Watercolor is good with abstract representations, so don’t get hung up on details but rather think about it as gesturing to the detail as opposed to perfectly imitating it.
Matthew Matthysen is an educated multidisciplinary artist and illustrator. He successfully completed his art degree at the University of Witwatersrand in South Africa, majoring in art history and contemporary drawing. The focus of his thesis was to explore the philosophical implications of the macro and micro-universe on the human experience. Matthew uses diverse media, such as written and hands-on components, to explore various approaches that are on the border between philosophy and science.
Matthew organized various exhibitions before and during his years as a student and is still passionate about doing so today. He currently works as a freelance artist and writer in various fields. He also has a permanent position at a renowned online gallery (ArtGazette) where he produces various works on commission. As a freelance artist, he creates several series and successfully sells them to galleries and collectors. He loves to use his work and skills in various fields of interest.
Matthew has been creating drawing and painting tutorials since the relaunch in 2020. Through his involvement with artincontext.org, he has been able to deepen his knowledge of various painting mediums. For example, watercolor techniques, calligraphy and lately digital drawing, which is becoming more and more popular.
Learn more about Matthew Matthysen and the Art in Context Team.
Cite this Article
Matthew, Matthysen, “How to Paint Watercolor Trees – An Easy Guide to Watercolor Trees.” Art in Context. February 15, 2022. URL: https://artincontext.org/how-to-paint-watercolor-trees/
Matthysen, M. (2022, 15 February). How to Paint Watercolor Trees – An Easy Guide to Watercolor Trees. Art in Context. https://artincontext.org/how-to-paint-watercolor-trees/
Matthysen, Matthew. “How to Paint Watercolor Trees – An Easy Guide to Watercolor Trees.” Art in Context, February 15, 2022. https://artincontext.org/how-to-paint-watercolor-trees/.


