


How to Draw Wings – Creating an Easy and Realistic Wings Sketch
The feathered wings of an angel can appear difficult to draw, but they are actually remarkably simple once you break the process down. In today’s drawing tutorial, we take you step-by-step through the process of drawing wings. We make learning how to draw wings easy for artists of all levels, whether you are a seasoned professional or you are just beginning your journey with a paintbrush. By the end of the tutorial, you will have all the skills to reproduce a realistic feathered wings sketch with ease!
How to Draw Wings In 15 Easy Steps!
In our wings sketch tutorial, we are drawing not just one wing, but a pair. Having two wings brings up the potential problem of symmetry, which may be intimidating for new artists. This is where construction lines come in. We begin with a series of construction shapes and lines that help us to get the proportion, symmetry, and shape right before we add any details.
You can see the first four steps in the collage below that will help you get the perfect symmetry in your wing drawings before you begin adding the feather details.

Step 1: Constructing the Top Line
We begin the wings sketch by constructing the top line of the right wing. Find the center point of your canvas, and just to the right of it, draw a straight tilted line. The right side of this top line should be significantly higher than the left, creating a sharply sloped horizontal line.
This line is the first step in creating symmetrical wings. You will also use this line to create the final shape and size of your wing drawings.

Step 2: Shaping the Curve of the Wing
We continue to work on this first wing by creating the downwards curve. Begin at the left end of the top line and create a downwards curving line.
In the next step, we will use this curve to help us shape the rest of the wing.

Step 3: Finishing the Shape of Your Wings Sketch
There are two parts to this step. First, draw a short tilted line that extends down and to the left from the curve you drew in the last step. This line should be very short. If it is too long, then your wing will not have the correct shape. To finish the construction of your first drawing of wings, you can draw a large curving line between the bottom of this short line and the right end of your first top line.
If you take a look at our example below, you will see that the bottom of this line is much more curved than the top.

Step 4: Mirror Your First Wings Sketch
This step is simple now that you have the first wing constructed. All you need to do is create a mirror image of the first wing, with a small gap between the bottom lines. This step is where symmetry comes into play. If you need to erase and redraw your wing drawings a few times, that is absolutely fine.
Take your time and make sure that your wings are as symmetrical as possible.

Step 5: Adding the First Layer of Feathers
In order to build up a realistic feather pattern, we are going to do it in a series of layers. We begin with the top layer along the upper curved line of each wing.
You do not need to be too precise with the shape and consistency of these feathers, as they are the smaller downy ones.

Step 6: Outlining the Top of Your Wings Sketch
In this step, you are going to outline the top feather on each wing. This feather is large and curving up from the middle curve. Begin the line on each wing by outlining the upper curve. Create a smooth curved lump before extending out on top of the wings.
Finish the upper feather by curving it back into the construction shape.

Step 7: Drawing the Second Layer of Feathers
We are going to continue building up the feather with the second layer. On each of the wings, follow the curve of the first feather layer with a second layer on your wings sketch.
The feathers at the top can be a little smaller than the ones at the bottom.

Step 8: Adding More Feathers to Your Wing Drawings
This step is very easy and simply follows on from the previous one. Add a third layer of feathers to your wings sketch. This third feather layer can be a little bigger than the last.
You can begin to curve them down towards the bottom of the wings a little more.

Step 9: Drawing the Mid Feathers
The mid feathers are the meeting point between the smaller downy feathers we have been drawing and the larger flowing feathers at the edge of the wings. You are going to continue to follow the feather curves in this step, but you can make this layer of feathers significantly bigger. You can see from our example below that the mid feathers at the top of both of the wings should be quite long and pronounced.
You want the feathers to have a gradient, becoming gradually smaller as you move down the curve of your drawing of wings.
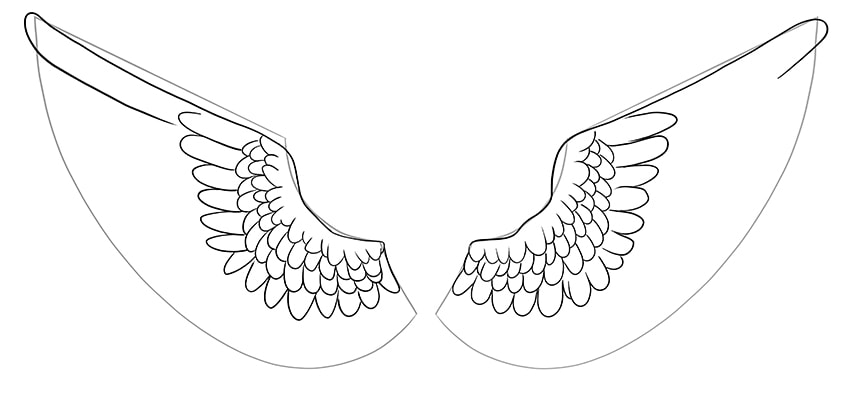

Step 10: Finishing Your Drawing of Wings
To finish your wings sketch, you are now going to draw the large final feathers on each wing. These wings should be large and curved all the way to the end of the construction shape. As with the previous layers, the top feathers should be significantly larger than the ones at the bottom. The bottom feathers should also be thicker and more rounded than the top feathers.
When you have finished this step, you can erase the construction lines.

Step 11: Detailing Your Wing Drawings
This step focuses on detailing the feathers in your wings sketch. The detailing should begin on the third layer of feathers. On each individual feather, add short curving lines in the center. Continue to add these lines to each of the feathers extending out to the final layer.
In each layer, the lines should get longer.

Step 12: Adding the Base Color to Your Drawing of Wings
As our wings are white, we are not going to add any strong color. Instead, we are going to begin with a base coat of ivory or cream paint. Use a regular paintbrush and add an even coat of ivory paint to each wing.
Make sure that the coat does not have any blotches and that it fills every part of the wings sketch.

Step 13: Contouring Your Wing Drawings
In this step, you are going to add a little dimension to your drawing of wings with a touch of black shading. Use a fine blending brush and add a touch of black paint to the connecting lines of each feather. This contouring will help emphasize the three dimensions of each layer of feathers.
You can also add some contouring along the edges of the larger feathers.

Step 14: Adding Shading
Shading and contouring are slightly different. The contours helped to emphasize the separation of the layers, while the shading emphasizes the effect of light. Use a small blending brush and some black paint and add a light shadow to the outline of each wing.
Leave the contouring visible, but use the shading to enhance the edges of each feather on the wings.

Step 15: Finishing Your Drawing of Wings
To finish your wing drawings, you can carefully erase the outline of your drawing. This will create a seamless finished wings sketch. Use the corresponding color at each point and carefully trace over the entire outline of your wing drawings.
You can repeat this process for each of the feathers, using light gray paint to trace the inner texture and details.

Congratulations on finishing your very own beautiful drawing of wings! We hope that you have enjoyed the drawing process and that you are happy with your final drawing. By using construction lines and breaking the drawing process down into easy-to-follow steps, you can draw anything you set your mind to!
Take a look at our angel wing drawing webstory here!
Frequently Asked Questions
How Do You Make Learning How to Draw Wings Easy?
Wings can be tricky to draw if you jump right in at the deep end. Fortunately, we break the process down to make it easy for any artist to follow. Using construction lines and layering steps, we make learning how to draw wings easy for anyone!
Can You Make Three-Dimensional Wing Drawings?
In our wings sketch tutorial, we show you how to draw wings that appear to be three-dimensional. Using contouring and shading between the feather layers, we emphasize the separation of each feather.
What Color Should I Use for My Wings Sketch?
The color that you use for your drawing of wings is entirely up to you. In our tutorial, we use white as this is the most traditional color, but you can really let your imagination run wild!

Matthew Matthysen is an educated multidisciplinary artist and illustrator. He successfully completed his art degree at the University of Witwatersrand in South Africa, majoring in art history and contemporary drawing. The focus of his thesis was to explore the philosophical implications of the macro and micro-universe on the human experience. Matthew uses diverse media, such as written and hands-on components, to explore various approaches that are on the border between philosophy and science.
Matthew organized various exhibitions before and during his years as a student and is still passionate about doing so today. He currently works as a freelance artist and writer in various fields. He also has a permanent position at a renowned online gallery (ArtGazette) where he produces various works on commission. As a freelance artist, he creates several series and successfully sells them to galleries and collectors. He loves to use his work and skills in various fields of interest.
Matthew has been creating drawing and painting tutorials since the relaunch in 2020. Through his involvement with artincontext.org, he has been able to deepen his knowledge of various painting mediums. For example, watercolor techniques, calligraphy and lately digital drawing, which is becoming more and more popular.
Learn more about Matthew Matthysen and the Art in Context Team.


