


How to Draw Mountains – A Realistic Mountain Drawing Tutorial
Learning how to draw a mountain is a simple and easy activity that can be a great visual tool for creating landscapes that suggest vast distances. Mountain drawings can be a beautiful way to enhance a landscape as they are large structures that can be used as an indication of scale in a landscape. The visual quality of mountains is also quite versatile, as they can suggest a horrific or dark quality as a result of having been used as imagery associated with darkness and gloom within lore and folktales. On the other hand, mountains can be contextualized with other additional beautiful features in a landscape, which can suggest a wholesome or traveling excitement within a landscape. There are many ways to use mountains within an artwork but that can be creatively decided by you.
An Easy Guide to Drawing Mountains
As we learn how to draw mountains, we should take note that there are various ways to draw mountains. Within this tutorial on how to draw mountains, we will be creating a mountain drawing that is quite simple and can be used to create a set with the same method. Drawing mountains is quite simple, and learning how to draw a basic mountain can be a great way to understand how light interacts with a structure.
Mountain drawing is adaptable, in that once you understand how to draw basic mountain shapes, you can then add that structure on top of one another to create a variety of mountain peaks.
In this tutorial, we will see how we can use the concept of light to give the mountain structure a three-dimensional quality, and we can add other features to give a sense of scale to the mountain draw. We will only need simple materials for this mountain drawing, which make the process a lot easier.
Step-by-Step Instructions on How to Draw Mountains
Learning how to draw mountains is quite simple, as once you understand the basic formation of a single peak in a mountain, you can replicate this to create a series of peaks in a single image. In this tutorial, we will look at the simple process of creating a single peak, which we will then build onto with other peaks to make a mountain range.
We will also see how to create a lighter and darker side of a mountain face, which suggests a light source coming from a single direction.
We will also learn how the use of simple marks and line work can change a simple mountain sketch into a seemingly realistic mountain drawing. Lastly, we will add a feature such as a tree to define the scale of the mountainscape. Now that we know what to expect, let us go through the process of how to draw mountains.
Step 1: Sketching the First peak
Let us begin by drawing a simple triangular shape near the bottom of the page. You can do this on any side of the page, but try to keep it quite small. From there, take your pencil and draw a zig-zag-styled line from the peak of the triangular shape down the center. From here, we can decide which side can be shadowed and which side can be lightened by the light source.

From here, we can add shading with our pencils to the little triangular structure. You can add shading on both of the jagged lines down the center of the triangular structure. However, the aim is to always make one side darker than the other.
This will suggest a shadowed face and a light face of the mountain.
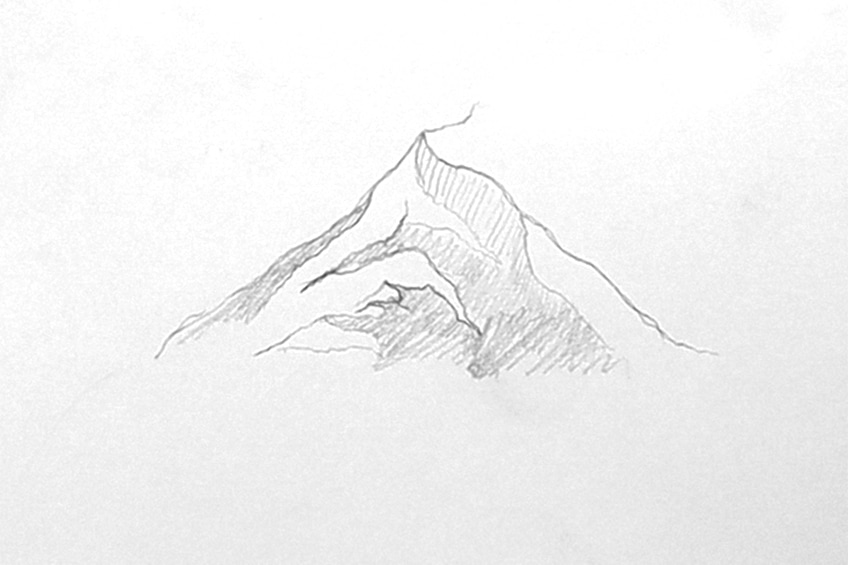
From here, we can take our ballpoint pens and go over the shading on the shadowed side of the mountain. This is completely up to you in terms of how dark you would like to make your mountains shadowed face. A good suggestion is to use lines rather than a scribble technique.
If you add lines in the direction of the mountain’s shape, it will have a really beautiful effect.
Step 2: Sketching the Mountain Range
Now that we understand the basic principles of creating a mountain peak, we can apply this principle to a full mountain range. What makes this easy is that you can take your pencil and simply draw a line from the tip of the triangular mountain peak and extend it as long as you would like the mountain range to be.
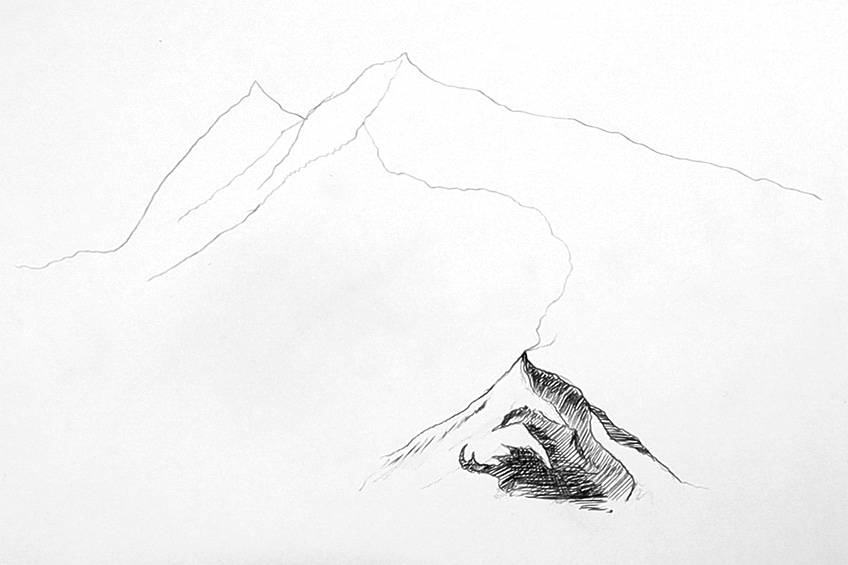
You can simply create a set of triangular shapes from that single line. That line doesn’t need to be straight either and can curve toward the top of the page. As you add perpendicular lines connecting to that main line, you will start to form mountain peaks that become part of a single mountain range.
Then, it is simply a matter of shading on a single side.
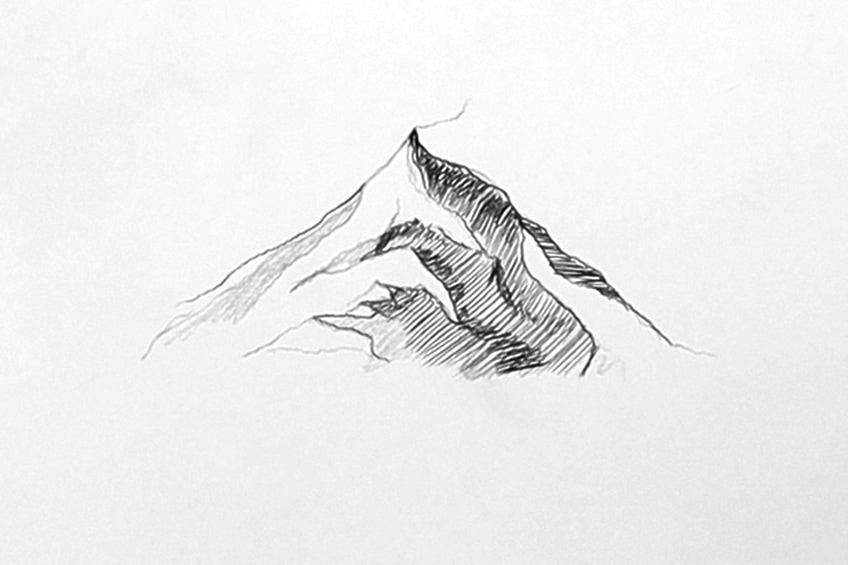
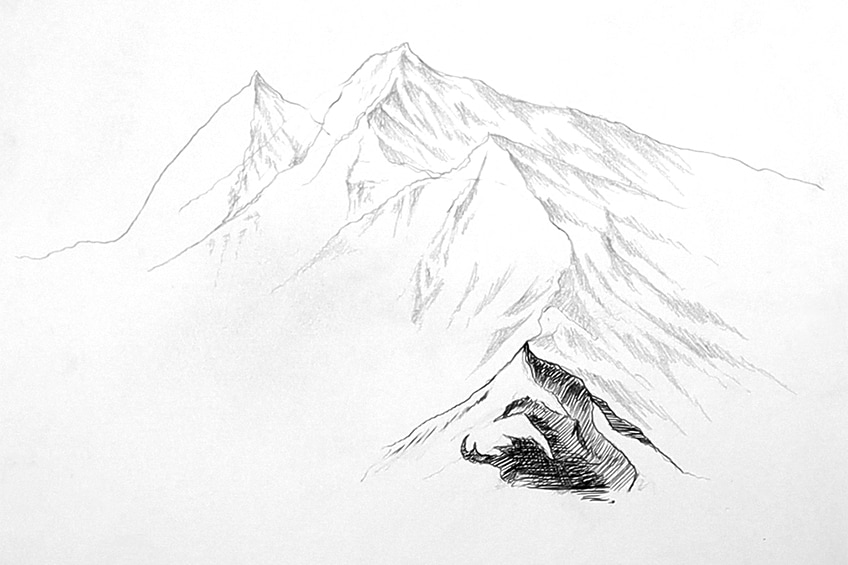
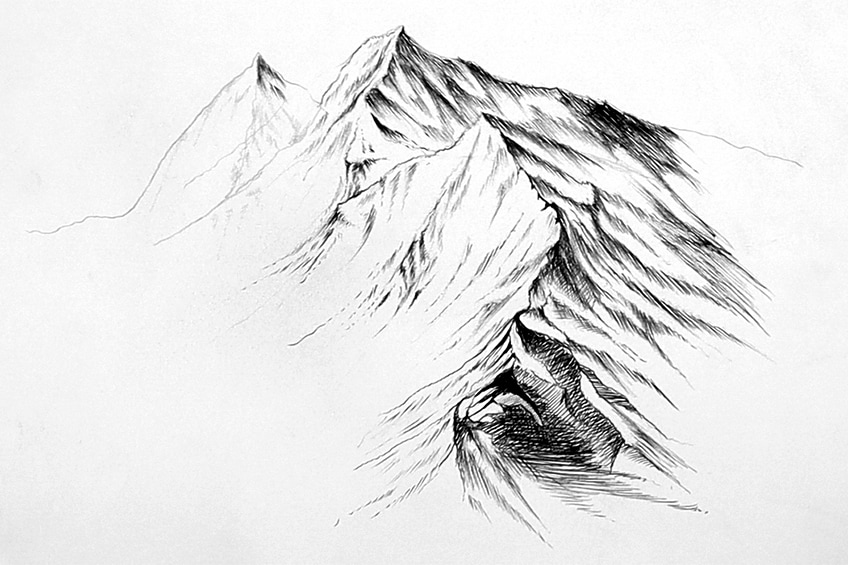
Step 3: Shading the Mountain With Pencil
Now, we want to create a sense of structure and rock-like texture in our mountainscape. We can create this effect by using our pencils to create linework on the shadowed side of the mountain. However, these forms should look jagged and like elongated triangular shapes that run down the side of the mountain on the shadowed side.
As you work your way through the mountain range, you want to take your time to add in this line work, predominantly being on the shadowed face of the mountain. You can add detailing and line work to the side of the face that would be exposed to the light source, but you will want to keep the shading marks light.
We can create distinctions in tonal value once we shade with our ballpoint pens.
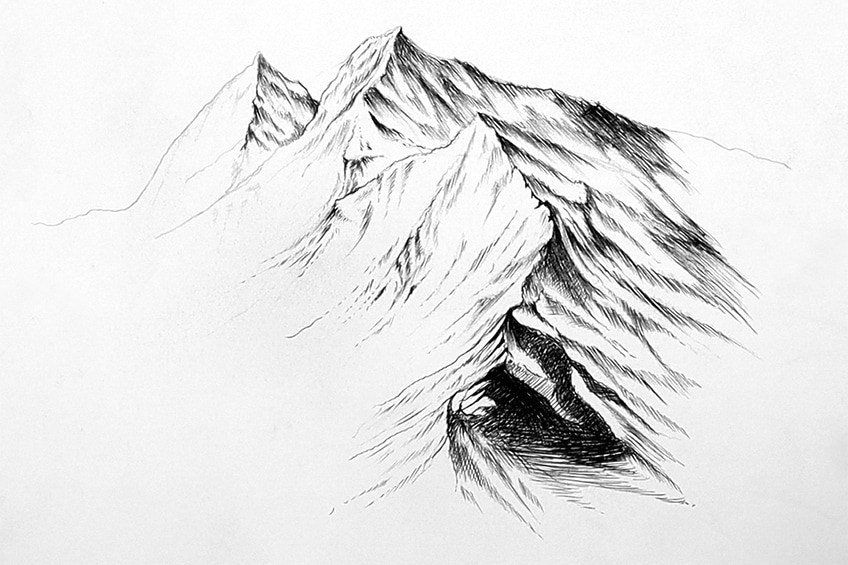
Step 4: Shading the Mountain With Pen
Now, it is important to know that mountains are quite abstract from afar. This means that we are creating the idea of rocky textures in the mountain-scape seen from far away. This is why line work is a great technique, as the lines do well to suggest sharp edges of rocky terrain.
Remember, as we shade with our ballpoint pens, we want to create a set of jagged sharp shapes moving down the shadow side of the mountain face.
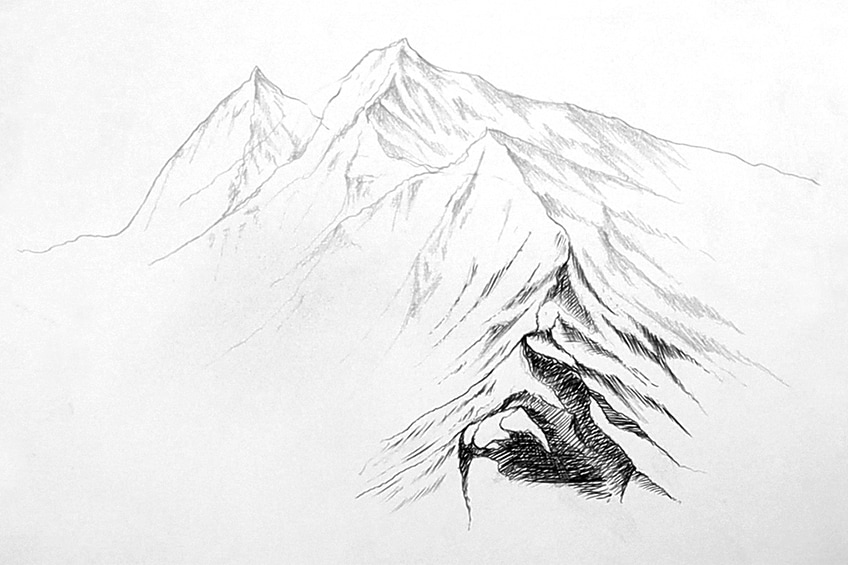
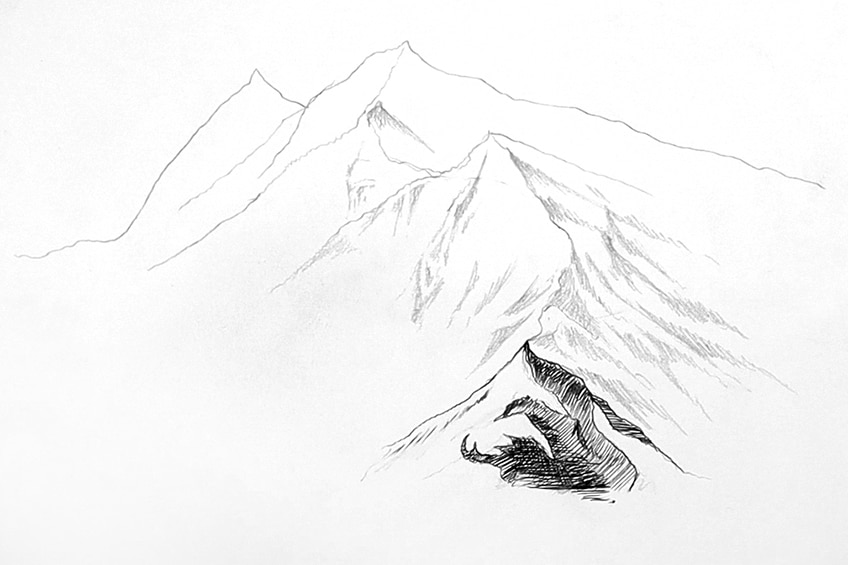
As you shade and add linework to your mountain face, you can also consider making the mountain peak that is closer and slightly darker. By doing this, you will create depth between the mountains in the foreground and the mountains in the background
As you shade in your mountain range, remember to take your time.
Drawing lines that flow with the slope of the mountain shape is a delicate task. You want to make sure that you are careful, especially when adding in-line work on the light side of the mountain.
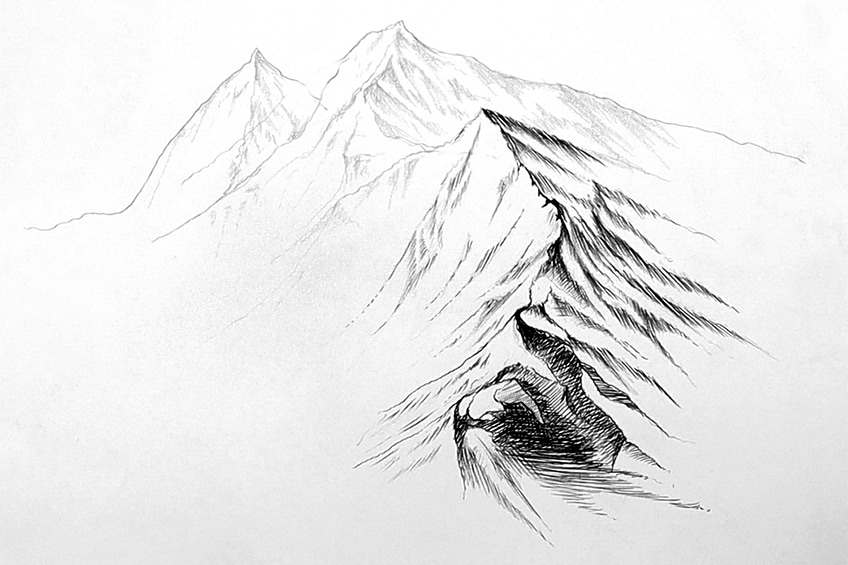
With mountain drawing, we are creating the geometric rocky terrain as seen from afar. This is why linework can be a great way to create straight-edged features. Again, we want to make sure that flows in the direction of the mountain shape on each side of the ridge. As we add linework to each peak of the mountain, we can also play around with the scale of the lines.
Consider making your linework slightly smaller when drawing features into the mountain peaks that are in the background.
Remember, you can explore creating more mountain peaks as you go by creating more triangular mountain shapes. However, if they sit in the background you want to make sure that they fall behind the last drawn mountains.
This way, we keep a consistency with the distance and how the mountains are placed realistically in a mountain range.
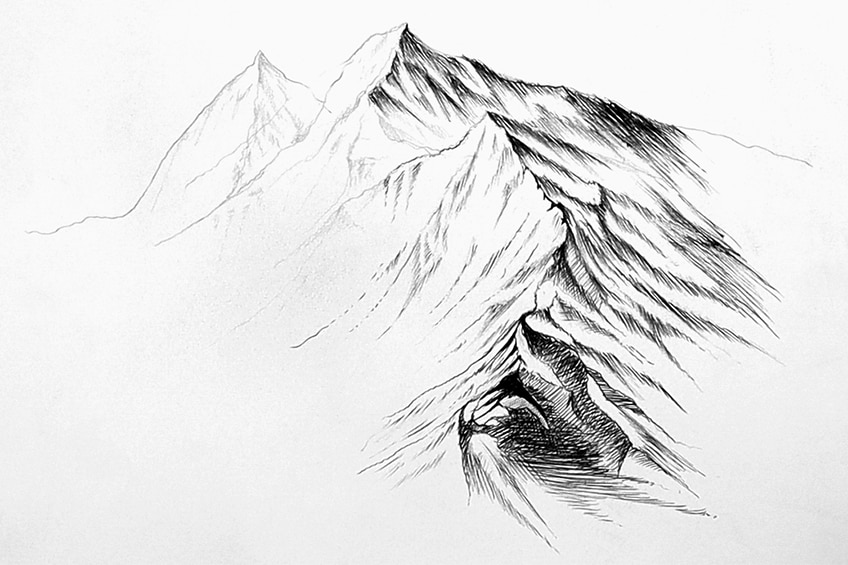
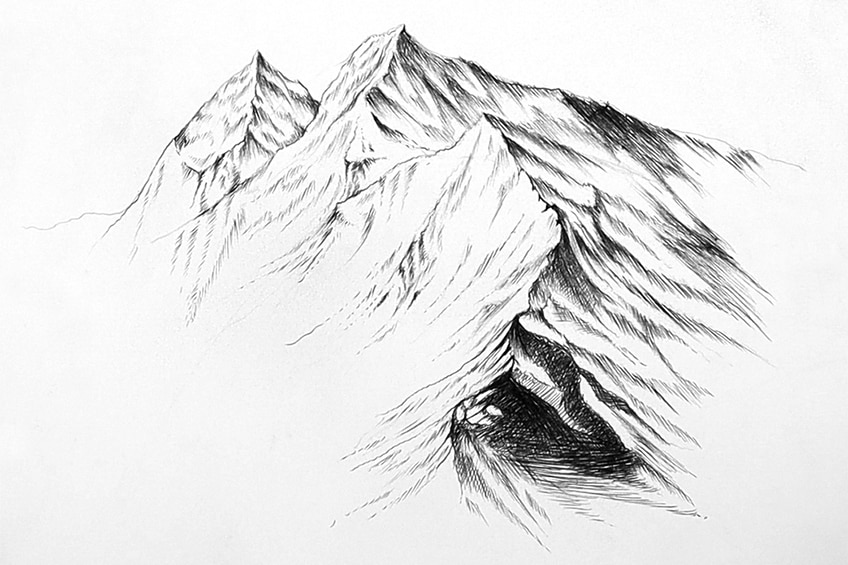
With the sides of the mountains exposed to the light source, you can add in some dark linework and geometric shapes. By doing this, we create a more realistic rocky texture, which suggests that there are some smaller features in the light-exposed mountain face that are facing away from the light source.
Again, adding in lines with your ballpoint pen can be drawn in all sorts of shapes. The only two things you want to remember are that you want to keep them geometric-like. Secondly, you want to make sure that these lines flow with the slopes of the mountains. Remember, you can also explore contrast in your mountain drawing. For one, you can use it to create depth between the foreground and the background.
You can also use it to darken shadowed sections in the mountain, suggesting that some areas are darker than others.
As you continue to shade in your mountain peaks, working in the line details you should start to see the mountain formation a little more clearly by now.
Keep in mind that mountains can seem quite abstract if not contextualized within a mountain range or with other features
As we add lighter linework to the light side of the mountain faces, and darker linework to the shaded parts, our mountains will slowly start to look a little more realistic. A realistic mountain drawing is simple when you start to understand that the image needs to be contextualized within a mountain range.
Step 5: Shading the Mountain With Pen
Now that we know how to draw mountains and how to create a realistic mountain drawing within a mountain range, we can now contextualize the mountain drawing with other features. You can add in all sorts of features, but to keep it simple, let’s use trees. Use your ballpoint pen to draw a simple pine tree.
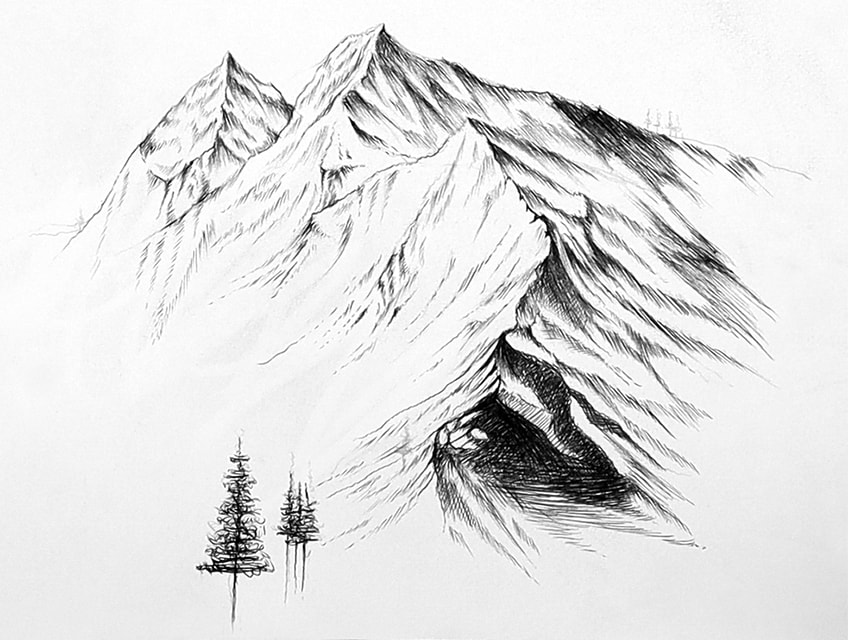
You can draw these trees by simply creating a little vertical line, which you then can scribble over in the shape of an arrowhead. The scribble technique will give the impression of foliage. Explore scale with your trees within the mountain range.
Additional features, like trees, can be a great way to contextualize the depth and scale of your mountain drawing.
You can be really subtle with adding trees into your mountain drawing. Playing around with how little and large you draw them can be a great way to define the distance within the mountain range. You also don’t have to draw too many; drawing a few here and there can be a subtle and effective way of further contextualizing the mountain range and defining its depth and scale. Play around and experiment by adding trees to your mountain drawing in various sizes.
That is the way to draw mountains in a few easy and simple steps.
Tips to Remember
- Take your time sketching with a pencil. You want to work out the drawing in pencil before moving on to using a pen.
- Work in the lines with the shape of the mountain. You want to imagine that the mountain slopes downward on each side of the ridge, so make the lines move in that direction.
- Explore contrast. Making the mountains that sit in the foreground slightly darker gives a sense of depth to the mountain range.
- Understand which shading technique works best. With mountain drawings, using linework to create shadows can also work as a way of creating a geometric texture that is unique to rocky terrain.
- Play around with other elements. Incorporating trees, clouds, a sun, or other details can further contextualize the depth and scale of the mountains.
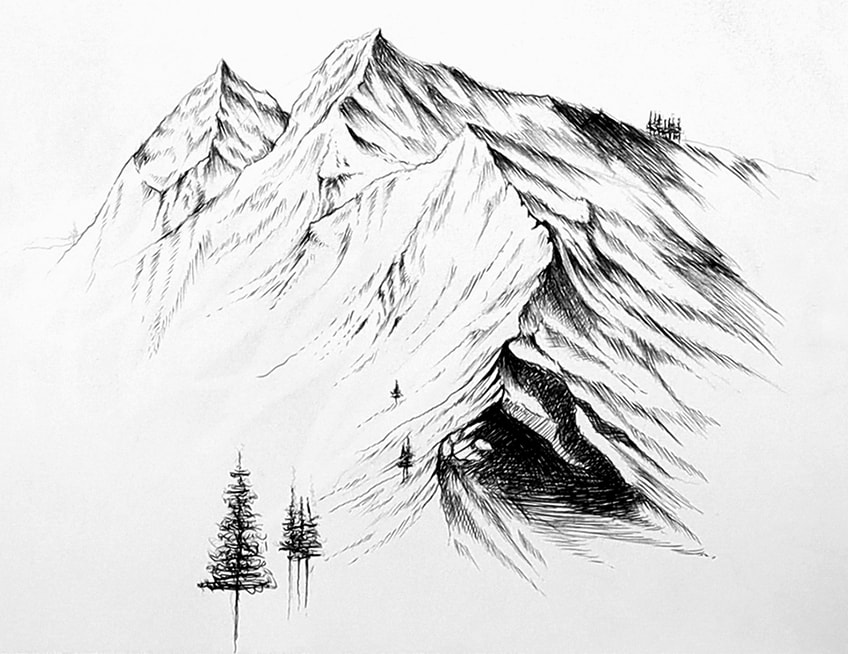
Learning how to draw mountains is not difficult once you understand the basic mountain shape. A simple triangular shape with a simple line going down the middle of it can create a ridge with two faces on either side. This is the easiest way to create a mountain and can be built on by extending the lines and creating deviating triangular shapes. The most important aspect is to make sure you keep consistency with the shadow and light side of the mountains. From there, you can explore different mark styles to create a rocky terrain and texture in your mountain drawing.
Frequently Asked Questions
How Do You Draw a Simple Mountain Shape?
Learning how to draw mountains is simple and the process of creating a realistic mountain drawing is easier than you think. Mountain drawing is quite an abstract exercise, which means that we can get away with a lot of strange marks that will result in a realistic mountain drawing. This is because when we see mountains from a distance, we are seeing an assortment of rocky terrain collectively making a strange geometric abstract shape along the mountain face. The way in which you can create a simple realistic mountain drawing is by creating a jaggedly drawn triangle. From there, you can draw a skew line down the middle of the triangular shape, starting from the point at the top of the triangle. You then want to add geometric shapes that move along the slope of the mountain on each side of the line going through the triangle. This will give the mountain a ridge with two faces. From there, we can add in all sorts of geometric marks on either side of the mountain to give it texture and replicate a rocky terrain. Lastly, you want to make sure that one side is darker than the other to suggest shadow and light. That is basically how you draw mountains.
How Do You Draw Shadows on a Mountain?
There are many ways to draw shadows or shade in a mountain, however, the main factor is to choose a shadowed side and a light side. This means that we want to have a mountain that has two faces with one face exposed to the light source and the other on the shadowed side. On the shadowed side of the mountain, we can add darker shading to suggest that it is less exposed to light. We can also play around with darkening and lightening features within the shadowed side, which can also be a great technique to create texture. On the light-exposed face of the mountain, we can also add shading, however, we want to keep it significantly lighter than that of the shadowed side. We can add little moments of shaded sections on the light side of the mountain, which can also suggest that there are rocks facing the shaded direction. Most importantly, you want to make sure that you have a predominantly shadowed and light side in your mountain drawing.

Matthew Matthysen is an educated multidisciplinary artist and illustrator. He successfully completed his art degree at the University of Witwatersrand in South Africa, majoring in art history and contemporary drawing. The focus of his thesis was to explore the philosophical implications of the macro and micro-universe on the human experience. Matthew uses diverse media, such as written and hands-on components, to explore various approaches that are on the border between philosophy and science.
Matthew organized various exhibitions before and during his years as a student and is still passionate about doing so today. He currently works as a freelance artist and writer in various fields. He also has a permanent position at a renowned online gallery (ArtGazette) where he produces various works on commission. As a freelance artist, he creates several series and successfully sells them to galleries and collectors. He loves to use his work and skills in various fields of interest.
Matthew has been creating drawing and painting tutorials since the relaunch in 2020. Through his involvement with artincontext.org, he has been able to deepen his knowledge of various painting mediums. For example, watercolor techniques, calligraphy and lately digital drawing, which is becoming more and more popular.
Learn more about Matthew Matthysen and the Art in Context Team.
Cite this Article
Matthew, Matthysen, “How to Draw Mountains – A Realistic Mountain Drawing Tutorial.” Art in Context. September 29, 2022. URL: https://artincontext.org/how-to-draw-mountains/
Matthysen, M. (2022, 29 September). How to Draw Mountains – A Realistic Mountain Drawing Tutorial. Art in Context. https://artincontext.org/how-to-draw-mountains/
Matthysen, Matthew. “How to Draw Mountains – A Realistic Mountain Drawing Tutorial.” Art in Context, September 29, 2022. https://artincontext.org/how-to-draw-mountains/.


