How to Draw a Skeleton – Depicting the Bones in the Human Body
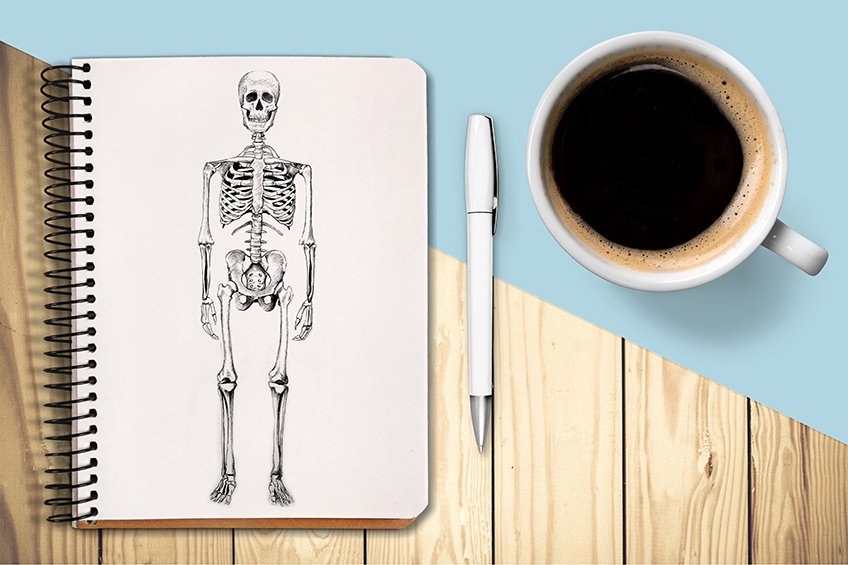
Learning how to draw a skeleton is a great exercise for refining your drawing skills. Bones drawing can be complicated and seem overwhelming, however, when you break down the process into digestible bites, you will find that it is quite a fun and easy task. Skeletons are strange structures that carry various connotations associated with both life and death. A skeleton drawing can be a great addition to other surreal and fantastical artworks. Furthermore, a skeleton drawing will enable you to better understand human anatomy, giving you a good foundation for drawing the human body. As you learn how to draw bones in this skeleton drawing tutorial, you will find that you will be developing both your concentration and drawing skills throughout the process.
An Easy Guide to Drawing a Skeleton
In this easy skeleton drawing tutorial, we won’t necessarily aim to draw a hyper-realistic skeleton, however, we will learn how to draw a skeleton that is accurate in proportion and scale. Learning how to draw bones can be tricky, however, in this tutorial we will break down the process into steps that are easy to follow.
This will make the process of learning how to draw a skeleton much easier, giving you the foundational knowledge of how a skeleton drawing is constructed from start to finish.
We will learn how to slowly develop a light pencil skeleton sketch into a more realistic and refined skeleton drawing through a few easy and simple steps. That being said, let us see what materials we will need for this tutorial on how to draw a skeleton.
Necessary Materials
We will be drawing the skeleton with both pencil and pen. This means we want to make sure we have the best materials that will be conducive to the best results in this tutorial on how to draw a skeleton. We will inevitably be encountering a few mistakes along the way, especially in the earlier stage of the tutorial. This means we want to have an eraser for rectifying any mistakes along the way.
We also want to keep our pencils sharp, as the skeleton drawing will come with finer mark-making. So a sharpener is essential for the earlier steps in the process of drawing a skeleton. We want to make sure we have some good paper for the drawing, and lastly, we will be using a reference image to guide us through the process. All materials can be found through the links below:
- Pencils
- Ballpoint pen
- Eraser
- Sharpener
- Good paper (200 g/m – 250 g/m recommended)
- Source image
Step-by-Step Instructions on How to Draw a Skeleton
The process of drawing a skeleton does require patience, especially within the earlier steps. We will begin by defining the scale and proportions of the skeleton through a light pencil sketch. This will take time, and we will find ourselves having to draw and erase constantly until we feel that the structure is right. Keep the drawing as light as possible during this step to make it easier for rectifying any mistakes.
Once we have satisfactorily configured the scale and proportions of our skeleton, we can then add more details with our pencils. We will start to define and draw each of the bones. From there we will add some light shading with our pencils before moving on to the pen. Lastly, we will then proceed to draw in pen, using our pencil marks to guide us through the drawing process with our pens.
Now that we know what to expect, let us go through the steps in this tutorial on how to draw a skeleton.
Step 1: Analysis and First Draft of the Skeleton
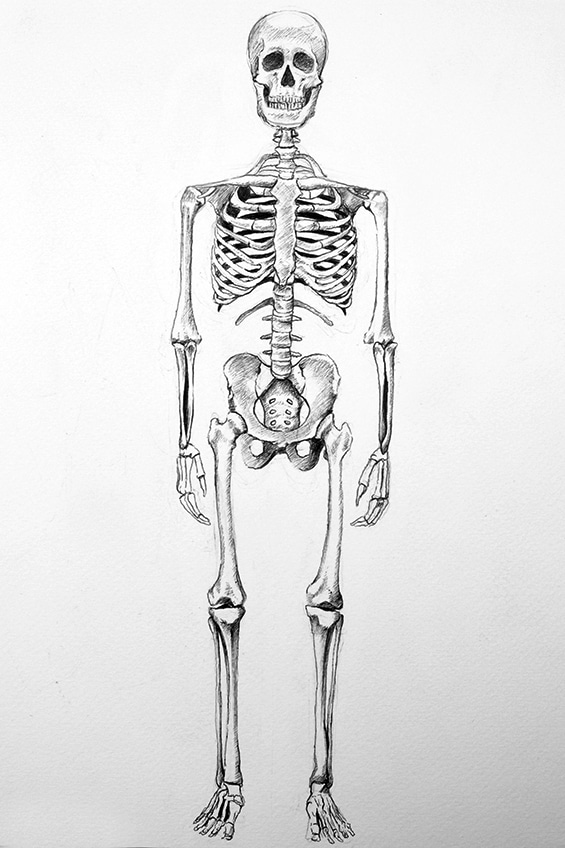
We will begin the tutorial by analyzing our reference image. Take a moment to analyze the reference image, figuring out the size of each feature and how they are positioned together. This is the most difficult part of the tutorial. We want to take our lightest pencil, anything between a 2H and HB pencil, and we want to slowly begin to make a vague skeleton sketch.

It is really important to refer to your reference image constantly through this part of the tutorial. The aim here is to work with our pencils and erasers as we proceed to make a mark and compare it to the reference image. If something is off, we want to erase it and then redraw.
This should take a little while, so remember to take a few breaks in between.
We want to consider questions like how large the head is in relation to the ribcage below. Or how wide are the shoulders? And how long are the femurs compared to the fibula and tibia bones? Our reference image doesn’t have any labels; however, you can easily find a labeled diagram on the internet to help you identify different bones as you go through the tutorial.
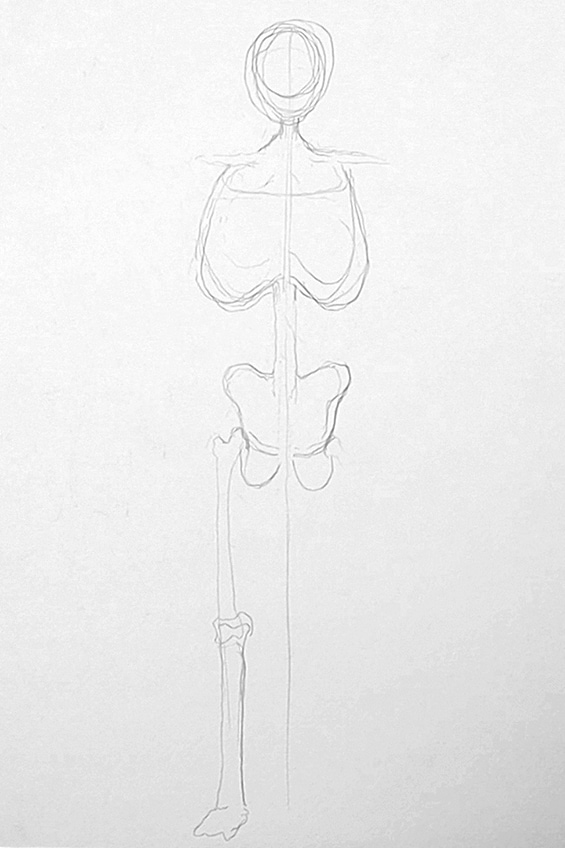
If you find yourself drawing, then erasing, and then drawing again, this is completely normal. A skeleton is a very specific structure, and the intention here is to create a skeleton drawing that resembles a realistic skeleton structure. As we work through the different features of the skeleton we will inevitably have to draw and redraw until it compares adequately to the reference image.
We want to spend a good portion of time on the ribcage specifically.
Once you configure its placement and scale, make sure you go through each row of ribs, one at a time. Going through each row, from top to bottom, is a great way to ensure that you have drawn it as accurately as possible. You can use a set of horizontal and vertical lines to help guide you in placing each row of ribs. However, just make sure you spend a good portion of time here.
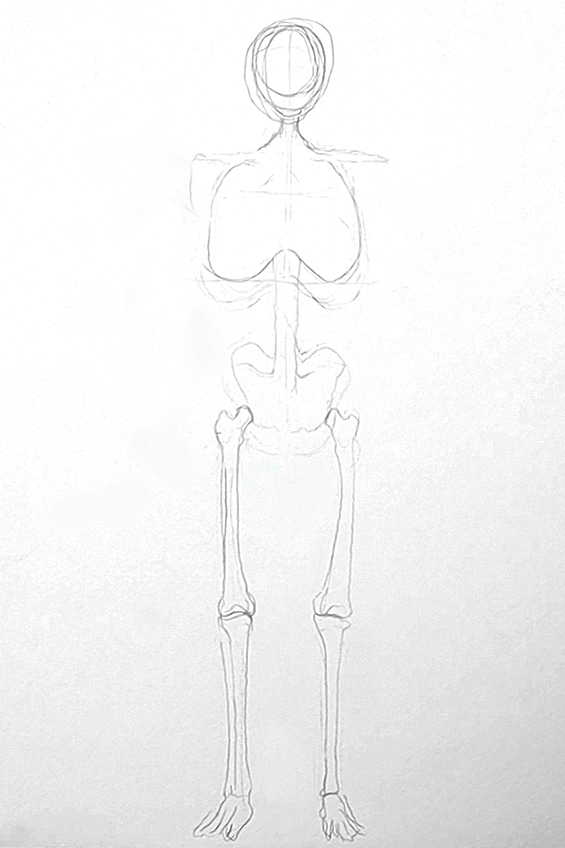
Again, we want the reference image to guide our drawing process. For instance, consider the number of vertebrae that are in between the pelvis and the bottom of the ribcage. Consider how wide the hips are in relation to how wide the ribcage is. Again, take your time during this stage, as you develop a light skeleton sketch, figuring out shape, proportions, and sizes.
We might even find that after we draw most of the skeleton, we will have to erase most of it or even all of it and begin again.
Remember, this stage is intended to get used to analyzing the reference image, making some light sketching marks that are indicative of the various features and their placement. Keep working through the process of looking at the reference image, then making some drawing marks, and then tweaking when necessary. Again, we want to keep the drawing light as we will later give our drawing a light erasing, which we will then go over to establish the structure more permanently with our pencils.
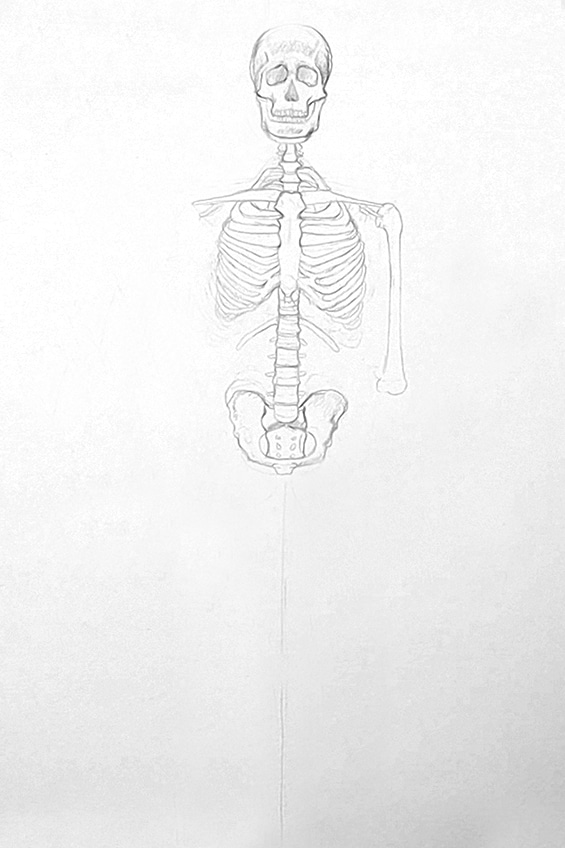
Again, the intention of this step is more to familiarize ourselves with the skeleton structure, as we develop a first draft sketch of the skeleton. By going through this process, we are imprinting the form and image of the skeleton, whilst training our hands to understand how to translate the image into a drawing.
We want to continue this process, until we have lightly sketched and erased, then redrawn each component of the skeleton. We want to be left with a rough sketch of the skeleton, as by now it should start to resemble the skeleton in the reference image.
We are intending to create an accurate drawing of a skeleton structure, so this process is completely necessary for training your mind and hand to understand the skeleton structure.
Step 2: Refining the Skeleton Sketch
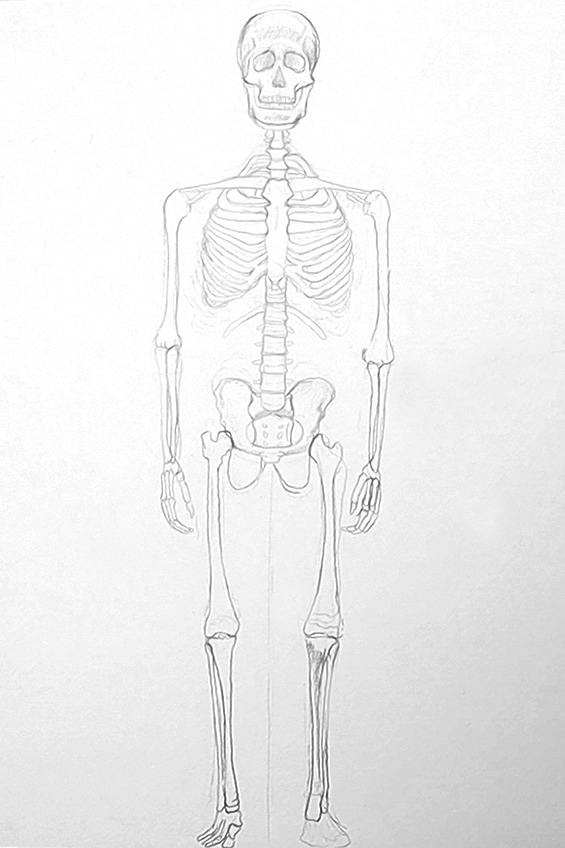
Once you have a rough and completely drawn skeleton sketch, we want to proceed by going through each component of the skeleton, giving it one last light erasing, and then redrawing. By doing this, we refined the drawing. As you constantly analyze the reference image and redraw a feature of the skeleton, we will find that the drawing becomes more accurate.
The reason why we go through this erasing process is two-fold.
Firstly, we are developing a mental imprint of the skeleton structure. We are also teaching our hands how to translate this mental image into a drawing. Furthermore, this is a helpful process when you are drawing something complex on a relatively small scale.
To reiterate, the tutorial intends to create a realistic drawing, that resembles a skeleton structure as adequately as possible. Skeleton drawings can be approached in a variety of ways, however, beginning with a rough sketch, refining with a better understanding, and then finalizing your drawing is a great way of learning how to draw something.
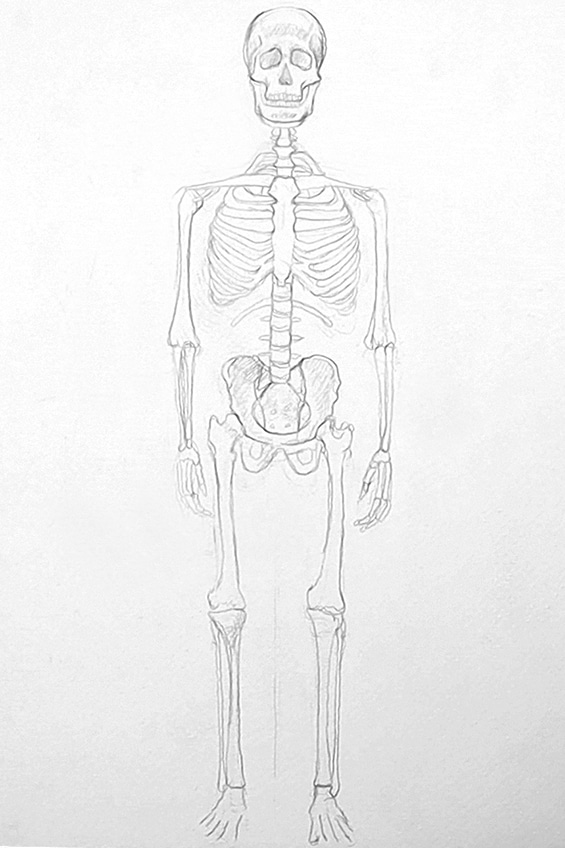
As we redraw, we gain a better understanding each time. Remember that drawing can get strenuous, so allow yourself breaks in between. This way you reengage fresh when you begin drawing again. Proceed with this process, of lightly erasing each feature of the skeleton, and lightly redrawing each feature.
Our skeleton drawing should start to resemble the reference image fairly accurately by now. Taking the time to refine each feature in pencil is also very helpful for drawing in pen. By the time we begin drawing in pen, we don’t want to rely on rectifying the drawing with pen marks. That is risky, which is why we spend time getting the skeleton accurately drawn in pencil.
Before we move on to the next step, make sure you go through your drawing one last time. Analyze your image and have one last comparative look between your drawing and the reference image. Once you feel that the drawing is as accurate as can be, we then can proceed to draw with our pens.
Step 3: Drawing From the Skull to the Ribcage in Pen
This is where we can now begin to draw in pen. Now, we want to proceed with caution, whilst drawing in pen, but, if the pencil drawing of our skeleton is accurate, we will use those pencil marks to guide our pen drawing process. Let us start with the skull, slowly adding pen marks over our pencil marks. We still want to constantly refer to the reference image.
The skull has small features, we want to spend time going through them carefully. We should find that using our ballpoint pens is not as difficult as it sounds. The process is similar to using a pencil, as we carefully work through the details of the skull, paying attention to the pressure we apply to our pens.
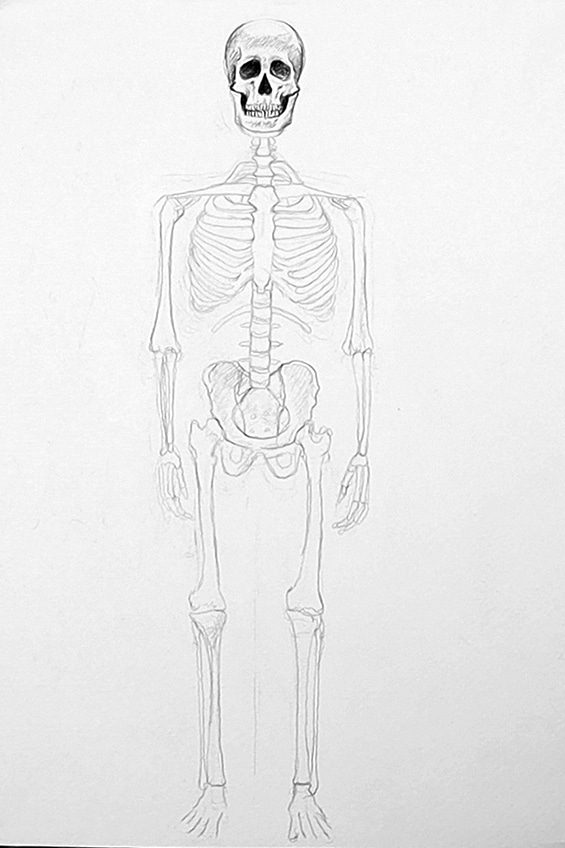
As we slowly work through the skull, we want to proceed with caution. As we start coming to the shoulder blades and collar bones, we should at this point be going over our pencil marks. You can add some light shading onto the bones with your pen. You can do this by making some light cross-hatching along the lining of the bones.
Perhaps, before shading the bones, first define the outline of the bones with your pen. Especially, as you come to the ribcage. Again, the rib cage is the most complex structure of the skeleton. This means we want to spend a good portion of time on this structure. Slowly go over the pencil marks with your pen, one row of ribs at a time.
We want to proceed with caution here. Pay close attention to the sternum, and how each row of ribs is connected to the sternum. You can add little details as you go along if you feel that your drawing might need it. However, make sure that you focus on outlining the whole rib cage structure, make this the priority.
As you come to complete the rib cage outline, pay close attention to the bottom ribs. Again, we are attempting to mimic the reference image, however, if there are slight variations, that is okay. As you carry on outlining the ribs, row by row, make sure you keep referring to the reference image.
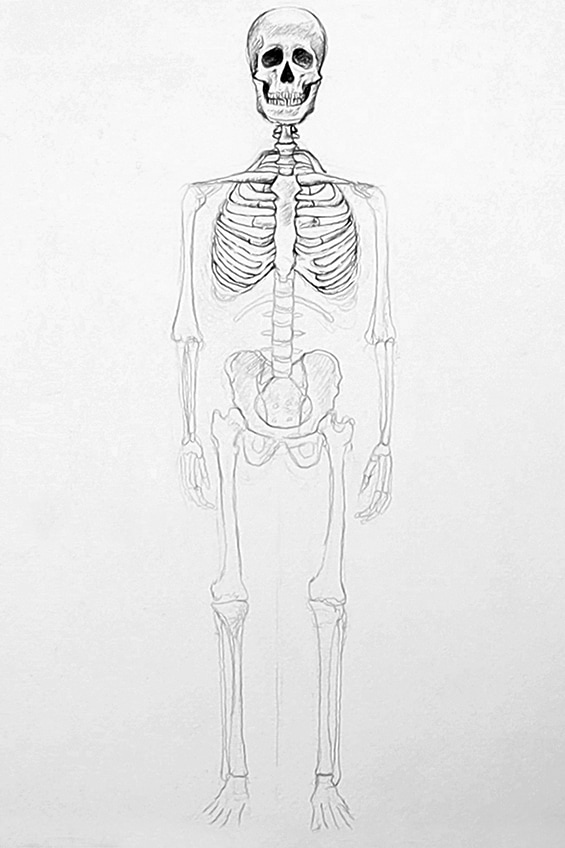
Once we have completed the outline of the rib structure, we now will draw the ribs that curve toward the back of the skeleton. Here is where we will want to draw very dark, by doing so the front row will become more prominent in the foreground.
Again, go through each row of ribs, use your reference image to see how each back row peers through the front row of ribs. A good suggestion is to work either row by row, sticking to one side of the ribs. As you stick to one side, you will find that you can focus on effectively drawing the back rows, one side at a time.
Take your time with the ribcage, as it can easily be messed up if not approached with attention to detail. Make sure you constantly refer to the reference image.
Once you have completed one side of the back row, this will help guide you as you proceed to do the same on the other side of the ribs. Remember, ribs are symmetrical, so you can use both the reference image as well as the one completed side of ribs to help you draw the structure more adequately.
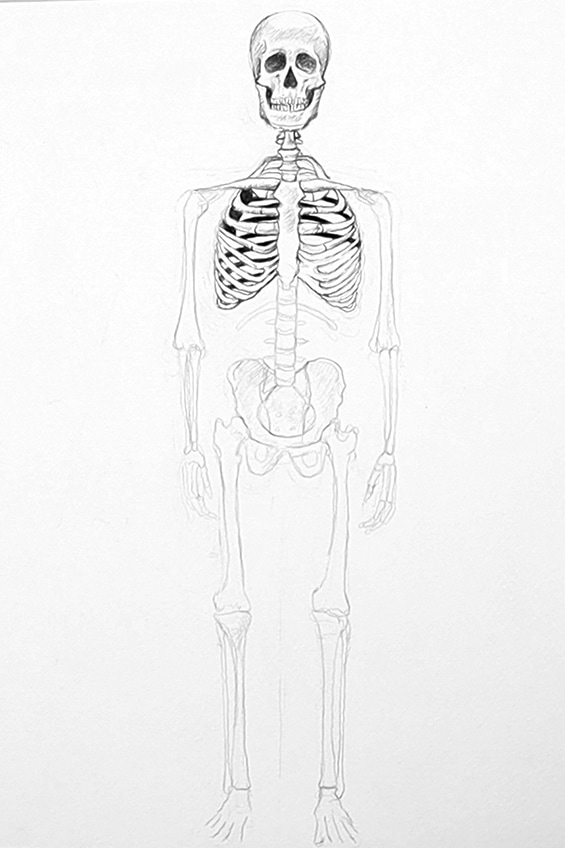
Step 4: Drawing the Pelvis and Legs in Pen
Once we have completed the ribs, we have moved on from the most difficult part of the tutorial. We now want to work our way down each vertebra, arriving at the pelvis. Again, we can give the pelvis a light outline, which we can follow up with some light shading. We can use the reference image to give us an indication of the shadows that are present in the pelvis.
As we start drawing the pelvis with our pens, we can accompany this with some shading.
We can shade the ischium bones under the pelvis slightly darker, giving the effect of depth. By doing so the pelvis will be pulled into the foreground as the ischium bones remain behind, the pelvis. We want to make all features that would be positioned in the background slightly darker.
As you continue shading and drawing with your pens, remember that the pen marks are a direct result of the pressure applied to the pen. This means, we want to pay attention to the pressure we apply to our pens. Go steadily and cautiously as you shade and draw with your pen. Work through each detail of each feature before moving on.
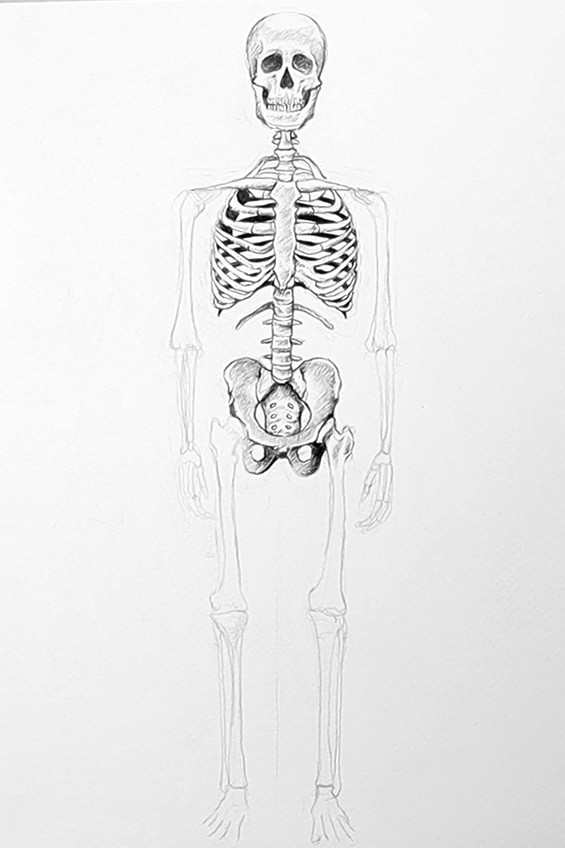
As we complete the pelvic area and its surrounding features, we can now move on to the femurs. This is where we can utilize the subtlety of shading, as we very cautiously and with a gentle hand proceed to shade the bone structure near its connection to the pelvic area.
Remember to build light layers on top of each other when shading with a pen.
We can proceed to do the same for the other femur. We want to simply use both our pencil marks and the reference image to guide our pen drawing process. Try to focus on the little shadows and details where the legs connect to other features of the skeleton at both ends of the femur.
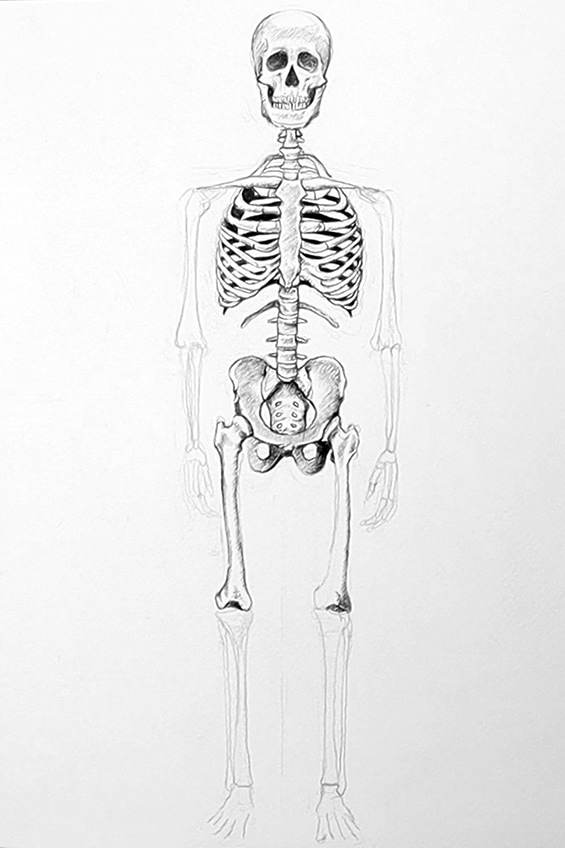
We can follow the same analytical process with the tibia and fibula bones. We want to constantly be referring to our reference image as we add some light shading with our pens. Again, we also want to use our pencil marks to guide us through our pen drawing process.
Bones drawing can be easy, if we are patient and go through each feature with attention to detail.
Once we have completed one lower section of one leg we can do so with the other leg. This means we can also add pen marks to the feet. We also want to take some time going over the feet. We want to make sure that we are careful as we go over our pencil marks, as the feet have really small details that we want to make sure we don’t miss.
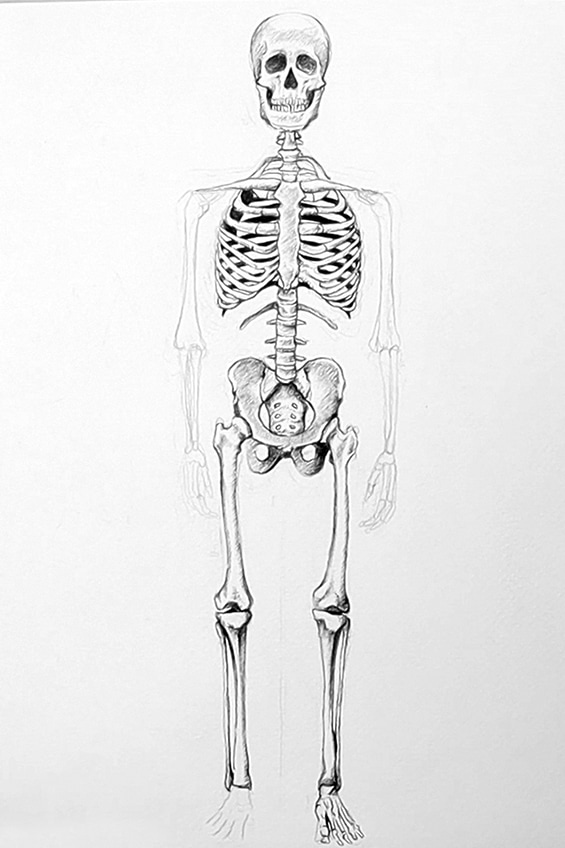
As a rule of thumb, it is better to take your time on each feature of the skeleton and then take a break. It is easy for the drawing to compromise from a place of tiredness. By taking breaks, you are less likely to compromise your drawing.
This is especially true for complicated structures like skeletons, as they are complex and require a lot of concentration, which can be exhausting.
Step 5: Drawing the Arms and Hands in Pen
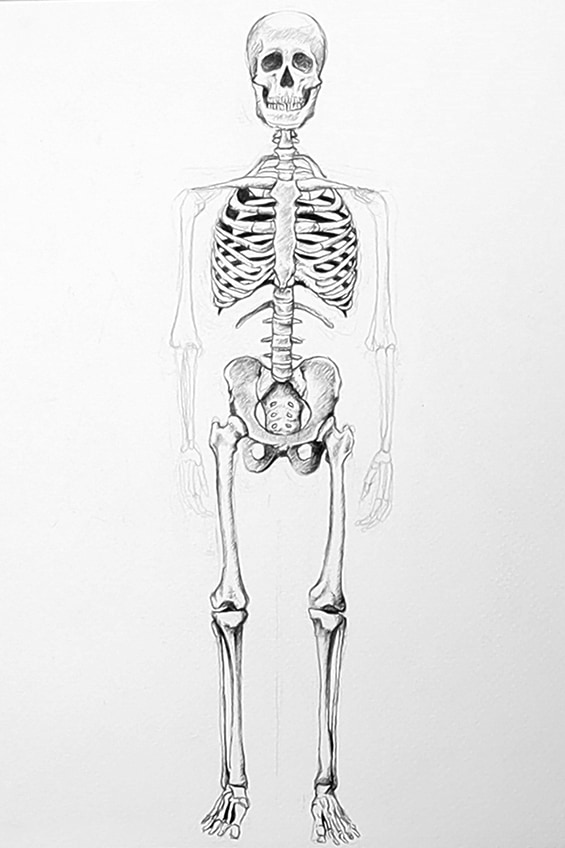
We now can proceed to draw the skeleton arms in the pen, again, using the reference image and the pencil marks as a means of guiding our pen drawing process. The humerus bone is very similar to the femur. We want to follow a similar process of shading this bone as we did for the legs. Focusing on the light and subtle shadows that form along the sides of the bones.
A good suggestion is to start with both upper arms.
By doing so, we can then imitate the same shading process and translate it directly onto the other arm. By shading the same bones first we can keep a consistency between the same bones, helping us to keep them looking the same. As you shade in the humerus, try your best to focus on the light shadowing that runs down the bone.
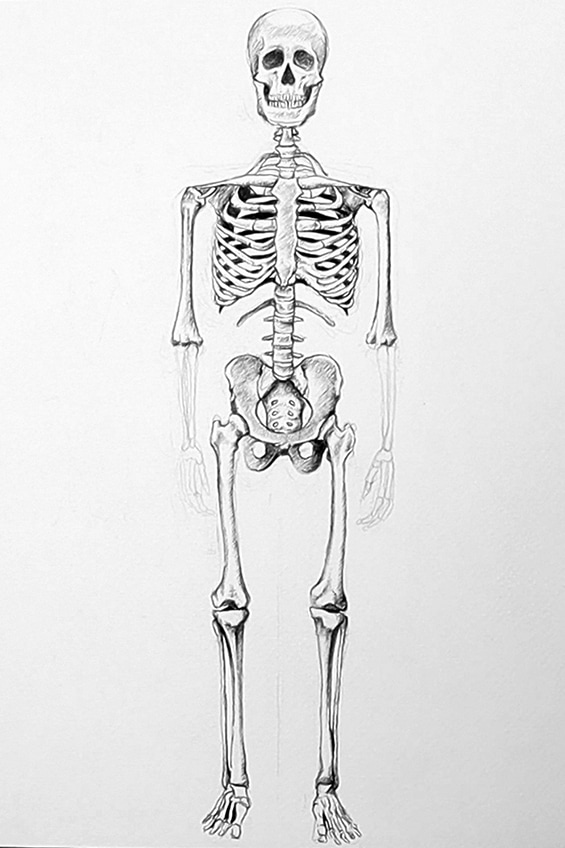
Once we have completed the humerus of both arms, we can continue with our drawing process and begin to outline the radius and ulna bones. Outlining these bones first can be helpful to establish the shape of the bones before adding in shading. By doing this, you will find that it will be easier to shade, as you will use the outline of the bones as a demarcated area for shading.
Once we are done with radius and ulna on one arm, we can then proceed to outline them on the other arm. Once the ulna and radius of each arm are outlined, we can begin to add some shading for more dimension in the bones. We can also color in the gap in between the ulna and radius of each arm.
This will provide the arm with more contrast, giving it a more realistic quality.
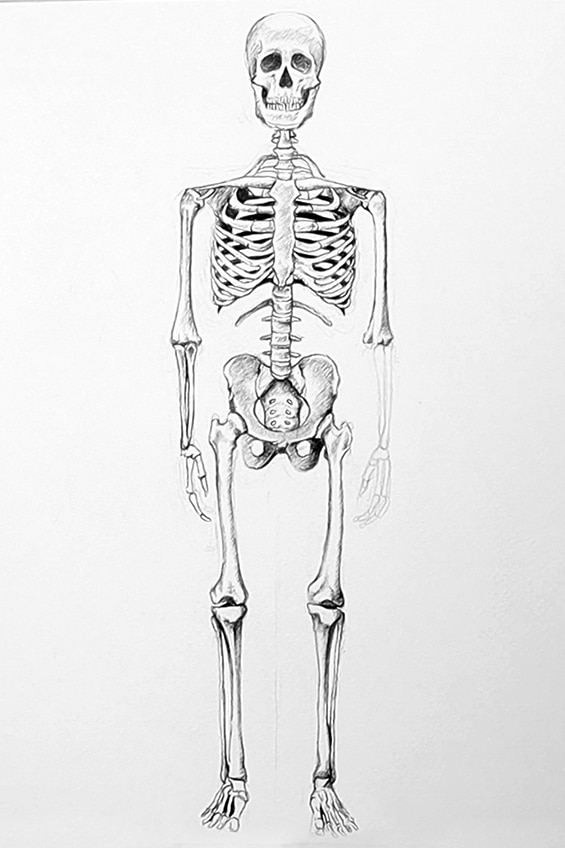
Lastly, we will then continue to draw the bones of the hand. Remember, before moving on to new features of the skeleton, you always want to take a little break in between, giving you a more refreshed mind before proceeding to draw. Take your time with the fingers.
The reference image does not give too many visuals for the hand; however, we want to use it as best we can to guide us whilst simultaneously allowing the pencil marks to assist us.
Step 6: Final Touch-Ups
Lastly, we have come to the end of our tutorial. Remember to always go through all features of the skeleton, making sure you attended to all aspects of the drawing, both with your pencil and pen. You can also erase any unnecessary pencil marks if you find any. We just want to add little details and tweak our drawing if we feel that it is necessary, and that is it: a fully comprehensive approach to drawing a skeleton.
Tips to Remember
- Take your time. Skeletons are complicated structures, so try to take your time.
- Get the pencil marks as correct as possible. This will make it much easier when moving on to drawing with a pen.
- Take a break. Allow yourself to break in between the tutorial, so that you can engage with the process with a fresh mind.
- Constantly refer to the reference image. This will allow you to develop a more accurate skeleton.
- Keep your pencil marks light. This will make it easier for you to rectify any mistakes along the way.
Learning how to draw a skeleton is a really interesting exercise because it requires a great deal of attention. This is the case for drawing a skeleton that is anatomically accurate in scale and proportions. The process of learning how to draw a skeleton develops many skills, such as concentration, anatomical understanding, and of course your drawing skills. This tutorial can be quite an easy skeleton drawing tutorial if you approach the process with patience and time. Taking your time and taking breaks in between will make each step more doable and will result in a more accurate resembling drawing of a skeleton.
Frequently Asked Questions
How to Accurately Draw Skeleton Proportions?
First of all, having a reference image to guide your drawing process is essential. Drawing an accurate skeleton without a reference image is difficult, so have a reference image to refer to throughout the drawing process. Next, you want to begin by developing a light pencil skeleton sketch. By this, what is meant is that you want to slowly and lightly draw a loose line drawing of the skeleton. As you refer to the reference image, you can slowly draw from head to toe, slowly analyzing the reference image to guide the drawing process. The aim is to keep your drawing as light as possible, almost as if you are drawing a stickman. This is because you want to simply scale each of the bones in comparison to one another. Once you have figured out the placement and scale with a light pencil sketch, you then can move on to adding detail to your skeleton drawing.
How Do You Draw an Accurate Skeleton?
When learning how to draw a skeleton you want to start with having an image to refer to. You then want to develop the scale and proportions of the various bones with a light pencil sketch. You will spend time on the skeleton sketch, erasing and redrawing until you are satisfied with the form and proportions of each bone structure in the skeleton. From there you will begin to refine the drawing with your pencil. You do so by working from head to toe, slowly drawing each component of the skeleton as you refer to the reference image. Once the components are lightly drawn in the skeleton drawing, you can proceed to add some light pencil shading to give the structure more depth. Each time you begin a new process, begin from the head and move downward, this way you know you have attended to all aspects of the structure. Then lastly, you can add in final shading with your pencils, or in the case of this tutorial you can do it with a pen for more contrast within the skeleton drawing.
How Do You Accurately Draw a Ribcage?
The rib cage is the most complicated structure within the skeleton. This is because an accurately drawn rib cage requires symmetry. This can be an easy structure to draw when approached with some patience. The best way to draw the ribcage is to move from the top of the rib cage, slowly working your way to the bottom of the rib cage, As you draw from top to bottom, you want to draw both the left and right rib, making sure that they are symmetrical before moving onto the next row of ribs. It is important to keep your pencil marks light for the initial layer of drawing the rib cage. Once that is accurately drawn, you then may proceed to add more details, knowing that the light pencil marks accurately indicate the symmetry of the structure of the ribs.
Matthew Matthysen is an educated multidisciplinary artist and illustrator. He successfully completed his art degree at the University of Witwatersrand in South Africa, majoring in art history and contemporary drawing. The focus of his thesis was to explore the philosophical implications of the macro and micro-universe on the human experience. Matthew uses diverse media, such as written and hands-on components, to explore various approaches that are on the border between philosophy and science.
Matthew organized various exhibitions before and during his years as a student and is still passionate about doing so today. He currently works as a freelance artist and writer in various fields. He also has a permanent position at a renowned online gallery (ArtGazette) where he produces various works on commission. As a freelance artist, he creates several series and successfully sells them to galleries and collectors. He loves to use his work and skills in various fields of interest.
Matthew has been creating drawing and painting tutorials since the relaunch in 2020. Through his involvement with artincontext.org, he has been able to deepen his knowledge of various painting mediums. For example, watercolor techniques, calligraphy and lately digital drawing, which is becoming more and more popular.
Learn more about Matthew Matthysen and the Art in Context Team.
Cite this Article
Matthew, Matthysen, “How to Draw a Skeleton – Depicting the Bones in the Human Body.” Art in Context. August 18, 2022. URL: https://artincontext.org/how-to-draw-a-skeleton/
Matthysen, M. (2022, 18 August). How to Draw a Skeleton – Depicting the Bones in the Human Body. Art in Context. https://artincontext.org/how-to-draw-a-skeleton/
Matthysen, Matthew. “How to Draw a Skeleton – Depicting the Bones in the Human Body.” Art in Context, August 18, 2022. https://artincontext.org/how-to-draw-a-skeleton/.


