


How to Paint Glass Windows – Guide to Decorating Glass Windows
Glass painting may seem like a daunting task best left to professionals, however, even the average DIYer can create a beautiful statement piece. You can even buy or make stencils for your designs that show off your creativity without the need for any drawing or painting skills. Learning how to paint glass windows can reward you with a fun afternoon activity that the whole family can enjoy or a lasting centerpiece for your home.
Why Paint Glass Windows?
Your space has a big impact on your mood and glass painting can be a cost-effective way to add color to particularly drab or dark rooms. Glass can also be used to create art in small spaces or rooms with limited wall space and give you that stained-glass look at a fraction of the cost and without the need for disruptive renovations.
If you are renting or just enjoy changing up your style regularly, using temporary or semi-permanent glass paint is great for experimenting with the aesthetic of your space and allows you to add a personal flair to your living spaces that can be easily washed off and changed. Washable window paint is great for an arts and craft session with the whole family or even a fun activity for a kid’s birthday party.

Decorating glass windows can also provide practical solutions in your home that are easy and budget-friendly. In bathrooms with large windows, frosted glass painting can create privacy that still lets in light, while painting acrylic on glass windows in overly bright or hot rooms can reduce or block out the light entirely. French door windowpanes can also be painted in a way that more reflects your style or to turn an office into an isolated retreat.
Learning how to paint glass windows provides a skill that can bring unique joy to your space or a fun project for you and your loved ones.
What Paint to Use for Glass Window Painting
The first step in learning how to paint glass windows is understanding the different types of paint available. Knowing what paint to use on glass is key to ensuring that you are happy with the final result and understand how to make it last. Different glass paints can produce a variety of finishes and effects in your window art, so it is important to choose one with your finished project in mind.
Glass has a non-porous surface, so ensure that you use paint made specifically for glass painting if you want your creation to last. Everyday oil-based paint works best on porous surfaces and so is not suitable for use on glass, whereas water-based latex paint will not apply easily and will peel off once dry.

Fortunately, permanent and semi-permanent paint for glass windows comes in various long-lasting finishes such as gloss, shimmer, or frosted. Acrylic glass paint is easy to work with and is opaquer than solvent-based or resin glass paint. Solvent-based glass paint is more difficult to use but comes in both transparent and opaque varieties and is very durable once dry. Epoxy resin glass paint is usually transparent and also highly durable once cured. This type of paint is great for frosted glass painting or altering the tint of window glass colors.
| Drying Time | Finish | Permanence | |
| Washable | Dry within minutes | Matte | Temporary |
| Tempera | Dry within 20 minutes | Matte | Temporary |
| Acrylic | Dry within 5 to 24 hours. Acrylic enamels dry within 24 to 72 hours | Opaque with multiple finishes available including matte, gloss, and frosted options | Semi-permanent – will chip off after a few years if not sealed |
| Solvent-Based | Dry within 2 to 8 hours | Transparent or opaque with multiple finishes available including matte, gloss, and frosted options | Permanent |
| Epoxy Resin | 24 hours to dry; up to a week to fully cure | Transparent with multiple finishes available including gloss and frosted options | Permanent |
Important Things to Consider When Choosing a Glass Paint for Windows
Now that you know about the different kinds of glass paint, there are many other factors to consider when deciding on what paint to use on glass. How long you want your art to last is the most important factor in deciding what paint to use when decorating glass windows. Something else to consider is the look that you want to achieve for the final product, especially for more permanent projects.

Temporary Glass Painting Projects
If you are looking for a quick window painting session with the kids that can be cleaned off at the end of the day, then washable window paint or tempera paint is the best to use. While it can stick around for a few days if it is protected from the elements, this paint is designed to be easily washed off with warm water after you are done with your project and is nontoxic so safe for kids to use.
Washable window paint can also give you the freedom to experiment with different designs before committing to a longer-lasting paint, which is great when you are trying out different window art ideas.
Semi-permanent Glass Painting Projects
Acrylic water-based paint is also nontoxic but offers a semi-permanent option for paint for glass windows. Painting acrylic on glass creates art that has a much longer staying power than tempera or washable window paint. If done properly, designs that are protected from the elements can last a few months without chipping or peeling. Acrylic window art can be removed using vinegar and a blade or made permanent by painting a coat of sealer over it.

Permanent Glass Painting Projects
If you are looking for a permanent option without the need for a sealing layer, then solvent-based glass paint can be used. These paints are oil-based and adhere to the glass by altering its surface making it perfect for windows that are exposed to the elements. These paints, however, produce lots of fumes that are both toxic and flammable meaning that this method requires some experience and is not safe for kids.
Solvent-based glass paints are also much more expensive than most other glass paints.
Different Glass Paint Finishes
Temporary glass paint tends to have a matte finish while both acrylic and solvent-based glass paint comes in many different finishes including gloss, matte, or frosted glass painting options. Most of these paints are opaque and the more layers you add, the more light is blocked out and the easier it is to see your design. If you are looking for a transparent finish, then resin-based glass paint is a great option that tints glass and lets light shine through creating a stained-glass effect when decorating glass windows.

Other Factors to Consider
Important to note is that if you are not working with clear glass, the paint may be affected by the window glass colors. The texture of your glass can also impact the final look of your project so be sure to test your window painting ideas and colors on a separate sheet of glass or in a section of the window that is not as visible before painting the whole window.
Ultimately the best option for you will be based on your experience level, the effect you are looking for, and how long you want your window art to last.
Our Top Picks for Paint for Glass Windows
Now that you understand some of the different types of glass paint available and their uses, we have chosen a few of the best products for glass window painting for different projects and experience levels. We provide the best overall, temporary, and permanent recommendations. Each of these products is versatile but offers specific benefits based on your project needs.

Best Overall: ARTIFY Premium Heavy Body Acrylic Paint Set
This paint set is a fantastic option for people of all skill levels and a range of projects. The water-based acrylic paints are non-toxic, easy to blend, and have a glossy, smooth finish. This pack includes 24 colors at a very affordable price making it perfect for beginner glass painters. The paint is thick, which makes painting vertical surfaces easier as the paint is less likely to run, but it can be thinned out to your desired consistency using water. The paints are UV-resistant so perfect for windows that get a lot of sun. These paints also come with a storage box and are available in larger and smaller set sizes.

- Vibrant acrylic paints in 24 unique colors including metallics
- Top-quality high-viscosity acrylic paint for many painting techniques
- Certified as non-toxic and safe for use by adults and children
- UV-resistant to fading
- Non-toxic
- Beginner- and kid-friendly
- Budget-friendly
- Requires a sealant to make permanent
- Not sold in larger or individual tubes
- Dries very quickly
Best Temporary Option: JACK RICHESON Tempera Powder Paint
These powders are a great option for temporary glass paint projects for all ages. Although the price for these powders is higher than some of the premixed tempera paints, a lot of paint can be mixed from them. The powder form is also preferred over premixed paints as you have more control over the consistency, especially important for painting vertical glass surfaces. The 12 colors are good for beginners to start with and easy for kids to use. The paint dries to a matte finish.
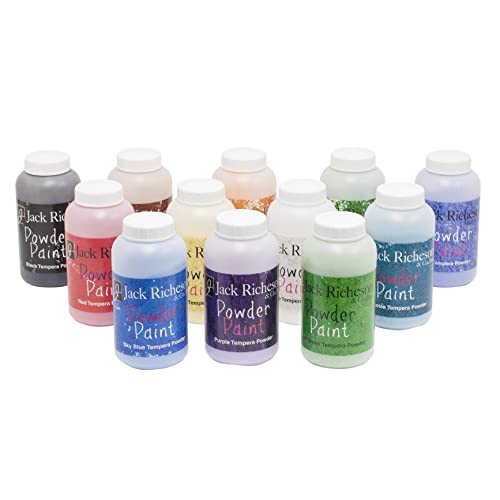
- Easy tempera paint that is convenient to use and clean up
- Simply needs to be mixed with water to create unique viscosities
- Perfect for children to use and can be cleaned from glass surfaces
- Non-toxic
- Get a lot of paint from powders
- Temporary
- Can control the thickness of the paint
- Pigments may stain hands, clothing, and other surfaces
- Can be messy and time-consuming to mix individual colors
Best Permanent Option: PEBEO Permanent Glass Paint Stain Kit
This 12-pack of solvent-based glass paint is great for the experienced DIYer. These paints have a glossy, transparent finish and blend together effortlessly to create the effect of real-stained glass. Once dry, these paints are very durable and long-lasting and can be layered for an opaquer look. These paints are very thin, however, and may run. If painting upright surfaces, apply them in thin layers and allow them to dry between layers.

- Professional solvent-based permanent and transparent glass paint
- Includes a range of unique and brilliant colors for your creativity
- The vibrant colors can be applied in a number of different ways
- Gives real stained-glass effect
- Durable and long-lasting
- Has a 90-day money-back guarantee
- Very thin consistency
- Strong fumes and smell
- Need to buy thinner separately
Step-by-Step Beginner’s Guide for Painting Glass Windows
Once you have decided on what paint is right for you and your project, you can begin creating your glass window art. We have created the following easy step-by-step guide to ensure you get the best results when creating your very own temporary or permanent window art designs. This is what you will need:
- Paint of your choice, prepared accordingly
- Paintbrushes or sponges
- An old towel or sheet
- Paper and pencil
- Scissors
- Liquid leading or a dry erase marker
- Soft cloth
- Rubbing alcohol
- A pallet for mixing colors
- Cups for each color (if using tempera powdered paints)
Step 1: Prepare Your Paint and Tools
If you are using tempera powder, add roughly one tablespoon of each color into separate containers or cups. Add one to two drops of dish soap to each color. The dish soap not only makes it stick better to the glass but also makes it easier to remove come clean-up time. Lastly add water, a few drops at a time while stirring, until the paint reaches the desired consistency.

Epoxy resin paint usually comes in two parts that require mixing. Be sure to read the instructions on how to prepare it thoroughly before beginning and ensure you are in a well-ventilated area. Washable, acrylic, and solvent-based paint can often be used immediately but be sure to read the manufacturers’ instructions thoroughly before beginning your project. Because of the fumes it creates, solvent-based glass paint needs to be used in a well-ventilated area.
Step 2: Plan Your Design
Once you have chosen a paint it is time to plan out your design. Using a pencil, sketch your design out on paper first to work out its dimensions and other details. You can even create a stencil of your own at this time by drawing or printing off a to-scale outline of your design and cutting it out. This stencil can later be stuck to the other side of the glass window allowing you to easily trace it.
Ready-made stencils can also be bought and used in the same fashion.
Now is a good time to experiment with the different colors and brushes you will be using in your project even if you are free-handing your creation. If you have the time, waiting for the paint to dry can also be beneficial as some colors may appear very different after they dry. Always patch test your paint in a part of the window that is easy to hide if testing the colors or removability of the paint. It would be a good idea to test sealers to see their effects on the final texture and opacity of your glass paint.
Step 3: Prepare Your Glass
Prepare your glass by cleaning the surface with warm water and soap. Dry the glass and then wipe it down using a soft cloth and some rubbing alcohol to remove any residual oils on its surface. Doing this will make your paint apply smoother as it is not affected by any dirt or dust. Cleaning the glass also allows the paint to adhere better and therefore last longer.

Once you have cleaned your glass, wearing latex gloves will prevent fingerprints and oils from your hands from dirtying the surface while also protecting them from being stained by the paint. Now would also be a good time to lay down an old towel or sheet to protect your work surfaces and floors from any stray paint. Busy backgrounds can make it harder to see your design and stencils. You can use a towel to create a neutral backdrop behind the glass by either hanging it behind or laying the glass down on it.
Step 4: Transfer Your Stencil
Tape up the edges of your window using masking or painter’s tape to create a clean border around your piece. Also, protect any sections of the glass you do not want paint on by taping them up as well. You should remove the tape once your paint is dry to the touch but before it fully sets.
You can also use tape to create a simple stencil for temporary projects or dry erase markers can be used to trace a stencil onto the glass window.
If you are using a stencil for a more permanent project, you can use liquid leading to trace your design onto your glass. Using liquid leading gives your work a stained-glass effect as it resembles metal framing. Opt for a squeeze bottle to make it easier to trace the stencil. Once the liquid leading or dry erase marker has dried you are ready to paint your stencil.
Step 5: Painting
You are now ready to begin painting. Starting in an upper corner to avoid smudging your work, fill in your stencil or start painting directly onto the window. Try not to paint the edges of the tape too much. If you are painting a background layer or a large area of one color, then using a sponge may be more useful than a brush.
A sponge or foam brush should also be used with resin-based paint. Painting a picture or design will require the use of a brush but the type of brush will affect the finished product. Using a natural bristle brush will result in a smoother finish with less visible brush strokes than synthetic brushes. Use toothpicks to pop any air bubbles that may appear in the paint before it dries.

Paint the design using one color at a time making sure to clean your brush thoroughly between colors with either water, for acrylic and temporary paint, or paint thinner, for resin and enamel paint. Waiting for the paint to dry in between colors can minimize them bleeding into each other. If you are looking for an opaquer finish, then add two or three more coats but ensure that each layer is dry before painting another.
Painting on the outside of the glass is recommended if you do not live in a rainy climate. This way any reflections on the glass will not hide your design from the outside and your creation will also look nicer from the inside.
Lastly, remember to have fun!
How to Remove Paint From Glass Windows
We all make mistakes and while some may prefer to embrace them, others might be inclined to fix them. If you make any mistakes that you would like to correct, the best thing to do would be to fix them as soon as you notice them, and ideally before it dries. Any mistakes made with tempera or washable paint can be cleaned up quickly with a paper towel or a wet rag. Acrylic, resin, and solvent-based paint mistakes should be cleaned up immediately with a rag and some paint thinner as they can become permanent after they dry.

Removing dry washable paint and tempera paint from glass after it dries is much easier. Although tempera paint is slightly more difficult to remove and more likely to stain, if you add dish soap to the mixture the removal process becomes much easier. Simply use warm soapy water and a cloth to wipe the paint off. Ensure that the window is once again clean and dry before you begin painting a new design on it. If you used dry erase markers as a stencil they may come off with the water, but if some remains, they can be removed with acetone, or rubbing alcohol.
In the case of acrylic paints that have not fully dried, white vinegar can be sprayed on to soften the paint first before washing with soap and water. Once acrylic paint has dried you will need to use a sharp razor blade, using long strokes at a 45° angle to the glass surface to scrape it off. Take care not to scratch or damage the glass surface.
Creative Window Painting Ideas
To get you started, we have come up with a few window art ideas if you need some inspiration. If you have kids, you can use glass paint to create a fantastical design on their bedroom windows using stencils of their favorite characters. You could try painting only a frame or leaving one of their windows bare as a unique canvas for them to create more temporary artworks that can be cleaned off at the end of the week.
If you are looking for a more practical use, glass paint can be used in a range of home improvement projects. For example, if you have a large bathroom window or glass sliding door facing the neighbors, you can easily create more privacy by frosting the glass using glass paint. This method is much more cost-effective than replacing the existing glass and you can easily do it yourself.

Finally, glass paint is great for holiday-themed window décor. Painted snowflakes and cobwebs on your windows are a wonderful, budget-friendly addition to your seasonal decorations. Some glass paints even come in a spray can form which is great for creating snow and quickly spraying on stenciled designs. Just make sure that you are using temporary or acrylic paints, as you may not want a pumpkin on your window straight through to New Year’s!
You now know how the different types of glass paints can affect your design, as well as the correct way to prepare your glass to ensure you get the best possible results for your project. We hope this guide has been helpful in getting you started with window glass painting. Whether you are looking for a fun weekend activity for the whole family or creating a unique piece in your home that you can enjoy for years to come, glass window painting offers a variety of options for all experience levels, without breaking the bank.
Frequently Asked Questions
What Kind of Paint Do You Use on Glass?
Acrylic, solvent-based, and resin-based glass paints can all be used to paint glass. The exact type of paint you use will depend on your project and experience level.
Can You Paint Directly on Glass?
Yes, if you use the correct paint, you can paint directly on glass. Ensure that you clean your glass surface before painting it for the best results.
How Can I Make My Paint Colors Look Better on Glass?
Adding a small amount of white paint to all colors, except for black, can make acrylic paint colors stand out more. For solvent-based paint, adding clear paint can bring out the colors while maintaining opacity.
Do You Need to Prime Glass for Paint?
No, you do not need to prime the glass before you paint it. If you want to increase the opacity of acrylic paint or create a background for your design, you can paint a base layer. Allow the base layer to dry before painting onto it.

In 2005, Charlene completed her Wellness Diplomas in Therapeutic Aromatherapy and Reflexology from the International School of Reflexology and Meridian Therapy. She worked for a company offering corporate wellness programs for a couple of years, before opening up her own therapy practice. It was in 2015 that a friend, who was a digital marketer, asked her to join her company as a content creator, and this is where she found her excitement for writing.
Since joining the content writing world, she has gained a lot of experience over the years writing on a diverse selection of topics, from beauty, health, wellness, travel, and more. Due to various circumstances, she had to close her therapy practice and is now a full-time freelance writer. Being a creative person, she could not pass up the opportunity to contribute to the Art in Context team, where is was in her element, writing about a variety of art and craft topics. Contributing articles for over three years now, her knowledge in this area has grown, and she has gotten to explore her creativity and improve her research and writing skills.
Charlene Lewis has been working for artincontext.org since the relaunch in 2020. She is an experienced writer and mainly focuses on the topics of color theory, painting and drawing.
Learn more about Charlene Lewis and the Art in Context Team.


