

How to Draw a Dragon – Instructions for Easy Dragon Drawing
For as long as humans have had mythology, dragons have been central characters. Breath of fire, intimidating wings, tough scaley skin, and fiercesome teeth are the trademarks of the mighty dragon. When it comes to drawing a dragon, the first thing to consider is what type of dragon you want to bring to life. There are countless varieties of dragon friends and foes, all with different features. In this comprehensive tutorial, we will investigate these differences and lead you through the process of breathing the fire of life into your unique dragon.
First and Foremost, What Are the Different Types of Dragons?
Although we may assume that dragons typically have four legs, a long tail and neck, two leathery wings, a scaly body, and infinite spines along their spine, there is actually a great deal of variety among dragon types. We are going to introduce you to the complexities of six different dragon species. Then, we will lead you through how to draw dragons like these.
It is important to remember that dragons are fictitious (or so we believe), and as such, it is not possible to separate them into strict groups. It is also not necessary for you to stick to any strict guidelines when creating your own dragon. Your imagination is your only restriction, so feel free to play with mixing colors, shapes, and sizes.
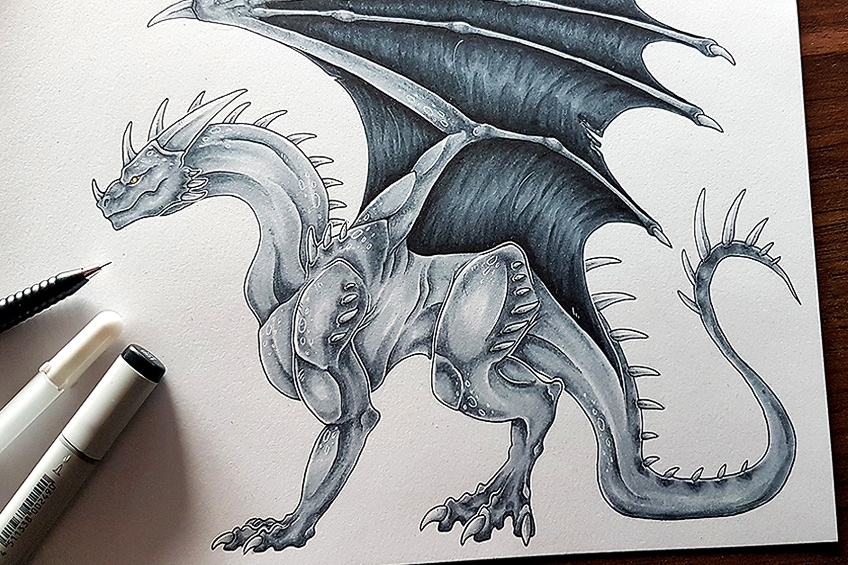
The Classic Dragon
You are probably most familiar with this dragon because it is the most common. This dragon has four legs with large claws, a long neck and tail dotted with spines, and two immense wings that allow it to glide through the air. You may recognize this classic dragon from Sleeping Beauty or Shrek. Classic dragons with larger wings could fly much higher for longer, while dragons with smaller wings could only glide for shorter distances. This may be the easiest dragon to draw because it is the one you are likely to be most familiar with.
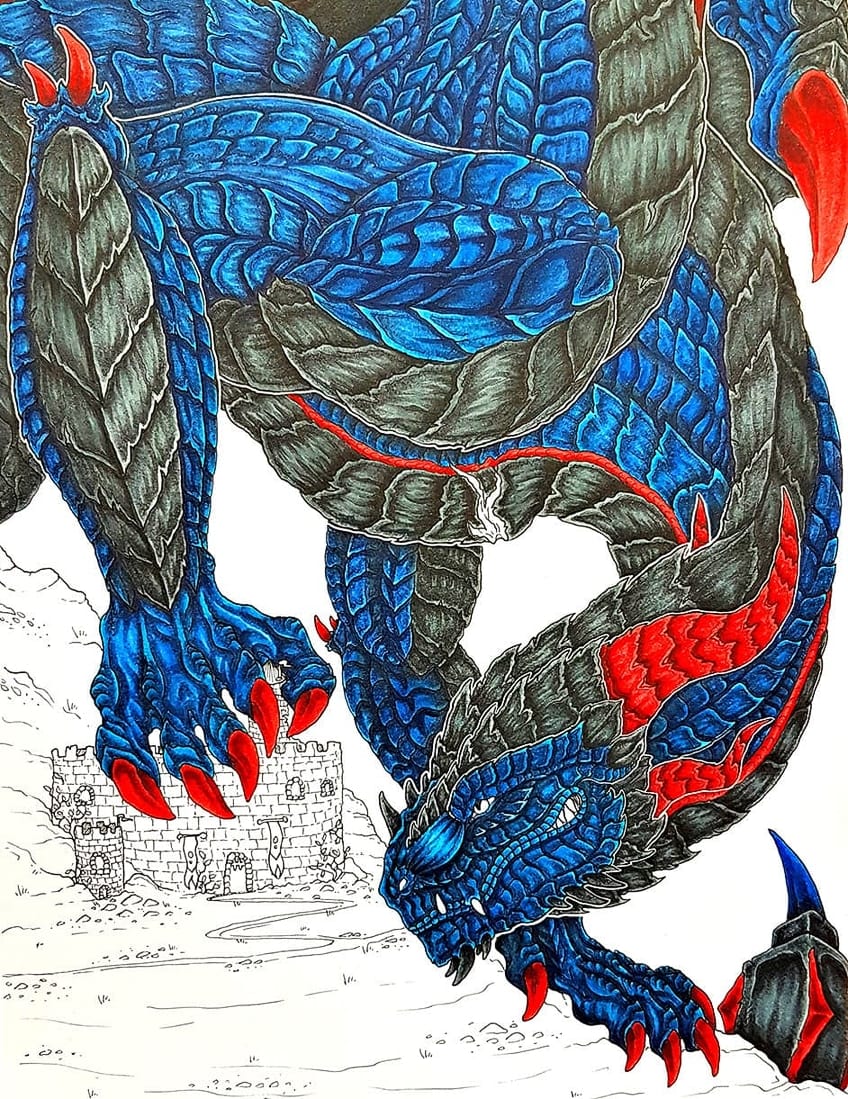
The Drake Dragon
Although we typically picture dragons with wings, the Drake has no wings at all. These dragons typically have more robust bodies designed to cover the distance on foot. You may find Drake dragons living in water, in which case they may have fins on their tail and back to make gliding through the water easier. The Drake is a strong dragon with thick scales. Many of the dragons in the Lord of the Rings saga are Drakes.
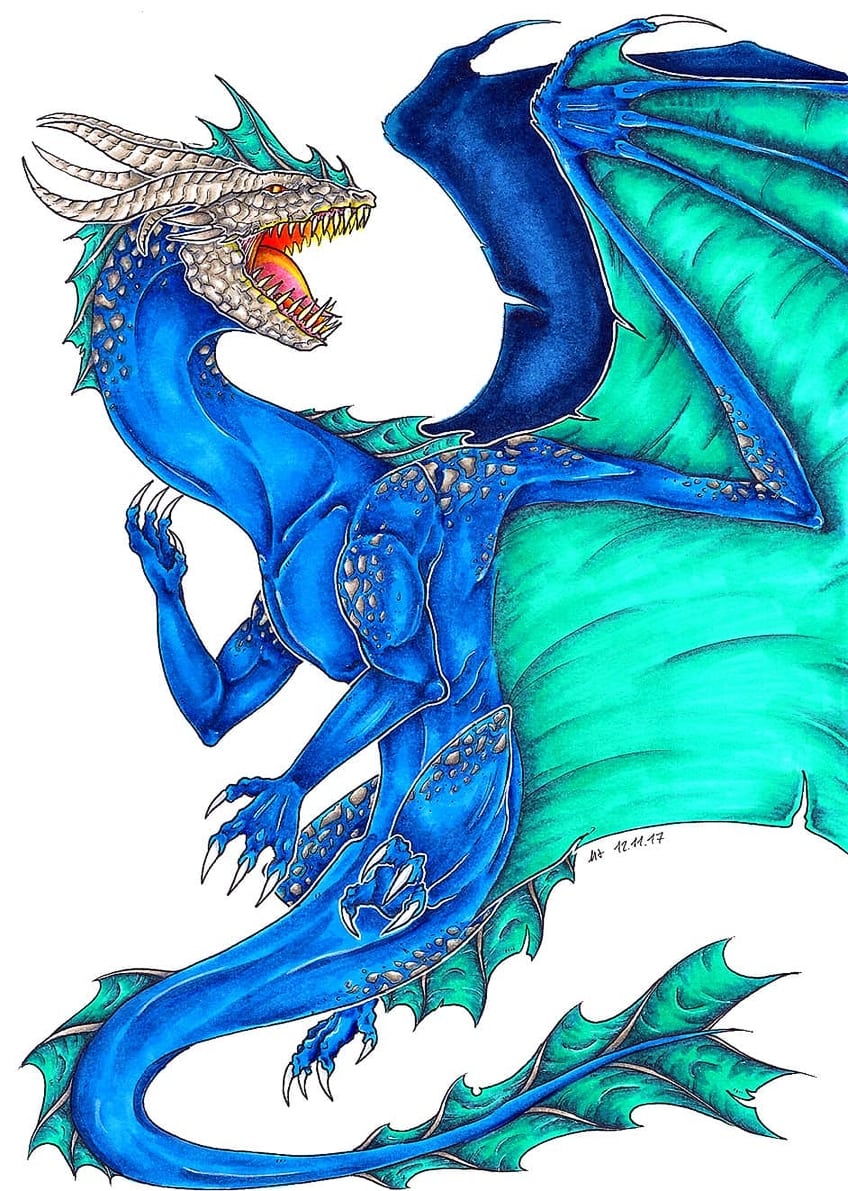
The Wyvern Dragon
The Wyvern dragon is a happy medium between the Classic dragon and the Drake. Lacking forearms, the Wyvern has enormous claw-like thumbs on the upper edge of its wings. Wyvern dragons can use these thumbs to support themselves on the ground, with some using them as front legs. Other Wyverns walk exclusively on their muscular hind legs that help propel them into the air. Smaug from the Hobbit trilogy is a Wyvern dragon, as is Pendragon from Jack the Giant Killer.
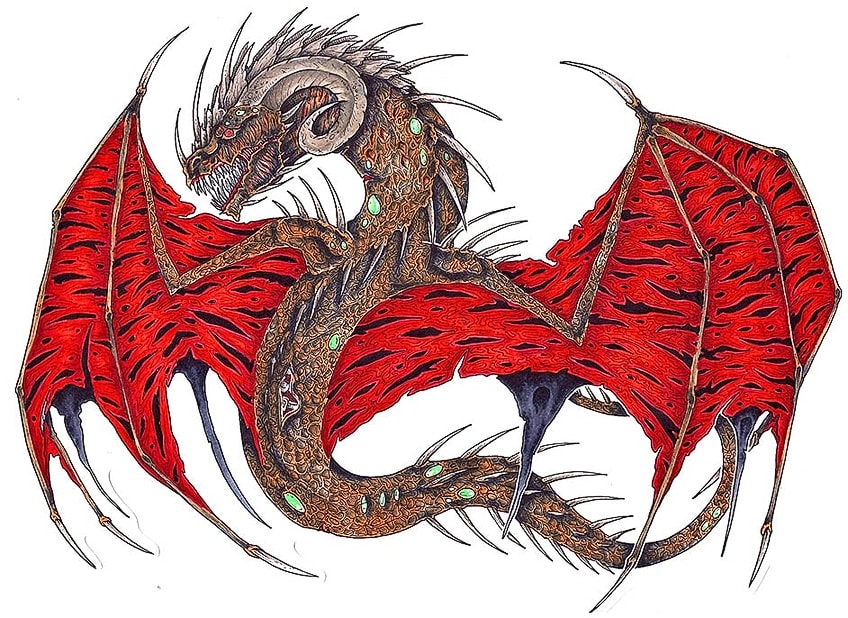
The Amphiptere
You can think of the Amphiptere as the polar opposite of the Drake dragon. This fiercesome, but often quite small dragon, has no legs but two strong wings. When it is not silently flying through the air, the Amphiptere slithers across the ground much like a snake. The Amphiptere dragon has its origins in ancient European armory design.
The Wyrm Dragon
Also known as ancient dragons, the Wyrm dragons are an ancient race revered among other dragons. The Wyrm dragon does not have any limbs and generally cannot fly either. They move around by wiggling through sand or over the ground. In addition to the lack of limbs, you can identify a Wyrm dragon by its wide jaws. The Wyrm dragon may be the easiest dragon to draw because it does not have limbs and wings, which can be complicated.
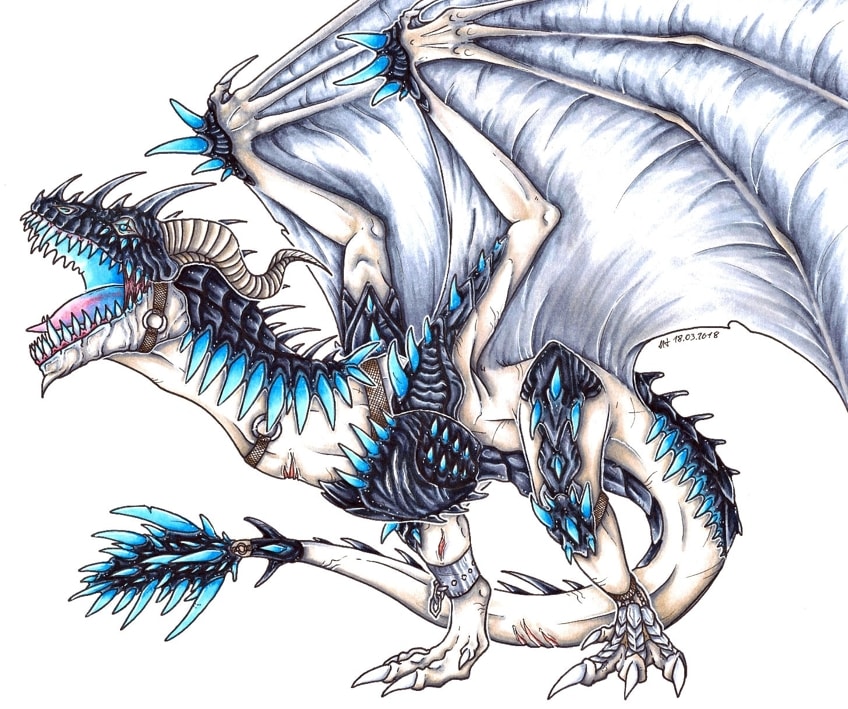
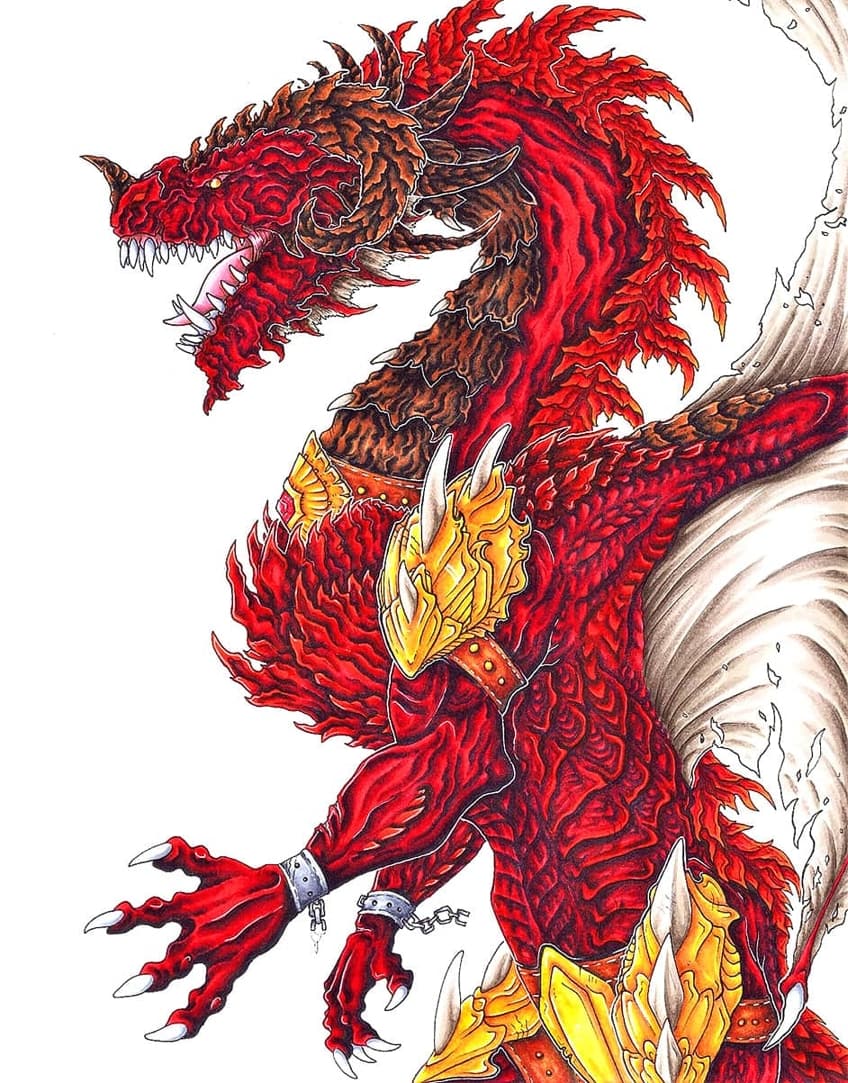
The Oriental Dragon
The Oriental or Asian dragon varies widely in its appearance. Some Oriental dragons have four legs and two wings, while others have no legs or wings but can still fly. You can easily identify the Oriental dragon by the glorious mane that flows from their head across their back. Oriental dragons also have horns that look like antlers extending from the side of their noses. Mushu from Mulan is an Oriental dragon, as is Haku from Spirited Away.

How to Draw Dragons: First, You Need the Right Equipment
To breathe the firey life into your dragon drawing, you will need some supplies. You can make dragon drawing easy with the right tools, so we suggest you try to get hold of the following:
- Good quality Letter paper for your final drawing (weight between 135-190 g)
- A simple HB pencil for the initial planning, as it can easily be erased
- A 3B or 4B pencil to add the detail
- A good quality eraser like those from Staedtler
- Good quality coloring markers like Copic Markers, or more affordable Prismacolor Markers
- Fine liner pens like the Sakura Liners for final detailing
These equipment suggestions are for your final drawings. If you like to carry around a sketchbook and pencil or pen to capture any moments of inspiration, these do not have to be of high quality. We do suggest using a mechanical pencil if you prefer to use pencils over pens, because you will not need to carry a sharpener around.
How to Draw a Dragon Step-by-Step
Now that you know what kind of dragon you would like to create and have the right tools, we can get going. Following the steps in this next section of the tutorial will make dragon drawing easy for you. You can use a reference picture from Google if you are not comfortable drawing a dragon from your imagination. When learning how to draw a dragon, step-by-step processes are your best bet.
Planning the Anatomy of Your Dragon Drawing
One of the trickiest parts of drawing dragons is nailing the anatomy. Luckily, dragons are up for a certain degree of interpretation, but it is still important to capture the right sort of anatomical structure. Let us go over some strategies for achieving the perfect proportions in your dragon drawing.
To begin, using your HB pencil, map out the basic anatomy of your dragon. Draw circles where the head, belly, and thighs of your dragon will be. You can also draw a line to map out where your dragon’s tail will lie. Following this, you will simply connect the circles to create the outline of your dragon’s body.
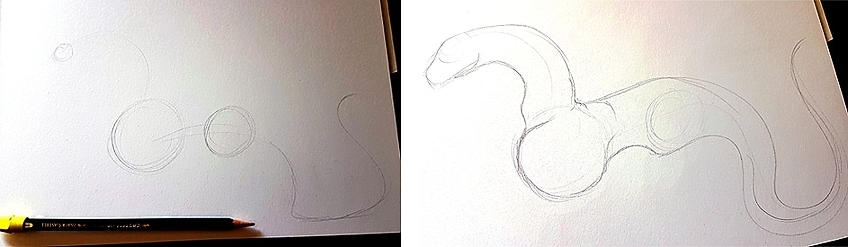
At this stage, your dragon may look more like a sausage, but trust the process!
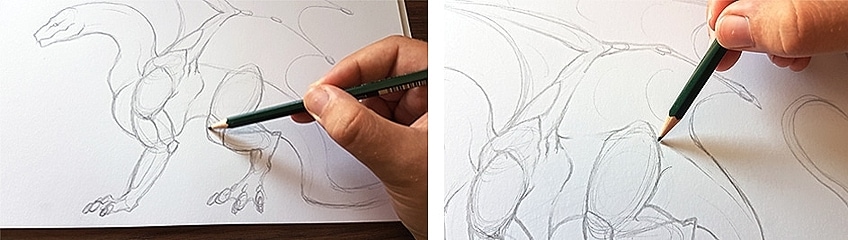
It is now time to draw in the legs and wings of your mighty dragon. Begin by using rough circles to place the various leg muscles onto your dragon’s torso. Using circles helps you to divide the proportions equally.
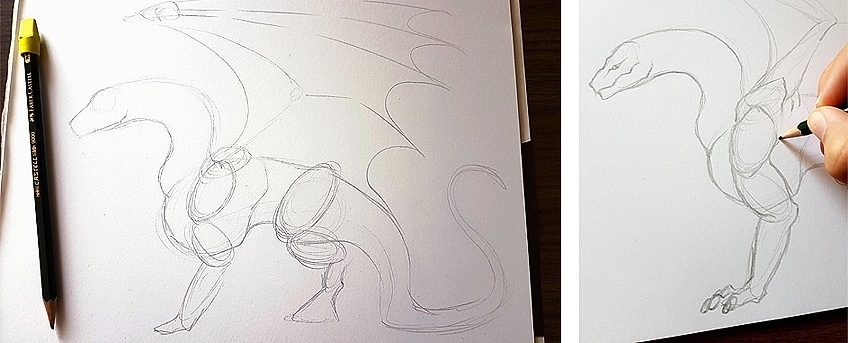
The largest circle will represent the shoulder or hip of your dragon. Use smaller circles for the thighs and biceps, and then even smaller ones for the calves and forearms. This stage of the dragon drawing process may take some time to get the hang of, so if it does not look right, simply erase it and try again until you are happy.
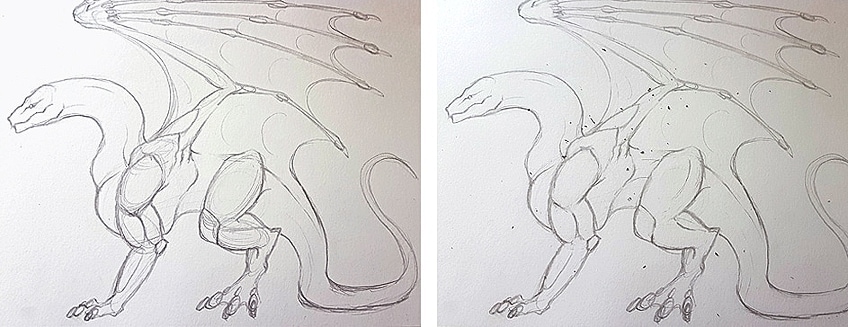
To draw the wings, you can bring a curved line from just below your dragon’s neck up over its head. From this top edge, you can draw another slightly downward curved line towards the back of your dragon. The back bottom edge of the wing should meet the torso just before the tail. You can connect this edge with your top curved line with small curves like a spider’s web.
Time to Add Some Detail and Linework to Your Easy Dragon Drawing
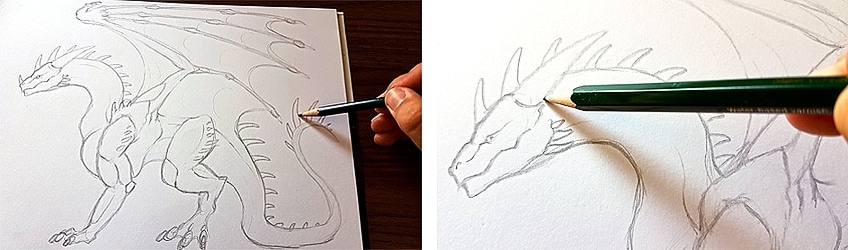
Once you are happy with the anatomical proportions of your dragon, you can start to add some details. You can add horns, spines, or fins to the back and tail of your dragon. The details you add depend on the type of dragon you are drawing. Once you have added all your desired detail and you are happy with your dragon, we can move onto the outline.
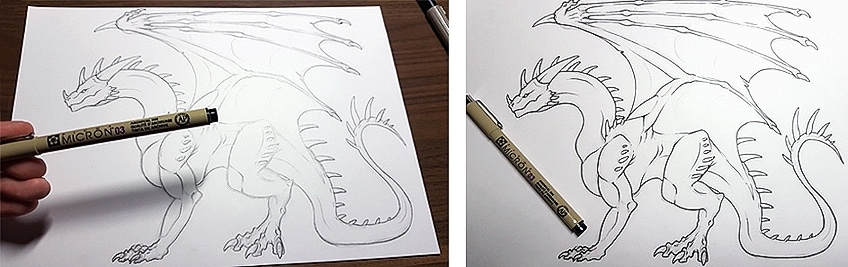
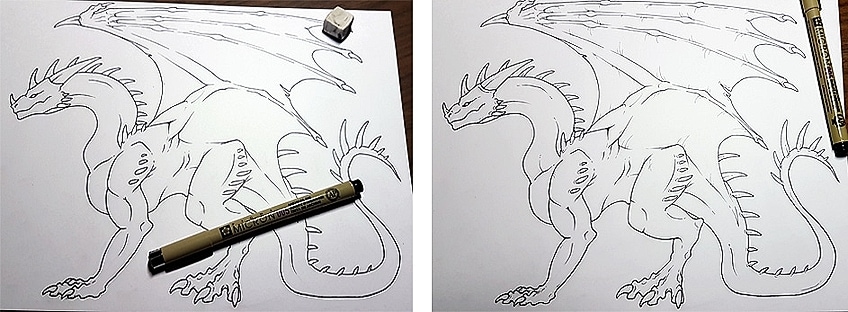
We like to use a 4B pencil to outline the important lines before going in with the liner in order to make sure we are happy. If you are satisfied, you can use a liner to draw the main lines of the dragon.
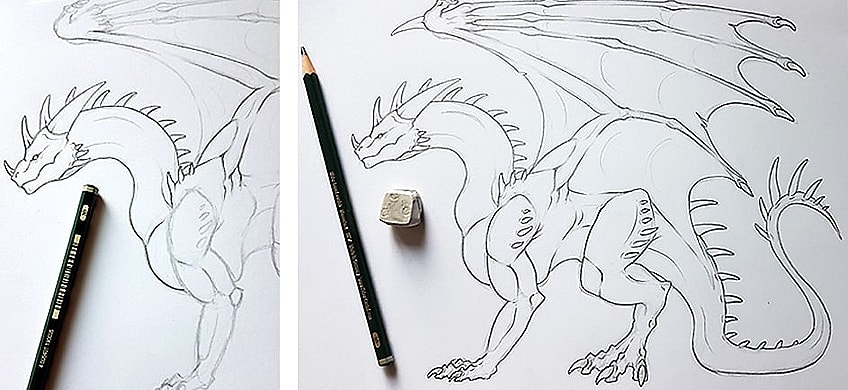
Outline the torso, head, and limbs with your liner, allowing the lines to become thicker where they meet. For the finer details like scales, scratches, or scars, you can use a thinner liner. At this stage, you have a beautiful line drawing dragon of your creation.
How to Draw a Dragon in Color
You may be happy with your line drawing dragon, or you may like to add some color. If you would like to add color, you need to decide whether it will be a single color or a few different ones. For simplicity, we are going to lead you through coloring your dragon with a single color.
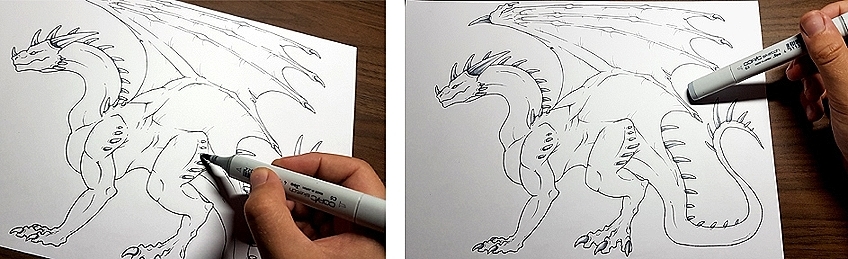
We like to start with the darkest shade of your color. You will use this darker shade to contour the body of your dragon. For your color drawing dragon, you will need to consider where the light source is. We suggest using the darkest color shade to add the shadows cast by your dragon’s body.
Once you have defined your shadows, take a slightly lighter shade of your color and go over these same areas, but extend them a little further. You can do this again with an even lighter shade to achieve a nice gradient of color.
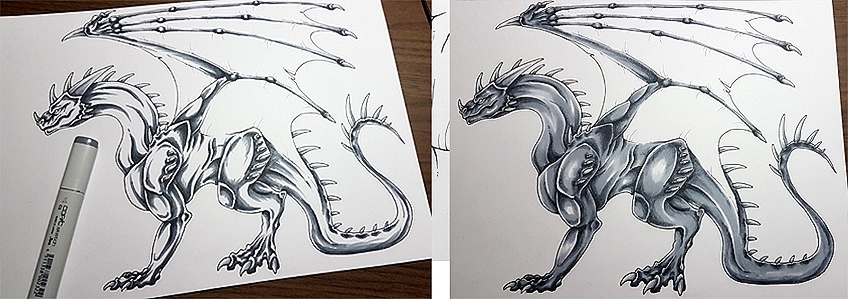
Finally, you can use your lightest shade to color the rest of your dragon. The last step is adding some detailing with a white liner. This step can really make your dragon come to life.
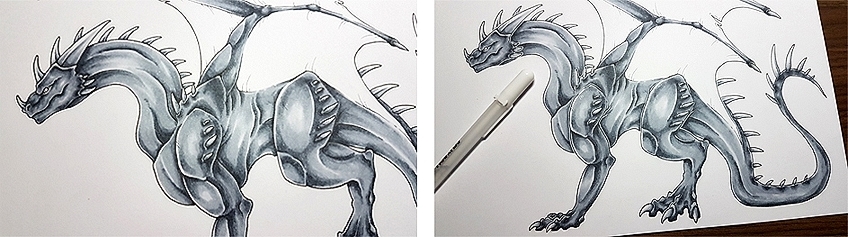
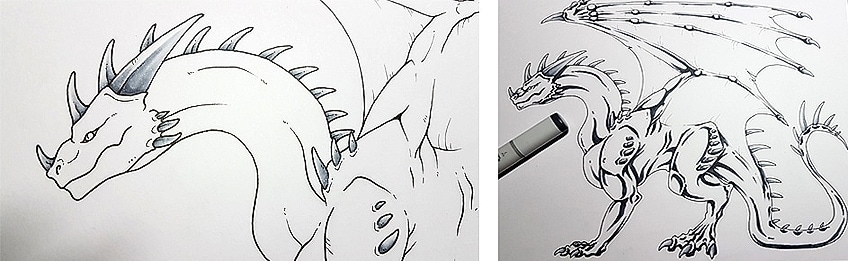
To color the wings of your dragon drawing, we recommend using your darkest shade of color or black. Begin your coloring strokes at each of the membranes and gently curve them into the center of each wing panel.
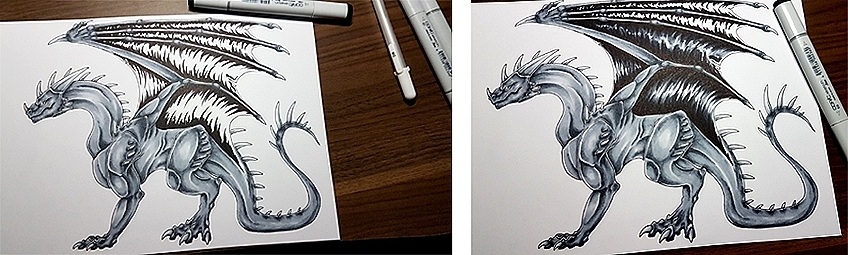
We like to leave a small area of open space in the center of each wing segment. Once you are happy with the dark shading in your wings, you can use a lighter color to fill in the open spaces.

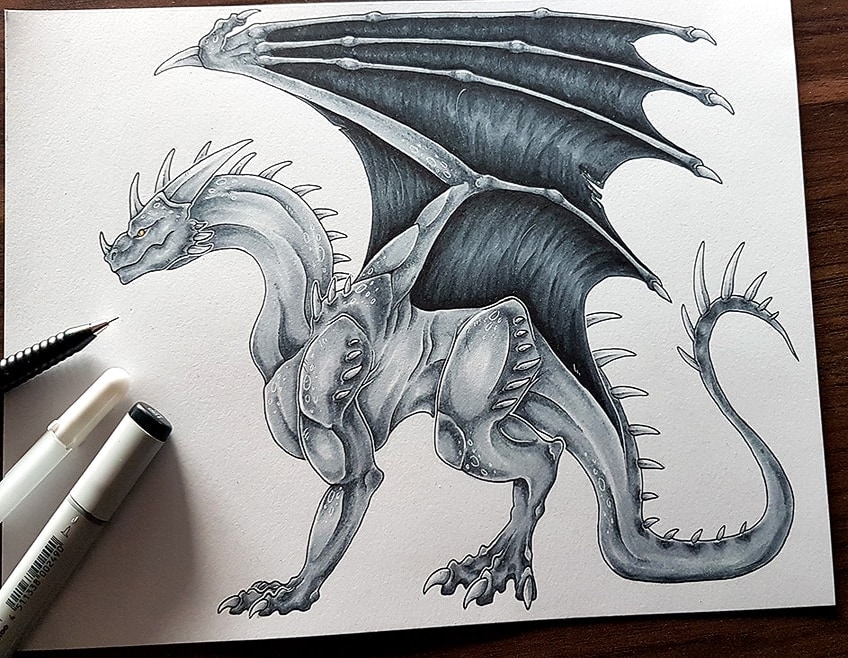
Finally, use your white liner to add some crisp detailing, and tada!
How to Draw a Dragon With Scales
To take your drawing from an easy dragon drawing to a masterpiece, you can add some scaling details. Scales may seem intimidating, but having a good technique will make learning how to draw a dragon easy. The level of detail you put into your dragon scales is completely up to you.
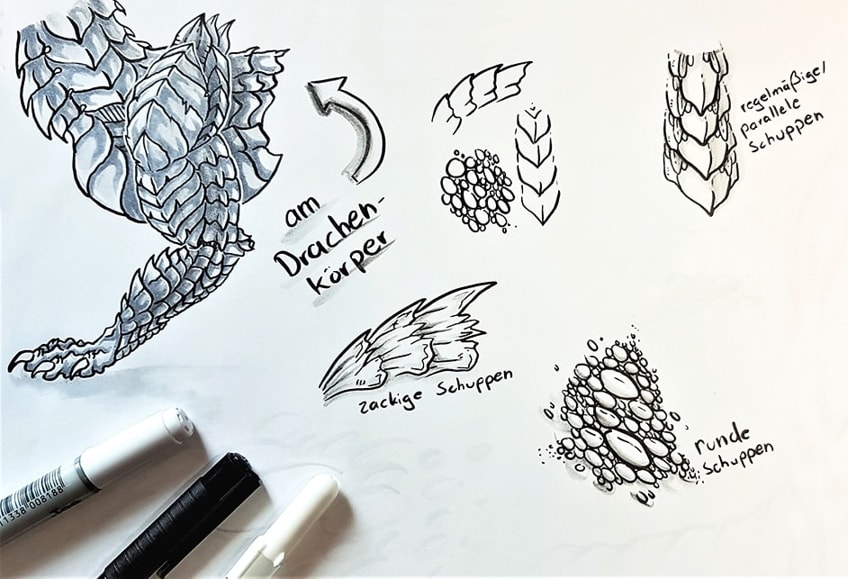
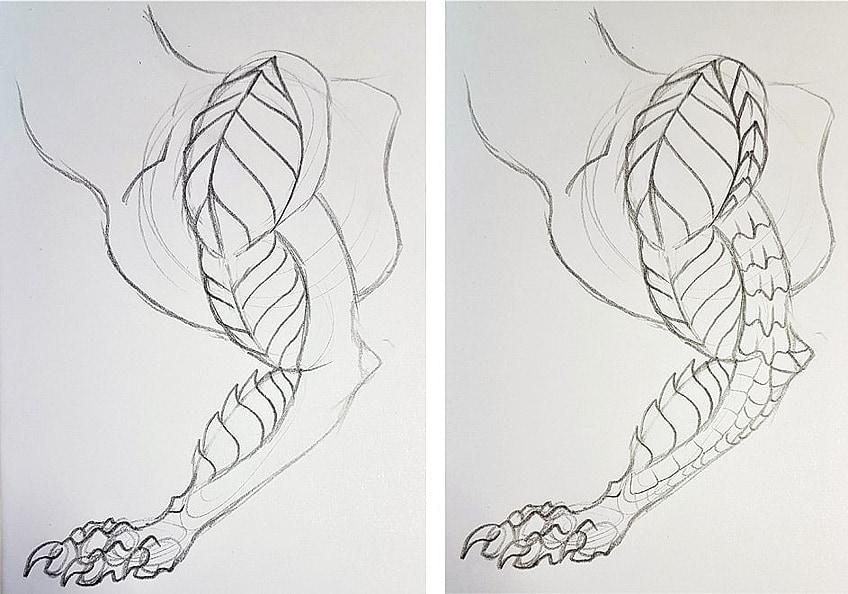
It is crucial to pay attention to the structure of the scales you add to your dragon. We always suggest determining the proportions of your dragon as outlined above before attempting to add scaling details. Outline the main muscles in your dragon’s limbs, and then we can begin to consider adding the scales.

First, we must determine where the biggest and strongest scales will be. The scales of a dragon are its armor, and as such, the largest will likely be forward-facing. Mark down these areas, and then you can begin to add a regular pattern of scales. Once you have your largest scales in place, you can fill the skin around them with a smaller scale pattern. You can experiment with the shape and placement of your dragon scales to find what you like best.
You can use the same principle for scaling the torso as you did for the limbs. Place the strongest scales down the center of the dragon’s back, neck, and belly, where you believe it would need the most protection. Once you have all of your scales in place and you are happy with how it looks, you can use a fine liner marker to outline each scale.
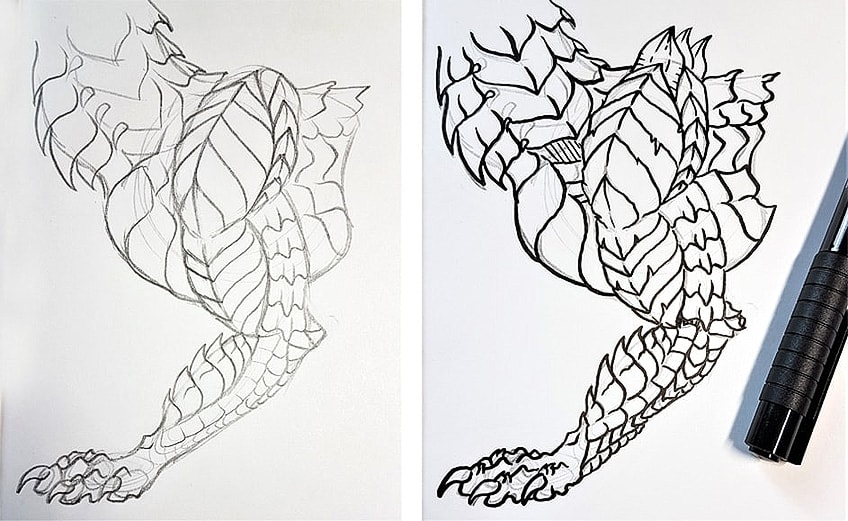
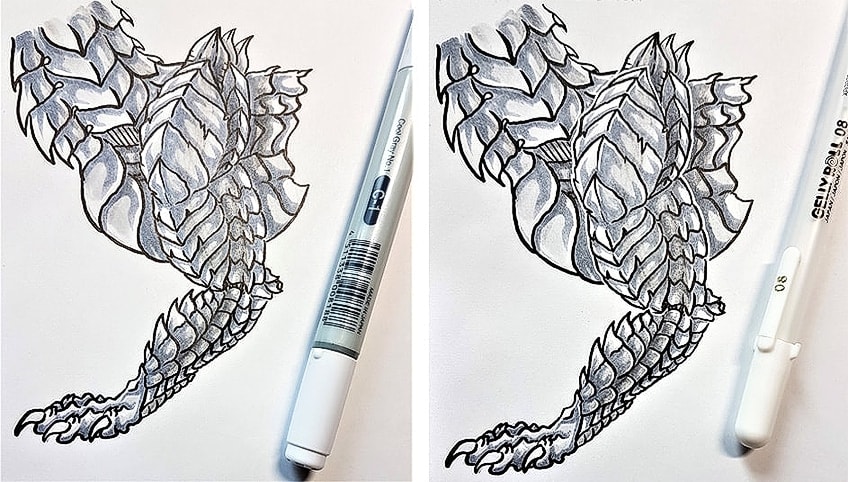
Following this, you can erase the pencil marks and add a little shading. We like to shade around the edges of the scales, paying particular attention to the place where one scale slots over another. This shading technique will make your scales appear more three-dimensional.
We hope that you have found this detailed guide on how to draw a dragon step-by-step helpful, and that you are now feeling inspired to begin working on your own dragon drawing creation! You want to start even easier? Then check out our dragon coloring pages.
We have also created a little web story for the dragon drawing tutorial.
Frequently Asked Questions
How do I get Better at Drawing Dragons?
To get better at drawing dragons, you should study their anatomy, look for inspiration from other artists, sketch regularly, experiment with different tools and materials, use reference images, and seek feedback from others. Improvement takes time and practice, so don’t be discouraged by mistakes or failures. Keep practicing and experimenting, and your dragon drawing skills will improve over time.
How to Draw a Dragons Eye?
[su_panel]

Lisa Hustedt
Originally from Lower Saxony, Lisa Hustedt has been an artist since she could pick up a pencil. Throughout her years of school, Lisa developed an increasing interest in drawing dragons. In addition to her school art classes, Lisa taught herself to draw. This lifelong learning culminated in her completing her Abitur with a focus in art in 2018. Today, Lisa works at a local newspaper as a trainee editor and paints in the evenings. Although her schedule is busy, Lisa still finds time to take some commissions for work.
For Lisa, drawing time is a time of relaxation, and she loves to listen to music while she draws. Lisa hopes she will never stop drawing, and we do too. Her beautiful and intricate dragon drawings have inspired us, and hopefully you as well. Lisa dreams of working as a character designer or animator, and we believe that she has what it takes. Many thanks to Lisa for this wonderful and easy dragon drawing tutorial.
https://www.instagram.com/kronoluna
https://www.artstation.com/kronoluna
https://www.patreon.com/user/creators?u=15486042
https://www.deviantart.com/kronoluna
https://www.redbubble.com/de/people/kronoluna/shop
[/su_panel]

Matthew Matthysen is an educated multidisciplinary artist and illustrator. He successfully completed his art degree at the University of Witwatersrand in South Africa, majoring in art history and contemporary drawing. The focus of his thesis was to explore the philosophical implications of the macro and micro-universe on the human experience. Matthew uses diverse media, such as written and hands-on components, to explore various approaches that are on the border between philosophy and science.
Matthew organized various exhibitions before and during his years as a student and is still passionate about doing so today. He currently works as a freelance artist and writer in various fields. He also has a permanent position at a renowned online gallery (ArtGazette) where he produces various works on commission. As a freelance artist, he creates several series and successfully sells them to galleries and collectors. He loves to use his work and skills in various fields of interest.
Matthew has been creating drawing and painting tutorials since the relaunch in 2020. Through his involvement with artincontext.org, he has been able to deepen his knowledge of various painting mediums. For example, watercolor techniques, calligraphy and lately digital drawing, which is becoming more and more popular.
Learn more about Matthew Matthysen and the Art in Context Team.


