Foreshortening – A Guide on Foreshortened Drawings and Paintings
Foreshortening is a relatively unknown term, but it is an age-old artistic practice for capturing perspective accurately. If you are wondering “what is foreshortening?”, then you are certainly not alone. Foreshortening is quite a difficult skill to master, but it can elevate any piece of art dramatically. In this post, we hope to introduce you to the history, types, and techniques of foreshortening so that you can begin to incorporate it into your work.
Can We Get a Foreshortening Definition?
At the most basic level, foreshortening is a perspective technique in which the artist can create an illusion of objects receding into the distance. By shortening a subject, any artist can make it appear to be further away. This practice helps to maximize the dimension and depth of drawings or paintings. You can use foreshortening techniques on any drawn object, from figures to landscapes. You will be astounded at how much foreshortening art can elevate your compositions.
How to Visualize Foreshortening
As we are speaking about visual perspective, it is perhaps easiest to understand foreshortening by visualizing it. Here is a short exercise full of foreshortening examples:
- Lift your arm and place it before your body. Bend your elbow bringing your forearm parallel with your chest.
- Look at the apparent length of your forearm and each of your fingers in this position. What you see here is limited foreshortening.
- Extend your whole arm out in front of you now. You will now see that from this perspective, your forearm and fingers appear to be much shorter.
- While your fingers and forearm may appear to be shorter than they did in front of your chest, their actual length has not changed. This perspective is extreme foreshortening.

Whenever you paint or draw an object in three-dimensional space, you will have to use some degree of foreshortening. You can use foreshortening definition to bring that extra degree of realism to any composition. When drawing figures, foreshortening directly affects the proportions of the body and each limb.
If, for example, you were to paint a figure lying on their back with their feet towards you, you would need to paint their feet much bigger than their head to communicate the illusion of three-dimensionality and depth.
While the visualization example above concerns figure-drawing, foreshortening is also a fundamental part of painting three-dimensional landscapes. One of the most common examples of foreshortening art in landscapes is to picture a long, straight road flanked by trees. As the road extends into the distance, the two edges appear to move closer to each other, and if you could continue the painting indefinitely, the two edges may touch. The trees that flank the road will also become smaller as the road extends into the distance.
A Brief History of Foreshortening
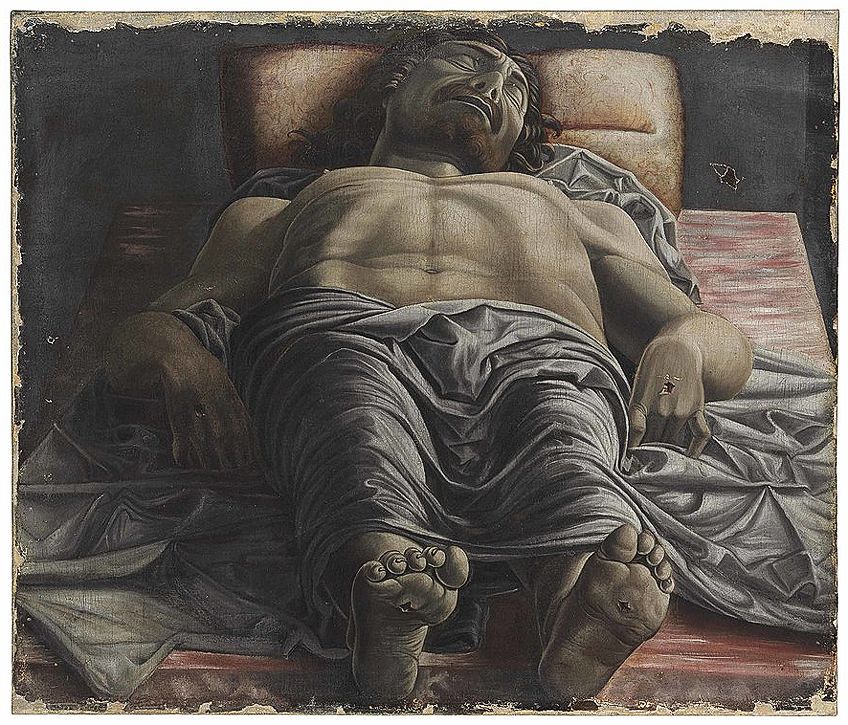
Foreshortening became popular during the early Renaissance period. Andrea Mantegna was one of the first foreshortening pioneers. Mantegna’s paintings, di sotto in su (1465-74), and Lamentation of Christ (1480) exemplify this illusionary technique. In Lamentation, the chest and legs of Christ are shortened, creating a sense of space and depth.
Alongside Mantegna, Vincenzo Foppa and Paolo Uccello pioneered the foreshortening technique. Luca Signorelli, Mantegna’s contemporary, is also celebrated for his foreshortening techniques seen in his Last Judgement frescos (1499-1503).
During the high Renaissance era, Michelangelo was the next great foreshortening master. In his Genesis Fresco, particularly The Separation of Light from Darkness, Michelangelo shortens god’s body, making him appear to be rising above the viewer.
Following Michelangelo, Correggio, one of the greatest painters to emerge from the Parma school, used dramatic foreshortening techniques. Assumption of the Virgin (1526-30) is one of Correggio’s most celebrated works, and it went on to influence several other pieces, including Palazzo Barberini’s Allegory of Divine Providence (1633-39).

Paolo Veronese was another great proponent of foreshortening techniques. Veronese’s ceiling paintings for the Marciana Library and Doge’s Palace established him as a master of foreshortening. Veronese could combine Michelangelo’s heroic figuration with Correggio’s figurative subtlety.
In the Rococo period, Giambattista Tiepolo was the most significant proponent of foreshortening techniques. Not only were Tiepolo’s frescoes on the ceiling of the Wurzburg Residenz grand staircase some of his greatest works, but they exemplify his incredible use of foreshortening and his stunning draftsmanship.
Foreshortening Effects
Depending on the extent of the foreshortening, the effects will vary. The primary effects of drawing foreshortening are:
- Objects in the distance will appear more compressed and shorter than they are in reality.
- Objects that are closer to the viewer will overlap those behind.
- As objects recede into the background, they will appear to shrink in size.
While there certainly are mathematical foundations to the art of foreshortening, as artists, we do not need to be this precise. You are welcome to work out the relative angles to determine the perfect foreshortening perspective, but we do not believe this is necessary to master the technique. Ultimately, all we want is for our paintings and drawings to look correct to the eye, and you can achieve this without worrying about the mathematics involved.
Learning How to Foreshorten
Depending on the objects you want to depict, you may use different foreshortening techniques. There are several available options, and you can try them all out to find which one works best for you. As with art, artistic techniques are adaptable and unique to each person. If you find that meshing two practices together helps you capture a three-dimensional perspective – that is perfect.

Some Things to Consider When Foreshortening
Before we dive into the different foreshortening techniques, there are a few things to keep in mind. Referring back to this list as you begin your foreshortening perspective journey will help you grasp the skill faster and make the whole process a little easier.
Foreshortening Tip One
The first tip is to consider where the object you want to draw lies in space. What we mean by this is where is the object relative to you, the viewer? Is the subject of your painting or drawing moving away from you or towards you? Which parts of the object lie further away from you, and which are the closest? How far away from you is the object? Keeping all of these questions in mind when you first start practicing foreshortening techniques is essential.
Foreshortening Tip Two
Our second suggestion is to use perspective lines. Using perspective lines is a fantastic tool for those who are new to drawing foreshortening. These lines extend away from one point on the horizon. Using perspective lines can help you determine the size of objects relative to each other and their surroundings as they recede into the distance. Using a pencil to sketch perspective lines in the early stages of your drawing or painting can make foreshortening so much easier.
Foreshortening Tip Three
The third tip we have for foreshortening beginners is to look for the foundational shapes that overlap. Foreshortening is much easier to understand when you can break down the object into basic shapes. The relative overlap between objects at the front of your frame and those further away is one of the foundations of foreshortening. Breaking your larger object down into simple shapes can make it much easier to position them and map out the overlapping areas.
Foreshortening Tip Four
Our fourth suggestion is to draw the object as though you could see through it. What we mean is that you should draw through the object as if you were drawing a cube in three-dimensional space. Using this practice allows you to follow the contours of your subject throughout, and in turn, this will help you understand the form as a whole and how it sits within the space.
Foreshortening Tip Five
Paying attention to the important contours and edges of your chosen subject is our fifth suggestion. You will find that some of your object’s edges will be more defined than others from a particular perspective. Determining which edges will stand out more and ensuring that you emphasize them will make your foreshortening far more effective.
Foreshortening Tip six
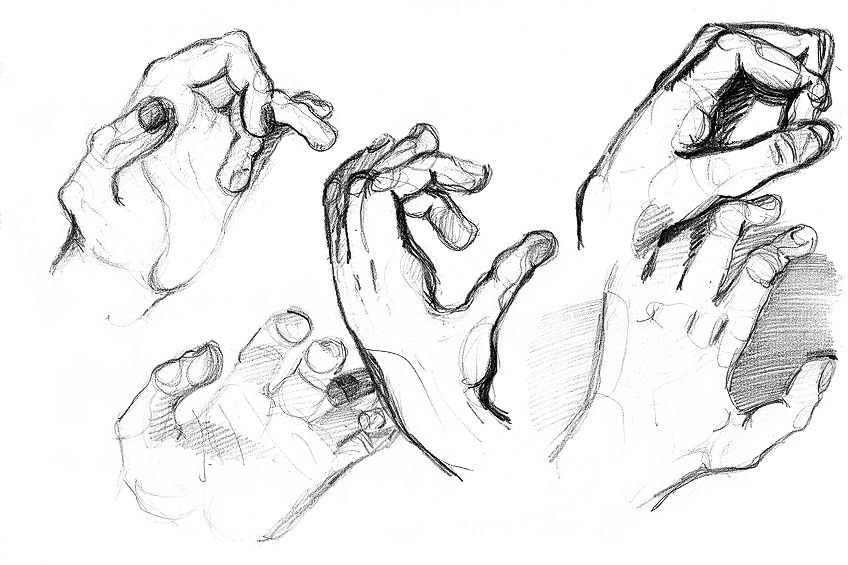
The sixth tip we have for those starting with foreshortening is to ensure that you have continuity. Breaking up your subject into overlapping shapes can result in a disjointed composition. Let us consider drawing your hand as it extends away from you.
There will be an overlap between the shape of your wrist and where your thumb extends. This overlap can cause a break in the continuity of your arm shape. We suggest picking out some of the longer, more sweeping lines on the arms and accentuating them a little. Highlighting these lines will help carry the continuity throughout your composition.
Foreshortening Tip Seven
Our final suggestion is more of a personal preference: Depending on the style you want to achieve, you can understate or exaggerate your foreshortening. Understating the effects of your foreshortening can make your artwork appear flatter and almost cartoonish. Alternatively, you can increase the drama of your composition by exaggerating your foreshortening effects.
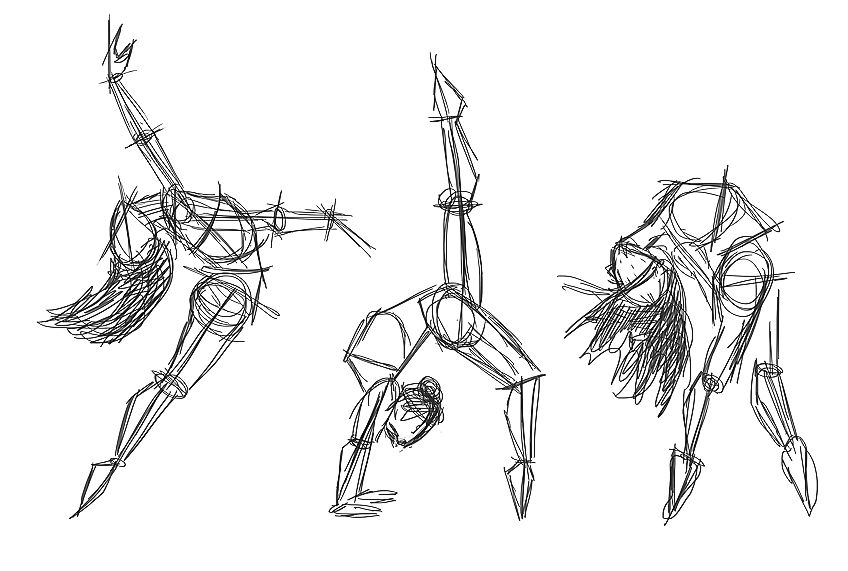
How to Foreshorten a Figure
The human body is one of the most complicated forms to capture, and if you get it wrong, it is very obvious. Drawing a human figure from an unusual perspective can be even more challenging. Using foreshortening techniques is essential for drawing a realistic and proportional figure in space.
In this next section, we will cover three methods you can use to foreshorten the human figure. Depending on your unique style and process, you may prefer one of these methods over the others. We recommend experimenting and feeling out what works best for you.

The Four-Step Method for Figure Foreshortening
When drawing a figure from an extreme angle, we must comprehend how the perspective distortion will affect our lines. In this next section, we are going to provide you with four steps that you can use to practice foreshortening a human figure.
Step One: Measuring Your Figure Visually
When drawing a figure in perspective, the first step is to measure the height visually. Your measurement does not need to be completely accurate, but depending on the perspective you are viewing the figure at, it may vary drastically. Draw a line to represent the height of your figure from their feet to their head. This line may be curved or at an angle, depending on your chosen perspective.
Drawing this line is an essential first step because it ensures that your entire figure will fit on your page. This line will assist you as you plan out the rest of the figure’s proportions. If you are viewing the figure from an extreme angle, like from above, you will notice that the line is much shorter.
Step Two: Mapping Out Other Proportions
In the second step of foreshortening a figure, you will use more lines to map out some of the other proportions. You will need to draw lines for the waist and shoulders of your figure. Once again, the shape and length of these lines will depend on your vantage point and the position of the figure.
These lines may be slightly curved, and the distance between them will also vary depending on where the figure is to you. The line for the shoulders will be much longer than that of the waist. If you draw the figure from above, you will notice that the distance between the feet and the waistline is much shorter.
Step Three: Drawing a Stick Figure
Yes, you did read that correctly. In this next step, you need to flesh out the structure of the figure by drawing a line that follows each limb. You want to approach this step as if you were drawing the bone structure of the human form. When it comes to the torso, rather than drawing a central line, draw a geometric shape. Using geometric shapes will give you a better structure to work with as you flesh it out later. You can also use geometric shapes to represent the feet and hands.
Step Four: Fleshing Out the Figure
At this stage, you have all the basic proportions of the figure mapped out. You can now begin to flesh out your human form by drawing in contour lines. This stage is where you can explore your ideas and try new things. You can flesh out your figure as much or as little as you like. If you are adding clothes and intricate details, now is the time. You can exaggerate or understate the level of foreshortening you apply to your figure until you are satisfied with your final piece.
If you want to practice figure drawing, this easy four-step foreshortening technique is a fantastic way to get to grips with proportion and perspective. In no time at all you will be producing beautiful foreshortened drawings of figures in various perspectives and positions.
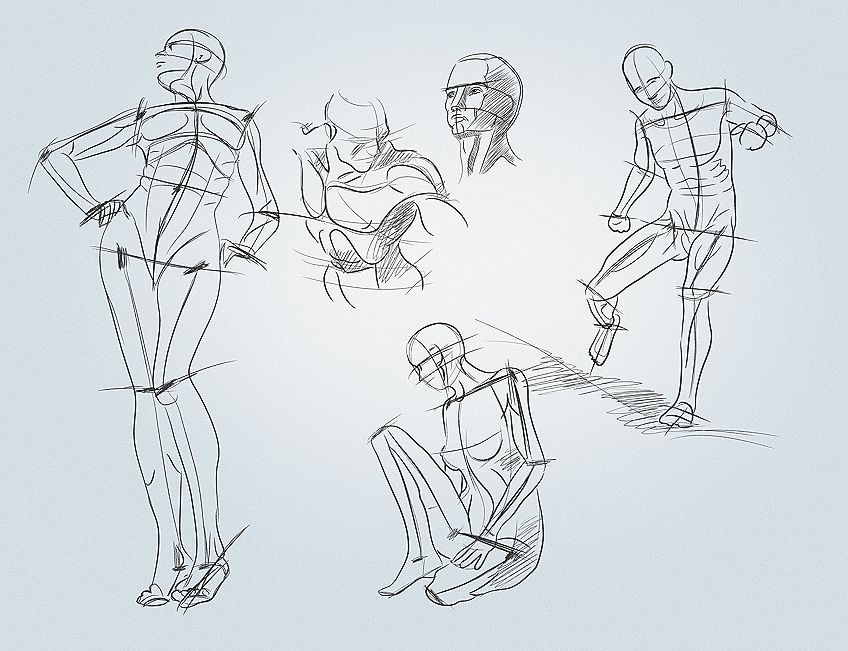
The Geometry Technique for Foreshortening Figures
The geometry technique is similar to the four-step method outlined above, but it involves breaking the body down into different shapes. When you are trying to wrap your head around human anatomy, at the same time as trying to foreshorten the figure, breaking the body down into simple geometric shapes can be very effective. There are no rules or special techniques to follow with this approach, but you need to observe the figure and map it out with different shapes.
Try to picture the limbs as three-dimensional tapering cylinders and the torso as a variety of cuboids or rectangles. The shapes you use are likely to change for each figure you draw, depending on their size and your vantage point. Part of this process involves figuring out how each of these shapes fit together. Once you have the basic shapes and proportions of your figure mapped out in simple geometric shapes, fleshing out your foreshortened figure can be as simple as smoothing out the edges.
The Spiral or Coil Technique for Foreshortening Figures
The spiral or coil foreshortening technique is a slightly messier technique, but it works very well for capturing three-dimensional figures. At the foundations, the spiraling technique involves building a three-dimensional with concentric spirals, which follow the contours of the body. Our tip about drawing through your object is particularly relevant with this technique. You are not simply mapping out a two-dimensional representation of the figure.
When trying this technique, you must use your pencil quite lightly. The outcome will be a little bit messy, and you will have to do a fair amount of rubbing out. On the horizontal or vertical parts of the body, your coils will appear to be flat. When the form of the figure begins to move towards you, like a leg extending in your direction or away from you, your spirals will morph into near circles. You can map the changing form very effectively in this way. This technique can be extremely useful for becoming accustomed to the contours of the human form.
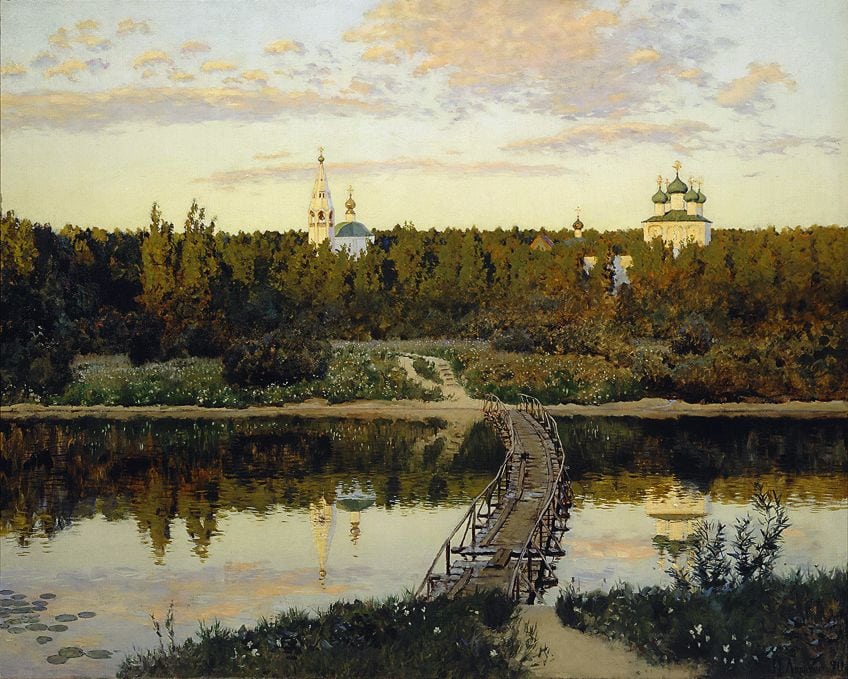
How to Foreshorten Landscapes
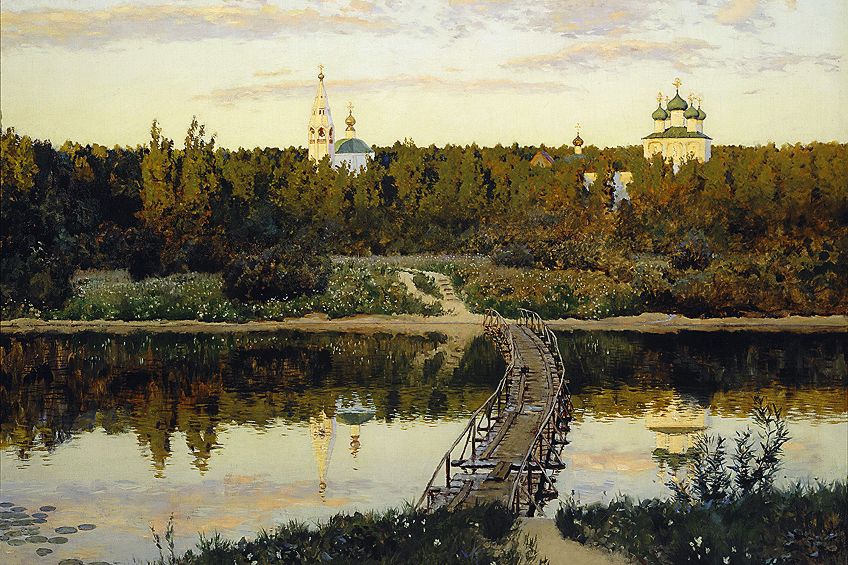
Typically, foreshortening is less complex and less obvious in landscape scenes, but it is not absent. Landscape artists also need to know how to create foreshortened drawings that enhance realism and create a sense of depth. For example, you can see the effects of foreshortening in the bridge over the river in Isaac Levitan’s Silent Abode (or A Quiet Monastery). Here are some foreshortening examples you may find in landscape compositions:
- A road or river winding away into the distance.
- The branch of a tree extending either towards or away from the viewer.
- A fallen tree.
- An ocean wave crashing in from a sharp angle.
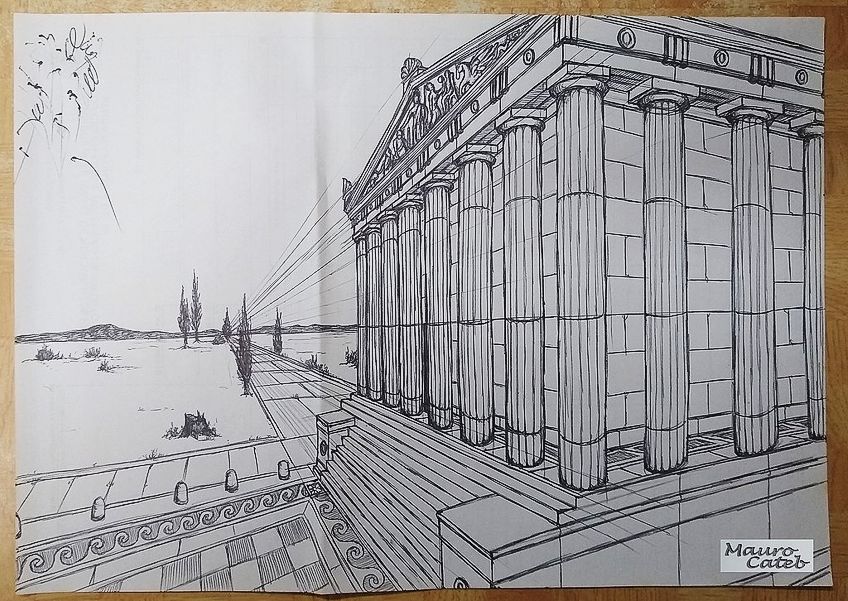
One Point Perspective
Foreshortening in landscapes is based primarily on a one-point perspective. One point perspective involves using a single vanishing point to create depth and dimension in a painting or drawing. This perspective is probably the simplest form of linear perspective to master, and getting the hang of it can really enhance your foreshortening.
When working with a one-point perspective, we need to assume that all the planes of an object that face us have no depth. The sides that extend away from us to the vanishing point on the horizon do have depth. Your vanishing point is the point on the horizon at which your perspective converges. This vanishing point can sit anywhere on the horizon. If, for example, you are drawing a road that extends into the distance to the right, the point at which the road hits the edge of your paper or the horizon will be your vanishing point.
Foreshortening Exercises
As with all creative endeavors, you will only get better at foreshortening by practicing. Knowing the theory will only take you part of the way, and you always need to put that theory into practice. With practice, your eye will naturally begin to pick out geometric shapes and gather information about perspective.
Your hand will begin to know where to put pen to paper instinctively, and you will find the whole process much easier. There are several foreshortening exercises that you can practice that will help train your eye and hand and dramatically improve your foreshortening techniques.
Foreshortening Exercise One
The first exercise involves using dramatic or extreme foreshortening to draw simple shapes. This exercise could be as simple as placing a water bottle well above your eye-line and exaggerating the foreshortening effect. The more objects you use for this exercise, the better you will become at foreshortening a variety of differently shaped objects.
Foreshortening Exercise Two
The second exercise is an extension of the first. For this practicing activity, you will draw the same object in varying perspectives and degrees of foreshortening. Practice like this will help greatly with your ability to foreshorten figures in a variety of different postures and perspectives.
Foreshortening Exercise Three
The third exercise that we recommend involves drawing multiple shapes that overlap. Very rarely will you draw or paint lone objects. Your compositions will almost always involve multiple objects or at least multiple shapes. Overlapping shapes are a fundamental aspect of foreshortening figures, so becoming a pro at this kind of exercise will be incredibly useful. Still life scenes that include several objects are the best subject for this foreshortening exercise.
Foreshortening Exercise Four
The fourth exercise that we can recommend is to draw over masterpieces that use foreshortening. We do not mean that you should visit a gallery with your permanent marker. Instead, try printing out paintings by a master of foreshortening like Michelangelo and practice drawing over that. This exercise is particularly helpful for people who want to get the hang of foreshortening figures, and you can use a variety of paintings with figures from different perspectives.
Foreshortening Exercise Five
Our final recommended exercise is to use one point perspective and perspective lines. If you are a landscape artist, this is the best exercise for you to practice foreshortening techniques. You can use one-point perspective and perspective lines to draw anything, and the more you practice, the easier foreshortening will become for you.
In Conclusion: What Are the Key Foreshortening Takeaways?
Although the term is relatively unknown, you will find foreshortening in many works of art if you look for it. Foreshortening lends a composition more depth and three-dimensionality, ultimately increasing the realism. The question of foreshortening is not whether it exists but rather the extent to which it is used in a particular work.
Foreshortened objects will appear to shrink in size as they move into the distance, away from the viewer. The shapes of foreshortened objects will become more compressed and begin to overlap the further away they are from the viewer’s vantage point.
If you really wanted to, you could work out the mathematical logic behind foreshortening, but it does not have to be this precise. You can exaggerate or understate the foreshortening in your own compositions to achieve different effects.
Drawing through an object and acknowledging its three-dimensionality is an important part of foreshortening. The best way to learn how to foreshorten any object is simply to practice. There are several foreshortening exercises that you can use to train your eye and hand.
Take a look at our foreshortening art webstory here!
Frequently Asked Questions
What Is Foreshortening in Art?
Foreshortening is a perspective technique that helps artists to communicate a sense of depth and perspective in their work. Foreshortening involves breaking an object or figure down into its composite parts and altering the dimensions to shift the vantage point.
When Did Foreshortening Become Popular?
Foreshortening became very popular among artists in the Renaissance period. Artists like Michelangelo and Andrea Mantenga are particularly famous artists who specialized in foreshortening techniques. Since the Renaissance, foreshortening has become an integral part of many artist’s work.
How Do You Foreshorten a Figure?
Foreshortening the human figure can be very complicated when you first begin. There are several foreshortening techniques that you can try, including spiral and geometric shape techniques. We also cover a four-step foreshortening technique for figures which we highly recommend for beginners.

In 2005, Charlene completed her Wellness Diplomas in Therapeutic Aromatherapy and Reflexology from the International School of Reflexology and Meridian Therapy. She worked for a company offering corporate wellness programs for a couple of years, before opening up her own therapy practice. It was in 2015 that a friend, who was a digital marketer, asked her to join her company as a content creator, and this is where she found her excitement for writing.
Since joining the content writing world, she has gained a lot of experience over the years writing on a diverse selection of topics, from beauty, health, wellness, travel, and more. Due to various circumstances, she had to close her therapy practice and is now a full-time freelance writer. Being a creative person, she could not pass up the opportunity to contribute to the Art in Context team, where is was in her element, writing about a variety of art and craft topics. Contributing articles for over three years now, her knowledge in this area has grown, and she has gotten to explore her creativity and improve her research and writing skills.
Charlene Lewis has been working for artincontext.org since the relaunch in 2020. She is an experienced writer and mainly focuses on the topics of color theory, painting and drawing.
Learn more about Charlene Lewis and the Art in Context Team.